Key Takeaways
- Prep in just 15 minutes then let your slow cooker do all the work
- Freezer-friendly Slow Cooker White Chicken Chili perfect for meal prep and busy weeknights
- Customizable heat level to please both spice lovers and mild palates
- One-pot meal with protein, fiber, and veggies in every bite
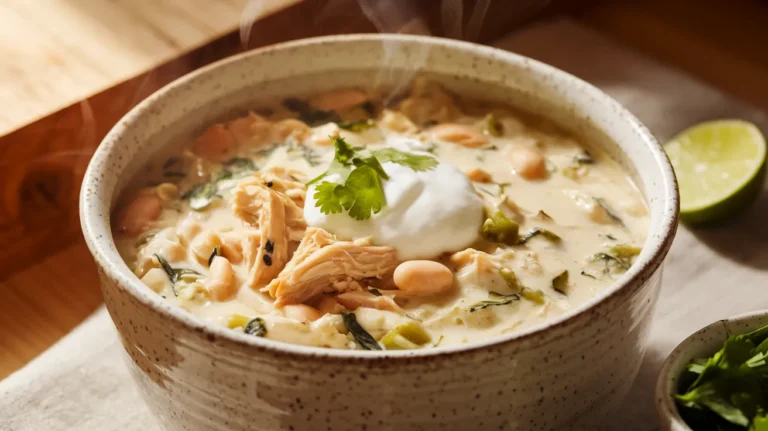
The Easiest Way to Make Slow Cooker White Chicken Chili
Tired of complicated recipes that take hours and dirty every dish in your kitchen? This Slow Cooker White Chicken Chili solves your dinner dilemma with minimal effort and maximum flavor.
Just 15 minutes of prep time is all you need before your slow cooker transforms simple ingredients into a creamy, satisfying meal. Perfect for busy weeknights or weekend meal prep, this white chicken chili delivers restaurant-quality taste without the fuss.
If you’re a fan of traditional red chili recipes like my popular Texas Roadhouse Chili, you’ll love how this white version offers a lighter but equally satisfying alternative.
Nutrition Facts
| Nutrient | Amount per Serving |
|---|---|
| Calories | 385 |
| Protein | 32g |
| Carbohydrates | 28g |
| Fiber | 8g |
| Fat | 16g |
| Sodium | 680mg |
| Serving size | 1½ cups |
What You’ll Need
Ingredients (Serves 4)
| Ingredient | Amount |
|---|---|
| Boneless, skinless chicken breasts | 1½ pounds |
| White beans (Great Northern or Cannellini) | 2 (15 oz) cans, drained and rinsed |
| Mild green chiles | 1 (4 oz) can, diced |
| Yellow onion | 1 medium, diced |
| Garlic | 3 cloves, minced |
| Low-sodium chicken broth | 2 cups |
| Ground cumin | 1 tablespoon |
| Dried oregano | 1 teaspoon |
| Ground coriander | 1 teaspoon |
| Salt | 1 teaspoon |
| Black pepper | ½ teaspoon |
| Cream cheese | 4 oz, softened |
| Optional toppings | Avocado slices, shredded cheese, cilantro, lime wedges, tortilla strips |
Kitchen Tools
| Tool | Purpose |
|---|---|
| Slow cooker (6-quart) | Main cooking vessel |
| Cutting board | For prep work |
| Chef’s knife | For chopping vegetables |
| Can opener | For opening canned ingredients |
| Measuring spoons | For measuring spices |
| Measuring cups | For measuring liquids |
| Mixing spoon | For combining ingredients |
| Two forks | For shredding chicken |
Ingredient Substitutions
Can’t find some ingredients? Here are easy swaps:
- Chicken breasts: Use chicken thighs for more flavor
- White beans: Substitute pinto beans or navy beans
- Green chiles: Use fresh jalapeños (seeds removed for less heat)
- Cream cheese: Greek yogurt or sour cream work well
- Yellow onion: White or red onion can be used instead
Step-by-Step Instructions for Slow Cooker White Chicken Chili
Preparation Phase (15 minutes)
- Set up your workspace
- Clear your kitchen counter to create enough space for all ingredients
- Place your cutting board on a stable surface
- Put your slow cooker on the counter and plug it in (don’t turn it on yet)
- Gather all measuring spoons and cups nearby
- Beginner tip: Read through the entire recipe once before starting
- Prepare the onion
- Place the onion on your cutting board
- Cut off both ends (the root end and the tip)
- Peel off the papery outer skin and discard
- Cut the onion in half from top to bottom
- Place each half flat-side down on the cutting board
- Make vertical cuts about ¼-inch apart without cutting through the root end
- Then make horizontal cuts across the vertical cuts to create small, uniform pieces
- Photo guide: The diced pieces should be about the size of a pencil eraser
- Beginner tip: If your eyes water, try refrigerating the onion for 30 minutes before cutting
- Prepare the garlic
- Separate 3 cloves from the garlic head
- Place a clove on the cutting board
- Place the flat side of your knife on the clove
- Gently press or tap on the knife with your palm to crush the clove slightly
- This will make the skin easier to remove
- Peel off and discard the papery skin
- Repeat with all 3 cloves
- Once peeled, chop the garlic into very small pieces (mince)
- Beginner tip: If garlic sticks to your knife, wipe the blade with a little cooking oil
- Prepare the beans
- Place a colander in your sink
- Open both cans of white beans using your can opener
- Pour the contents of both cans into the colander
- Run cold water over the beans for at least 30 seconds, gently stirring with your hand
- Allow excess water to drain completely
- Why this matters: Rinsing removes excess sodium and starch, preventing your chili from becoming too salty or thick
- Prepare the chicken
- Remove chicken from packaging
- Place on a clean plate or cutting board (not the one used for vegetables)
- Pat dry with paper towels
- Examine the chicken and trim any visible fat with kitchen scissors or a knife
- Safety note: Always wash your hands for 20 seconds with soap after handling raw chicken
- Clean any surfaces the raw chicken touched with disinfectant or hot soapy water
- Prepare the spices
- Set out all spices near your slow cooker
- Use individual measuring spoons for each spice to avoid cross-contamination
- Measure each spice into separate small bowls or directly into the slow cooker
- Beginner tip: Level off each spoon with the straight edge of a knife for accurate measurements
- Prepare the cream cheese
- Remove cream cheese from refrigerator 30 minutes before you plan to use it
- Leave it in its wrapper on the counter to soften
- Why this matters: Room temperature cream cheese will blend smoothly; cold cream cheese will form lumps
Assembly Steps for Slow Cooker White Chicken Chili (10 minutes)
- Start layering ingredients in slow cooker
- Spray the inside of your slow cooker with non-stick cooking spray (optional but helpful)
- Add the diced onion, spreading it evenly across the bottom
- Add the minced garlic, distributing it evenly over the onions
- Beginner tip: Placing aromatics at the bottom allows their flavors to infuse upward
- Add the chicken
- Place chicken breasts on top of the onion and garlic layer
- Arrange in a single layer, not stacked or overlapping
- If pieces are very thick, you can butterfly them (cut horizontally almost all the way through and open like a book)
- Visual check: Chicken should be evenly distributed and not reaching up the sides of the slow cooker
- Add the beans and chiles
- Pour the drained and rinsed beans around the chicken (not on top)
- Open the can of green chiles with your can opener
- Pour the entire contents (chiles and liquid) over and around the chicken
- Beginner tip: Distribute ingredients evenly for consistent flavor throughout
- Add the seasonings
- Sprinkle the measured cumin evenly over everything
- Add the oregano, distributing across the surface
- Add the coriander, salt, and pepper, making sure to season all areas
- Beginner tip: Don’t dump all spices in one spot; distribute for even flavor
- Add the broth
- Measure 2 cups of chicken broth using a liquid measuring cup
- Pour the broth slowly around the edges of the slow cooker
- The liquid should just barely cover the chicken
- If chicken isn’t mostly covered, add a little more broth (up to ½ cup extra)
- Visual check: You should see the liquid coming up just around the sides of the chicken pieces
- Final check before cooking
- Ensure all ingredients are in the slow cooker
- Make sure nothing is sticking up above the liquid line
- Double-check that you’ve added all seasonings
- Beginner tip: Take a photo of your assembled ingredients as a reference for next time
Cooking Phase (4-8 hours)
- Set your slow cooker
- Put the lid securely on your slow cooker
- Press the “Low” setting button if cooking for 6-8 hours
- Press the “High” setting button if cooking for 3-4 hours
- If your model has a timer, set it for the desired cooking time
- Beginner tip: Write down your start time and target end time
- Monitor occasionally
- Check once halfway through cooking time that the slow cooker is working
- You should see gentle bubbling around the edges
- No need to stir during cooking
- Warning: Every time you lift the lid, you add 15-20 minutes to the cooking time
- Safety tip: Don’t leave your slow cooker unattended if you’ll be away for more than the cooking time
- Check for doneness
- After the minimum cooking time has elapsed (3 hours on high, 6 hours on low), check chicken
- Use a meat thermometer inserted into the thickest part of a chicken breast
- The temperature should read at least 165°F
- If you don’t have a thermometer, remove a piece and cut into the center – it should be white, not pink
- The chicken should easily shred when pierced with a fork
- If not done, continue cooking for 30-minute intervals until done
Finishing Steps for Slow Cooker White Chicken Chili (15 minutes)
- Shred the chicken
- Turn slow cooker to “Warm” setting if available (or leave on “Low”)
- Use tongs to remove chicken pieces to a clean cutting board or plate
- Let cool for 2 minutes so you can handle it
- Hold one chicken piece steady with one fork
- Use a second fork to pull and tear the meat into shreds
- Aim for bite-sized pieces, not too large or too small
- Return all shredded chicken to the slow cooker
- Stir gently to combine with beans and liquid
- Beginner tip: If chicken is difficult to shred, it may need more cooking time
- Add the cream cheese
- Check that your cream cheese is soft (should yield easily when pressed)
- Cut the block into 8 small cubes
- Drop cubes into different areas of the slow cooker
- Stir gently to help them begin melting
- Cover and let cook for 15 more minutes
- Remove lid and stir thoroughly until cream cheese is fully incorporated
- Troubleshooting: If cream cheese isn’t melting, mash cubes against the side of the pot with your spoon
- Adjust consistency and seasonings
- Taste a small spoonful of the chili (be careful, it’s hot)
- If chili is too thick, add more broth, ¼ cup at a time
- If too thin, mash some of the beans against the side of the pot
- Or turn to high heat with the lid off for 15-20 minutes to reduce
- Add more salt or pepper if needed, ¼ teaspoon at a time
- Beginner tip: Always taste after each adjustment before adding more
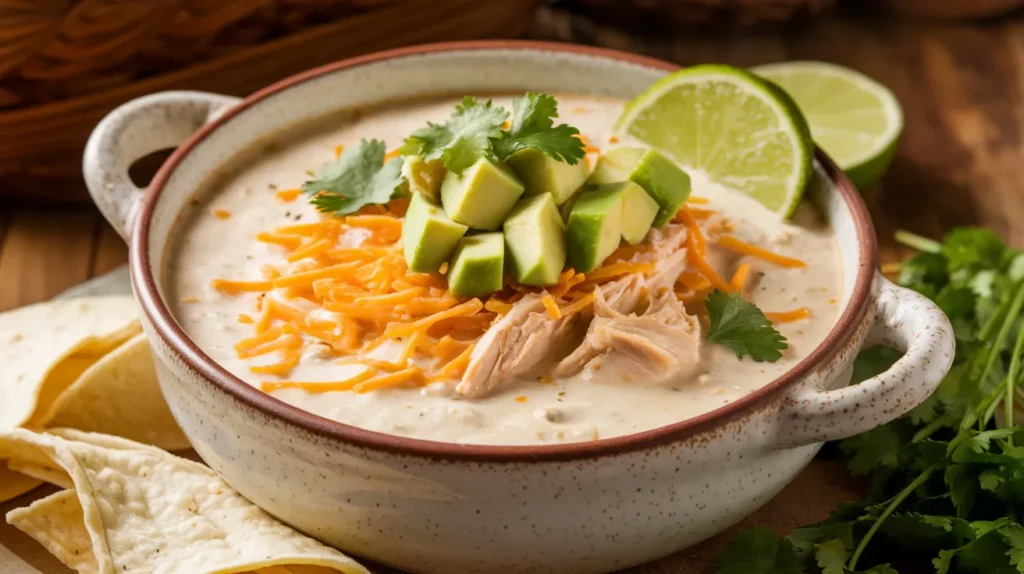
- Prepare for serving
- Set out serving bowls
- Prepare any desired toppings in separate small bowls:
- Dice avocado
- Chop fresh cilantro
- Shred cheese
- Cut limes into wedges
- Break tortilla chips into strips
- Presentation tip: White bowls make the chili colors pop
- Serve and enjoy
- Ladle about 1½ cups of chili into each bowl (a standard ladle is about ½ cup)
- Allow each person to add their preferred toppings
- Serve with a spoon and napkins
- For a fun presentation, consider serving with a side of Hormel Chili Dip and tortilla chips for a complete meal
- Serving suggestion: Provide a trivet for the hot slow cooker if placing it on the dining table
Troubleshooting Common Issues with Slow Cooker White Chicken Chili
Problem: Chicken is too dry
Solution: Next time, check doneness earlier or use chicken thighs instead of breasts. For now, add extra broth and cream cheese to add moisture.
Problem: Chili is too thin
Solution: Remove lid and cook on HIGH for 20-30 minutes to reduce liquid. Alternatively, mash some of the beans to thicken the broth.
Problem: Not enough flavor
Solution: Add more spices, a squeeze of lime juice, or a dash of hot sauce. For a twist, try adding a spoonful of Sweet Chili Sauce for extra dimension. Remember that flavors develop overnight, so leftovers will taste even better.
Problem: Cream cheese is lumpy
Solution: Make sure cream cheese is room temperature before adding. For now, whisk vigorously or blend a cup of the hot liquid with the cream cheese before stirring back in.
Problem: Beans are too firm
Solution: Continue cooking for another 30-60 minutes. If still firm, next time ensure you’re using canned beans, not dried beans.
Problem: Onions still crunchy
Solution: Next time, dice onions smaller or sauté them in a pan for 5 minutes before adding to the slow cooker.
Variations of Slow Cooker White Chicken Chili
Spicy White Chicken Chili
Add 1-2 diced jalapeños (with seeds for extra heat) and ¼ teaspoon cayenne pepper to the initial ingredients.
Corn and Poblano Version
Add 1 cup of frozen corn and 1 roasted, diced poblano pepper in the last 30 minutes of cooking.
Vegetarian Option
Replace chicken with 2 extra cans of white beans and use vegetable broth instead of chicken broth.
Quick Stovetop Method
Don’t have 4-8 hours? Use rotisserie chicken, simmer all ingredients except cream cheese for 30 minutes, then add shredded chicken and cream cheese for final 10 minutes.
Storage & Reheating
Refrigerator Storage
- Allow chili to cool completely (no more than 2 hours at room temperature)
- Transfer to airtight containers with lids
- Leave a little space at the top (about ½ inch)
- Label with the date
- Store in refrigerator for up to 4 days
- Safety tip: Don’t place hot chili directly in the refrigerator as it raises the internal temperature
Freezer Storage
- Cool completely in the refrigerator first
- Portion into individual serving-sized containers
- Leave 1 inch of space at the top for expansion
- Seal tightly with lids
- Label with contents and date
- Store in freezer for up to 3 months
- Beginner tip: Freeze in flat, zip-top freezer bags to save space
Reheating Instructions
- From refrigerator (microwave method):
- Place a portion in a microwave-safe bowl
- Cover loosely with a microwave-safe lid or paper towel
- Heat on 70% power for 2 minutes
- Stir thoroughly
- Continue heating in 30-second intervals until hot throughout (165°F)
- From refrigerator (stovetop method):
- Place chili in a saucepan
- Heat over medium-low heat
- Stir frequently to prevent sticking
- Heat until bubbling and hot throughout (about 5-7 minutes)
- From frozen:
- Thaw overnight in refrigerator (safest method)
- For quick thawing, place sealed container in cold water for 30 minutes
- Once thawed, follow refrigerator reheating instructions
- Safety note: Never thaw at room temperature
- Add fresh toppings after reheating, not before
Safety Notes & Expert Tips
Food Safety
- Always wash hands for 20 seconds with soap before and after handling raw chicken
- Use separate cutting boards and utensils for meat and vegetables
- Cook chicken to 165°F internal temperature
- Don’t leave cooked chili at room temperature for more than 2 hours
- Reheat leftovers to 165°F before eating
Time-Saving Tips
- Prep vegetables the night before and store in sealed containers in the refrigerator
- Measure and combine all dry spices in a small container ahead of time
- Use pre-minced garlic (1½ teaspoons equals 3 cloves)
- Make a double batch and freeze half for later
Serving Suggestions
- Pair with cornbread or tortilla chips
- Set up a toppings bar for family dinner
- Serve in bread bowls for a hearty meal
- Add a simple green salad for a complete dinner
Remember, this Slow Cooker White Chicken Chili tastes even better the next day as flavors continue to develop. Perfect for meal prep Sunday to enjoy throughout your busy week!