Key Takeaways:
- High-quality unsalted butter and room temperature ingredients are essential for achieving authentic Italian bakery results
- The dough should be soft but not sticky – temperature control is crucial
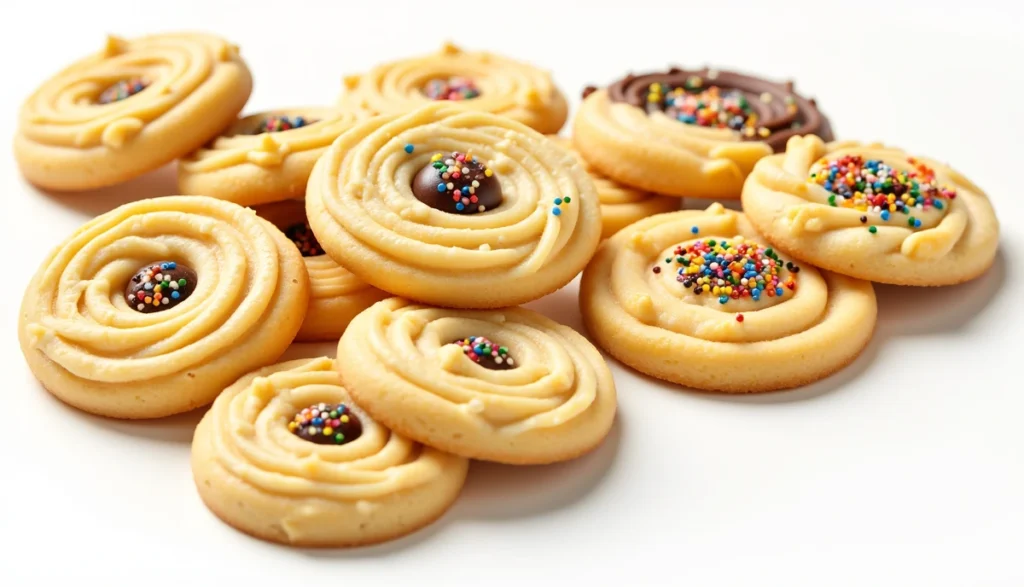
- Piping techniques create the signature swirl shape and texture
- Make ahead and store up to 2 weeks in an airtight container
Creating those beloved Italian butter cookies from your neighborhood bakery might seem tricky. You know the ones – perfectly swirled, tender-crisp, and impossibly buttery. Many home bakers struggle to replicate that melt-in-your-mouth texture and rich flavor. Here’s your guide to making these classic treats right in your kitchen.
Ingredients
For the Cookies:
- 2 cups all-purpose flour
- 1/2 teaspoon baking powder
- 1/4 teaspoon salt
- 1 cup unsalted butter, softened
- 3/4 cup granulated sugar
- 1 large egg
- 2 teaspoons vanilla extract
- 1/4 teaspoon almond extract
Optional Toppings:
- Melted chocolate for dipping
- Chopped nuts
- Sprinkles
- Candied cherries
Kitchen Equipment Needed
- Stand mixer or hand mixer
- Pastry bag
- French star tip (size 825 or similar)
- 2-3 baking sheets
- Parchment paper
- Cooling racks
- Kitchen scale (recommended)
Step-by-Step Instructions
- Preparation (2 hours before baking)
- Take butter out of refrigerator and cut into 1-inch cubes
- Place butter cubes on a plate at room temperature
- Set egg on counter to reach room temperature
- Clear counter space and gather all equipment
- Read through recipe completely before starting
- Setting Up (15 minutes)
- Turn oven on to 350°F – let it preheat fully (about 15 minutes)
- Cut parchment paper to fit your baking sheets
- Place parchment on sheets and set aside
- Attach star tip to pastry bag and stand it up in a tall glass
- Set up your stand mixer with paddle attachment or get hand mixer ready
- Measuring Ingredients (10 minutes)
- If using a scale: weigh 250g flour
- If using cups: spoon flour into measuring cup and level with knife
- Measure baking powder and salt with proper measuring spoons
- Place sugar in an easy-access bowl
- Crack egg into small bowl (check for shells)
- Pour vanilla and almond extracts into separate small bowls
- Making the Base (10 minutes)
- Place softened butter in mixer bowl
- Beat on medium speed for 3-4 minutes until very light and creamy
- Stop mixer, scrape down bowl with rubber spatula
- Check butter texture – should be light, fluffy, and pale yellow
- Adding Sugar (5 minutes)
- Turn mixer to low speed
- Add sugar gradually, about 2 tablespoons at a time
- After all sugar is added, increase speed to medium-high
- Beat for 2-3 minutes until mixture looks fluffy and lighter in color
- Scrape bowl again with rubber spatula
- Mixing Wet Ingredients (3 minutes)
- Turn mixer to medium speed
- Add egg and beat until fully mixed (about 1 minute)
- Pour in vanilla and almond extracts
- Mix another 30 seconds
- Scrape bowl thoroughly
- Adding Dry Ingredients (5 minutes)
- In separate bowl, whisk flour, baking powder, and salt
- Turn mixer to lowest speed
- Add dry ingredients in 3 portions
- Mix just until flour disappears after each addition
- Stop as soon as last flour streak vanishes
- Check bottom of bowl for unmixed flour
- Preparing to Pipe (5 minutes)
- Test dough consistency – should hold its shape but feel soft
- If too soft, refrigerate 15 minutes
- Fold down top of pastry bag about halfway
- Fill bag about 2/3 full with dough
- Twist top of bag to close and push dough toward tip
- Keep remaining dough covered with plastic wrap

- Piping Technique (15-20 minutes)
- Hold bag at 90-degree angle to baking sheet
- Position tip about 1/2 inch above parchment
- Squeeze bag with steady pressure
- Pipe 2-inch spiral, starting from center
- Release pressure and pull away quickly to finish
- Space cookies 2 inches apart
- Practice on a separate parchment if needed
- Baking Process (12-15 minutes per batch)
- Place sheets in middle of oven
- Set timer for 12 minutes
- Watch cookies at end – edges should be light golden
- Don’t open oven door while baking
- Check at 12 minutes through oven window
- Add 1-2 minutes if needed
- Cooling Steps (30 minutes total)
- Remove from oven
- Let cookies rest on baking sheets 5 minutes
- Transfer carefully to cooling racks using flat spatula
- Allow to cool completely before decorating
- Test one cookie to ensure it’s completely cool
- Optional Decorating
- Melt chocolate in microwave in 30-second intervals
- Dip cooled cookies halfway in chocolate
- Add sprinkles or nuts immediately if using
- Place on parchment to set
- Let chocolate harden completely before storing
Tips for Success
- Never melt the butter – it must be softened but still cool
- Measure flour by weight if possible
- Don’t overmix after adding flour
- Refrigerate dough 15 minutes if too soft to pipe
- Test pipe a few cookies to get the right pressure and motion
Things to Avoid
- Using warm butter – leads to flat cookies
- Overmixing the dough – makes tough cookies
- Skipping the star tip – shape matters for texture
- Opening oven while baking
- Using dark baking sheets – they brown too quickly
Storage and Make-Ahead
Plain cookies keep 2 weeks in airtight containers. Chocolate-dipped versions last 1 week. Freeze undecorated cookies up to 3 months.
Shopping List
Dairy Section:
- Unsalted butter (high quality)
- Large eggs
Baking Aisle:
- All-purpose flour
- Granulated sugar
- Baking powder
- Vanilla extract
- Almond extract
- Optional: chocolate for dipping, sprinkles
Your Italian butter cookies will rival any bakery’s version with these detailed steps and quality ingredients. Remember that practice makes perfect with piping – don’t get discouraged if your first few cookies aren’t Instagram-worthy. Focus on the fundamentals of good butter, proper temperature, and careful mixing for cookies that taste amazing every time.
</antArtif


