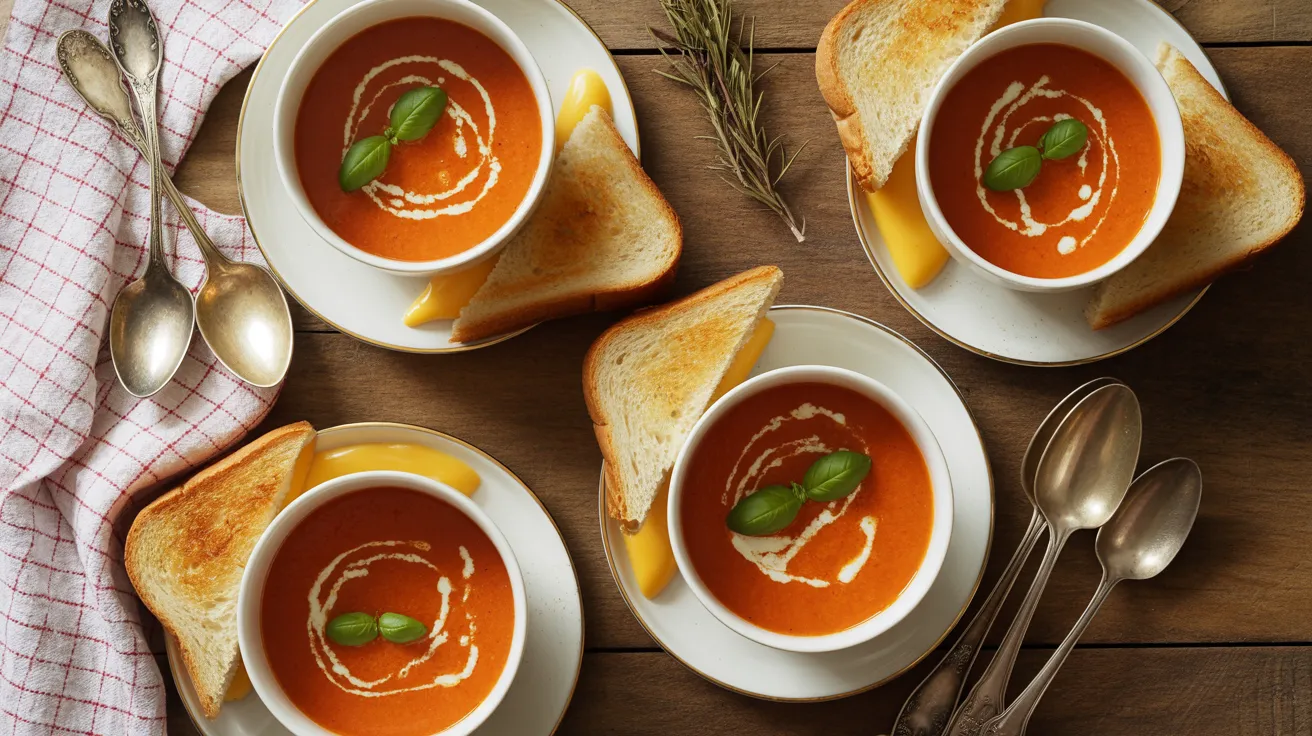
This easy tomato soup with grilled cheese brings the ultimate comfort food experience to your kitchen. Our foolproof recipe creates rich, velvety tomato soup paired with perfectly golden grilled cheese sandwiches in just 45 minutes. This easy tomato soup with grilled cheese serves four people and uses simple pantry ingredients, making it perfect for busy weeknights or cozy weekend meals.
Recipe Info
SERVES: 4 | PREP: 20 MIN | COOK: 25 MIN | TOTAL: 45 MIN
Ingredients
For the Easy Tomato Soup:
| Ingredient | Amount |
|---|---|
| Butter | 3 tablespoons |
| Yellow onion, diced | 1 medium |
| Garlic cloves, minced | 3 cloves |
| Crushed tomatoes | 28 oz can |
| Chicken or vegetable broth | 2 cups |
| Heavy cream | ½ cup |
| Sugar | 1 tablespoon |
| Dried basil | 1 teaspoon |
| Salt | 1 teaspoon |
| Black pepper | ½ teaspoon |
| Bay leaf | 1 leaf |
For the Grilled Cheese:
| Ingredient | Amount |
|---|---|
| Bread slices | 8 slices |
| Butter, softened | 4 tablespoons |
| Sharp cheddar cheese, sliced | 8 oz |
| American cheese, sliced | 4 oz |
Complete Step-by-Step Instructions for Easy Tomato Soup with Grilled Cheese
Phase 1: Setting Up Your Kitchen (5 minutes)
1. Prepare Your Workspace Before you start cooking, gather all your ingredients on the counter. This is called “mise en place” and prevents you from scrambling for ingredients while cooking. Place a large pot on the stove for the soup and a large skillet nearby for the grilled cheese. Keep a wooden spoon, ladle, and spatula within easy reach.
2. Prep Your Vegetables Peel and dice the yellow onion into small, uniform pieces about ¼-inch in size. Smaller pieces cook faster and distribute flavor better. Peel and mince the 3 garlic cloves finely – you can use a garlic press if you have one, or chop with a knife. The finer you chop garlic, the more flavor it releases.
Phase 2: Building the Soup Base (12 minutes)
3. Start with the Butter Place your large pot over medium heat – this is about a 5 on most stovetops. Add 3 tablespoons of butter and let it melt completely. The butter should sizzle gently and foam slightly. If it starts turning brown or smoking, your heat is too high – reduce it immediately. This gentle sizzling sound means your pan is at the right temperature.
4. Cook the Onions Properly Add the diced onion to the melted butter. You should hear a gentle sizzling sound when the onion hits the pan – this is good! Stir the onions with a wooden spoon to coat them evenly with butter. Cook for 5-6 minutes, stirring every minute or so. The onions are ready when they look translucent (you can almost see through them) and have softened considerably. They should not be brown or caramelized – just soft and clear.
5. Add Garlic at the Right Time Add the minced garlic to the softened onions and stir constantly for 30 seconds only. Garlic cooks much faster than onions and can burn quickly, creating a bitter taste. You’ll know it’s ready when you can smell the garlic strongly – it should be fragrant but not brown. If you see any browning, remove the pot from heat immediately.
Phase 3: Creating the Tomato Base (8 minutes)
6. Add the Tomatoes Open your 28 oz can of crushed tomatoes and pour the entire contents into the pot with the onions and garlic. Stir well to combine. The mixture will look chunky and bright red. Use your wooden spoon to scrape up any brown bits from the bottom of the pot – these add flavor to your soup.
7. Pour in the Broth Add 2 cups of broth (chicken or vegetable – both work perfectly). The liquid should cover the tomato mixture by about an inch. Stir everything together until well combined. The color should be a rich, deep red.
8. Season the Base Add 1 tablespoon sugar (this balances the acidity in tomatoes – don’t skip it!), 1 teaspoon dried basil, 1 teaspoon salt, ½ teaspoon black pepper, and 1 bay leaf. Stir well to distribute all seasonings evenly throughout the soup.
Phase 4: Simmering the Soup (15 minutes)
9. Bring to a Proper Boil Increase heat to medium-high and bring the mixture to a full boil. You’ll see large bubbles breaking the surface consistently. This should take about 3-4 minutes. Watch carefully – once it starts boiling, immediately reduce the heat.
10. Simmer Gently Reduce heat to low so the soup maintains a gentle simmer. You should see small bubbles occasionally breaking the surface, but not a vigorous boil. Cover the pot with a lid slightly ajar (leave about a 1-inch gap) to prevent splattering while allowing steam to escape. Simmer for 15 minutes, stirring every 5 minutes to prevent sticking.
11. Test for Doneness After 15 minutes, taste the soup carefully (it’s hot!). The flavors should be well-blended and the soup should taste rich and tomatoey. Remove and discard the bay leaf – use a spoon to fish it out.
Phase 5: Finishing the Soup (5 minutes)
12. Blend for Smoothness (Optional) If you want a completely smooth soup, use an immersion blender directly in the pot. Blend for 30-60 seconds until you reach your desired consistency. If you don’t have an immersion blender, you can leave it chunky (which is delicious too!) or carefully transfer small batches to a regular blender. Safety tip: If using a regular blender, let the soup cool for 5 minutes first and never fill the blender more than halfway.
13. Add the Cream Remove the pot from heat completely before adding cream – this prevents curdling. Slowly stir in ½ cup heavy cream until fully incorporated. The soup should become lighter in color and creamy. Return to very low heat for 2-3 minutes to warm through, but do not boil after adding cream.
Phase 6: Preparing the Grilled Cheese (12 minutes)
14. Set Up Your Grilled Cheese Station While the soup finishes simmering, prepare your grilled cheese ingredients. Take the butter out of the refrigerator to soften if you haven’t already. Lay out 8 slices of bread on a clean work surface. Slice your cheddar and American cheese if not pre-sliced. Room temperature cheese melts more evenly than cold cheese.
15. Butter the Bread Properly Spread softened butter evenly on one side of each bread slice, all the way to the edges. This creates a barrier that prevents the bread from getting soggy and ensures even browning. Use about ½ tablespoon of butter per slice. The butter should be soft enough to spread without tearing the bread.
16. Heat Your Pan Place a large skillet or griddle over medium-low heat – this is about a 3-4 on most stovetops. Let it heat for 2-3 minutes. You can test if it’s ready by sprinkling a few drops of water on the surface – they should sizzle and evaporate quickly. Lower heat ensures the bread browns evenly without burning before the cheese melts.
17. Assemble the Sandwiches Place 4 slices of bread butter-side down in the heated skillet. Layer 2 oz of cheddar cheese and 1 oz of American cheese on each slice. The combination of cheeses gives you both flavor (cheddar) and meltability (American). Don’t overfill – too much cheese will leak out and make a mess.
18. Complete the Sandwiches Top each sandwich with the remaining 4 slices of bread, butter-side up. Press down gently with your spatula to help the sandwich hold together, but don’t press too hard or you’ll squeeze out the cheese.
Phase 7: Cooking the Perfect Grilled Cheese (8 minutes)
19. First Side Cooking Cook the sandwiches for 3-4 minutes without moving them. Resist the urge to peek too often – lifting the sandwich releases heat and prevents proper browning. You’ll know they’re ready to flip when you can see golden-brown edges and the bottom looks crispy when you lift a corner slightly.
20. The Perfect Flip Using a wide spatula, carefully flip each sandwich. If cheese starts to leak out, that’s normal – just push it back in with the spatula. The cooked side should be golden brown and crispy. If it’s too dark, reduce your heat slightly for the second side.
21. Second Side Cooking Cook the second side for another 3-4 minutes until golden brown and the cheese is fully melted. You can test this by gently pressing the center of the sandwich – it should give slightly, indicating melted cheese. If the cheese isn’t melted but the bread is browning too quickly, cover the pan with a lid for the last minute.
22. Rest Before Cutting Remove the sandwiches from heat and let them rest on a cutting board for 1 full minute. This allows the cheese to set slightly and prevents it from all running out when you cut the sandwich. This step is crucial for neat presentation.
Phase 8: Final Assembly and Serving
23. Prepare for Serving While the sandwiches rest, give your soup a final stir and taste for seasoning. Add more salt, pepper, or a pinch of sugar if needed. The soup should be creamy, rich, and well-balanced between sweet and savory flavors.
24. Cut and Plate Cut each grilled cheese sandwich diagonally using a sharp knife in one clean motion. Diagonal cuts create more surface area for dipping and look more appealing. Arrange the sandwich halves on plates alongside bowls of the hot soup.
25. Serve Immediately Ladle the hot soup into bowls, filling them about ¾ full to leave room for dipping. Serve immediately while the soup is steaming hot and the grilled cheese is still crispy on the outside with melted cheese inside. The temperature contrast between hot soup and warm, crispy sandwich is what makes this easy tomato soup with grilled cheese combination so satisfying.
Expert Chef’s Notes for Perfect Easy Tomato Soup with Grilled Cheese
Temperature Control is Key: The biggest mistake beginners make is cooking at too high heat. Keep your soup at a gentle simmer and your grilled cheese at medium-low heat. This easy tomato soup with grilled cheese recipe relies on patience for the best results.
Cheese Melting Science: The combination of sharp cheddar and American cheese isn’t random. American cheese contains emulsifiers that help it melt smoothly, while cheddar provides complex flavor. This ensures your grilled cheese has both taste and the perfect melty texture.
Timing Strategy: Start your soup first, then begin the grilled cheese when the soup goes into its 15-minute simmer. This way, both components finish at the same time for optimal serving temperature.
Texture Preferences: Some people prefer chunky soup, others want it smooth. The choice is yours! Chunky soup feels more rustic and homemade, while smooth soup feels more elegant and restaurant-style.
Nutrition Information (Per Serving)
- Calories: 485
- Protein: 18g
- Carbohydrates: 42g
- Fat: 28g
- Fiber: 4g
- Sodium: 1,240mg
Creative Variations for Your Easy Tomato Soup with Grilled Cheese
Roasted Red Pepper Boost: Add ½ cup of jarred roasted red peppers during step 6 with the tomatoes. This creates a deeper, smokier flavor that elevates the classic combination while maintaining the simplicity of this easy tomato soup with grilled cheese recipe.
Bacon Lovers’ Version: Cook 4 strips of bacon until crispy, then crumble into the finished soup. Use 1 tablespoon of the bacon fat to butter your bread for extra richness. The smoky bacon flavor complements both the soup and sandwich perfectly.
Fresh Herb Garden: Replace dried basil with 2 tablespoons of fresh herbs like basil, oregano, or thyme added in the last 5 minutes of cooking. Fresh herbs brighten the entire dish and pair beautifully with other comfort foods like our creamy caramelized broccoli soup.
Spicy Kick: Add ¼ teaspoon red pepper flakes with the garlic in step 5 for gentle heat that won’t overpower the classic flavors. For more tomato-based inspiration, check out our best tomato basil soup recipe.
Storage & Reheating Your Easy Tomato Soup with Grilled Cheese
Refrigerator Storage: Store leftover soup in airtight containers for up to 4 days. The flavors actually improve overnight as they continue to meld together. Let the soup cool completely before refrigerating to prevent condensation.
Freezing Guidelines: Freeze soup without cream for up to 3 months in freezer-safe containers. Leave 1 inch of space at the top for expansion. Thaw overnight in the refrigerator and stir in fresh cream when reheating.
Proper Reheating: Warm soup gently over low heat, stirring frequently to prevent scorching. Add a splash of broth if it’s too thick after storage. Never use high heat or microwave at full power – use 50% power in 30-second intervals, stirring between each interval.
Grilled Cheese Storage: Grilled cheese is best served immediately, but leftover sandwiches can be stored in the refrigerator for 1 day. Reheat in a toaster oven at 350°F for 3-4 minutes to restore crispiness.

Complete Troubleshooting Guide
Problem: My soup tastes too acidic or tart Solution: Add an extra teaspoon of sugar gradually, tasting after each addition. You can also add a tiny pinch of baking soda (no more than ⅛ teaspoon) to neutralize acidity. The sugar balances the natural acids in tomatoes without making the soup sweet.
Problem: The cream curdled or separated in my soup Solution: Remove from heat immediately and whisk vigorously. The soup is still safe to eat. To prevent this, always remove the pot from heat before adding cream and never boil the soup after adding cream. If it’s severely curdled, strain the soup and start over with fresh cream.
Problem: My grilled cheese isn’t melting properly Solution: Your heat is too high. Lower the temperature to medium-low and cover the skillet with a lid for the last minute of cooking on each side. The steam created helps melt the cheese evenly. Also, ensure your cheese is at room temperature before cooking.
Problem: The soup is too thin and watery Solution: Remove the lid and simmer for an additional 10-15 minutes to reduce the liquid. You can also mix 1 tablespoon of cornstarch with 2 tablespoons of cold water to create a slurry, then stir it into the soup and simmer for 5 minutes until thickened.
Problem: My bread burns before the cheese melts Solution: Your heat is definitely too high. Remove from heat, lower the temperature to medium-low, and let the pan cool for 2-3 minutes before continuing. Patient, low-heat cooking is the secret to perfect grilled cheese.
Problem: The soup tastes bland or flat Solution: Add more salt gradually – under-seasoning is the most common cause of bland soup. You can also add a splash of Worcestershire sauce or a squeeze of lemon juice to brighten the flavors. Taste and adjust seasonings at the end of cooking.
Essential Equipment for Easy Tomato Soup with Grilled Cheese
Large Heavy-Bottomed Pot (4-6 quarts): Essential for even heat distribution and preventing scorching. A heavy bottom ensures the soup cooks evenly without hot spots that can burn the ingredients.
Immersion Blender: Makes creating smooth soup effortless and safe. If you don’t have one, a regular blender works, but you’ll need to work in small batches and let the soup cool slightly first.
Large Skillet or Griddle: A 12-inch skillet lets you cook all four sandwiches at once. Cast iron or heavy-bottomed skillets work best for even heat distribution.
Sharp Chef’s Knife: For clean, efficient vegetable prep. A dull knife is more dangerous and makes prep work frustrating.
Wooden Spoon: Won’t scratch your pot and handles heat well. Metal spoons can scratch non-stick surfaces and get too hot to handle comfortably.
Wide Spatula: Essential for flipping grilled cheese without breaking the sandwiches. A wide spatula supports the entire sandwich during flipping.
Ladle: For clean, neat soup serving without splashing or mess.
Organized Shopping List
Dairy Section:
- Butter (1 stick needed)
- Heavy cream (16 oz container – you’ll use ½ cup)
- Sharp cheddar cheese (8 oz block or sliced)
- American cheese (4 oz sliced)
Produce Section:
- Yellow onion (1 medium)
- Fresh garlic (1 bulb)
Pantry/Canned Goods:
- Crushed tomatoes (28 oz can)
- Chicken or vegetable broth (32 oz container)
- Granulated sugar
- Dried basil
- Bay leaves
- Salt and black pepper
Bakery Section:
- Sandwich bread (1 loaf – day-old bread works great)
Five Success Secrets for Perfect Results
1. Taste and Adjust Constantly: Every brand of tomatoes has different acidity levels. Start with the recipe amounts, then taste and adjust salt, sugar, and seasonings at the end. This ensures your easy tomato soup with grilled cheese tastes perfect every time.
2. Room Temperature Ingredients: Take your cheese and butter out of the refrigerator 30 minutes before cooking. Room temperature ingredients melt more evenly and create better texture in both the soup and sandwiches.
3. Don’t Rush the Process: This recipe succeeds because of proper timing and temperature control. Resist the urge to crank up the heat to speed things along. Low and slow cooking develops better flavors and prevents burning.
4. The One-Minute Rest: Always let your grilled cheese rest for a full minute after cooking before cutting. This prevents all the melted cheese from immediately running out and creates neater presentation.
5. Serve at Peak Temperature: Hot soup with warm, crispy grilled cheese creates the perfect temperature contrast. Time your cooking so both components finish together, and serve immediately for the best experience.
This easy tomato soup with grilled cheese recipe transforms simple ingredients into the ultimate comfort food experience. With detailed instructions perfect for beginners and expert tips for consistent results, you’ll have a new go-to recipe that brings warmth and satisfaction to any table.
