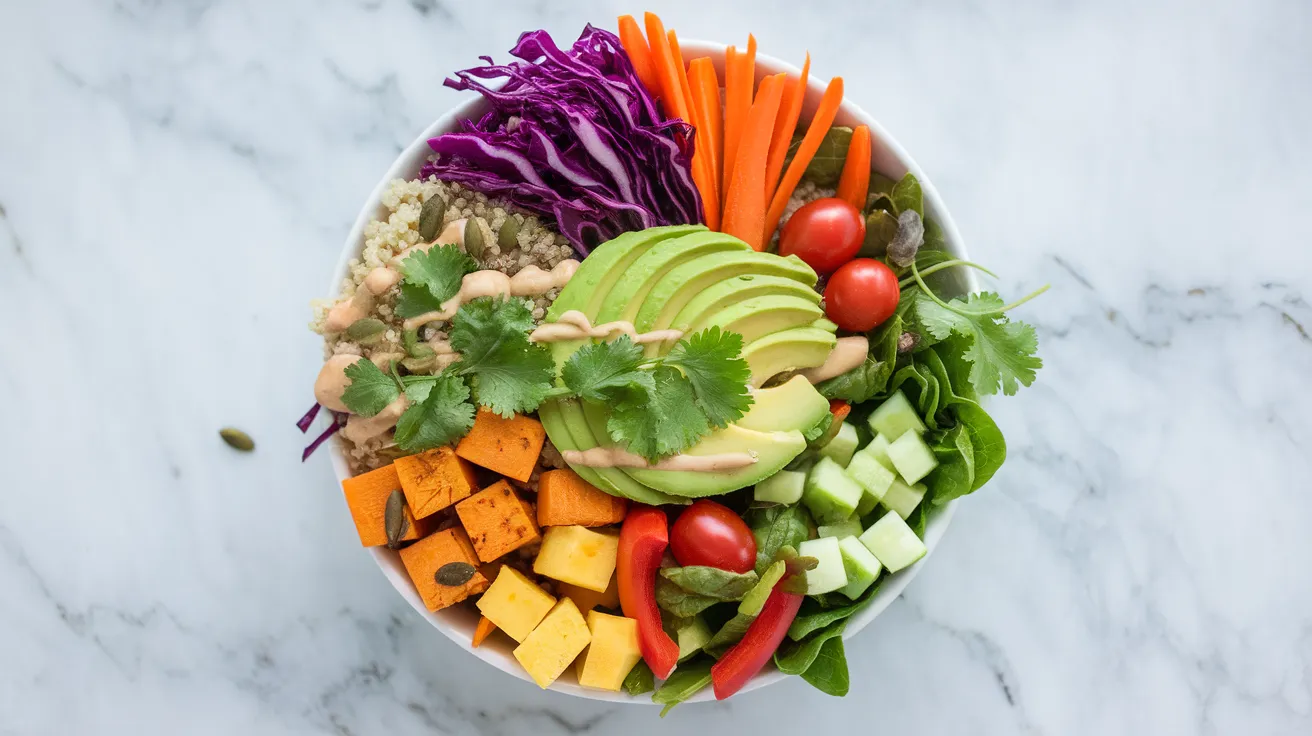
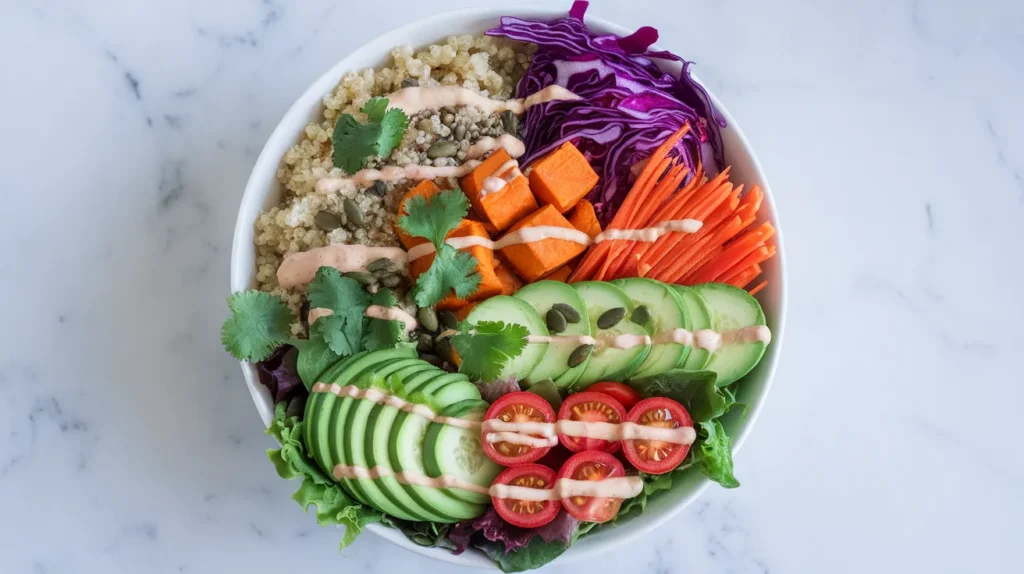
This vibrant Vegan Aesthetic bowl combines colorful roasted vegetables, creamy avocado, and nutrient-packed quinoa to create an Instagram-worthy meal that’s as delicious as it is beautiful. Perfect for those seeking a Vegan Aesthetic recipe that nourishes both body and soul, this rainbow bowl delivers fresh flavors and satisfying textures in every bite.
SERVES: 4 | PREP: 20 MIN | COOK: 25 MIN | TOTAL: 45 MIN
Ingredients
Base Components
| Ingredient | Amount |
|---|---|
| Quinoa, rinsed | 1 cup |
| Vegetable broth | 2 cups |
| Mixed greens | 4 cups |
Roasted Vegetables
| Ingredient | Amount |
|---|---|
| Sweet potato, cubed | 2 medium |
| Red bell pepper, sliced | 1 large |
| Purple cabbage, chopped | 2 cups |
| Carrots, julienned | 2 large |
| Olive oil | 3 tablespoons |
| Sea salt | 1 teaspoon |
| Black pepper | ½ teaspoon |
Fresh Toppings
| Ingredient | Amount |
|---|---|
| Ripe avocados, sliced | 2 medium |
| Cherry tomatoes, halved | 1 cup |
| Cucumber, diced | 1 medium |
| Fresh herbs (cilantro/parsley) | ½ cup |
| Pumpkin seeds | ¼ cup |
Tahini Dressing
| Ingredient | Amount |
|---|---|
| Tahini | ¼ cup |
| Lemon juice, fresh | 3 tablespoons |
| Maple syrup | 2 tablespoons |
| Garlic, minced | 2 cloves |
| Warm water | 3-4 tablespoons |
Detailed Step-by-Step Vegan Aesthetic Instructions
Phase 1: Getting Started – Foundation Setup (10 minutes)
1. Prepare Your Workspace and Oven
- Move your oven rack to the center position before preheating. This ensures even heat circulation around your vegetables.
- Preheat your oven to 425°F (220°C). Set a timer so you don’t forget this crucial step. This high temperature is essential for achieving those golden, caramelized edges that make your Vegan Aesthetic bowl visually stunning.
- Gather all your ingredients on the counter before you start. This French technique called “mise en place” prevents mistakes and makes cooking smoother.
2. Prepare Your Quinoa
- Measure 1 cup of quinoa into a fine-mesh strainer. If you don’t have a fine strainer, use a regular strainer lined with cheesecloth or paper towel.
- Rinse the quinoa under cold running water for 2-3 minutes, stirring it with your fingers. The water will be cloudy at first – keep rinsing until it runs clear.
- Why this matters: Quinoa has a natural coating called saponin that tastes bitter and soapy. Proper rinsing removes this coating completely.
- Shake the strainer gently to remove excess water, then set aside.
3. Prepare Your Baking Setup
- Line a large rimmed baking sheet with parchment paper. Make sure the paper covers the entire surface and comes up the sides slightly.
- If you don’t have parchment paper, lightly oil the baking sheet with 1 tablespoon of olive oil and spread it evenly with a paper towel.
- Set the prepared baking sheet near your prep area so it’s ready when you need it.
Phase 2: Perfect Quinoa Cooking (20 minutes total)
4. Start Your Quinoa
- In a medium saucepan (2-3 quart size), combine the rinsed quinoa with 2 cups of vegetable broth. The broth adds flavor compared to plain water.
- Bring the mixture to a full, rolling boil over high heat. You’ll see large bubbles breaking the surface – this takes about 3-4 minutes.
- Watch carefully as broth can boil over quickly. If it starts to foam up, reduce heat slightly but maintain the boil.
5. Simmer the Quinoa
- The moment it reaches a rolling boil, immediately reduce heat to low and cover with a tight-fitting lid.
- Set a timer for exactly 15 minutes. Don’t lift the lid during this time – the steam is cooking the quinoa evenly.
- You’ll know it’s working when you hear gentle bubbling sounds. If it’s too quiet, increase heat slightly. If it’s bubbling vigorously, reduce heat more.
6. Rest and Fluff
- After 15 minutes, remove the pan from heat but keep it covered. Let it rest for exactly 5 minutes. This steaming step is crucial for fluffy quinoa.
- Remove the lid and check: All liquid should be absorbed, and you should see little white rings around the quinoa grains.
- Using a fork (never a spoon), gently fluff the quinoa by stirring from bottom to top. A spoon will make it mushy.
- Set aside to cool slightly while you prepare the vegetables. The quinoa should be warm but not steaming hot when you assemble your Vegan Aesthetic bowls.
Phase 3: Masterful Vegetable Preparation (25 minutes)
7. Prepare Sweet Potatoes
- Wash and scrub 2 medium sweet potatoes under running water. You can peel them or leave the skin on for extra nutrients and texture.
- Using a sharp chef’s knife, cut sweet potatoes into uniform ¾-inch cubes. Here’s how: Cut in half lengthwise, place cut-side down, slice into ¾-inch thick planks, then cut planks into ¾-inch strips, finally dice into cubes.
- Why uniform size matters: Even-sized pieces cook at the same rate, preventing some from burning while others stay raw.
- Place cubed sweet potatoes in your large mixing bowl.
8. Prepare Bell Pepper
- Remove the stem by cutting around it, then slice the pepper in half from top to bottom.
- Remove all seeds and white pith by scraping with your knife or fingers.
- Cut into ½-inch wide strips for the perfect Vegan Aesthetic presentation. Strips should be uniform in width.
- Add to the bowl with sweet potatoes.
9. Prepare Purple Cabbage
- Remove any damaged outer leaves from the cabbage.
- Cut the cabbage in half through the core, then cut each half in half again, giving you quarters.
- Cut out the tough core from each quarter with a diagonal cut.
- Slice the cabbage into bite-sized pieces, about 1-inch wide. The pieces will shrink as they roast.
- Add to your vegetable bowl. The purple color will be stunning in your final Vegan Aesthetic presentation.
10. Prepare Carrots
- Peel 2 large carrots with a vegetable peeler, then wash them clean.
- Cut into julienne (matchstick) strips: First, cut carrots into 3-inch segments. Cut each segment into ¼-inch thick planks, then cut planks into ¼-inch matchsticks.
- Alternative method: Use a vegetable peeler to create long, thin ribbons by peeling down the length of each carrot.
- Add julienned carrots to your vegetable collection.
11. Season and Oil the Vegetables
- Drizzle 3 tablespoons of olive oil over all the vegetables in your large bowl.
- Sprinkle with 1 teaspoon sea salt and ½ teaspoon black pepper.
- Using clean hands or two large spoons, toss everything together until every piece is lightly coated with oil and seasoning. This should take about 1 minute of thorough mixing.
- Taste a small piece of sweet potato – it should taste lightly seasoned. Adjust salt if needed.
12. Arrange for Perfect Roasting
- Transfer seasoned vegetables to your prepared baking sheet in a single layer.
- Spread them out so no pieces are overlapping. Overcrowded vegetables steam instead of roast, which prevents those beautiful caramelized edges.
- If vegetables don’t fit in one layer, use a second baking sheet. Better to use two sheets than crowd them.
13. Roast to Perfection
- Place baking sheet in preheated oven and immediately set a timer for 20 minutes.
- After 20 minutes, check for doneness: Sweet potatoes should be fork-tender, and all vegetables should have golden, slightly crispy edges.
- If needed, roast 3-5 minutes longer until vegetables are caramelized but not burnt.
- Remove from oven and let cool for 3-4 minutes before assembling. This prevents the warm vegetables from wilting your greens.
Phase 4: Creating Your Vegan Aesthetic Masterpiece (15 minutes)
14. Make the Perfect Tahini Dressing
- In a small bowl, add ¼ cup tahini. Stir the tahini in its container first, as it often separates.
- Add 3 tablespoons fresh lemon juice (about 1 large lemon). Fresh juice tastes much better than bottled.
- Add 2 tablespoons maple syrup and 2 minced garlic cloves.
- Whisk everything together vigorously for 30 seconds. It will look thick and possibly separated – this is normal.
- Slowly add warm water, 1 tablespoon at a time, whisking constantly until you reach a smooth, pourable consistency. You’ll need 3-4 tablespoons total.
- The dressing should coat the back of a spoon but still drizzle easily. Adjust with more water if too thick, or more tahini if too thin.
15. Taste and Perfect Your Dressing
- Taste the dressing and adjust seasonings: Add more lemon juice for brightness, maple syrup for sweetness, or a pinch of salt for balance.
- The perfect dressing should be creamy, slightly sweet, tangy, and garlicky – all flavors in harmony.
- Set aside until ready to serve. The dressing can be made up to 3 days ahead and stored in the refrigerator.
16. Prepare Fresh Components
- Wash and thoroughly dry your mixed greens using a salad spinner or clean kitchen towels. Wet greens will make your Vegan Aesthetic bowl soggy.
- Cut 2 ripe avocados in half, remove pits, and slice into ¼-inch thick crescents. Leave the slices in the avocado shell until ready to serve to prevent browning.
- Halve 1 cup of cherry tomatoes through their equators for the prettiest presentation.
- Dice 1 medium cucumber into small, uniform cubes after removing any tough skin if desired.
- Roughly chop ½ cup fresh herbs (cilantro or parsley work beautifully).
17. Master the Vegan Aesthetic Bowl Assembly
- Use four wide, shallow bowls for the best presentation. Deep bowls hide the beautiful layers.
- Divide mixed greens evenly among bowls, creating a bed that covers about half of each bowl.
- Add warm quinoa to one section of each bowl, keeping it separate from other components for maximum visual impact.
18. Create Your Rainbow Sections
- Working clockwise around each bowl, add roasted vegetables in distinct sections: sweet potatoes in one area, bell peppers in another, purple cabbage in its own space, and carrots in the remaining section.
- Keep colors separate – this is the key to achieving that coveted Vegan Aesthetic look that’s so popular on social media.
- Fill any gaps with the fresh components: cucumber dice, halved cherry tomatoes, and carefully fanned avocado slices.
19. Final Vegan Aesthetic Touches
- Drizzle 2-3 tablespoons of tahini dressing over each bowl in an artistic zigzag pattern.
- Don’t overdress the bowls – you want to see all the beautiful colors underneath.
- Sprinkle fresh herbs and pumpkin seeds over the top for final texture and color contrast.
20. Serve Your Masterpiece
- Serve immediately while vegetables are still slightly warm and greens are crisp.
- Provide extra dressing on the side for those who want more.
- Have napkins ready – these gorgeous bowls are meant to be enjoyed with your hands if desired!
Professional Chef’s Notes for Vegan Aesthetic Success
Perfect Color Coordination: The secret to achieving that perfect Vegan Aesthetic lies in keeping colors separate during plating. Think of each bowl as an edible rainbow where every hue has its designated space. This visual separation creates the stunning contrast that makes these bowls so photogenic.
Temperature and Texture Balance: Serve warm roasted vegetables over cool greens and fresh toppings. This temperature variation creates an exciting eating experience that’s both satisfying and refreshing. The combination of textures – crispy edges, creamy avocado, fluffy quinoa, and tender vegetables – is what makes this Vegan Aesthetic recipe so memorable.
Make-Ahead Success: All components can be prepared separately up to 3 days ahead. Store roasted vegetables and quinoa in the refrigerator, but bring to room temperature or warm slightly before serving. Keep greens crisp by storing with paper towels to absorb excess moisture.
Seasonal Adaptations: This Vegan Aesthetic recipe is incredibly versatile. Swap vegetables based on seasons while maintaining the color variety that makes these bowls so visually appealing.
Nutrition Information (Per Serving)
- Calories: 485
- Protein: 14g
- Carbohydrates: 58g
- Fat: 24g
- Fiber: 12g
- Iron: 15% DV
- Vitamin C: 120% DV
Creative Vegan Aesthetic Variations
Mediterranean Vegan Aesthetic Bowl: Replace quinoa with farro and add roasted red peppers, olives, and cucumber with a lemon-herb dressing for a beautiful coastal-inspired presentation that maintains the Vegan Aesthetic appeal.
Asian-Inspired Bowl: Substitute edamame for avocado, add shredded purple cabbage, and drizzle with sesame-ginger dressing. Perfect alongside our vegan brownies for a complete meal experience that satisfies both visual and taste preferences.
Autumn Harvest Version: Use roasted butternut squash, Brussels sprouts, and dried cranberries with a maple-tahini dressing for seasonal Vegan Aesthetic appeal that celebrates fall flavors.
Tropical Paradise Bowl: Add mango chunks, coconut flakes, and macadamia nuts with a lime-cilantro dressing for an island-inspired twist on this colorful Vegan Aesthetic recipe.
Storage & Reheating Guide
Refrigerator Storage: Store components separately in airtight containers for up to 4 days. Keep dressing in a squeeze bottle for easy serving and maintain that professional Vegan Aesthetic presentation.
Freezer Storage: Cooked quinoa and roasted vegetables freeze well for up to 3 months. Label containers clearly and thaw overnight in refrigerator before reheating.
Reheating Instructions: Warm quinoa and roasted vegetables in microwave for 60-90 seconds or in a skillet over medium heat for 3-4 minutes. Add fresh toppings after reheating to maintain the crisp textures that make this Vegan Aesthetic bowl so appealing.
Assembly Tips: For meal prep success, store greens separately with a paper towel to absorb excess moisture and maintain crispness throughout the week.
Troubleshooting Common Vegan Aesthetic Issues
Problem: Quinoa turns out mushy and affects the bowl’s texture Solution: You likely used too much liquid or overcooked it. Use exactly a 1:2 ratio (quinoa to broth) and never lift the lid during the 15-minute cooking time. Mushy quinoa won’t hold its shape in your Vegan Aesthetic presentation.
Problem: Vegetables are soggy instead of caramelized and beautiful Solution: Your oven temperature was too low or vegetables were overcrowded. Always use 425°F and give vegetables plenty of space on the baking sheet. Soggy vegetables ruin the visual appeal that makes this Vegan Aesthetic recipe so special.
Problem: Avocado browns too quickly and looks unappetizing Solution: Cut avocado just before serving and toss with a bit of lemon juice. Store cut avocado with the pit to slow browning. Brown avocado destroys the fresh, vibrant look you want.
Problem: Tahini dressing is too thick and won’t drizzle properly Solution: Add warm water one tablespoon at a time, whisking constantly until smooth. Cold water can make tahini seize up. The dressing should flow beautifully over your Vegan Aesthetic bowl.
Problem: Final presentation looks muddy instead of colorful Solution: Never mix components together during assembly. Keep each ingredient in distinct sections and add fresh herbs for vibrant green pops. The separate color sections are what make this Vegan Aesthetic recipe so Instagram-worthy.
Essential Equipment for Vegan Aesthetic Success
- Large rimmed baking sheet (18×13 inches minimum for even roasting)
- Medium saucepan with tight-fitting lid (2-3 quart capacity for perfect quinoa)
- Sharp 8-inch chef’s knife (for precise, uniform vegetable cuts)
- Large mixing bowl (4-quart capacity for tossing vegetables)
- Fine-mesh strainer (for thoroughly rinsing quinoa)
- Small whisk (for smooth, lump-free dressing)
- Four wide, shallow bowls (for beautiful Vegan Aesthetic presentation)
- Vegetable peeler (for perfect carrot ribbons)
Organized Shopping List
Produce Section
- 2 medium sweet potatoes
- 1 large red bell pepper
- 1 small purple cabbage
- 2 large carrots
- 2 ripe avocados
- 1 pint cherry tomatoes
- 1 medium cucumber
- Fresh cilantro or parsley bunch
- 1 head garlic
- 2 large lemons
Pantry Items
- 1 cup quinoa
- Vegetable broth (32 oz container)
- Extra virgin olive oil
- Tahini (16 oz jar)
- Pure maple syrup
- Sea salt
- Black pepper
- Raw pumpkin seeds
Refrigerated Section
- Mixed greens (5 oz container)
Success Secrets for Perfect Vegan Aesthetic Bowls
1. Master Your Mise en Place: This Vegan Aesthetic recipe flows smoothly when all ingredients are completely prepped before you start cooking. Wash, chop, and measure everything first. This professional approach prevents mistakes and creates better results.
2. Never Rush the Quinoa Rest Period: Letting cooked quinoa sit covered for exactly 5 minutes creates the fluffy, separate grains that make this dish restaurant-quality. Skipping this step results in dense, sticky quinoa that won’t showcase properly in your Vegan Aesthetic presentation.
3. Keep Colors Completely Separate: The visual impact of this Vegan Aesthetic bowl comes entirely from distinct color sections, never mixed ingredients. Think of yourself as an artist painting with food – each color should have its own space on the canvas.
4. Taste and Adjust Constantly: Different brands of tahini vary in intensity, so always taste your dressing and adjust accordingly. Some need extra maple syrup for balance, others need more lemon juice for brightness. Perfect seasoning makes the difference between good and exceptional.
5. Serve at the Right Temperature: The contrast between warm roasted vegetables and cool fresh ingredients creates the perfect eating experience. Assemble just before serving to maintain this temperature balance that makes each bite interesting and satisfying.
This comprehensive Vegan Aesthetic recipe proves that healthy eating doesn’t mean sacrificing flavor or visual appeal. Every colorful component brings its own nutritional benefits while contributing to a meal that’s as satisfying to create as it is to eat. Perfect for beginners who want to master the art of beautiful, plant-based cooking, this Vegan Aesthetic bowl celebrates the natural colors and flavors that make vegan cuisine so appealing. Whether you’re meal prepping for the week or entertaining friends, these stunning bowls will impress everyone with their professional presentation and delicious, balanced flavors.