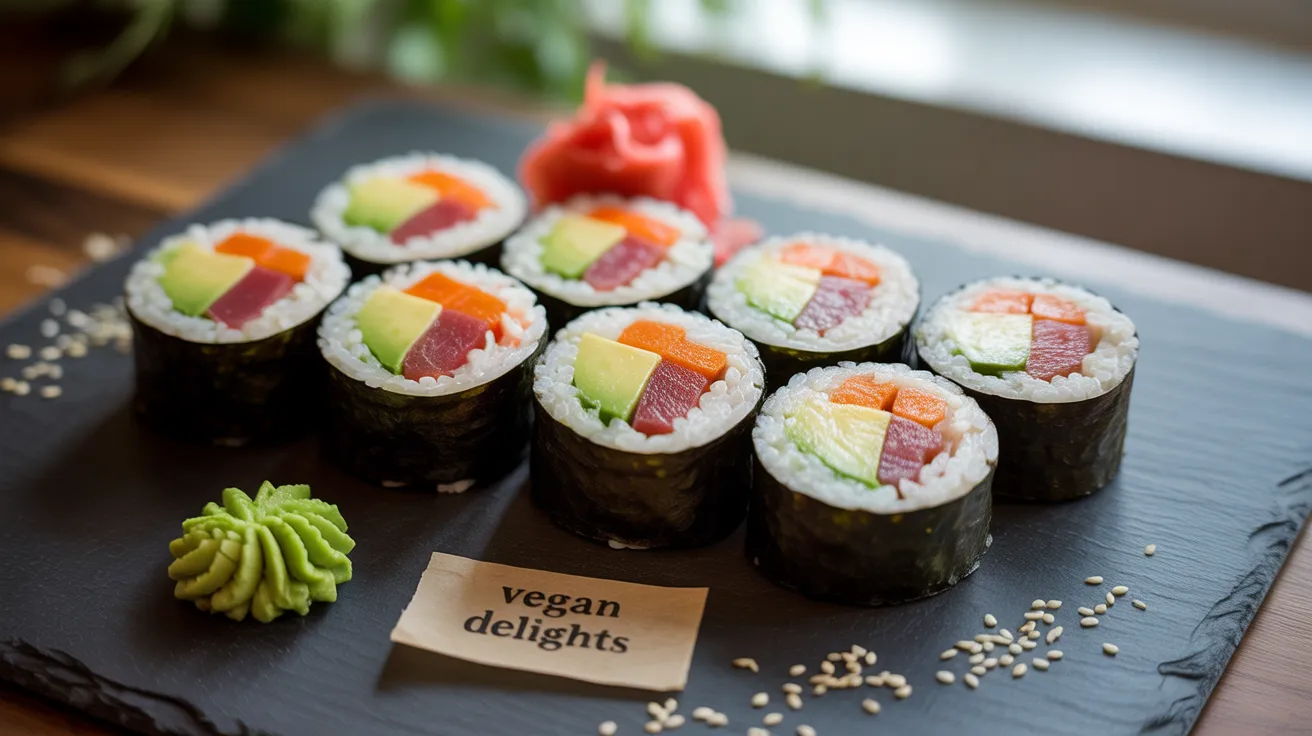
Master the art of making delicious vegan sushi at home with this comprehensive beginner’s guide. Our plant-based sushi recipe transforms simple vegetables and perfectly seasoned rice into restaurant-quality rolls that rival any traditional sushi restaurant. Whether you’re new to vegan cooking or an experienced plant-based chef, this vegan sushi tutorial will have you creating beautiful, Instagram-worthy rolls that taste as amazing as they look.
Recipe Info Bar
SERVES: 4 | PREP: 45 MIN | COOK: 20 MIN | TOTAL: 65 MIN
Ingredients
For the Sushi Rice
| Ingredient | Amount |
|---|---|
| Short-grain sushi rice | 2 cups |
| Water | 2½ cups |
| Rice vinegar | ¼ cup |
| Sugar | 2 tablespoons |
| Salt | 1 teaspoon |
For the Vegan Sushi Fillings
| Ingredient | Amount |
|---|---|
| Nori seaweed sheets | 8 sheets |
| Ripe avocado | 2 large |
| English cucumber | 1 medium |
| Carrots | 2 medium |
| Red bell pepper | 1 large |
| Fresh shiitake mushrooms | 8 oz |
| Sesame oil | 2 tablespoons |
| Soy sauce | 3 tablespoons |
For Serving
| Ingredient | Amount |
|---|---|
| Pickled ginger | ½ cup |
| Wasabi paste | 2 tablespoons |
| Low-sodium soy sauce | ¼ cup |
| Sesame seeds | 3 tablespoons |
Detailed Step-by-Step Vegan Sushi Instructions
Phase 1: Creating Perfect Sushi Rice Foundation (25 minutes)
1. Rinse Rice Like a Professional Start by placing your 2 cups of short-grain rice in a fine-mesh strainer. Run cold water over the rice while gently agitating it with your fingers. The water will look milky at first – this is the excess starch that makes rice gummy. Continue rinsing and stirring until the water runs completely clear, typically 5-7 rinses. This step is crucial for achieving the proper texture in your vegan sushi.
2. Measure Water Precisely Transfer your clean rice to a heavy-bottomed saucepan. Add exactly 2½ cups of cold water. The rice-to-water ratio is critical – too much water creates mushy rice, too little leaves it undercooked and hard. Use measuring cups, not eyeballing, for consistent results every time you make vegan sushi.
3. Start the Cooking Process Place the saucepan over high heat without a lid initially. Watch carefully as the water begins to bubble around the edges. Once you see rapid bubbling across the entire surface (this takes about 5-7 minutes), immediately cover with a tight-fitting lid and reduce heat to the lowest setting your stove allows.
4. Perfect the Simmer Technique Set a timer for exactly 18 minutes. Do not lift the lid during this time, no matter how tempting it might be to check. The trapped steam cooks the rice evenly. You might hear gentle bubbling sounds initially – this is normal. After about 10 minutes, the sounds should stop as the water absorbs.
5. Steam for Final Perfection After 18 minutes, remove the pan from heat but keep the lid on tight. Let it sit undisturbed for 10 more minutes. This steaming phase completes the cooking process and ensures each grain is perfectly tender for your vegan sushi rolls.
6. Create the Sushi Seasoning While rice steams, whisk together ¼ cup rice vinegar, 2 tablespoons sugar, and 1 teaspoon salt in a small bowl. Stir vigorously until the sugar and salt completely dissolve. The mixture should be clear, not cloudy. This seasoning gives sushi rice its distinctive slightly sweet and tangy flavor.
7. Season the Rice Properly Transfer the hot rice to the largest, shallowest bowl you have – this helps it cool faster. Pour the seasoning mixture over the rice gradually while gently folding with a wooden spoon or rice paddle. Use a cutting and folding motion rather than stirring to avoid mashing the grains. The rice should look glossy and smell slightly sweet. Let it cool to room temperature before making your vegan sushi – this takes about 15 minutes.
Phase 2: Preparing Fresh Vegan Fillings (20 minutes)
8. Master the Avocado Slice Cut each avocado in half lengthwise, remove the pit, and carefully peel away the skin. Place each half cut-side down on your cutting board. Using a sharp knife, make parallel cuts ¼-inch apart from end to end, cutting all the way through but keeping the slices together. Gently fan out the slices and squeeze a few drops of lemon juice over them to prevent browning. Perfect avocado slices are essential for beautiful vegan sushi presentation.
9. Create Cucumber Matchsticks Wash the cucumber but don’t peel it – the skin adds color and nutrition to your vegan sushi. Cut off both ends, then slice the cucumber in half lengthwise. Use a spoon to scrape out the seeds and watery center, leaving just the firm flesh. Cut each half into 4-inch long pieces, then slice each piece into thin ¼-inch matchsticks. Consistent sizing ensures even distribution in your rolls.
10. Julienne Carrots Like a Pro Peel the carrots and cut them into 4-inch sections. Cut each section in half lengthwise to create a flat surface for stability. Place flat-side down and cut into thin planks, then stack the planks and cut into matchsticks. Your carrot pieces should be roughly the same size as your cucumber for uniform vegan sushi rolls.
11. Prepare Perfect Pepper Strips Remove the stem, seeds, and white membrane from the bell pepper – these parts can be bitter. Cut the pepper into quarters, then slice each quarter into thin strips about ¼-inch wide. The strips should be long enough to span the width of your nori sheet when making vegan sushi rolls.
12. Sauté Shiitake Mushrooms Remove stems from mushrooms and slice caps into ¼-inch thick pieces. Heat sesame oil in a large skillet over medium-high heat until shimmering. Add mushrooms in a single layer – don’t overcrowd or they’ll steam instead of browning. Cook without moving for 3 minutes until golden on one side, then flip and cook 2 more minutes. Add 1 tablespoon soy sauce and cook 30 seconds more until absorbed. Transfer to a plate and let cool completely before using in your vegan sushi.
Phase 3: Setting Up Your Vegan Sushi Rolling Station (5 minutes)
13. Organize Your Workspace Clear a large, clean workspace near your sink. Place your bamboo rolling mat on the counter and cover it completely with plastic wrap, tucking the edges under the mat. This prevents rice from sticking to the bamboo. Arrange all your fillings in small bowls within arm’s reach. Fill a medium bowl with room-temperature water for keeping your hands wet – this is crucial for handling sushi rice without it sticking to your fingers.
14. Test Your Knife Sharpness Your knife must be razor-sharp for clean cuts through your vegan sushi rolls. Test it by slicing a piece of paper – it should cut cleanly without tearing. If your knife is dull, use a sharpening steel or stone now. Also prepare a damp kitchen towel for cleaning your knife between cuts.
Phase 4: Rolling Your First Vegan Sushi Roll (15 minutes per roll)
15. Position the Nori Correctly Place one sheet of nori on your plastic-wrapped bamboo mat with the shiny side facing down and the rough side up. The nori should be positioned horizontally (landscape orientation) with the longer edge running left to right. This orientation makes rolling easier and creates the classic sushi roll shape.
16. Spread Rice with Wet Hands Dip both hands in your water bowl and shake off excess – your hands should be damp, not dripping. Scoop about ¾ cup of seasoned rice and place it in the center of the nori. Using gentle pressure, spread the rice evenly across the nori, leaving a 1-inch border at the top edge (farthest from you) completely rice-free. The rice layer should be about ¼-inch thick – you should still see the nori texture through the rice in places.
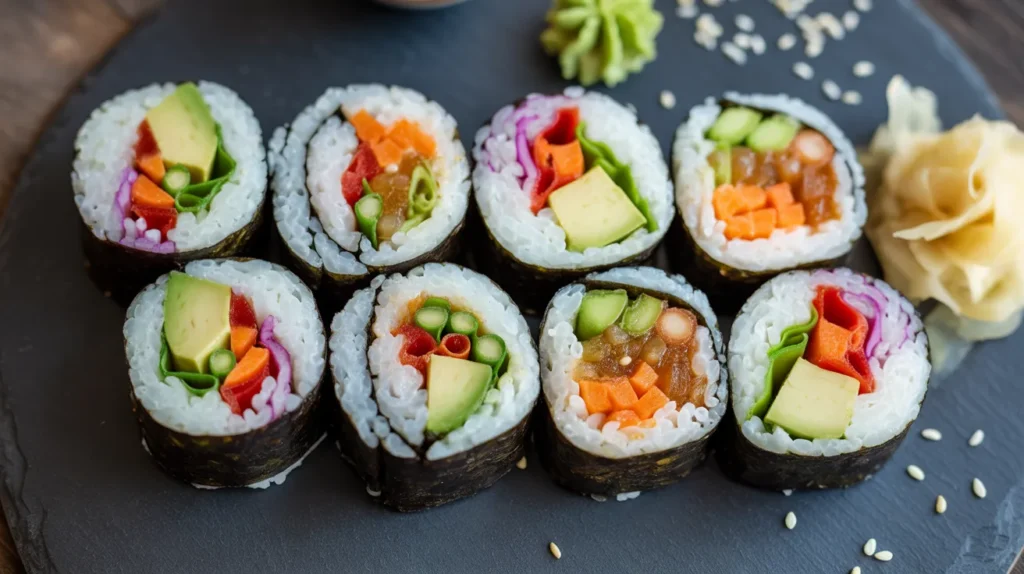
17. Add Fillings Strategically Create a horizontal line of fillings about 1 inch from the bottom edge of the nori (closest to you). Start with 3-4 thin avocado slices, then add 3-4 cucumber matchsticks, 3-4 carrot matchsticks, 2-3 pepper strips, and 2-3 pieces of cooked shiitake. Don’t overfill – less is more when learning to make vegan sushi. The fillings should span about 6 inches across the width of the nori.
18. Begin the Rolling Motion Wet your hands again if they’ve dried out. Using your thumbs, lift the edge of the bamboo mat closest to you, keeping your fingers on top of the fillings to hold them in place. Start rolling the mat away from you, applying gentle but steady pressure. The goal is to tuck the rice-covered nori over the fillings and continue rolling to create a tight cylinder.
19. Complete the Roll Continue rolling, using the bamboo mat to guide and compress the roll. When you reach the rice-free edge of nori, wet your finger and run it along this edge to help it seal. Complete the roll and give it a gentle squeeze through the bamboo mat to ensure it’s compact. The completed roll should be about 2 inches in diameter.
20. Rest Before Cutting Place the completed roll seam-side down and let it rest for 2-3 minutes. This allows the nori to soften slightly and makes cutting much easier. Use this time to clean your knife and prepare for slicing your vegan sushi.
Phase 5: Cutting Perfect Vegan Sushi Pieces (10 minutes)
21. Master the Cutting Technique Remove the bamboo mat and place your roll on a clean cutting board. Wet your sharp knife with the damp towel – the blade should be moist but not dripping. Position the knife at the center of the roll and cut straight down with a gentle sawing motion. Don’t press down hard or you’ll crush the roll. Clean and wet your knife after each cut.
22. Create Eight Perfect Pieces Cut each half into quarters, giving you 8 pieces total from each roll. Make sure to cut straight down, not at an angle, for uniform pieces. If the rice sticks to your knife or the cuts look messy, your knife isn’t wet enough or sharp enough. Clean the blade thoroughly between cuts for the cleanest presentation of your vegan sushi.
Professional Chef’s Notes for Vegan Sushi Success
• Temperature is everything: Room temperature rice spreads easily and doesn’t make the nori soggy. Hot rice will create a steamy mess that’s impossible to roll properly.
• Moisture control matters: Keep your hands just damp enough to prevent sticking, but not so wet that you add extra moisture to the rice. This balance takes practice but makes all the difference in your vegan sushi texture.
• Rolling pressure technique: Apply steady, even pressure while rolling. Too light and your vegan sushi falls apart; too heavy and you’ll squeeze out the fillings. Practice with the same pressure you’d use to gently squeeze a stress ball.
• Sharp knife saves the day: A dull knife will crush your beautiful rolls and create ragged edges. The investment in a good, sharp knife pays off immediately in professional-looking vegan sushi presentation.
Nutritional Information (Per Serving)
- Calories: 285
- Protein: 8g
- Carbohydrates: 58g
- Fat: 6g
- Fiber: 4g
- Sodium: 890mg
Creative Vegan Sushi Variations
Rainbow Vegetable Rolls
Layer different colored vegetables in stripes across your rice for stunning visual appeal. Use purple cabbage, orange carrots, yellow bell peppers, and green cucumber for a rainbow effect that makes your vegan sushi Instagram-ready.
Spicy Mayo Vegan Rolls
Mix vegan mayonnaise with sriracha sauce and spread a thin layer on the rice before adding vegetables. This adds creamy heat that perfectly complements the fresh vegetables in your plant-based sushi.
Tempura Vegetable Sushi
Lightly batter and fry your vegetables before rolling for added texture and flavor. Sweet potato, asparagus, and zucchini work particularly well with this technique, creating restaurant-style vegan sushi at home.
Mediterranean-Inspired Rolls
Replace traditional Asian vegetables with sun-dried tomatoes, roasted red peppers, and fresh basil for a fusion approach. For more creative plant-based recipes, try our vegan stuffed peppers for another colorful meal idea.
Storage & Reheating Guidelines
Optimal freshness: Vegan sushi tastes best when eaten immediately after preparation. The textures and flavors are at their peak within the first hour of assembly.
Short-term storage: Wrap individual rolls tightly in plastic wrap and refrigerate for up to 24 hours maximum. Beyond this point, the rice hardens and the nori becomes chewy.
Serving temperature: Remove refrigerated vegan sushi 15 minutes before serving to bring it to optimal room temperature. Cold sushi rice becomes hard and loses its appealing texture.
Make-ahead strategy: Prepare all components separately up to one day in advance, then assemble your vegan sushi rolls just before serving for the freshest taste and best presentation.
Troubleshooting Common Vegan Sushi Problems
Rice Won’t Stick Together
This usually means your rice wasn’t rinsed enough initially, or it cooled too much before seasoning. The starch content needs to be just right for proper cohesion. Next time, rinse more thoroughly and season while the rice is still warm.
Nori Tears During Rolling
Old or low-quality nori becomes brittle and tears easily. Always buy nori from stores with high turnover, and store opened packages in an airtight container with a desiccant packet. Fresh nori should feel slightly flexible, not crispy.
Fillings Fall Out During Cutting
This happens when rolls are overfilled or not rolled tightly enough. Use fewer fillings and apply more pressure when rolling. Also ensure your knife is sharp and wet – a dull blade will push fillings out instead of cutting cleanly through your vegan sushi.
Rice Tastes Bland or Too Sweet
Adjust your seasoning mixture next time. If bland, add more salt and vinegar. If too sweet, reduce the sugar by half. The seasoning should enhance the rice flavor without overwhelming it.
Rolls Won’t Hold Their Shape
Usually caused by rice that’s too wet or not enough rolling pressure. Make sure your rice has cooled to room temperature and isn’t overly moist. Practice applying steady, firm pressure throughout the rolling process.
Essential Equipment for Making Vegan Sushi
- Bamboo rolling mat (makisu) – Essential for tight, even rolls
- Sharp chef’s knife – 8-10 inch blade works best
- Heavy-bottomed saucepan – For perfectly cooked rice
- Large, shallow mixing bowl – For cooling and seasoning rice
- Fine-mesh strainer – For rinsing rice thoroughly
- Plastic wrap – To cover bamboo mat and prevent sticking
- Small bowls – For organizing fillings and water
Budget alternatives: If you don’t have a bamboo mat, a clean kitchen towel can work, though results won’t be as professional-looking.
Organized Shopping List for Vegan Sushi
Rice & Pantry Items
- Short-grain sushi rice (not regular rice)
- Rice vinegar (not regular white vinegar)
- Sugar
- Salt
- Sesame oil
- Soy sauce
- Sesame seeds
Fresh Produce Section
- Ripe but firm avocados
- English cucumber (seedless variety)
- Large carrots
- Red bell pepper
- Fresh shiitake mushrooms
Asian Foods Aisle
- Nori seaweed sheets
- Pickled ginger
- Wasabi paste
- Low-sodium soy sauce
Five Expert Success Secrets for Perfect Vegan Sushi
1. Master rice texture first – Perfect sushi rice is neither mushy nor hard, but tender with individual grains that stick together. This foundation skill determines the success of every vegan sushi roll you make.
2. Prep all ingredients completely – Have every vegetable cut, rice cooled, and tools ready before you start rolling. Vegan sushi assembly works best when you can focus entirely on the rolling technique without stopping to prep ingredients.
3. Control your filling portions – Three to four different vegetables per roll is plenty. Overstuffing makes rolling difficult and eating messy. Quality ingredients in proper proportions beat quantity every time.
4. Practice the rolling motion – Your first few rolls might look imperfect, but the technique improves rapidly with repetition. Roll with confidence and steady pressure rather than hesitant, gentle movements.
5. Invest in quality ingredients – Fresh, high-quality nori, properly grown sushi rice, and peak-season vegetables make a noticeable difference in your final vegan sushi. The investment in good ingredients pays off in superior taste and presentation.
Once you’ve mastered these vegan sushi techniques, you’ll have an impressive skill perfect for entertaining guests or treating yourself to restaurant-quality plant-based cuisine at home. Complete your Japanese-inspired meal with something sweet like our delicious vegan sugar cookies for the perfect finishing touch.