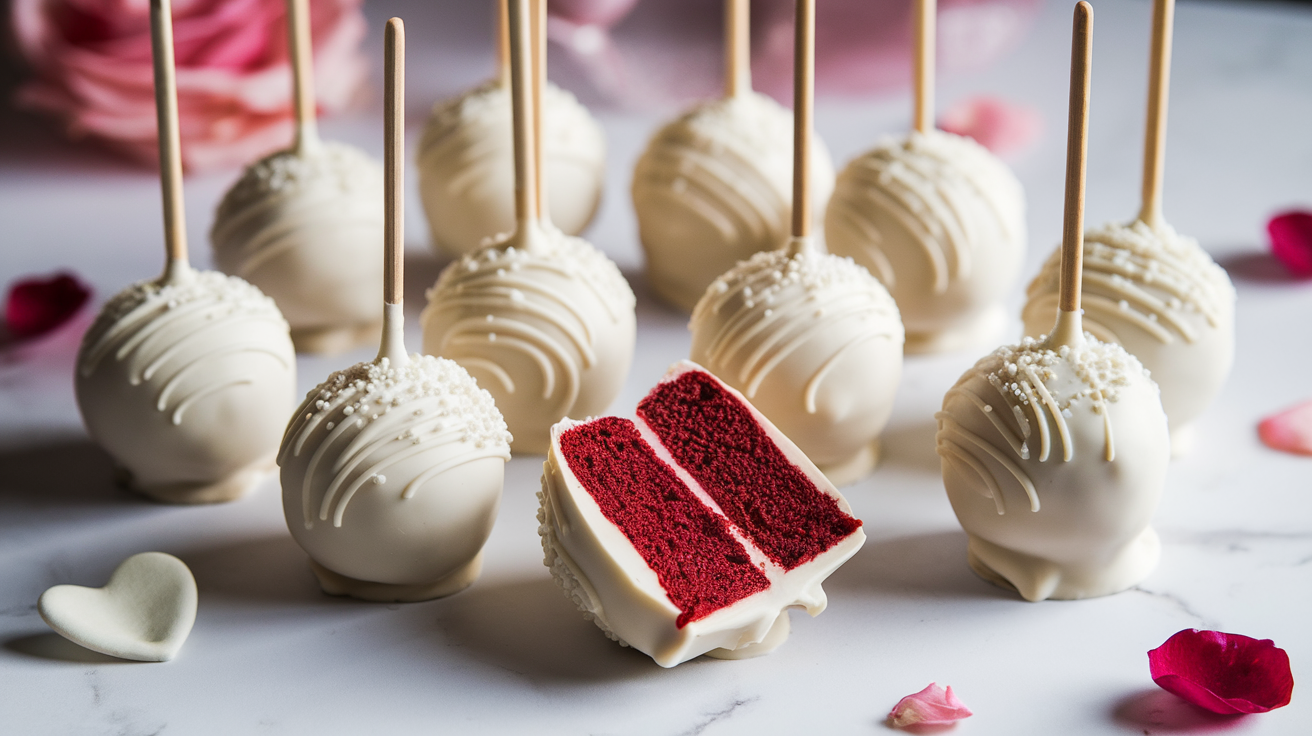
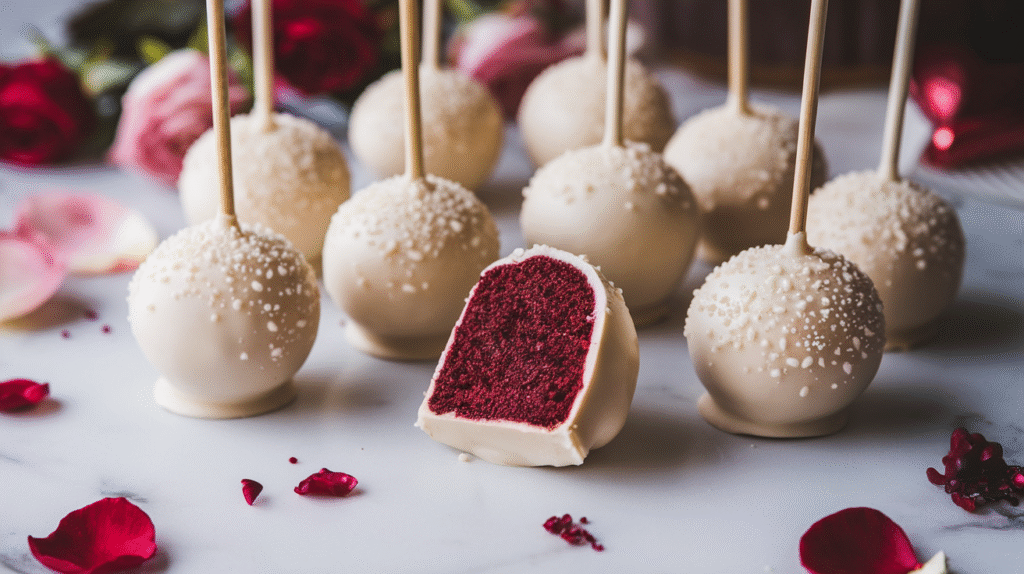
These vegan valentine’s day red velvet cake pops bring romance to your dessert table with their rich, velvety texture and stunning crimson color. Perfect for sharing with your loved one, these plant-based treats prove that vegan valentine’s day red velvet cake pops can be just as indulgent and beautiful as traditional versions. Each bite delivers the classic tangy-sweet flavor that makes red velvet so beloved.
SERVES: 4 | PREP: 45 MIN | COOK: 25 MIN | TOTAL: 70 MIN
Ingredients for Your Vegan Valentine’s Day Red Velvet Cake Pops
Cake Base
| Ingredient | Amount | Why We Use It |
|---|---|---|
| All-purpose flour | 1 cup | Creates structure and tender crumb |
| Granulated sugar | 3/4 cup | Adds sweetness and moisture |
| Unsweetened cocoa powder | 2 tablespoons | Gives subtle chocolate undertones |
| Baking soda | 1/2 teaspoon | Provides lift and fluffy texture |
| Salt | 1/4 teaspoon | Enhances all flavors |
| Non-dairy milk (oat or almond) | 1/2 cup | Adds moisture without dairy |
| Vegetable oil | 1/3 cup | Creates tender, moist texture |
| Apple cider vinegar | 1 tablespoon | Reacts with baking soda for lift |
| Vanilla extract | 1 teaspoon | Adds depth and warmth |
| Red food coloring (gel preferred) | 1-2 teaspoons | Creates signature red velvet color |
Frosting & Coating
| Ingredient | Amount | Purpose |
|---|---|---|
| Vegan butter (softened) | 1/4 cup | Binds cake crumbs together |
| Powdered sugar | 1 1/2 cups | Sweetens and thickens frosting |
| Vanilla extract | 1/2 teaspoon | Adds flavor to frosting |
| White chocolate chips (vegan) | 8 oz | Creates smooth outer coating |
| Coconut oil | 1 tablespoon | Helps chocolate melt smoothly |
| Cake pop sticks | 12 pieces | For easy handling and presentation |
Detailed Step-by-Step Instructions for Beginners
Phase 1: Preparing Your Red Velvet Cake (30 minutes total)
Step 1: Set Up Your Kitchen (5 minutes) Preheat your oven to 350°F (175°C). This temperature is crucial – too hot and your cake will cook unevenly, too cool and it won’t rise properly. Line an 8-inch square baking pan with parchment paper, leaving 2-inch overhangs on two sides. This acts like handles for easy cake removal later. Lightly spray the parchment with cooking spray to prevent any sticking.
Step 2: Mix Your Dry Ingredients (3 minutes) In a large mixing bowl (at least 3-quart capacity), add 1 cup flour, 3/4 cup sugar, 2 tablespoons cocoa powder, 1/2 teaspoon baking soda, and 1/4 teaspoon salt. Use a whisk to combine these ingredients thoroughly – spend a full minute whisking to break up any lumps in the cocoa powder or sugar. You’ll know it’s ready when the mixture looks uniform in color with no visible streaks.
Step 3: Prepare Your Wet Ingredients (2 minutes) In a 2-cup measuring cup, combine 1/2 cup non-dairy milk, 1/3 cup vegetable oil, 1 tablespoon apple cider vinegar, and 1 teaspoon vanilla extract. Stir these together with a fork. The mixture might look slightly separated – this is normal and expected.
Step 4: Add the Signature Red Color (1 minute) Add 1 teaspoon red food coloring to your wet ingredients. Gel food coloring works best because it’s more concentrated and won’t thin your batter. If using liquid coloring, start with 1 teaspoon and add more as needed. Stir until the liquid is evenly colored – it should be a deep red, not pink.
Step 5: Combine Wet and Dry Ingredients (2 minutes) Make a well (like a crater) in the center of your dry ingredients. Pour all the wet ingredients into this well. Using a wooden spoon or rubber spatula, start stirring from the center and work outward in circular motions. Mix only until you can no longer see dry flour – this should take about 30-40 stirs. The batter will be slightly lumpy, and that’s perfect. Overmixing creates tough, dense cake.
Step 6: Bake Your Cake (25 minutes) Pour the batter into your prepared pan and use a spatula to spread it evenly into corners. The batter should be about 1 inch thick. Place in the center rack of your preheated oven. Bake for 22-25 minutes. Start checking at 22 minutes by inserting a toothpick into the center – it should come out with just a few moist crumbs clinging to it, not wet batter.
Step 7: Cool Completely (30 minutes minimum) Remove the cake from the oven and place the entire pan on a wire cooling rack. Let it cool in the pan for 10 minutes, then use the parchment paper overhangs to lift the cake out of the pan. Place on the cooling rack and cool completely – this takes about 30 more minutes. The cake must be completely cool to room temperature before crumbling, or it will make your frosting too soft.
Phase 2: Making Perfect Vegan Valentine’s Day Red Velvet Cake Pops Frosting (10 minutes)
Step 8: Prepare Your Vegan Butter (2 minutes) Remove 1/4 cup vegan butter from the refrigerator and let it sit at room temperature for 15-20 minutes before starting. It should give slightly when pressed but not be melted. If you forgot to take it out early, cut it into small cubes and microwave for 5-10 seconds to soften quickly.
Step 9: Create Smooth Frosting (5 minutes) In a medium bowl, use an electric mixer (hand mixer works fine) to beat the softened vegan butter on medium speed for 2 full minutes. It should become light in color and fluffy in texture. Stop the mixer and scrape down the sides with a spatula.
Step 10: Add Sugar Gradually (3 minutes) Add 1/2 cup powdered sugar to the butter and mix on low speed until combined. Add the remaining 1 cup powdered sugar and 1/2 teaspoon vanilla extract. Beat on medium speed for 2-3 minutes until the frosting is smooth and holds its shape when the beaters are lifted. If it seems too thick, add 1 teaspoon of non-dairy milk. If too thin, add 2 tablespoons more powdered sugar.
Phase 3: Creating the Cake Pop Mixture (15 minutes)
Step 11: Crumble Your Cake Properly (5 minutes) Break your completely cooled cake into large chunks with your hands. Working with one chunk at a time, crumble it between your fingers until all pieces are no larger than a pea. For the finest texture, you can pulse the chunks in a food processor 3-4 times, but hand-crumbling gives you better control. The goal is fine, even crumbs that look like coarse breadcrumbs.
Step 12: Test Your Frosting Amount (3 minutes) Start by adding 3/4 of your prepared frosting to the cake crumbs. Using a large spoon or your clean hands, mix the frosting and crumbs together thoroughly. The mixture is ready when you can squeeze a handful and it holds together without cracking. If it crumbles apart, add more frosting 1 tablespoon at a time until it binds properly. If it feels too wet and mushy, add more cake crumbs.
Step 13: Shape Your Cake Balls (7 minutes) Wash and dry your hands thoroughly. Scoop about 2 tablespoons of mixture (roughly the size of a golf ball) and roll between your palms to create smooth, round balls. Apply gentle, consistent pressure – don’t squeeze too hard or the balls will be dense. Place each finished ball on a parchment-lined baking sheet, making sure they don’t touch each other. You should have 12 uniform balls.
Phase 4: First Chilling Phase (20 minutes)
Step 14: Chill for Proper Texture Place your baking sheet of cake balls in the refrigerator for 20-30 minutes. This chilling step is absolutely essential – it firms up the mixture so the balls won’t fall apart when you insert the sticks and dip them in chocolate. Set a timer so you don’t forget them.
Phase 5: Preparing Your Chocolate Coating (10 minutes)
Step 15: Melt Chocolate Perfectly (5 minutes) In a microwave-safe bowl, combine 8 oz vegan white chocolate chips and 1 tablespoon coconut oil. Microwave in 30-second intervals, stirring thoroughly between each interval. This prevents burning and ensures smooth melting. After 1-2 intervals, the chocolate should be completely melted and smooth. The mixture should be warm to the touch, not hot – test by touching the bottom of the bowl to your wrist.
Step 16: Test Consistency (2 minutes) Your melted chocolate should coat the back of a spoon and drip off in a steady stream. If it’s too thick, add 1/2 teaspoon more coconut oil and stir. If it’s too thin, let it cool for 2-3 minutes, stirring occasionally.
Step 17: Set Up Your Dipping Station (3 minutes) Arrange your workspace with the bowl of melted chocolate, your chilled cake balls, cake pop sticks, and either a styrofoam block or a tall glass to hold the finished pops upright. Have paper towels ready for cleanup.
Phase 6: Assembling Your Vegan Valentine’s Day Red Velvet Cake Pops (15 minutes)
Step 18: Attach Sticks Properly (5 minutes) Working with one cake ball at a time, dip a cake pop stick about 1/2 inch deep into the melted chocolate. Immediately insert the chocolate-coated end straight down into the center of a cake ball, pushing it about halfway through the ball. The melted chocolate acts as “glue” to secure the stick. Repeat with all balls and return to refrigerator for 5 minutes to set the connection.
Step 19: Final Chocolate Coating (7 minutes) Remove cake pops from refrigerator. Working with one pop at a time, hold the stick and slowly dip the entire cake ball into the melted chocolate. Submerge it completely, then lift straight up and let excess chocolate drip back into the bowl. Gently tap the stick against the rim of the bowl 2-3 times to remove excess coating – but don’t tap too hard or the cake ball might fall off.
Step 20: Final Setting (3 minutes) Immediately place each coated cake pop stick-end down into your styrofoam block or stand them in a tall glass. The chocolate should set within 3-5 minutes at room temperature. For faster setting, place in the refrigerator for 10 minutes.
Chef’s Notes for Perfect Vegan Valentine’s Day Red Velvet Cake Pops
Texture Perfection: The secret to amazing vegan valentine’s day red velvet cake pops lies in achieving the perfect cake-to-frosting ratio. The mixture should hold together when squeezed but not feel sticky or wet.
Color Consistency: Gel food coloring provides the most vibrant red color without affecting texture. Start with less and gradually add more until you achieve that signature red velvet hue.
Temperature Control: Chocolate that’s too hot will cause your cake balls to fall apart or create an uneven coating. Always test the temperature on your wrist first.
Make-Ahead Success: These vegan valentine’s day red velvet cake pops can be made up to 3 days ahead, making them perfect for planned romantic celebrations.
Nutrition Information (Per Serving – 3 cake pops)
- Calories: 385
- Protein: 4g
- Carbohydrates: 52g
- Fat: 18g
- Fiber: 2g
- Sugar: 45g
Creative Variations for Your Vegan Valentine’s Day Red Velvet Cake Pops
1. Romantic Chocolate Drizzle
After the white chocolate coating sets, melt dark chocolate and drizzle artistic patterns over each pop using a fork or squeeze bottle. This creates an elegant, bakery-style finish.
2. Pink Ombré Romance
Create multiple batches using different amounts of red food coloring to achieve gradient pink shades. Arrange from lightest to darkest for a stunning valentine display.
3. Gluten-Free Valentine Treats
Replace all-purpose flour with a 1:1 gluten-free baking blend. The texture will be nearly identical. For more gluten-free inspiration, try our vegan gluten-free chocolate cake recipe.
4. Mini Heart Shapes
Instead of round balls, shape your mixture into small hearts using a silicone mold or by hand. This takes extra time but creates an adorable valentine presentation similar to our vegan donut holes shaping technique.
Storage & Reheating Guide
Short-term Storage: Keep finished vegan valentine’s day red velvet cake pops in the refrigerator for up to 5 days. Store in airtight containers with parchment paper between layers to prevent sticking.
Long-term Storage: Freeze uncoated cake balls for up to 3 months in freezer bags. Thaw completely at room temperature before coating with chocolate.
Serving Temperature: Remove from refrigerator 5-10 minutes before serving for the best texture and flavor. The coating may develop condensation if left at room temperature too long in humid conditions.
Transport Tips: For gifting or parties, transport in a cool environment and store upright in a cake pop stand or styrofoam block.
Troubleshooting Your Vegan Valentine’s Day Red Velvet Cake Pops
1. Cake Balls Falling Off Sticks
Problem: Insufficient chilling time or chocolate coating too hot when inserting sticks. Solution: Always chill cake balls for full 20 minutes before inserting sticks. Test chocolate temperature on your wrist – it should feel warm, not hot.
2. Cracked Chocolate Coating
Problem: Temperature shock from very cold cake balls meeting hot chocolate. Solution: Let chilled cake balls sit at room temperature for 2-3 minutes before dipping. Ensure chocolate is warm, not hot.
3. Mixture Too Dry and Crumbly
Problem: Not enough frosting to bind the cake crumbs properly. Solution: Add frosting gradually, 1 tablespoon at a time, mixing thoroughly between additions until mixture holds together when squeezed.
4. Coating Too Thick or Lumpy
Problem: Chocolate cooled too much during the dipping process or wasn’t melted completely. Solution: Reheat chocolate in 15-second microwave intervals, stirring between each. Add 1/2 teaspoon coconut oil if needed.
5. Uneven Red Color
Problem: Food coloring wasn’t fully incorporated into the wet ingredients before mixing with dry ingredients. Solution: Always mix food coloring completely with wet ingredients first. Use gel coloring for more intense, even color distribution.
6. Cake Pops Too Sweet
Problem: Balance between cake and frosting is off, or chocolate coating is overpowering. Solution: Add a pinch of salt to your frosting or use dark chocolate coating instead of white chocolate.
Essential Equipment for Making Vegan Valentine’s Day Red Velvet Cake Pops
Must-Have Tools
- 8-inch square baking pan – Creates the perfect cake thickness
- Electric mixer (hand or stand) – Essential for smooth frosting
- Large mixing bowls (2-3 needed) – Prevents overflow during mixing
- Measuring cups and spoons – Accuracy is crucial for proper texture
- Cake pop sticks (12-count package) – Lollipop sticks work as substitute
- Microwave-safe bowl – For melting chocolate safely
- Wire cooling rack – Allows air circulation for even cooling
Helpful Additions
- Food processor – Makes crumbling easier (optional)
- Cookie scoop – Ensures uniform cake ball sizes
- Styrofoam block – Perfect for holding pops while coating sets
- Squeeze bottles – For decorative drizzling
Complete Shopping List
Baking Aisle
- All-purpose flour (5-lb bag)
- Granulated sugar (4-lb bag)
- Powdered sugar (1-lb box)
- Unsweetened cocoa powder (8-oz container)
- Baking soda (small box)
- Salt (table salt works fine)
- Red gel food coloring (preferred) or liquid
- Pure vanilla extract (small bottle)
Refrigerated Section
- Vegan butter (stick form preferred)
- Non-dairy milk (oat milk recommended for neutral flavor)
Specialty/Health Food Section
- Vegan white chocolate chips (8-oz bag minimum)
- Coconut oil (refined for neutral taste)
Other Items
- Apple cider vinegar (small bottle)
- Cake pop sticks (available in baking section or online)
- Parchment paper
Professional Success Secrets
1. Temperature Management is Everything Keep cake balls properly chilled and chocolate at the ideal warm (not hot) temperature. This prevents coating disasters and ensures professional-looking results every time.
2. Perfect Your Frosting Ratio The ideal vegan valentine’s day red velvet cake pops have just enough frosting to bind without being too wet. Practice the squeeze test – the mixture should hold together without being sticky.
3. Work in Small Batches Coat only 2-3 cake pops at a time to maintain optimal chocolate temperature and prevent the coating from becoming too thick or setting up in the bowl.
4. Quality Ingredients Make a Difference Invest in high-quality vegan chocolate chips and gel food coloring. These ingredients directly impact the final appearance and taste of your finished cake pops.
5. Practice Patience at Every Step Allow proper chilling time between each phase. Rushing the process often results in cake pops that fall apart or have imperfect coatings. The extra time investment pays off in professional results.
These vegan valentine’s day red velvet cake pops prove that plant-based desserts can be every bit as romantic and delicious as traditional treats. With their gorgeous red color, rich flavor, and elegant presentation, they make the perfect sweet gesture for your valentine celebration. The detailed instructions ensure that even complete beginners can create bakery-quality results in their own kitchen.