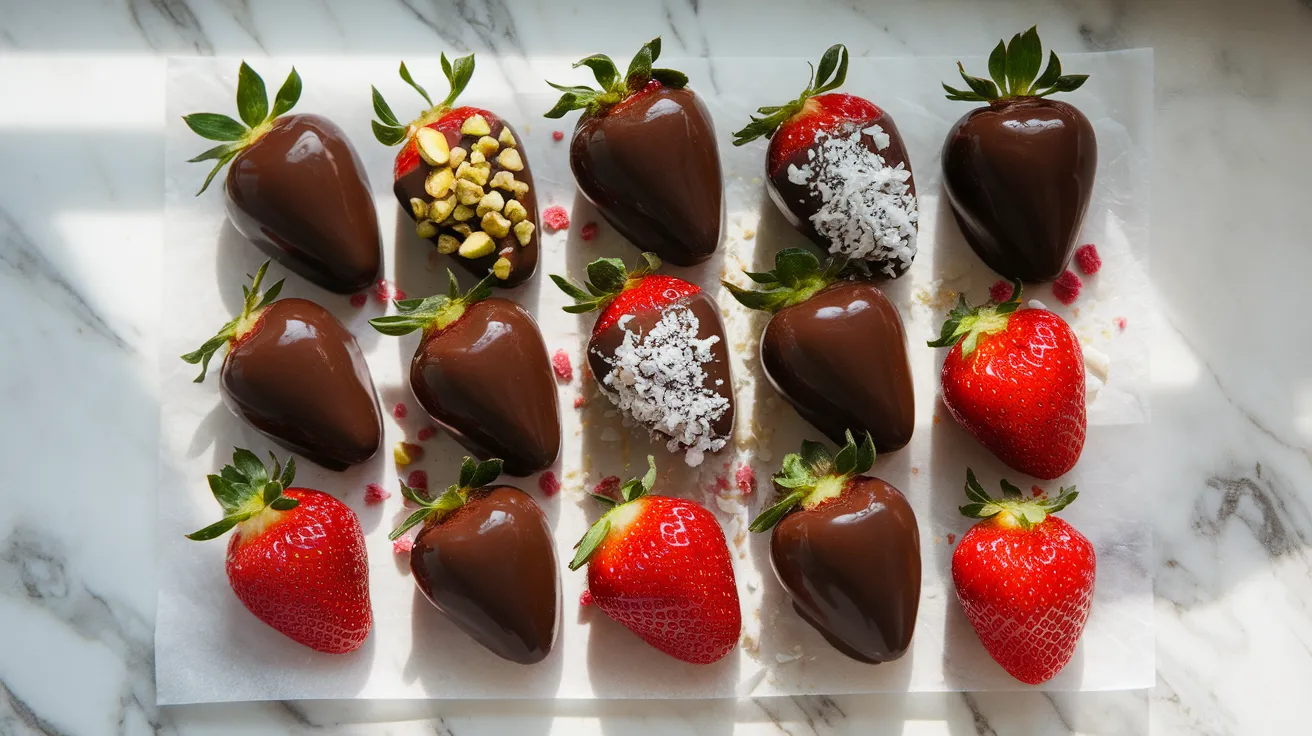
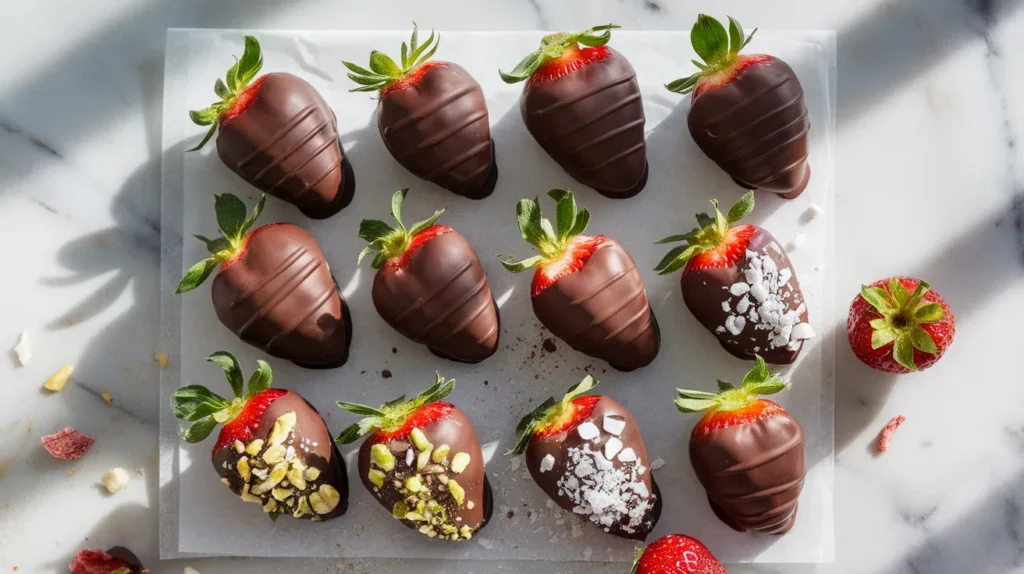
These luxurious vegan chocolate covered strawberries prove that plant-based desserts can be just as indulgent as traditional treats. Each berry gets wrapped in silky, rich chocolate that creates the perfect balance of sweet and tart flavors. This vegan chocolate covered strawberries recipe walks you through every single step, ensuring even first-time chocolate dippers achieve professional-looking results that will impress at any gathering.
Recipe Info
SERVES: 4 | PREP: 20 MIN | CHILL: 30 MIN | TOTAL: 50 MIN
Ingredients
Fresh Fruit
- 2 pounds fresh strawberries (choose large, firm berries with bright green tops)
- 1 tablespoon fresh lemon juice (helps remove wax and residue)
Vegan Chocolate Coating
- 12 ounces high-quality vegan dark chocolate, finely chopped
- 2 tablespoons refined coconut oil (unscented variety)
- 1 tablespoon full-fat coconut cream (adds richness and shine)
Optional Decorative Toppings
- 1/4 cup finely chopped pistachios
- 1/4 cup unsweetened shredded coconut, toasted
- 2 tablespoons crushed freeze-dried raspberries
- 1/4 cup mini vegan chocolate chips
Detailed Step-by-Step Instructions for Beginners
Phase 1: Preparing Your Strawberries (8 minutes)
1. Fill a large bowl with cool water and add the lemon juice. The acid in lemon helps remove any waxy coating that might prevent chocolate from sticking properly.
2. Gently place strawberries in the lemon water one at a time. Swirl them around for about 30 seconds, then lift each berry out carefully by its green stem.
3. Lay clean paper towels on your counter in a single layer. Place each washed strawberry on the paper towels, making sure berries don’t touch each other.
4. Take additional paper towels and very gently pat each strawberry completely dry. Pay special attention to the area around the stem and any crevices. Even the tiniest drop of water will cause your chocolate to seize up and become unusable.
5. Let strawberries air dry for another 5 minutes while you prepare your workspace. Room temperature, completely dry berries are essential for smooth chocolate coating.
6. Examine each strawberry and set aside any that have soft spots, bruises, or damaged areas. These imperfections can leak moisture into your chocolate.
Phase 2: Setting Up Your Dipping Station (5 minutes)
7. Line two large baking sheets with parchment paper. Make sure the parchment lies completely flat with no wrinkles or bubbles.
8. If using toppings, place each type in a separate shallow bowl near your dipping area. Arrange them in the order you plan to use them.
9. Have additional paper towels within reach for cleaning your hands between different toppings.
10. Set out a candy thermometer if you have one. This ensures your chocolate stays at the perfect temperature for smooth dipping.
Phase 3: Melting the Vegan Chocolate (10 minutes)
11. Using a sharp knife, chop your vegan chocolate into pieces no larger than a pencil eraser. Uniform small pieces melt evenly and prevent hot spots that can burn the chocolate.
12. Place chopped chocolate and coconut oil in a microwave-safe bowl. The coconut oil acts as a thinning agent and creates that glossy finish you see on professional chocolates.
13. Microwave on 50% power for 30 seconds. Remove and stir thoroughly with a dry spoon. The chocolate will still look mostly solid – this is normal.
14. Continue microwaving in 20-second intervals at 50% power, stirring completely between each interval. This gentle heating prevents the chocolate from burning or seizing.
15. After 2-3 intervals, the chocolate will start looking glossy and smooth. Continue until about 80% of the pieces are melted, then stop microwaving.
16. Stir vigorously for 1-2 minutes. The residual heat will melt the remaining pieces completely. This technique prevents overheating.
17. Add coconut cream and stir until completely incorporated. The mixture should be smooth, glossy, and coat the back of your spoon evenly.
18. Test the temperature with your thermometer – it should read between 110-115°F. If it’s too hot, let it cool for 2-3 minutes while stirring occasionally.
Phase 4: Mastering the Perfect Vegan Chocolate Covered Strawberries Dip (15 minutes)
19. Hold your first strawberry by the green stem, gripping it firmly but gently between your thumb and forefinger.
20. Tilt the bowl of melted chocolate slightly toward you. This creates a deeper pool of chocolate and makes dipping easier.
21. Lower the strawberry into the chocolate at a 45-degree angle, starting with the tip. This angle creates the classic teardrop shape of professional chocolate covered strawberries.
22. Dip the strawberry until about 3/4 of the berry is covered, leaving some red showing at the top near the stem. This creates an attractive color contrast.
23. Hold the strawberry in the chocolate for 2-3 seconds to ensure complete coating, then slowly lift it straight up.
24. Allow excess chocolate to drip back into the bowl for exactly 5 seconds. Count slowly: “one-thousand-one, one-thousand-two…” This timing prevents drips on your finished strawberry.
25. Gently tap the strawberry against the rim of the bowl 2-3 times to remove any excess chocolate that might create drips.
26. If adding toppings, immediately roll the wet chocolate-covered portion in your chosen topping while the chocolate is still liquid. Work quickly but gently.
27. Place the finished strawberry on your parchment-lined baking sheet, positioning it so the chocolate doesn’t pool around the base.
28. Repeat this exact process with each strawberry, working steadily but not rushing. If your chocolate begins to thicken, microwave it for 10 seconds and stir.
Phase 5: Creating Your Vegan Chocolate Covered Strawberries Display (5 minutes)
29. Once all strawberries are dipped, check your chocolate bowl. If you have leftover chocolate, transfer it to a small plastic bag.
30. Twist the bag tightly, then use scissors to cut a tiny hole in one corner – about the size of a pinhead.
31. Create decorative drizzles over your strawberries by moving the bag in quick back-and-forth motions about 4 inches above the berries.
32. For polka dot designs, hold the bag steady and squeeze tiny dots of chocolate onto each berry.
33. Work quickly with decorations – the base chocolate coating will set within 5-10 minutes at room temperature.
Phase 6: Setting Your Vegan Chocolate Covered Strawberries (30 minutes)
34. Place both baking sheets in the refrigerator immediately after finishing all decorations.
35. Chill for exactly 30 minutes. The chocolate should be completely set and no longer tacky when gently touched with a clean finger.
36. Remove from refrigerator and let sit at room temperature for 5 minutes before serving. This brings them to the perfect eating temperature where the chocolate has a satisfying snap.
Chef’s Notes for Perfect Vegan Chocolate Covered Strawberries
Temperature Mastery: Your vegan chocolate covered strawberries will only turn out perfectly when chocolate temperature stays between 110-115°F throughout the dipping process. Too hot and the chocolate will be thin and drippy; too cool and it won’t coat smoothly.
Berry Selection Strategy: The success of your vegan chocolate covered strawberries starts with choosing the right fruit. Look for berries that are deep red all over, have bright green tops, and feel firm when gently squeezed. Avoid any with white or pale patches, which indicate they’re underripe.
Timing Your Project: Plan to serve these vegan chocolate covered strawberries within 24 hours of making them. The berries continue to release moisture over time, which can make the chocolate coating soft and less appetizing.
Quality Investment: Using high-quality vegan chocolate with at least 60% cacao content makes an enormous difference in both flavor and how smoothly your chocolate melts and coats.
Nutrition Information (Per Serving)
- Calories: 285
- Protein: 4g
- Carbohydrates: 32g
- Fat: 18g
- Fiber: 6g
- Sugar: 24g
- Sodium: 8mg
Creative Variations for Vegan Chocolate Covered Strawberries
White Chocolate Elegance
Replace dark chocolate with vegan white chocolate for a sophisticated look that’s perfect for weddings or elegant dinner parties. The creamy sweetness creates a beautiful contrast with the tart berries.
Spiced Mexican Hot Chocolate Style
Add 1/2 teaspoon ground cinnamon and 1/4 teaspoon cayenne pepper to your melted chocolate. This creates a warming kick that transforms ordinary vegan chocolate covered strawberries into an exotic treat.
Coconut Lime Paradise
Mix 2 tablespoons fresh lime zest into your melted chocolate, then roll finished strawberries in toasted coconut flakes. This tropical twist pairs wonderfully with other citrus desserts like our vegan key lime pie.
Double Chocolate Luxury
First dip strawberries in vegan white chocolate and let set completely. Then dip the lower half in dark chocolate for a stunning two-tone effect that looks incredibly professional.
Storage & Serving Your Vegan Chocolate Covered Strawberries
Store your finished vegan chocolate covered strawberries in the refrigerator arranged in a single layer on parchment paper. Never stack them or let them touch, as this can damage the chocolate coating.
Cover loosely with plastic wrap, leaving some air circulation to prevent condensation from forming on the chocolate surface. Condensation creates those unsightly white spots that ruin the appearance.
These treats maintain their best quality for 48 hours when stored properly. After that, the berries begin releasing more moisture, which can soften the chocolate coating.
Never freeze vegan chocolate covered strawberries. Freezing makes the berries mushy and causes the chocolate to crack when thawed.
For the best eating experience, remove from refrigerator 10-15 minutes before serving to allow both the chocolate and strawberries to reach ideal temperature.
Troubleshooting Your Vegan Chocolate Covered Strawberries
Chocolate Slides Right Off the Strawberries
Problem: The chocolate coating won’t stick and just slides off the berries. Solution: This happens when berries aren’t completely dry or when chocolate temperature is wrong. Re-dry your berries thoroughly and check that chocolate temperature is 110-115°F.
Chocolate Becomes Thick and Grainy
Problem: Your smooth chocolate suddenly turns into a thick, clumpy mess. Solution: This is called “seizing” and happens when even tiny amounts of water contact the chocolate. Unfortunately, seized chocolate can’t be saved. Start over with fresh chocolate and ensure all equipment is bone dry.
White Spots Develop on Finished Strawberries
Problem: Your beautiful vegan chocolate covered strawberries develop white, chalky spots after storing. Solution: This is “chocolate bloom” caused by temperature fluctuations. Store at consistent refrigerator temperature and avoid moving between warm and cold environments.
Chocolate Coating Is Too Thin
Problem: You can see the strawberry color through the chocolate coating. Solution: Let the first thin coat set completely in the refrigerator, then dip each strawberry a second time for full coverage.
Berries Leak Juice Into the Chocolate
Problem: Red strawberry juice starts mixing with your chocolate, creating streaks and discoloration. Solution: This indicates overripe or damaged berries. Remove any berries with soft spots or bruises before dipping, and choose firmer fruit next time.
Essential Equipment for Vegan Chocolate Covered Strawberries
- Medium microwave-safe glass bowl (plastic can retain oils that affect chocolate)
- Digital candy thermometer (ensures perfect chocolate temperature every time)
- Two large rimmed baking sheets (prevents strawberries from rolling off)
- Parchment paper (never use wax paper, which can stick to chocolate)
- Multiple small shallow bowls (for organizing different toppings)
- Clean paper towels (for drying berries and cleanup)
- Small plastic bags (for creating decorative drizzles)
- Sharp knife (for chopping chocolate evenly)
Complete Shopping List for Vegan Chocolate Covered Strawberries
Produce Section
- 2 pounds fresh strawberries (choose large, firm berries)
- 1 fresh lemon (for cleaning berries)
Baking Aisle
- 12 ounces vegan dark chocolate (60% cacao or higher)
- Refined coconut oil (unscented)
- Optional decorative toppings (nuts, coconut, freeze-dried fruit)
Refrigerated/Natural Foods Section
- Full-fat coconut cream (for extra richness)
Paper Products
- Parchment paper (not wax paper)
- Paper towels
Five Success Secrets for Perfect Vegan Chocolate Covered Strawberries
1. Master temperature control by using a candy thermometer to maintain chocolate between 110-115°F throughout the entire dipping process. This single factor determines whether your coating will be smooth and glossy or thick and dull.
2. Work in small batches of 4-5 strawberries at a time rather than trying to dip all berries quickly. This prevents your chocolate from cooling too much and ensures each vegan chocolate covered strawberry gets the attention it deserves.
3. Invest in premium ingredients, especially your chocolate. High-quality vegan chocolate with at least 60% cacao content melts more smoothly, tastes richer, and creates a more professional-looking finish.
4. Perfect your timing by serving these vegan chocolate covered strawberries within 24 hours of making them. This ensures the chocolate coating stays crisp and the berries maintain their fresh texture and flavor.
5. Practice makes perfect with your dipping technique. The angle of entry, how long you hold the strawberry in chocolate, and your dripping technique all improve with repetition, so don’t expect perfection on your first try.