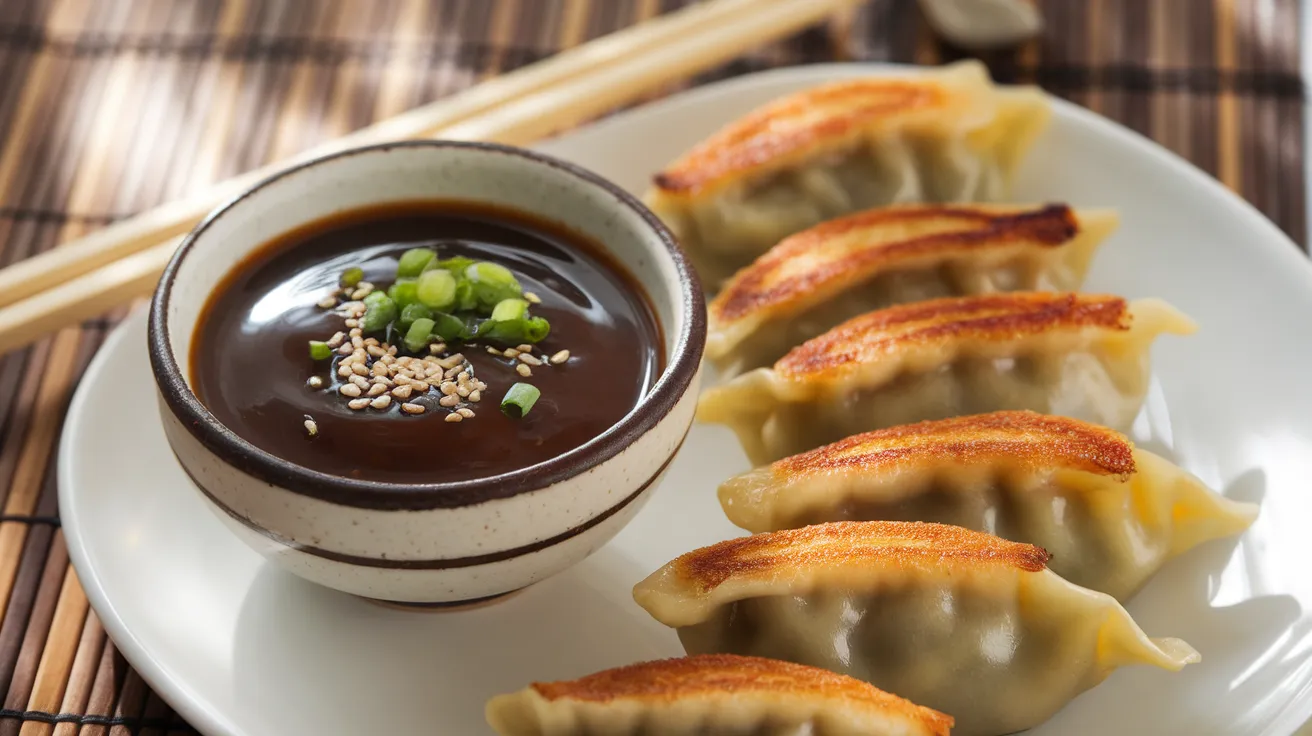
This sauce for potstickers transforms ordinary dumplings into restaurant-quality perfection. Our savory-sweet blend combines soy sauce, rice vinegar, and aromatic spices that complement every bite. This sauce for potstickers recipe takes just 20 minutes and creates enough delicious dipping sauce for four people to enjoy with their favorite dumplings.
Recipe Info Bar
SERVES: 4 | PREP: 5 MIN | COOK: 15 MIN | TOTAL: 20 MIN
Ingredients for Your Potsticker Sauce
Base Sauce Components
| Ingredient | Amount |
|---|---|
| Soy sauce (low sodium) | 1/2 cup |
| Rice vinegar | 3 tablespoons |
| Sesame oil | 1 tablespoon |
| Brown sugar | 2 tablespoons |
Aromatics & Flavor Enhancers
| Ingredient | Amount |
|---|---|
| Fresh ginger (minced) | 1 tablespoon |
| Garlic cloves (minced) | 3 cloves |
| Green onions (finely chopped) | 2 stalks |
| Red pepper flakes | 1/2 teaspoon |
Optional Finishing Touches
| Ingredient | Amount |
|---|---|
| Sesame seeds (toasted) | 1 teaspoon |
| Fresh cilantro (chopped) | 2 tablespoons |
| Chili oil | 1/2 teaspoon |
Detailed Step-by-Step Instructions for Potsticker Sauce
Phase 1: Preparation and Setup (5 minutes)
Step 1: Organize Your Workspace Clear a clean, flat surface near your stovetop. Arrange all ingredients within arm’s reach of your cooking area. This setup prevents scrambling for ingredients while cooking and ensures you don’t miss any components.
Beginner Tip: Read through the entire recipe once before starting. This familiarizes you with the process and prevents surprises.
Step 2: Prepare Your Aromatics First Using a sharp knife and cutting board, mince the ginger and garlic into very fine pieces, about 1/8-inch in size. The smaller the pieces, the better they’ll dissolve into your sauce for potstickers.
Why This Matters: Large chunks of ginger or garlic create unpleasant bites in your finished sauce. Take your time with this step.
Step 3: Prep the Green Onions Trim off the root ends and any wilted green parts from your green onions. Slice them into thin rings, about 1/4-inch thick. Separate the white and light green parts from the dark green tops – you’ll use them at different times.
Storage Tip: Save the dark green tops for garnish. They add beautiful color and fresh flavor.
Step 4: Measure Your Liquids Accurately Use proper measuring cups for liquids (the kind with a spout) and measure at eye level for accuracy. Pour the soy sauce, rice vinegar, and sesame oil into separate small bowls or measuring cups for easy addition later.
Accuracy Alert: Baking measurements matter less than sauce measurements. Too much soy sauce makes it too salty; too much vinegar makes it too sour.
Step 5: Choose the Right Pan Select a medium saucepan with a heavy bottom – this distributes heat evenly and prevents hot spots that could burn your sauce for potstickers. A 2-quart capacity works perfectly for this recipe.
Pan Selection: Avoid thin-bottomed pans that heat unevenly. Stainless steel or heavy aluminum works best.
Phase 2: Building the Sauce Base (7 minutes)
Step 6: Create the Foundation Place your saucepan on the stovetop (don’t turn on heat yet). Add the measured soy sauce, rice vinegar, and brown sugar to the cold pan. Using a wire whisk, stir vigorously for 60 seconds until the brown sugar completely dissolves.
Visual Cue: The mixture should look smooth without any sugar granules visible at the bottom of the pan.
Step 7: Test Your Sugar Dissolution Lift your whisk and let the liquid drip back into the pan. If you see any grittiness or undissolved sugar, continue whisking for another 30 seconds. This step ensures your finished sauce won’t have unpleasant grainy texture.
Troubleshooting: If sugar won’t dissolve, add 1 tablespoon warm water and whisk again.
Step 8: Add the Sesame Oil Properly Drizzle the sesame oil slowly around the edges of the liquid mixture while whisking continuously. This technique helps emulsify the oil into the sauce rather than leaving it floating on top.
Technique Tip: Think of making salad dressing – slow addition while whisking creates better integration.
Step 9: Start Your Heat Application Turn your burner to medium-low heat – this should be about 3 or 4 on a 10-point scale. Place the saucepan on the burner and watch for the first small bubbles to appear around the edges, which takes about 3-4 minutes.
Temperature Warning: Never use high heat for this sauce. It will scorch the garlic and create bitter flavors.
Phase 3: Developing Complex Flavors (8 minutes)
Step 10: Achieve the Perfect Simmer When you see consistent small bubbles breaking the surface (not a rolling boil), you’ve reached the perfect simmer. The liquid should bubble gently about once per second. Adjust heat up or down to maintain this rhythm.
What to Look For: Gentle, lazy bubbles that occasionally break the surface. Vigorous bubbling means your heat is too high.
Step 11: Add Aromatics at the Right Moment Add your minced ginger and garlic to the simmering sauce for potstickers. Immediately begin stirring with a wooden spoon or silicone spatula, moving constantly to prevent the aromatics from sticking to the bottom of the pan.
Timing is Critical: The aromatics should sizzle gently when they hit the liquid. If they don’t sizzle, increase heat slightly.
Step 12: Develop the Aromatic Base Continue stirring constantly for exactly 2 minutes. You’ll notice the aroma becoming more fragrant and complex. The raw garlic smell will mellow into something more savory and appealing.
Sensory Cues: The mixture should smell nutty and aromatic, not sharp or raw. This transformation indicates proper flavor development.
Step 13: Season with Heat Carefully Sprinkle the red pepper flakes evenly across the surface of your simmering sauce. Start with just 1/4 teaspoon if you’re sensitive to spice – you can always add more later, but you can’t take it out.
Spice Level Control: Red pepper flakes bloom in heat, so the spiciness will intensify during cooking.
Step 14: Execute the Long Simmer Reduce your heat to low (about 2 on a 10-point scale) and continue cooking for exactly 6 minutes. Stir every 90 seconds to prevent sticking and ensure even cooking. The sauce should barely bubble during this phase.
Consistency Check: The sauce will thicken slightly and darken in color. This concentration of flavors is what makes homemade sauce superior to store-bought.
Phase 4: Finishing and Final Touches (5 minutes)
Step 15: Cool Down Properly Remove the saucepan from heat completely and let it sit undisturbed for exactly 3 minutes. This cooling period stops the cooking process and brings the temperature down so fresh ingredients won’t wilt when added.
Temperature Test: The sauce should still be warm but not steaming hot. You should be able to hold your hand 2 inches above it comfortably.
Step 16: Add Fresh Elements Stir in the light green and white parts of your chopped green onions (save the dark green tops for garnish). These parts can handle the residual heat without becoming mushy.
Texture Goal: The green onions should remain slightly crisp, adding textural contrast to your sauce for potstickers.
Step 17: Perform Taste Adjustments Using a clean teaspoon, taste your sauce carefully (it may still be quite warm). Add more rice vinegar if you want more tang, more brown sugar if you need sweetness, or more red pepper flakes for heat.
Balancing Act: Great sauce has balanced sweet, salty, sour, and spicy elements. Adjust one element at a time and re-taste.
Step 18: Final Presentation Setup Transfer your sauce for potstickers to a attractive serving bowl using a ladle or large spoon. Sprinkle the reserved dark green onion tops and toasted sesame seeds over the surface for visual appeal.
Serving Temperature: This sauce is delicious served warm, at room temperature, or chilled. Each temperature brings out different flavor notes.
Chef’s Notes for Perfect Potsticker Sauce
Professional Tip #1: Toast your own sesame seeds in a dry skillet for 2 minutes over medium heat. Fresh-toasted seeds provide superior nutty flavor compared to pre-toasted varieties and elevate your homemade sauce for potstickers.
Professional Tip #2: Make this sauce for potstickers up to 3 days ahead. The flavors actually improve as they marry in the refrigerator, creating deeper, more complex taste profiles.
Professional Tip #3: Double the recipe and freeze half in ice cube trays. Pop out frozen cubes for instant sauce whenever you crave dumplings – each cube equals about 2 tablespoons of sauce.
Professional Tip #4: Substitute rice vinegar with black vinegar for earthier flavor, or try apple cider vinegar for subtle sweetness that complements pork-filled potstickers perfectly.
Nutrition Information (Per Serving)
- Calories: 45
- Protein: 2g
- Carbohydrates: 8g
- Fat: 4g
- Sodium: 920mg
- Sugar: 6g
Creative Variations for Your Sauce for Potstickers
Spicy Garlic Version
Add 2 extra garlic cloves and 1 teaspoon chili oil for heat lovers. This variation pairs exceptionally well with vegetable dumplings and creates a more intense flavor profile.
Sweet & Sour Style
Increase brown sugar to 3 tablespoons and add 1 tablespoon honey. Perfect for kids who prefer milder flavors or when serving with dessert-style dumplings.
Citrus-Infused Twist
Replace 1 tablespoon rice vinegar with fresh lime juice and add lime zest. This bright variation complements seafood potstickers beautifully. Try this technique with our sauce for onion rings dipping for similar citrus enhancement.
Smoky BBQ Fusion
Add 1/2 teaspoon smoked paprika and 1 teaspoon hoisin sauce. This unique blend works wonderfully as a crossover sauce, similar to our sauce for wings dipping approach.
Storage & Reheating Guide
Refrigerator Storage
Store leftover sauce for potstickers in an airtight container for up to 5 days. Glass containers work best as they don’t absorb flavors or stain from the soy sauce.
Freezer Storage
Freeze portions in ice cube trays for up to 3 months. Each cube equals approximately 2 tablespoons of sauce – perfect single-serving portions.
Reheating Instructions
Microwave frozen cubes for 30 seconds or let thaw naturally for 20 minutes at room temperature. Stir before serving to redistribute any separated oils.
Freshness Tips
Always use a clean spoon when serving to prevent contamination. The sauce may separate slightly during storage – this is normal, just stir before using.

Troubleshooting Your Sauce for Potstickers
Problem #1: Sauce Too Salty
Solution: Add 1 tablespoon brown sugar and 1 tablespoon rice vinegar to balance the saltiness. Taste and adjust gradually – don’t add too much at once.
Problem #2: Lack of Flavor Depth
Solution: Simmer the sauce 3-5 minutes longer to concentrate flavors. Add 1/2 teaspoon more sesame oil for richness and authentic Asian taste.
Problem #3: Too Thick Consistency
Solution: Thin with 1-2 tablespoons warm water while stirring. Add liquid gradually to achieve desired consistency for dipping.
Problem #4: Bitter Aftertaste
Solution: Usually caused by overheating garlic. Add 1 teaspoon honey to counteract bitterness and balance flavors in your sauce for potstickers.
Problem #5: Sauce Separates When Stored
Solution: This is completely normal. Simply whisk vigorously before serving, or blend briefly with an immersion blender for smooth texture.
Equipment Essentials
Required Tools
- Medium saucepan (2-quart capacity)
- Wire whisk for smooth blending
- Sharp knife for mincing aromatics
- Cutting board (preferably wood)
- Measuring cups and spoons
- Small serving bowl
Helpful Alternatives
- Immersion blender for ultra-smooth texture
- Fine-mesh strainer if you prefer smooth sauce
- Garlic press instead of mincing by hand
Shopping List by Store Section
Asian Foods Aisle
- Low-sodium soy sauce
- Rice vinegar
- Sesame oil
- Chili oil (optional)
- Sesame seeds
Produce Section
- Fresh ginger root
- Garlic bulbs
- Green onions
- Fresh cilantro (optional)
Baking Aisle
- Brown sugar
- Red pepper flakes
Success Secrets for Perfect Sauce for Potstickers
Secret #1: Always use low-sodium soy sauce to control saltiness. Regular soy sauce can overpower other delicate flavors in this balanced recipe and make your sauce for potstickers too intense.
Secret #2: Mince ginger and garlic immediately before cooking to preserve their potent oils and maximize flavor impact in your finished sauce.
Secret #3: Simmer at medium-low heat only – high heat destroys delicate flavors and can make the sauce bitter from scorched garlic and aromatics.
Secret #4: Make sauce 2-4 hours ahead when possible. Resting time allows all ingredients to harmonize and develop deeper, more complex flavors that enhance your potsticker experience.
Secret #5: Serve in small individual bowls rather than one large bowl. This prevents double-dipping and keeps the sauce for potstickers cleaner for longer enjoyment during your meal.
This homemade sauce for potstickers elevates any dumpling experience from ordinary to extraordinary. The perfect balance of salty, sweet, and tangy flavors makes every bite memorable and creates an authentic restaurant-quality dipping experience at home.