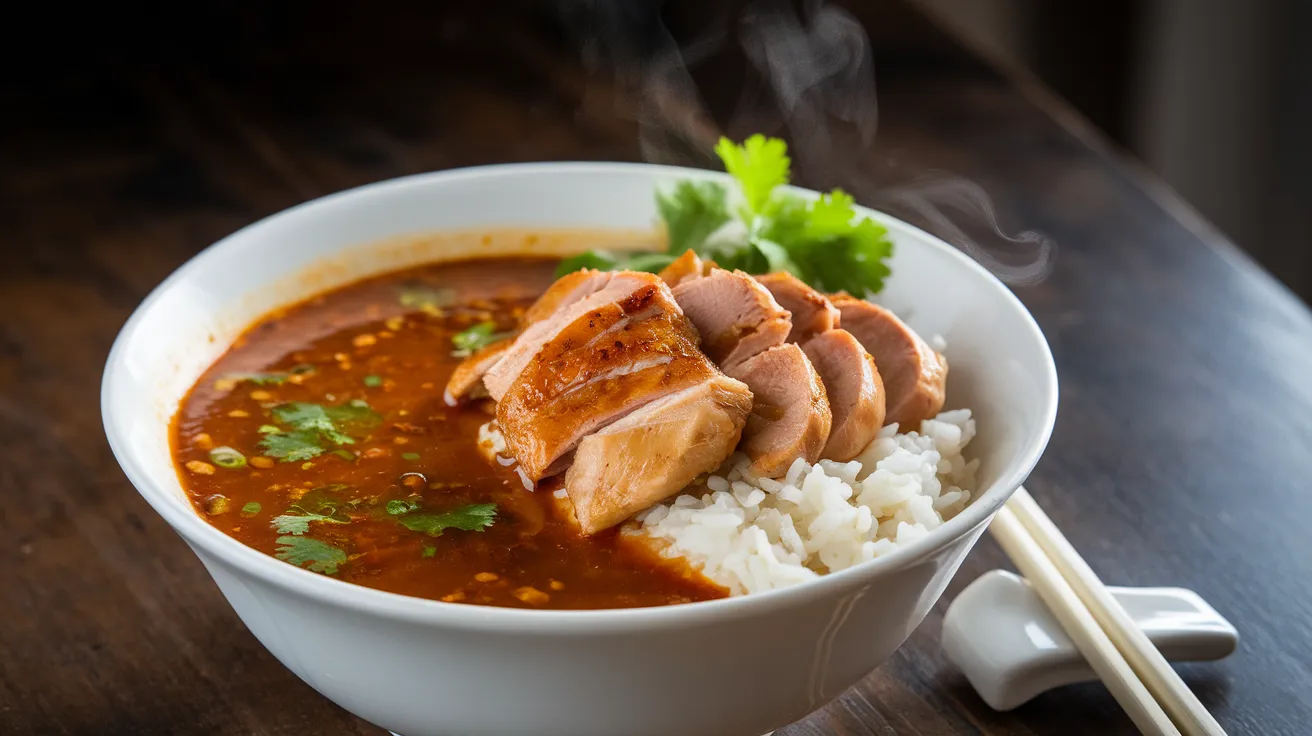
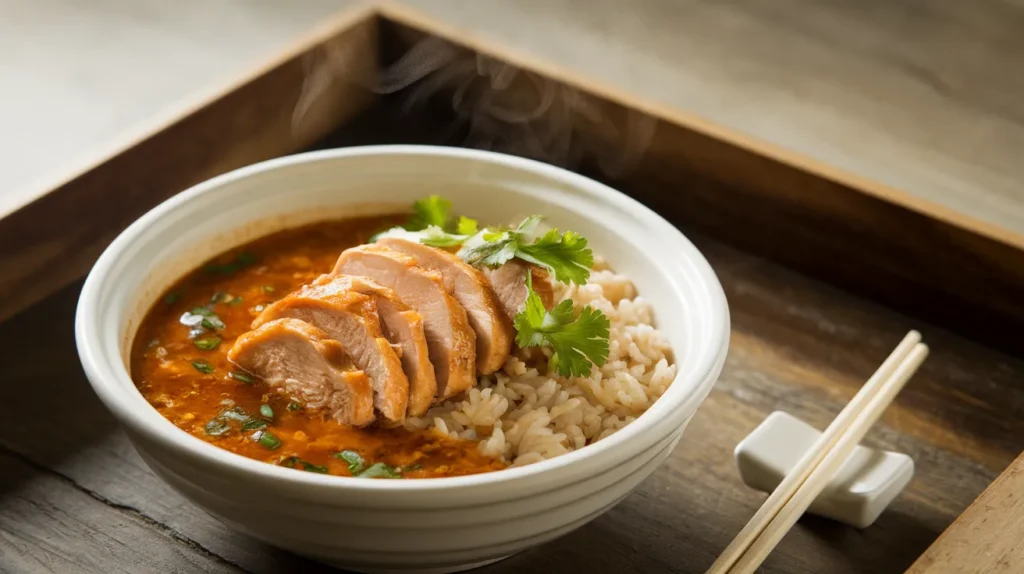
This foolproof sauce for rice and chicken elevates simple ingredients into a restaurant-quality meal that even novice cooks can master. Rich with savory umami flavors and aromatic spices, this sauce for rice and chicken creates the perfect coating that clings beautifully to every grain of rice and tender piece of chicken, delivering satisfying comfort food your whole family will request again and again.
SERVES: 4 | PREP: 15 MIN | COOK: 20 MIN | TOTAL: 35 MIN
Ingredients
For the Base Sauce
| Ingredient | Amount |
|---|---|
| Chicken broth | 2 cups |
| Soy sauce | 3 tablespoons |
| Garlic cloves, minced | 4 cloves |
| Fresh ginger, grated | 1 tablespoon |
| Sesame oil | 2 tablespoons |
| Rice vinegar | 2 tablespoons |
For the Thickener
| Ingredient | Amount |
|---|---|
| Cornstarch | 3 tablespoons |
| Cold water | 3 tablespoons |
For the Flavor Boost
| Ingredient | Amount |
|---|---|
| Green onions, chopped | 4 stalks |
| Honey | 2 tablespoons |
| Red pepper flakes | 1/2 teaspoon |
| Fresh cilantro, chopped | 1/4 cup |
Complete Step-by-Step Instructions for Beginners
Phase 1: Essential Preparation (8 minutes)
Step 1: Organize Your Workspace Clear your cooking area completely and gather every ingredient listed above. Place them on your counter in the order you’ll use them. This cooking method, called “mise en place,” prevents mistakes and ensures your sauce for rice and chicken turns out perfectly. Set out measuring spoons, cups, and bowls. Having everything ready prevents burning ingredients while you search for items.
Step 2: Prepare the Cornstarch Slurry In a small bowl, measure 3 tablespoons cornstarch and 3 tablespoons cold water. Use a fork to whisk them together vigorously for 30 seconds until the mixture looks like smooth milk with no lumps visible. This slurry will thicken your sauce later. Set this bowl aside where you can reach it easily. Important: Never use hot water – it creates instant lumps that ruin the texture.
Step 3: Prep Your Aromatics Properly Take 4 garlic cloves and remove the papery skin by crushing them lightly with the flat side of your knife, then peel. Mince the garlic by chopping it into tiny pieces about 1/8 inch in size. For the ginger, use a spoon to scrape off the brown skin, then grate it using the smallest holes on your box grater. You should have 1 tablespoon of wet, pulpy ginger. These fresh aromatics create the foundation flavor for your sauce.
Step 4: Prepare Fresh Herbs Wash 4 green onions under cold running water and pat completely dry with paper towels. Using kitchen scissors or a sharp knife, cut both the white and green parts into small pieces about 1/4 inch thick. For the cilantro, remove any thick stems and roughly chop the leaves until you have 1/4 cup. Keep these herbs separate – they go in at the very end to maintain their fresh flavor and bright green color.
Phase 2: Building the Flavor Base (7 minutes)
Step 5: Heat Your Pan Correctly Choose a 3-quart saucepan with a heavy bottom – this prevents hot spots that burn ingredients. Place it over medium heat (if your stove has numbers, use setting 5 out of 10). Let the pan heat for 1 minute until you can feel warmth when you hold your hand 4 inches above the surface. Add 1 tablespoon sesame oil and swirl the pan so oil covers the entire bottom. You’ll know it’s ready when the oil shimmers and moves easily around the pan.
Step 6: Cook the Aromatics Without Burning Add your minced garlic and grated ginger to the hot oil. You should hear a gentle sizzling sound immediately – this means your temperature is perfect. Using a wooden spoon, stir constantly for exactly 45 seconds. The garlic should become fragrant and barely start to turn golden, but never brown. If you see any browning, immediately reduce heat to medium-low. Why this matters: Burnt garlic tastes bitter and ruins the entire sauce.
Step 7: Add Liquids Gradually Pour the 2 cups chicken broth into your pan slowly in a steady stream while stirring with your wooden spoon. The mixture will bubble and steam – this is normal. Add 3 tablespoons soy sauce, 2 tablespoons rice vinegar, and the remaining 1 tablespoon sesame oil. Stir everything together for 30 seconds until completely combined. The liquid should be a rich brown color.
Phase 3: Sweetening and Balancing Flavors (4 minutes)
Step 8: Incorporate Honey Properly Measure 2 tablespoons honey and drizzle it slowly into your simmering sauce while stirring constantly in circular motions. Critical tip: Don’t dump honey in all at once – it can create sticky clumps. Keep stirring for 1 full minute to ensure the honey dissolves completely. Taste the sauce with a clean spoon – you should notice a pleasant balance of salty, sweet, and tangy flavors.
Step 9: Add Heat Level Sprinkle 1/2 teaspoon red pepper flakes evenly across the surface of your sauce. Stir them in completely. For beginners: Start with less spice – you can always add more, but you can’t take it out. If you’re sensitive to heat, use only 1/4 teaspoon initially. The flakes need time to release their heat into the liquid.
Step 10: Achieve Proper Simmer Increase your heat to medium-high (setting 7 out of 10). Watch the surface of your sauce carefully. You want to see small bubbles forming around the edges and occasionally breaking the surface – this is a gentle simmer. If large bubbles form rapidly, reduce heat immediately. Perfect simmer looks like: steady small bubbles with occasional gentle movement across the surface.
Phase 4: Thickening Your Sauce for Rice and Chicken (6 minutes)
Step 11: Re-whisk the Cornstarch Slurry Before using your prepared slurry, whisk it again vigorously with a fork for 15 seconds. Cornstarch settles quickly, and unincorporated starch creates lumps. The mixture should look smooth and milky again. Test: Pour a small amount from your spoon – it should flow smoothly without any grittiness.
Step 12: Add Thickener Gradually With your sauce simmering gently, pour the cornstarch slurry in a thin, steady stream while stirring constantly with your wooden spoon. Technique: Pour with one hand, stir with the other, never stopping the stirring motion. You should see the sauce begin thickening immediately. Continue stirring for 2 full minutes – this ensures even distribution and prevents lumps from forming.
Step 13: Test for Perfect Consistency Dip your wooden spoon into the sauce and lift it out. The sauce should coat the back of the spoon in a thin layer that doesn’t immediately drip off. Perfect thickness: When you draw your finger across the coated spoon, it should leave a clear line that doesn’t immediately fill back in. If too thin, simmer 1 minute longer. If too thick, add 2 tablespoons warm chicken broth and stir.
Step 14: Final Seasoning Adjustments Remove your pan from heat completely. Taste the sauce using a clean spoon each time. The sauce for rice and chicken should taste balanced – not too salty, sweet, or acidic. Adjustments: If too salty, add 1 teaspoon honey. If bland, add 1 teaspoon soy sauce. If too sweet, add 1 teaspoon rice vinegar. Make one adjustment at a time and taste after each change.
Phase 5: Finishing Touches (2 minutes)
Step 15: Add Fresh Elements Stir in your prepared green onions and fresh cilantro. These ingredients add color, freshness, and a final layer of flavor to your sauce. Mix gently for 30 seconds just to distribute evenly. Don’t overcook: Fresh herbs lose their vibrant flavor and color when heated too long.
Step 16: Rest and Serve Let your completed sauce for rice and chicken rest off the heat for 2 minutes. This allows the flavors to meld together and the temperature to stabilize for safe serving. The sauce should have a glossy appearance and coat ingredients beautifully when poured over rice and chicken.
Professional Chef’s Notes for Success
• Texture Mastery: This sauce for rice and chicken should flow like warm honey – thick enough to cling but thin enough to distribute evenly. If reheating, add liquid gradually to restore proper consistency.
• Make-Ahead Strategy: Prepare this sauce completely up to 3 days in advance. Store covered in the refrigerator and reheat gently over low heat, whisking frequently to prevent breaking.
• Chicken Pairing: This versatile sauce complements any chicken preparation – grilled breasts, roasted thighs, or crispy pan-seared pieces all benefit from these rich, balanced flavors.
• Rice Selection: Long-grain varieties like jasmine or basmati rice work best with this sauce for rice and chicken, as they absorb flavors without becoming mushy.
Nutrition Information (Per Serving)
- Calories: 95
- Protein: 3g
- Carbohydrates: 12g
- Fat: 4g
- Sodium: 890mg
- Fiber: 1g
Creative Sauce for Rice and Chicken Variations
Spicy Asian Fusion
Transform your basic recipe by adding 1 tablespoon sriracha and 1 teaspoon chili garlic sauce during the sweetening phase. This variation creates exciting heat that pairs beautifully with the techniques found in our sauce for rice bowls recipe.
Coconut Curry Style
Replace 1/2 cup chicken broth with canned coconut milk and add 1 teaspoon curry powder with the aromatics. This creates a creamy, exotic sauce for rice and chicken with tropical flavors.
Mediterranean Herb Blend
Double the cilantro and add 2 tablespoons fresh basil plus 1 tablespoon fresh oregano. This variation brings bright, garden-fresh flavors to your dish.
Protein-Enhanced Version
Whisk 2 tablespoons natural peanut butter into the sauce during thickening for added richness and protein. Similar umami-building techniques work well in our sauce for quinoa patties recipe.
Storage and Reheating Your Sauce
Refrigerator Storage
Cool sauce completely before transferring to airtight glass containers. Properly stored sauce keeps for up to 5 days refrigerated. Glass prevents flavor absorption that occurs with plastic containers.
Freezer Options
Pour cooled sauce into ice cube trays for perfect portion control. Once frozen solid, transfer cubes to freezer bags labeled with contents and date. Frozen sauce cubes keep up to 3 months.
Reheating Methods
Stovetop Method: Place sauce in saucepan over low heat, stirring frequently. Add 1-2 tablespoons warm broth if needed to restore original consistency. Microwave Method: Use 50% power setting, heating in 30-second intervals while stirring between each heating to prevent hot spots and separation.
Complete Troubleshooting Guide
Problem: Sauce Too Thin
Solution: Create a new slurry with 1 tablespoon cornstarch and 1 tablespoon cold water. Add slowly to simmering sauce while stirring constantly until desired thickness develops.
Problem: Lumpy Texture Appears
Solution: Pour sauce through a fine-mesh strainer to remove lumps, or use an immersion blender for 10 seconds. Prevention tip: Always whisk slurries completely before adding to hot liquids.
Problem: Overly Salty Taste
Solution: Balance excess salt by adding 1-2 tablespoons honey combined with 1 tablespoon rice vinegar. Sweetness and acidity naturally counteract sodium levels.
Problem: Lacks Flavor Depth
Solution: Enhance umami by adding 1 teaspoon fish sauce or 1 tablespoon white miso paste. These ingredients boost the overall flavor complexity of your sauce for rice and chicken.
Problem: Sauce Separates or Breaks
Solution: Remove from heat and whisk vigorously for 30 seconds. Return to very low heat while stirring constantly. Temperature shock commonly causes emulsion breaking.
Essential Equipment for Making Sauce
• Heavy-bottomed 3-quart saucepan – ensures even heat distribution and prevents burning • Wooden spoon – gentle stirring that won’t scratch your cookware • Wire whisk – essential for smooth slurry incorporation • Fine-mesh strainer – backup for removing any lumps • Small mixing bowls – for preparing slurries and organizing ingredients • Microplane grater – creates perfect ginger texture every time
Organized Shopping List
Fresh Produce Section
- Fresh ginger root (buy extra – it keeps well frozen)
- Garlic bulbs (choose firm, plump heads)
- Green onions (look for bright green tops)
- Fresh cilantro (avoid wilted or yellowing leaves)
Pantry and Condiment Aisles
- Low-sodium chicken broth (reduced sodium prevents over-salting)
- Soy sauce (choose naturally brewed varieties)
- Pure sesame oil (toasted versions add deeper flavor)
- Rice vinegar (milder than white vinegar)
- Cornstarch (for thickening)
- Pure honey (avoid corn syrup blends)
- Red pepper flakes (check freshness date)
Five Success Secrets for Perfect Results
1. Temperature Control Mastery: Maintain medium or lower heat throughout the entire cooking process. High temperatures break the emulsion and create grainy, separated sauce textures that ruin the final dish.
2. Fresh Ingredient Priority: Always choose fresh garlic and ginger over powdered alternatives. The aromatic compounds in fresh ingredients create the complex flavor base that makes this sauce for rice and chicken exceptional.
3. Proper Slurry Technique: Mix cornstarch with cold liquid exclusively and whisk until completely smooth before adding to hot sauce. This single technique prevents the lumpy disasters that frustrate beginning cooks.
4. Gradual Seasoning Approach: Build flavors slowly by tasting and adjusting throughout the cooking process. Layer seasonings rather than adding everything at once for more sophisticated, restaurant-quality results.
5. Perfect Timing Coordination: Begin cooking rice first, then start sauce preparation so both components finish simultaneously. Hot sauce poured over hot rice creates the ideal serving temperature and optimal flavor absorption.
This comprehensive sauce for rice and chicken recipe provides foolproof techniques that guarantee success for cooks of all skill levels. The detailed instructions remove guesswork while building confidence in fundamental cooking skills that apply to countless other recipes in your culinary journey.