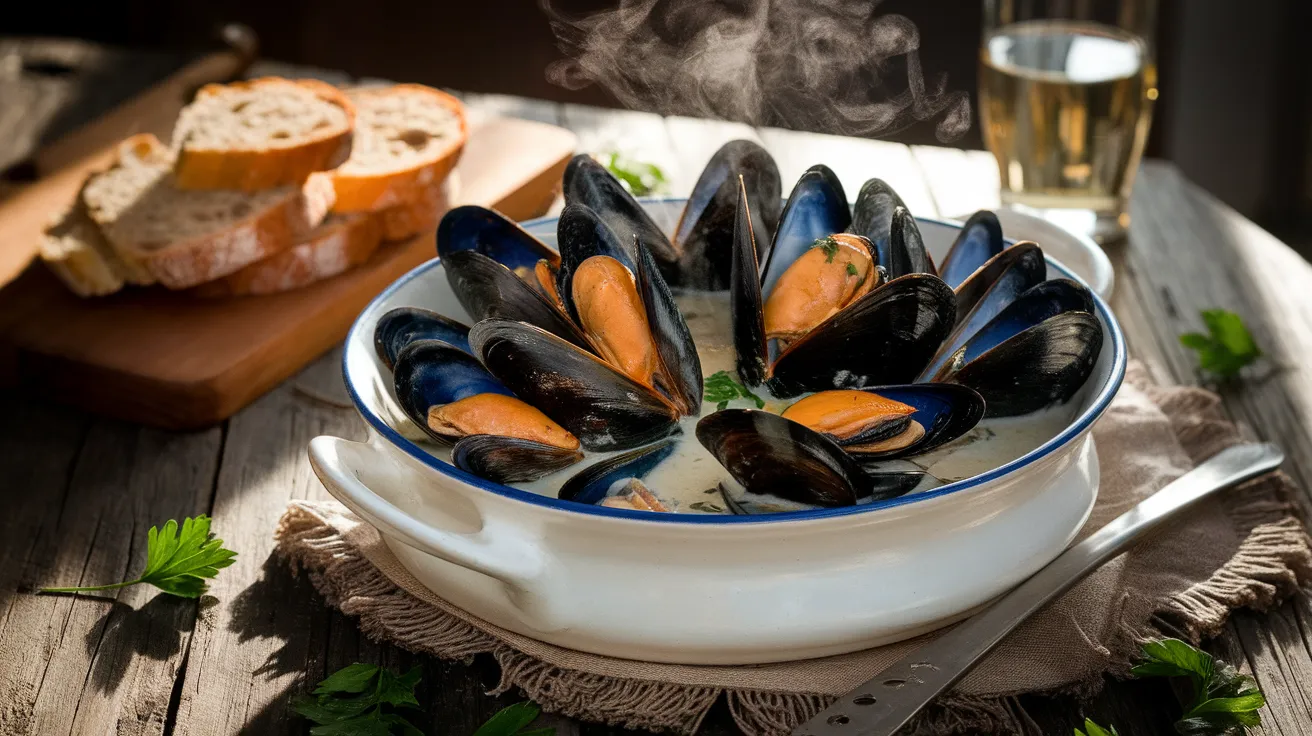
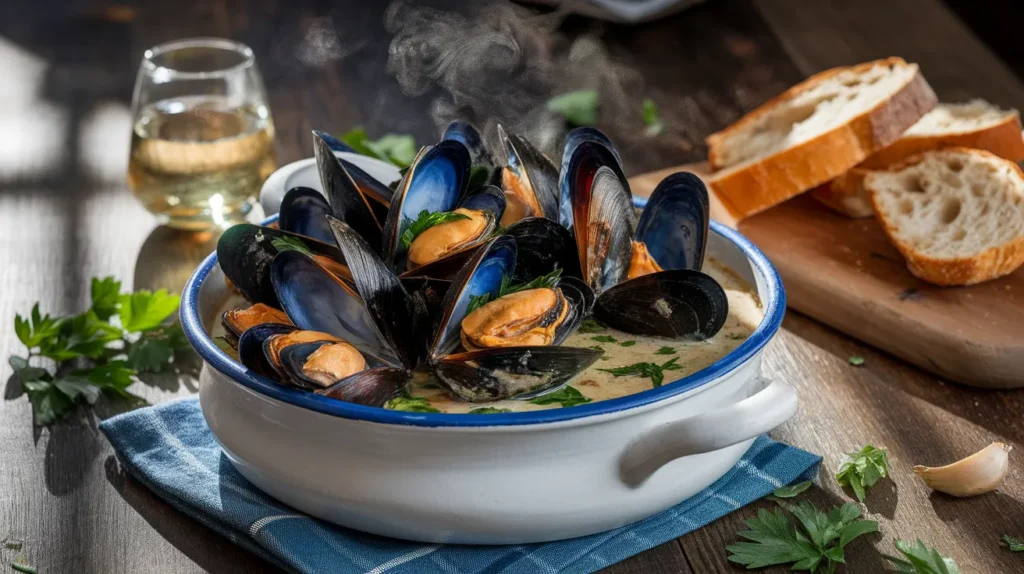
This luxurious sauce for mussels combines buttery garlic, white wine, and fresh herbs to create an unforgettable dining experience that rivals the best seafood restaurants. Our foolproof sauce for mussels recipe guides complete beginners through every step, ensuring restaurant-quality results with just 45 minutes of cooking time for four people.
Recipe Info Bar
SERVES: 4 | PREP: 20 MIN | COOK: 25 MIN | TOTAL: 45 MIN
Ingredients
Base Sauce Components
| Ingredient | Amount | Notes |
|---|---|---|
| Butter | 4 tablespoons | European-style preferred |
| Olive oil | 2 tablespoons | Extra virgin |
| Garlic cloves | 6 large | Minced fine |
| Shallots | 2 medium | Finely chopped |
| Dry white wine | 1 cup | Sauvignon Blanc works best |
| Heavy cream | ½ cup | Room temperature |
Seasonings & Aromatics
| Ingredient | Amount | Notes |
|---|---|---|
| Fresh parsley | ¼ cup | Chopped, plus extra for garnish |
| Fresh thyme | 1 tablespoon | Or 1 teaspoon dried |
| Bay leaves | 2 whole | Remove before serving |
| Red pepper flakes | ¼ teaspoon | Adjust to taste |
| Sea salt | 1 teaspoon | Or to taste |
| Black pepper | ½ teaspoon | Freshly ground |
| Lemon juice | 2 tablespoons | Fresh squeezed |
Mussel Preparation
| Ingredient | Amount | Notes |
|---|---|---|
| Fresh mussels | 2 pounds | Cleaned and debearded |
| Crusty bread | 1 loaf | For serving |
Detailed Step-by-Step Instructions for Beginners
Phase 1: Careful Mussel Preparation (15 minutes)
Step 1: Inspect Each Mussel Individually Place your 2 pounds of mussels in a large colander. Examine each mussel carefully – they should be tightly closed or close quickly when you tap them with your finger. If a mussel stays open when tapped, it’s likely dead and should be thrown away immediately. Look for any with cracked or broken shells and discard those as well. This step is crucial for food safety and the quality of your sauce for mussels.
Step 2: Remove the “Beard” from Each Mussel You’ll notice some mussels have tough, fibrous strings hanging out – these are called “beards.” Grab each beard firmly between your thumb and forefinger, then pull it toward the hinge of the shell (the pointed end) with a quick, firm motion. It should come out completely. Don’t worry if some mussels don’t have beards – that’s perfectly normal. Take your time with this step as any remaining beards will be unpleasant to eat.
Step 3: Scrub Shells Thoroughly Under Cold Water Using a stiff brush or the rough side of a sponge, scrub each mussel shell under cold running water. You’re removing sand, barnacles, and any other debris from the ocean. Pay special attention to the crevices where dirt likes to hide. The shells should look clean and smooth when you’re finished. This cleaning process ensures your sauce for mussels won’t have any gritty texture.
Step 4: Final Rinse and Quality Check Give all the cleaned mussels one final rinse under cold water. Do another quick inspection – any mussels that opened during cleaning and won’t close when tapped should be discarded. Place the clean mussels in a clean bowl and keep them refrigerated until ready to cook. Never store them in water or sealed plastic bags as they need to breathe.
Phase 2: Preparing Your Aromatics (10 minutes)
Step 5: Properly Mince Fresh Garlic Peel 6 large garlic cloves by crushing them gently with the flat side of your knife – the skins will slip right off. Cut each clove in half lengthwise and remove the green germ (the little shoot in the center) if present, as it can taste bitter. Slice each half into thin pieces, then rock your knife back and forth to chop into very fine pieces. The pieces should be no larger than rice grains. Finely minced garlic distributes evenly throughout the sauce for mussels and won’t burn as easily.
Step 6: Dice Shallots into Uniform Pieces Peel 2 medium shallots and cut off both the root and top ends. Slice each shallot in half from top to bottom. Lay each half flat on your cutting board and make horizontal cuts (parallel to the board) about ⅛ inch apart, stopping just short of the root end. Then make vertical cuts ⅛ inch apart, and finally slice across to create tiny, uniform dice. Uniform pieces cook evenly and prevent some pieces from burning while others remain raw.
Step 7: Prepare All Other Ingredients Wash and thoroughly dry your fresh parsley, then chop it finely – you should have about ¼ cup plus extra for garnish. If using fresh thyme, strip the tiny leaves from the stems by running your fingers backward along each stem. Measure out your wine, cream, and all seasonings, placing them in small bowls near your stove. This French technique called “mise en place” means everything is ready when you need it, which is essential since this sauce for mussels comes together quickly.
Phase 3: Building the Perfect Sauce Base (12 minutes)
Step 8: Heat Fats to the Perfect Temperature Place a large, heavy-bottomed pot (at least 6-quart capacity) over medium heat. Add 4 tablespoons of butter and 2 tablespoons of olive oil. The combination prevents the butter from burning while adding rich flavor. Watch the butter carefully – it will foam up initially, then the foaming will subside. When the foaming stops and the butter smells nutty and fragrant (about 2-3 minutes), you’re ready for the next step. If the butter starts turning brown, lower the heat immediately.
Step 9: Cook Shallots to Translucent Perfection Add your diced shallots to the hot fat mixture. You should hear a gentle sizzling sound – if it’s violent sizzling, lower the heat. Stir the shallots constantly with a wooden spoon for about 3 minutes. They’ll gradually change from opaque white to translucent (you can almost see through them) and will smell sweet and mild. Don’t let them turn brown or golden – that would make them bitter and overpower the delicate sauce for mussels. If they start browning, reduce heat and add a tablespoon of the white wine to cool the pan.
Step 10: Add Garlic with Extreme Care Add your minced garlic to the shallots and stir constantly for exactly 60-90 seconds. Garlic cooks much faster than shallots and can go from perfectly aromatic to burnt and bitter in seconds. You’ll know it’s ready when your kitchen fills with an incredible aroma and the garlic just starts to turn pale golden. If you smell any harsh or burnt odors, you’ve gone too far and should start this step over. The garlic should enhance your sauce for mussels, not overpower it.
Step 11: Bloom the Spices Properly Sprinkle in the red pepper flakes and fresh thyme leaves (or dried thyme). Stir constantly for 30 seconds to “bloom” these spices, which means heating them just enough to release their essential oils and intensify their flavors. You should smell the thyme becoming more aromatic and see the red pepper flakes darkening slightly. This technique adds incredible depth to your sauce for mussels that you can’t achieve by adding spices later.
Phase 4: Wine Reduction Mastery (8 minutes)
Step 12: Add Wine Safely and Effectively Remove the pan from heat temporarily (this prevents dangerous flare-ups if you’re using a gas stove). Slowly pour in 1 cup of dry white wine – it will bubble up vigorously at first, which is completely normal. Return the pan to medium-high heat. The initial bubbling will settle down after about 30 seconds. Never add wine to a screaming hot pan as it can cause dangerous splattering.
Step 13: Achieve the Perfect Wine Reduction Add your 2 bay leaves to the wine mixture now. Let the wine simmer actively – you should see steady bubbling across the surface. This process will take 5-6 minutes and serves two purposes: it cooks off the harsh alcohol flavor and concentrates the wine’s flavors. You’ll know it’s properly reduced when you have approximately ½ cup of liquid left and the smell changes from sharp and alcoholic to mellow and wine-like. Stir in half of your chopped parsley during the last minute of reduction.
Phase 5: Cooking Mussels to Perfection (10 minutes)
Step 14: Add Mussels with Proper Technique Turn the heat to high and carefully add all your cleaned mussels to the pot at once. Using a large spoon or tongs, gently toss the mussels to coat them with the wine mixture. Work quickly but gently – you want every mussel coated with the flavorful base that will become your sauce for mussels. Don’t worry if they don’t all fit perfectly at first; they’ll settle as they cook.
Step 15: Create the Perfect Steam Environment Cover the pot immediately with a tight-fitting lid. This step is crucial – the trapped steam will cook the mussels evenly and gently. Don’t lift the lid for the first 4 minutes, no matter how tempting it is to peek. The steam pressure and consistent temperature are what make mussels tender instead of tough. You’ll hear the mussels starting to pop open after about 3 minutes.
Step 16: Monitor the Opening Process After 4 minutes, quickly lift the lid and give the pot a gentle shake to redistribute the mussels. You should see about half of them opened already. Replace the lid and continue cooking for another 2-3 minutes. The mussels are done when 90-95% have opened wide and the meat looks plump and opaque. Any mussels that remain tightly closed after 8 minutes total should be discarded for food safety.
Step 17: Extract Maximum Flavor from Cooking Liquid Remove the pot from heat and use a slotted spoon or tongs to carefully transfer all the opened mussels to serving bowls, leaving behind all the flavorful cooking liquid. Don’t pour out this liquid – it’s the base for your sauce for mussels and contains incredible concentrated flavor from the shellfish. Cover the mussel-filled bowls with aluminum foil to keep them warm while you finish the sauce.
Phase 6: Creating the Silky Sauce Finish (8 minutes)
Step 18: Strain for Perfect Texture Pour the remaining cooking liquid through a fine-mesh strainer into a clean saucepan. This removes any sand or grit that may have come from the mussels, ensuring your sauce for mussels has a perfectly smooth texture. Rinse the original pot quickly and return the strained liquid to it. You should have about ¾ cup of intensely flavored liquid.
Step 19: Master the Cream Integration Place the pot with the strained liquid over medium-low heat. Make sure your heavy cream is at room temperature – if it’s cold, warm it in the microwave for 15 seconds. Starting with the pot off the heat, slowly drizzle the cream into the liquid while whisking constantly in small circles. Return to low heat and continue whisking for 1-2 minutes until the mixture is completely smooth and slightly thickened. The cream should integrate completely without any lumps or separation.
Step 20: Balance the Final Flavors Remove the bay leaves and discard them. Add the fresh lemon juice one tablespoon at a time, tasting after each addition. The acid brightens all the flavors and cuts through the richness. Add the remaining chopped parsley, then season with salt and freshly ground black pepper. Remember that mussels are naturally salty, so start with just a pinch of salt and add more if needed. The finished sauce for mussels should coat the back of a spoon and have a bright, balanced flavor that makes your mouth water.
Phase 7: Professional Plating and Service (3 minutes)
Step 21: Plate with Restaurant-Style Presentation Divide the warm mussels evenly among four deep bowls, arranging them so the open shells face upward to hold the sauce. Slowly pour the hot sauce for mussels over each portion, making sure each bowl gets equal amounts of the precious liquid. The sauce should pool in the bottom of the bowls and fill the open mussel shells beautifully.
Step 22: Final Garnish and Service Sprinkle additional fresh parsley over each bowl for color and freshness. Serve immediately with thick slices of crusty bread for soaking up every drop of the delicious sauce for mussels. Provide empty bowls for discarded shells, plenty of napkins, and small spoons for eating the sauce. Don’t forget finger bowls with warm water and lemon slices for cleaning hands between mussels.
Chef’s Notes for the Perfect Sauce for Mussels
Professional Tip 1: Temperature control is everything when making sauce for mussels. Keep heat at medium or lower when building the base – high heat will burn the garlic and ruin the entire dish.
Professional Tip 2: The quality of your wine directly affects the final taste. Use a wine you’d actually drink, as the reduction process concentrates both good and bad flavors.
Professional Tip 3: For restaurant-quality richness in your sauce for mussels, finish by whisking in an extra tablespoon of cold butter after removing from heat. This creates an incredibly silky texture.
Professional Tip 4: Save some extra sauce base (before adding mussels) for other seafood dishes. It keeps frozen for 3 months and works beautifully with scallops or shrimp.
Nutrition Information (Per Serving)
- Calories: 385
- Protein: 28g
- Carbohydrates: 12g
- Fat: 22g
- Fiber: 1g
- Sodium: 890mg
Creative Variations for Your Sauce for Mussels
Mediterranean Style: Replace cream with diced tomatoes and add fresh oregano and kalamata olives for a lighter, sun-drenched version of sauce for mussels that pairs beautifully with our sauce for grilled shrimp.
Asian Fusion: Substitute white wine with sake and add ginger, soy sauce, and sesame oil for an Eastern twist that transforms your traditional sauce for mussels into something completely unique.
Spicy Cajun: Increase red pepper flakes to 1 teaspoon and add paprika, cayenne, and andouille sausage for a Louisiana-style sauce for mussels with serious heat and bold flavors.
Herb Garden: Double the fresh herbs and add basil, chives, and tarragon for an intensely aromatic version that complements other seafood preparations like our sauce for octopus.
Storage & Reheating Your Sauce for Mussels
Refrigerator Storage: Leftover sauce for mussels keeps for 2 days in the refrigerator when stored in an airtight container. Remove mussels from shells before storing to save space.
Freezing: The sauce base (without mussels) freezes well for up to 3 months. Thaw overnight in the refrigerator before reheating gently over low heat.
Reheating Method: Warm your sauce for mussels gently in a saucepan over low heat, whisking frequently. Add a splash of wine or cream if the sauce appears too thick.
Safety Note: Consume reheated mussels within 24 hours and heat to 165°F internal temperature for food safety.
Troubleshooting Your Sauce for Mussels
Problem 1: Sauce is too thin Solution: Simmer uncovered for 2-3 minutes to reduce liquid, or whisk in a butter and flour mixture (beurre manié) for instant thickening of your sauce for mussels.
Problem 2: Cream curdled in the sauce Solution: Remove from heat immediately and whisk vigorously. Strain if needed and add cream more slowly next time at lower temperature to prevent breaking your sauce for mussels.
Problem 3: Mussels won’t open Solution: Increase heat and extend cooking time by 2-3 minutes. Discard any that remain closed – they may be dead and unsafe.
Problem 4: Sauce tastes too wine-heavy Solution: Continue simmering to cook off more alcohol, or balance with additional cream and a pinch of sugar in your sauce for mussels.
Problem 5: Garlic burned and tastes bitter Solution: Start over with the aromatics – burnt garlic will ruin the entire dish. Cook over lower heat next time.
Equipment Essentials
- Large heavy-bottomed pot (6-8 quart capacity)
- Fine-mesh strainer for removing sand
- Sharp chef’s knife for chopping aromatics
- Wooden spoon for stirring without scratching
- Slotted spoon for transferring mussels
- Measuring cups and spoons
- Cutting board (dedicated to seafood if possible)
Shopping List
Seafood Counter
- 2 pounds fresh mussels (buy day of cooking)
Dairy Section
- Butter (European-style preferred)
- Heavy cream
Produce Section
- Fresh garlic
- Shallots
- Fresh parsley
- Fresh thyme
- Lemons
Pantry Items
- Extra virgin olive oil
- Dry white wine
- Bay leaves
- Red pepper flakes
- Sea salt
- Black pepper
Bakery
- Crusty bread for serving
Success Secrets for Perfect Sauce for Mussels
1. Buy mussels the day you plan to cook them for the freshest flavor and best texture in your sauce for mussels. Store them in the refrigerator covered with a damp towel.
2. Never cover mussels with water or store in sealed plastic – they need to breathe. A breathable bag or bowl covered with a damp cloth works perfectly.
3. Taste and adjust seasoning at the very end – the natural saltiness of mussels varies, so your sauce for mussels may need different amounts of salt each time.
4. Serve immediately while hot and the sauce is at its silkiest consistency. This sauce for mussels doesn’t hold well and tastes best fresh from the pot.
5. Provide proper accompaniments – crusty bread, finger bowls with lemon water, and plenty of napkins make the eating experience much more enjoyable for your guests.