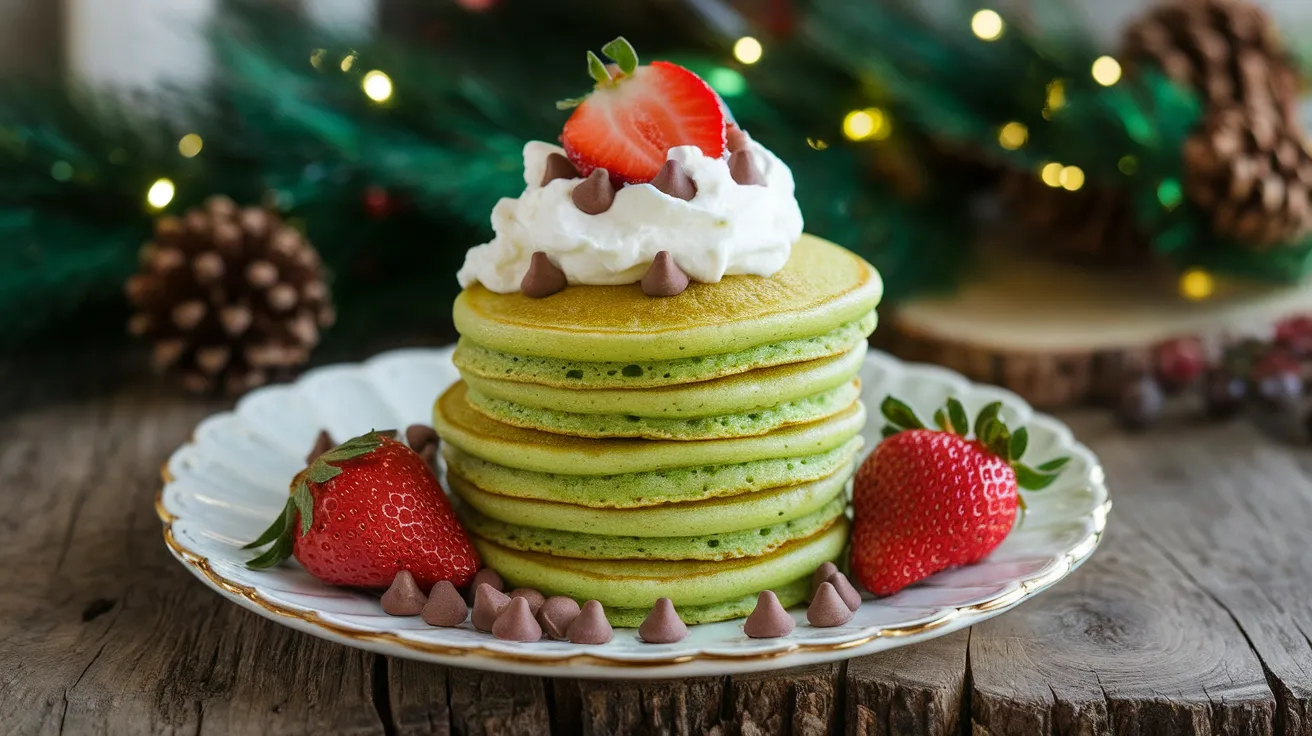
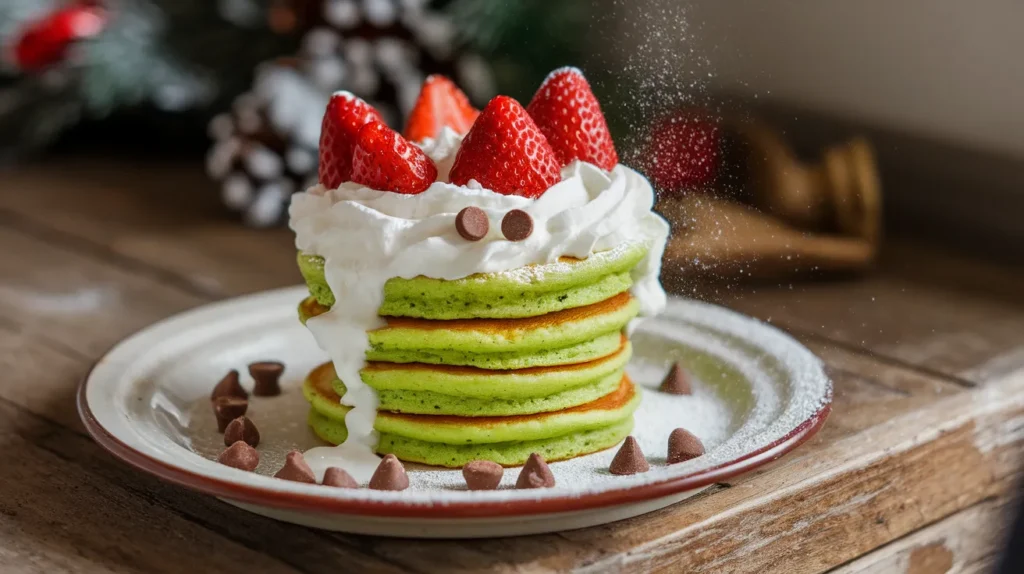
These vibrant green Grinch pancakes bring Christmas morning magic to your breakfast table with their fluffy texture and whimsical holiday charm. Perfect for creating memorable family moments, these Grinch pancakes combine classic pancake comfort with festive green coloring and playful toppings that transform ordinary breakfast into a Whoville celebration.
SERVES: 4 | PREP: 20 MIN | COOK: 25 MIN | TOTAL: 45 MIN
Ingredients for Perfect Grinch Pancakes
Pancake Base
| Ingredient | Amount |
|---|---|
| All-purpose flour | 2 cups |
| Granulated sugar | 3 tablespoons |
| Baking powder | 2 teaspoons |
| Salt | 1/2 teaspoon |
| Large eggs | 2 |
| Whole milk | 1 3/4 cups |
| Unsalted butter, melted | 4 tablespoons |
| Vanilla extract | 1 teaspoon |
| Green food coloring | 8-10 drops |
Grinch-Style Toppings
| Ingredient | Amount |
|---|---|
| Whipped cream | 1 cup |
| Fresh strawberries, sliced | 1 cup |
| Mini chocolate chips | 1/3 cup |
| Powdered sugar | 2 tablespoons |
Detailed Step-by-Step Instructions for Beginner Grinch Pancakes
Phase 1: Kitchen Setup and Prep (5 minutes)
Step 1: Prepare Your Cooking Surface Begin by setting your electric griddle to 375°F or placing a large non-stick skillet over medium heat on your stovetop. If using a stovetop, let it heat for 3-4 minutes. The key to perfect Grinch pancakes is consistent temperature – too hot and they’ll burn on the outside while staying raw inside, too cool and they’ll be tough and dense.
Step 2: Organize Your Workspace Gather all ingredients on your counter within arm’s reach. This French cooking technique called “mise en place” prevents rushing and ensures your Grinch pancakes turn out perfectly. Have two mixing bowls ready – one large for dry ingredients, one medium for wet ingredients.
Step 3: Test Your Baking Powder Since baking powder is crucial for fluffy Grinch pancakes, test its freshness by adding 1/2 teaspoon to 1/4 cup hot water. It should bubble vigorously immediately. If it doesn’t foam actively, your pancakes will be flat – replace the baking powder before continuing.
Phase 2: Creating the Perfect Batter (10 minutes)
Step 4: Combine Dry Ingredients Thoroughly In your large mixing bowl, add 2 cups flour, 3 tablespoons sugar, 2 teaspoons baking powder, and 1/2 teaspoon salt. Using a wire whisk, stir vigorously for 30 seconds until completely combined. This step is crucial – any unmixed flour pockets will create lumpy Grinch pancakes with uneven texture.
Step 5: Prepare the Wet Mixture Crack 2 large eggs into your medium bowl. Whisk them energetically for 1 full minute until they’re light yellow and slightly frothy. This incorporates air, making your Grinch pancakes exceptionally fluffy.
Step 6: Add Dairy and Flavorings Pour 1 3/4 cups whole milk into the whisked eggs, followed by 4 tablespoons melted butter (make sure it’s cooled slightly so it doesn’t scramble the eggs) and 1 teaspoon vanilla extract. Whisk until the mixture is smooth and the butter is completely incorporated with no visible streaks.
Step 7: Create That Signature Grinch Color Add 6 drops of green food coloring to your wet mixture and whisk. Gradually add 2-4 more drops until you achieve a vibrant Grinch green color. Remember, the color will lighten slightly during cooking, so aim for a shade slightly darker than your desired final result.
Step 8: The Critical Mixing Step Pour the green wet mixture into the dry ingredients all at once. Using a wooden spoon or rubber spatula (never a whisk at this stage), gently fold the ingredients together with 15-20 gentle strokes. Stop as soon as you can’t see dry flour – the batter should look lumpy and rough. Overmixing develops gluten, creating tough, chewy Grinch pancakes instead of tender ones.
Step 9: Let the Batter Rest Allow your batter to sit undisturbed for 5 minutes. This resting period lets the flour fully hydrate and the baking powder begin working, resulting in more tender Grinch pancakes.
Phase 3: Cooking Your Grinch Pancakes (15 minutes)
Step 10: Test Griddle Temperature Sprinkle a few drops of water onto your cooking surface. They should sizzle and dance immediately, then evaporate within 3-4 seconds. If they sit still, increase heat. If they disappear instantly, reduce heat slightly.
Step 11: Proper Greasing Technique Lightly brush your cooking surface with melted butter using a pastry brush, or spray with cooking spray. Wipe away any excess with a paper towel – too much fat will cause uneven browning and greasy Grinch pancakes.
Step 12: Portion Your Grinch Pancakes Using a 1/4 cup measuring cup, scoop batter and pour it onto the griddle from about 2 inches above the surface. This height helps the batter spread evenly into round shapes. Space each pancake 3 inches apart to prevent them from touching as they spread.
Step 13: Watch for the Perfect Flip Signal Cook for 2-3 minutes without moving or pressing the pancakes. Watch for small bubbles to form across the entire surface and for the edges to look set and slightly dry. When you lift a corner with your spatula, the bottom should be golden brown. These visual cues ensure perfectly cooked Grinch pancakes.
Step 14: Master the Flip Slide a wide spatula completely under each pancake, getting as close to the center as possible. In one confident, quick motion, flip the pancake over. Don’t worry if your first few aren’t perfect – flipping improves with practice. Cook the second side for 2-3 minutes until golden brown.
Step 15: Test for Doneness Gently press the center of a pancake with your spatula. It should spring back immediately when fully cooked. If it leaves an indentation, cook for another 30-60 seconds.
Step 16: Keep Pancakes Warm Transfer cooked Grinch pancakes to a plate and cover with aluminum foil. Place in a 200°F oven to keep warm while cooking remaining batches. This prevents the first pancakes from getting cold and soggy.
Phase 4: Assembly and Presentation
Step 17: Create Beautiful Stacks Place 2-3 warm Grinch pancakes on each serving plate, slightly overlapping for an appealing presentation.
Step 18: Add Whipped Cream Artistically Dollop 1/4 cup whipped cream on top of each stack, letting it cascade down the sides naturally to mimic the Grinch’s fluffy white fur.
Step 19: Arrange Festive Toppings Place strawberry slices around the plate and on top to represent the Grinch’s red Santa hat. Sprinkle mini chocolate chips strategically as eyes or buttons.
Step 20: Final Flourish Dust everything lightly with powdered sugar using a fine-mesh strainer for a magical, snowy effect that completes your Grinch pancakes presentation.
Chef’s Notes for Perfect Grinch Pancakes
Color Intensity: Gel food coloring provides more vibrant results than liquid without thinning your batter. Start conservatively – you can always add more, but you can’t take it away.
Texture Perfection: The secret to fluffy Grinch pancakes is minimal mixing. Lumpy batter equals tender pancakes – smooth batter creates tough, dense results.
Temperature Control: Maintain consistent medium heat throughout. Your cooking surface should stay at the same temperature for even browning and cooking.
Timing Strategy: Prepare all toppings before cooking begins. Hot Grinch pancakes wait for no one, and having everything ready ensures perfect serving temperature.
Nutrition Information (Per Serving)
- Calories: 485
- Protein: 12g
- Carbohydrates: 68g
- Fat: 18g
- Fiber: 2g
- Sugar: 24g
Creative Grinch Pancakes Variations
Double Chocolate Grinch Pancakes: Fold 1/2 cup mini chocolate chips into the batter before cooking for extra indulgence that kids absolutely love.
Protein-Powered Grinch Pancakes: Replace 1/4 cup flour with vanilla protein powder to boost nutrition while maintaining the signature fluffy texture.
Grinch Pancake Breakfast Sandwiches: Create festive sandwiches using cream cheese frosting and fresh berries between two smaller pancakes.
Gluten-Free Holiday Pancakes: Substitute with your favorite 1:1 gluten-free flour blend, similar to adaptations used in fruity pebble pancakes for dietary needs.
Storage & Reheating Your Grinch Pancakes
Refrigerator Storage: Store leftover Grinch pancakes in an airtight container for up to 3 days. Place parchment paper between layers to prevent sticking.
Freezer Storage: Freeze individual pancakes on a baking sheet until solid, then transfer to freezer bags for up to 2 months. Label with the date for best quality.
Reheating Methods: Toast frozen pancakes directly in a toaster for crispiest results, or warm refrigerated ones in a 350°F oven for 5 minutes. Avoid microwaving as it creates soggy texture.
Make-Ahead Strategy: Cook pancakes completely, cool, and freeze for busy mornings. This technique works wonderfully, just like preparing components for deep-fried oreos pancake mix ahead of time.
Troubleshooting Common Grinch Pancakes Problems
Problem: My Grinch Pancakes Turn Out Gray Instead of Bright Green Solution: This happens when food coloring is added too early or mixed too vigorously. Add coloring to wet ingredients only, and use gel coloring for better color retention during cooking.
Problem: Pancakes Are Dense and Heavy Solution: Check your baking powder expiration date and measure flour correctly by spooning it into cups and leveling. Most importantly, avoid overmixing – lumpy batter is your friend.
Problem: Grinch Pancakes Burn Before Cooking Through Solution: Lower your heat to medium-low and be patient. Thick pancakes need gentle, consistent heat to cook evenly throughout without burning.
Problem: Green Color Fades During Cooking Solution: Use gel food coloring instead of liquid, and add 2-3 extra drops to compensate for color loss during the cooking process.
Problem: Pancakes Stick to the Griddle Solution: Ensure your cooking surface is properly preheated and lightly greased before each batch. Clean any buildup between batches with a paper towel.
Essential Equipment for Grinch Pancakes
- Large mixing bowl (at least 3-quart capacity)
- Medium mixing bowl
- Wire whisk for dry ingredients
- Wooden spoon for gentle mixing
- 1/4 cup measuring cup for portioning
- Electric or stovetop griddle
- Wide spatula for easy flipping
- Fine-mesh strainer for powdered sugar dusting
Organized Shopping List for Grinch Pancakes
Dairy Section
- Large eggs (1 dozen)
- Whole milk (half gallon)
- Unsalted butter (1 stick)
- Heavy whipping cream or pre-made whipped cream
Pantry Aisle
- All-purpose flour (5-pound bag)
- Granulated sugar
- Baking powder
- Salt
- Pure vanilla extract
- Powdered sugar
Baking Aisle
- Green gel food coloring
- Mini chocolate chips
Produce Section
- Fresh strawberries (1 pound container)
Five Success Secrets for Perfect Grinch Pancakes
1. Temperature Consistency: Maintain steady medium heat throughout cooking. Fluctuating temperature creates unevenly cooked Grinch pancakes with tough textures.
2. Never Press Down: Resist the urge to press pancakes with your spatula while cooking. This removes crucial air bubbles and creates dense, flat results.
3. Fresh Leavening Power: Always use fresh baking powder within six months of opening. Old baking powder won’t provide proper lift for fluffy Grinch pancakes.
4. Room Temperature Ingredients: Allow eggs and milk to reach room temperature for easier blending and smoother batter without overmixing concerns.
5. Batch Strategy: Cook all Grinch pancakes first, then assemble with toppings so everything stays warm and maintains the best texture and presentation.