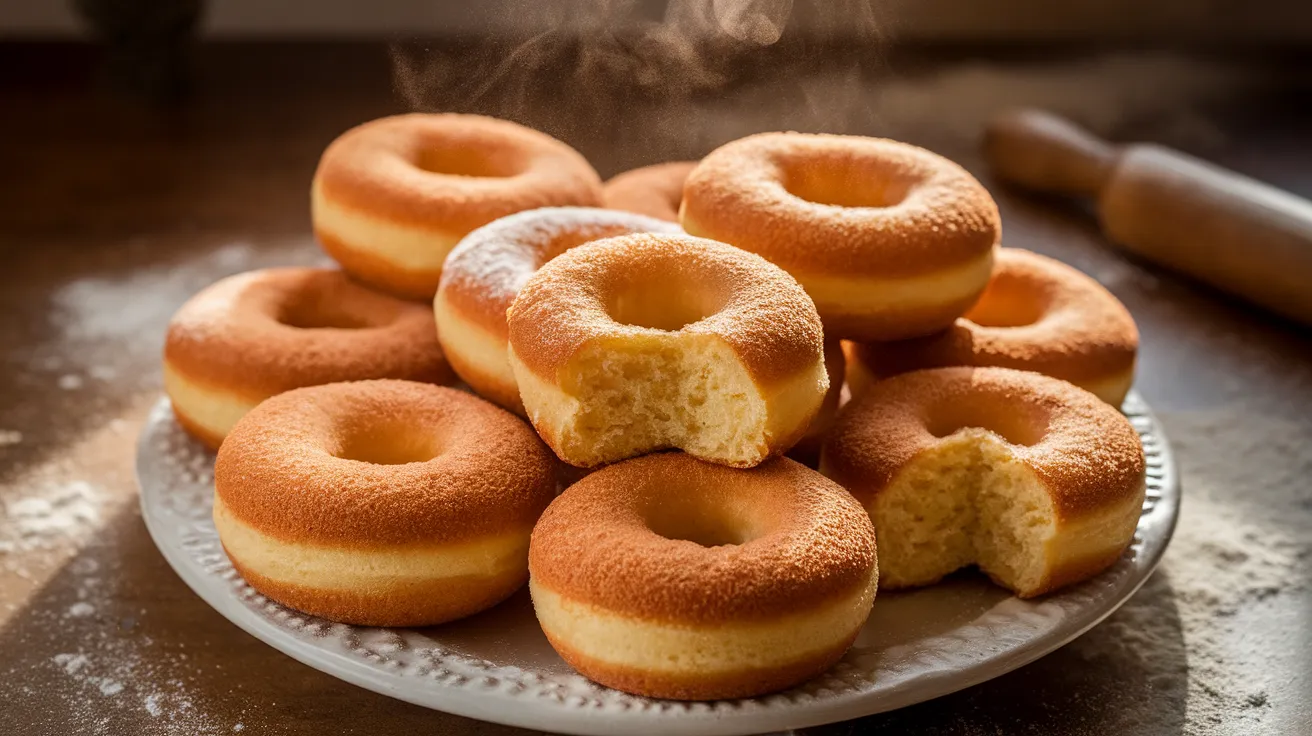
Learning how do you make donuts with pancake mix transforms ordinary breakfast ingredients into extraordinary treats that rival any bakery. This foolproof method shows beginners exactly how do you make donuts with pancake mix using simple techniques and common kitchen tools. With just a few pantry staples, you’ll master the art of creating four perfect servings of golden, fluffy homemade donuts.
Recipe Information
SERVES: 4 | PREP: 20 MIN | COOK: 25 MIN | TOTAL: 45 MIN
Ingredients
Donut Base
| Ingredient | Amount | Notes |
|---|---|---|
| Pancake mix | 2 cups | Any brand works |
| Granulated sugar | ¼ cup | For extra sweetness |
| Large eggs | 2 | Room temperature preferred |
| Whole milk | ½ cup | 2% milk also works |
| Melted butter | 3 tablespoons | Cooled slightly |
| Vanilla extract | 1 teaspoon | Pure vanilla best |
For Frying & Finishing
| Ingredient | Amount | Notes |
|---|---|---|
| Vegetable oil | 4 cups | For deep frying |
| Powdered sugar | 1 cup | For dusting |
| Ground cinnamon | 1 teaspoon | Optional coating |
How Do You Make Donuts With Pancake Mix: Complete Instructions
Phase 1: Create the Perfect Donut Dough (10 minutes)
Step 1: Prepare Your Workspace Start by clearing a large, clean workspace near your stove. Lay out all ingredients on the counter so everything is within easy reach. This organization prevents mistakes and makes the process smoother for beginners. Set out two large mixing bowls – one for dry ingredients and one for wet ingredients. Having everything ready before you start mixing ensures your dough comes together perfectly.
Step 2: Combine Dry Ingredients Properly In your first large bowl, measure exactly 2 cups of pancake mix using a dry measuring cup. Level the top with a knife for accuracy – too much pancake mix creates dense donuts. Add the ¼ cup granulated sugar to the same bowl. Using a wire whisk, stir these dry ingredients together for 30 seconds until the sugar disappears completely into the mix. This even distribution prevents sweet spots in your finished donuts and ensures consistent flavor throughout.
Step 3: Mix Wet Ingredients Carefully In your second bowl, crack both eggs and inspect them for any shell pieces. Beat the eggs gently with a fork until the yolks and whites blend completely – about 20 strokes. Pour in exactly ½ cup of milk, measuring at eye level for accuracy. Add the 3 tablespoons of melted butter (it should be warm but not hot enough to cook the eggs) and 1 teaspoon vanilla extract. Whisk all wet ingredients together for 45 seconds until the mixture looks smooth and uniform.
Step 4: Combine Wet and Dry (The Critical Step) Pour the wet mixture into the bowl with dry ingredients all at once. Using a wooden spoon or rubber spatula, gently fold the ingredients together with slow, sweeping motions. Stop mixing the moment you no longer see dry flour – this takes about 15-20 gentle stirs. The dough will look slightly lumpy and sticky, which is exactly right. Overmixing develops tough gluten strands that create chewy, dense donuts instead of light, fluffy ones.
Step 5: Rest the Dough for Success Cover the bowl with a clean kitchen towel and let the dough rest for exactly 5 minutes. This resting time allows the pancake mix to fully absorb the liquids, creating a more workable dough that holds together better when shaped. During this time, the leavening agents in the pancake mix begin activating, which contributes to lighter donuts. Use this time to prepare your work surface for shaping.
Phase 2: Master the Art of Shaping Donuts (8 minutes)
Step 6: Prepare Your Shaping Station Generously flour a large, clean work surface – use about ¼ cup of all-purpose flour and spread it evenly. The surface should look completely white with flour. Have extra flour nearby for dusting your hands and tools. Prepare a large baking sheet by lining it with parchment paper. This prevents shaped donuts from sticking and makes transferring them easier. Keep your donut cutter or round cutters within reach.
Step 7: Turn Out and Handle the Dough Scrape all the dough onto your floured surface using a rubber spatula. The dough will be softer and stickier than bread dough – this is normal. Flour your hands well, then gently pat the dough into a rough rectangle. Don’t knead or work the dough aggressively. Simply press it down with your palms until it reaches about ¾-inch thickness. Check thickness by standing a ruler next to the dough – proper thickness ensures even cooking.
Step 8: Cut Perfect Donut Shapes Dip your donut cutter (or 3-inch round cutter) in flour before each cut to prevent sticking. Press the cutter straight down through the dough without twisting – twisting seals the edges and prevents proper rising. Lift the cutter straight up and gently push the donut out onto your prepared baking sheet. If using two round cutters, cut the large circles first, then use a 1-inch cutter for the centers. Save all donut holes – they fry up into delicious bite-sized treats.
Step 9: Handle Scraps and Final Shapes Gather leftover dough scraps gently and press them together – don’t knead. Pat this recycled dough to ¾-inch thickness again and cut additional donuts. These “second cut” donuts may be slightly less tender but still delicious. You should get 8-10 donuts total plus holes. Arrange all shaped pieces on the parchment-lined baking sheet with space between each piece. Let them rest while you prepare the oil – this brief rest helps them hold their shape during frying.
Phase 3: Master Safe Oil Heating and Temperature Control (7 minutes)
Step 10: Set Up Your Frying Station Safely Choose a heavy-bottomed pot at least 4 inches deep – cast iron or enameled dutch ovens work perfectly. The pot should be wide enough to fit 2-3 donuts without crowding. Place the pot on your largest burner and keep pot holders nearby. Set up a cooling station next to the stove with a wire cooling rack set over paper towels. Have a slotted spoon and candy thermometer ready. Never leave hot oil unattended – safety comes first.
Step 11: Heat Oil to the Perfect Temperature Pour exactly 4 cups of vegetable oil into your pot – the oil should be 3-4 inches deep but not fill the pot more than halfway (oil expands when heated and bubbles when frying). Clip your candy thermometer to the side of the pot, ensuring the tip doesn’t touch the bottom. Turn heat to medium-high and watch the temperature climb gradually. This process takes 5-7 minutes. The target temperature is exactly 350°F – too cool creates greasy donuts, too hot burns the outside before the inside cooks.
Step 12: Test Oil Readiness Multiple Ways When your thermometer reads 350°F, double-check with the bread cube test. Drop a small piece of bread into the oil – it should sizzle immediately and turn golden brown in exactly 60 seconds. If it browns faster, the oil is too hot; if slower, it needs more heating. You can also drop a small piece of donut dough into the oil – it should float immediately and bubble actively around the edges. Maintain this temperature throughout frying by adjusting heat as needed.
Phase 4: Fry Donuts Like a Professional (15 minutes)
Step 13: Master the Art of Safe Donut Transfer Working with 2-3 donuts at a time, use a wide spatula to carefully lift each donut. Hold the spatula close to the oil surface and gently slide the donut into the oil away from yourself – never drop them in, which causes dangerous splashing. The donuts should float immediately and begin bubbling gently around the edges. If they sink, your oil isn’t hot enough. Space donuts apart in the oil so they don’t stick together. Have your slotted spoon ready for flipping.
Step 14: Perfect the Timing for Each Side Fry the first side for exactly 2-3 minutes, watching for a beautiful golden-brown color to develop. The donuts will puff up and the bottom will set. Don’t flip too early – undercooked donuts fall apart. Using your slotted spoon, gently turn each donut over. The cooked side should be deep golden brown, not pale yellow or dark brown. Fry the second side for 1-2 minutes until evenly golden. Total frying time per donut is 3-5 minutes depending on size.
Step 15: Monitor Oil Temperature Between Batches After each batch, check your thermometer and adjust heat to maintain 350°F. Adding cold donuts drops the oil temperature, so you may need to increase heat slightly. Let the oil return to proper temperature before adding the next batch – this takes 1-2 minutes. Rushing this step results in uneven cooking. If your oil gets too hot (over 375°F), remove the pot from heat briefly to cool down. Consistent temperature produces consistent results.
Step 16: Drain Donuts Properly for Best Texture Using your slotted spoon, lift each finished donut and hold it over the oil for 3-4 seconds to let excess oil drip back into the pot. Transfer donuts to your wire cooling rack, which allows air circulation and prevents soggy bottoms. Don’t stack hot donuts – they’ll steam each other and lose their crispy exterior. Let donuts cool for exactly 2-3 minutes before coating – this brief cooling time prevents coatings from melting off completely while keeping donuts warm enough for good adhesion.
Phase 5: Create Perfect Finishing Touches (5 minutes)
Step 17: Apply Coatings at the Optimal Time For powdered sugar coating, place 1 cup powdered sugar in a large paper bag. Add 2-3 slightly cooled donuts to the bag, fold the top closed, and shake gently for 10-15 seconds until evenly coated. For cinnamon sugar, mix ½ cup granulated sugar with 2 teaspoons ground cinnamon in a shallow bowl. Roll each warm donut in the mixture, turning to coat all surfaces. The slight warmth helps coatings stick better than coating cold donuts.
Step 18: Serve at Peak Quality Arrange finished donuts on a serving plate immediately after coating. These homemade treats are best enjoyed within the first hour when the contrast between the crispy exterior and fluffy interior is most pronounced. If serving isn’t immediate, store uncovered at room temperature to maintain texture. Check out our deep-fried Oreos pancake mix recipe for more creative frying ideas using similar techniques.
How Do You Make Donuts With Pancake Mix: Chef’s Professional Tips
Temperature Mastery: Learning how do you make donuts with pancake mix successfully depends entirely on oil temperature control. Invest in a reliable candy thermometer and monitor constantly. Oil that’s 25 degrees too cool doubles frying time and creates greasy results, while oil that’s 25 degrees too hot burns exteriors before centers cook through.
Pancake Mix Variations: Different pancake mix brands affect texture when you make donuts with pancake mix. Complete mixes with more sugar and fat create richer donuts, while basic mixes allow more control over sweetness. If using low-salt pancake mix, add an extra ¼ teaspoon salt to enhance flavor development and balance sweetness.
Dough Consistency Secrets: Perfect donut dough when you make donuts with pancake mix should be soft enough to shape but not sticky enough to cling to floured hands. If too wet, add pancake mix 1 tablespoon at a time. If too dry, add milk 1 teaspoon at a time. The dough should spring back lightly when poked but still feel tender.
Oil Quality and Reuse: Fresh oil produces the cleanest-tasting donuts when you make donuts with pancake mix. Strain cooled oil through fine mesh or cheesecloth and store in a cool, dark place. Properly filtered oil can be reused 2-3 times for similar recipes, but avoid mixing different types of fried foods in the same oil.
Nutrition Information (Per Serving)
- Calories: 385
- Protein: 8g
- Carbohydrates: 52g
- Fat: 16g
- Fiber: 2g
- Sugar: 18g
- Sodium: 420mg
How Do You Make Donuts With Pancake Mix: Creative Variations
Classic Glazed Perfection
Create bakery-style glazed donuts by whisking 1 cup powdered sugar, 3 tablespoons milk, and ½ teaspoon vanilla until smooth. The glaze should coat the back of a spoon but still drip easily. Dip each cooled donut face-down in glaze, allow excess to drip off for 5 seconds, then place on wire rack. The glaze sets in 10 minutes, creating that perfect glossy finish.
Rich Chocolate Dream Donuts
Transform your basic recipe by adding 2 tablespoons unsweetened cocoa powder to the dry ingredients and reducing pancake mix by 2 tablespoons. This creates deep chocolate flavor without affecting texture. Top with chocolate glaze made from melted chocolate chips mixed with cream, or dust with cocoa powder mixed with powdered sugar.
Cinnamon Sugar Classics
Mix ½ cup granulated sugar with 2 teaspoons ground cinnamon and ¼ teaspoon nutmeg for extra warmth. Roll donuts in this mixture while still warm from frying – the heat activates the spices and creates better adhesion. This coating method works better than dusting and provides more even coverage.
Filled Favorites for Special Occasions
Once donuts cool completely, use a piping bag fitted with a long, thin tip to inject fillings. Jam works best when slightly warmed and thinned. Pastry cream should be chilled and thick enough to pipe cleanly. Insert the tip halfway into the donut side and squeeze gently until you feel slight resistance, indicating the donut is full.
Storage & Reheating Guide
Room Temperature Storage: Store unfilled donuts in an airtight container with parchment paper between layers for up to 2 days. Filled donuts should be refrigerated and consumed within 24 hours for food safety. Never store warm donuts in closed containers – condensation creates soggy exteriors.
Freezing Instructions: Freeze completely cooled, unfilled donuts in freezer bags for up to 3 months. Remove excess air to prevent freezer burn. Thaw at room temperature for 30 minutes, then refresh in a 300°F oven for 5 minutes to restore crispness.
Proper Reheating Technique: Warm day-old donuts in a 300°F oven for 5-7 minutes to restore the crispy exterior. Never microwave donuts – the moisture creates chewy, tough textures. For glazed donuts, add fresh glaze after reheating.
Glaze and Coating Refresh: Day-old donuts absorb more glaze than fresh ones, so use this to your advantage. Re-glaze or re-coat stored donuts to restore moisture and improve flavor. The slightly stale texture actually holds coatings better than fresh donuts.

Complete Troubleshooting Guide for Beginners
Problem: Dense, Heavy Donuts
Root Causes: Overmixing the dough develops too much gluten, or expired pancake mix lacks active leavening agents. Old baking powder loses potency and won’t provide proper lift. Solutions: Mix dough just until ingredients combine – lumps are okay. Check pancake mix expiration dates and replace if over 6 months old. Store pancake mix in airtight containers to maintain freshness.
Problem: Greasy, Oil-Soaked Donuts
Root Causes: Oil temperature too low (under 340°F) or overcrowding the pot, which drops temperature rapidly. Solutions: Maintain steady 350°F temperature and fry only 2-3 donuts at a time. Let oil return to proper temperature between batches. Use a candy thermometer for accuracy – visual cues alone aren’t reliable.
Problem: Uneven Browning and Hot Spots
Root Causes: Uneven heat distribution in oil or donuts touching each other during frying. Solutions: Stir oil gently between batches to distribute heat evenly. Ensure donuts don’t touch in oil. Rotate donuts during frying if you notice uneven browning. Use a heavy-bottomed pot for better heat retention.
Problem: Donuts Falling Apart During Frying
Root Causes: Dough too wet, oil temperature too high (over 375°F), or not enough resting time before frying. Solutions: Add more pancake mix gradually if dough seems wet. Test oil temperature with bread cubes before adding donuts. Allow shaped donuts to rest 5 minutes before frying to firm up slightly.
Problem: Raw Centers with Cooked Exteriors
Root Causes: Dough rolled too thick (over 1 inch) or oil temperature too high, cooking outsides too quickly. Solutions: Keep dough at exactly ¾-inch thickness. Lower oil temperature to 340°F for thicker donuts and increase cooking time. Cut a test donut in half to check doneness.
Essential Equipment for Success
Must-Have Tools
- Heavy-bottomed pot (4+ inches deep) – maintains steady temperature and prevents hot spots
- Candy thermometer – accurate temperature control is crucial for success
- Donut cutter or two round cutters – creates uniform shapes for even cooking
- Wire cooling rack – prevents soggy bottoms and allows proper drainage
- Slotted spoon – safe handling of donuts in hot oil
Helpful But Optional
- Kitchen scale – for more precise ingredient measurements
- Stand mixer with paddle – easier dough mixing for larger batches
- Deep fryer – consistent temperature control but not necessary
- Dough scraper – helps handle sticky dough more easily
Complete Shopping List by Store Section
Dairy Section
- Large eggs (2 needed for recipe)
- Whole milk (½ cup needed)
- Butter (3 tablespoons needed, buy smallest package)
Pantry/Baking Aisle
- Pancake mix (2 cups needed – buy smallest box)
- Granulated sugar (¼ cup needed)
- Powdered sugar (1 cup needed for coating)
- Pure vanilla extract (1 teaspoon needed)
- Vegetable oil (4 cups needed for frying)
- Ground cinnamon (optional, 1 teaspoon needed)
Equipment (if needed)
- Candy thermometer
- Donut cutter or round cookie cutters
- Wire cooling rack
Professional Success Secrets
1. Temperature is Everything: Learning how do you make donuts with pancake mix successfully requires mastering oil temperature. Invest in a quality candy thermometer and never guess. Consistent 350°F oil temperature produces consistent results every single time.
2. Gentle Handling Creates Tender Results: Treat donut dough delicately throughout the process. Overmixing, overworking, or rough handling develops tough gluten strands that create dense, chewy donuts instead of light, fluffy ones.
3. Timing Your Ingredients: Room temperature eggs and milk blend more easily and create smoother batter. Take these ingredients out 30 minutes before cooking. Cold ingredients can cause the melted butter to solidify into lumps.
4. The Resting Game: Don’t skip the 5-minute dough rest – it allows complete hydration of the pancake mix and easier shaping. Similarly, let shaped donuts rest briefly before frying to help them hold their shape better in the oil.
5. Fresh Oil Makes Fresh Flavors: Start with clean oil for the best-tasting donuts. Reused oil from other fried foods imparts off-flavors. Strain and store oil properly between uses, and replace when it becomes dark or develops strong odors.