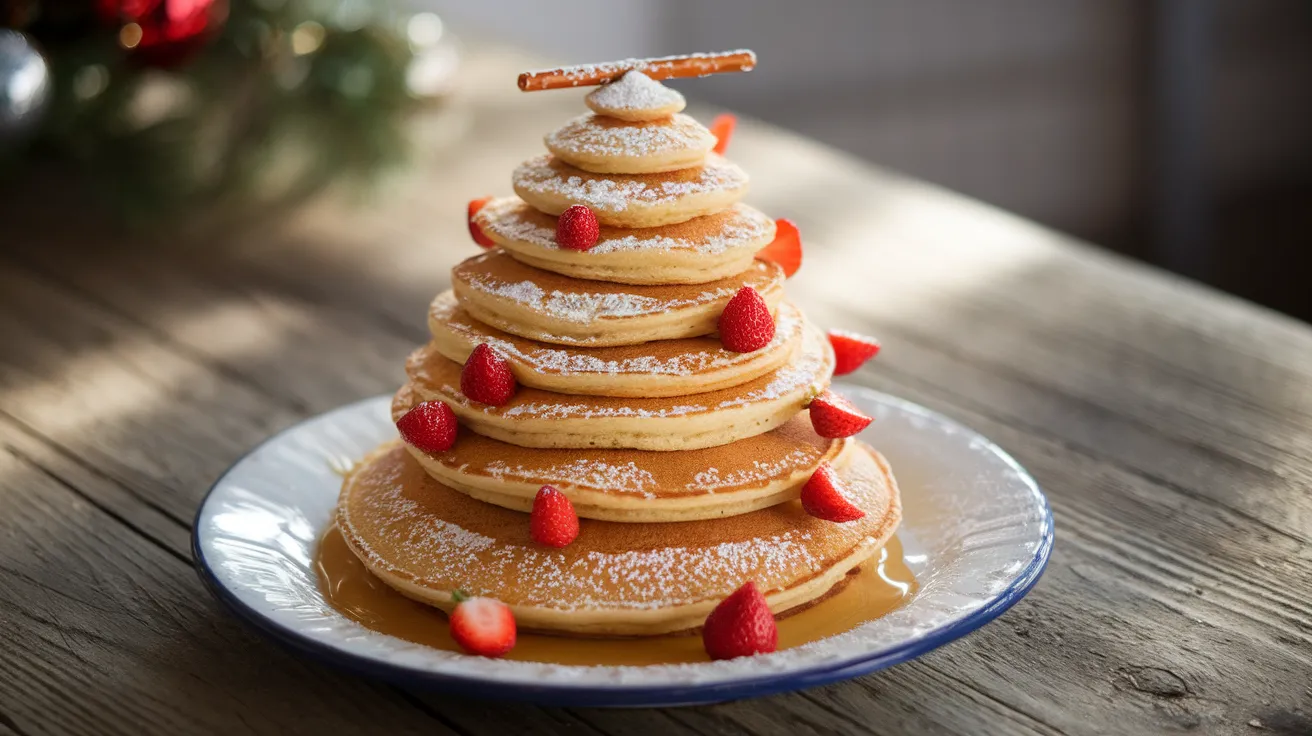
Create the most enchanting pancake Christmas tree that will make your holiday morning unforgettable with this step-by-step beginner’s guide. This festive pancake Christmas tree transforms simple ingredients into a towering breakfast masterpiece that’s surprisingly easy to make, even for first-time cooks.
Recipe Information
SERVES: 4 | PREP: 20 MIN | COOK: 25 MIN | TOTAL: 45 MIN
Ingredients
Pancake Batter
| Ingredient | Amount |
|---|---|
| All-purpose flour | 2 cups |
| Granulated sugar | 3 tablespoons |
| Baking powder | 2 teaspoons |
| Salt | 1 teaspoon |
| Large eggs | 2 |
| Whole milk | 1¾ cups |
| Melted butter | ¼ cup |
| Vanilla extract | 1 teaspoon |
Christmas Tree Assembly
| Item | Amount |
|---|---|
| Powdered sugar | ½ cup |
| Fresh strawberries | 8-10 berries |
| Maple syrup | ¼ cup |
| Pretzel stick | 1 large |
Detailed Step-by-Step Pancake Christmas Tree Instructions
Phase 1: Preparing Your Pancake Batter (8 minutes)
Step 1: Gather and Measure All Dry Ingredients Get out a large mixing bowl – it should hold at least 3 cups comfortably. Measure 2 cups all-purpose flour using the spoon-and-level method: spoon flour into your measuring cup, then level with a knife. Don’t pack or shake the cup. Add 3 tablespoons granulated sugar, 2 teaspoons baking powder, and 1 teaspoon salt to the same bowl.
Step 2: Mix Your Dry Ingredients Thoroughly Using a wire whisk, stir all dry ingredients together for 30 seconds until evenly distributed. You should see no streaks of baking powder or pockets of flour. Create a deep well in the center of this mixture using a large spoon – this well should go almost to the bottom of the bowl. This technique prevents lumpy pancake batter.
Step 3: Prepare Wet Ingredients in Separate Bowl Crack 2 large eggs into a medium bowl, checking each egg for broken shells before adding. Beat eggs with a fork until yolks and whites are completely combined – about 20 vigorous strokes. The mixture should be pale yellow with no streaks.
Step 4: Add Remaining Wet Ingredients Pour 1¾ cups whole milk into your beaten eggs. Add ¼ cup melted butter (it should be warm but not hot – test with your finger) and 1 teaspoon vanilla extract. Whisk everything together until smooth and well-combined. The butter should blend completely without creating clumps.
Step 5: Combine Wet and Dry Ingredients Pour your wet ingredient mixture directly into the well you created in the dry ingredients. Using a large spoon or rubber spatula, gently fold the mixture together with a scooping motion from bottom to top. Stop mixing the moment you no longer see dry flour – small lumps are perfectly normal and desired. Overmixing creates tough, dense pancakes.
Phase 2: Setting Up Your Cooking Station (5 minutes)
Step 6: Prepare Your Cooking Surface Heat a large non-stick griddle or heavy-bottomed skillet over medium heat for 3-4 minutes. The pan is ready when you sprinkle a few drops of water on the surface and they dance around before evaporating within 2 seconds. If they evaporate instantly, reduce heat slightly.
Step 7: Organize Your Tools and Ingredients Place your batter bowl near the stove with a ladle or large spoon for pouring. Have a large, thin spatula ready for flipping. Set out measuring cups: 1 cup, ½ cup, ⅓ cup, and a small cup for 2 tablespoons. Keep your warm oven (set to 200°F) ready with a large plate inside to keep finished pancakes warm.
Phase 3: Creating Your Pancake Christmas Tree Layers (20 minutes)
Step 8: Make the Foundation Pancake (8-inch) Lightly spray or brush your heated pan with cooking oil. Using a 1 cup measure, scoop batter and pour it slowly into the center of your pan in a steady stream. The batter should spread naturally into an 8-inch circle. If it doesn’t spread enough, gently shake the pan or use the back of your ladle to encourage spreading. Don’t worry if it’s not perfectly round.
Step 9: Monitor the First Pancake Watch for small bubbles to form on the surface – this takes 2-3 minutes. The edges should look set and slightly dry. When bubbles form and stay open (don’t fill back in), carefully lift one edge with your spatula to check the bottom. It should be golden brown, not dark brown or black.
Step 10: Perfect the First Flip Slide your spatula completely under the pancake, getting as close to the center as possible. In one confident motion, flip the pancake away from yourself. Don’t peek for 1-2 minutes – let the second side cook undisturbed. The second side typically cooks faster than the first. Transfer to your warm plate in the oven.
Step 11: Create the Second Layer (6-inch) Using your ½ cup measure, pour batter into the center of your pan. This pancake will be noticeably smaller than the first. Follow the same cooking process: wait for bubbles, check for golden color, flip confidently. The smaller size means slightly faster cooking – watch carefully to prevent burning.
Step 12: Form the Third Layer (4-inch) Measure ⅓ cup batter and pour into a compact circle. This smaller pancake cooks much faster – expect bubbles to form in 1-2 minutes instead of 2-3. The flip timing is quicker too. Keep this pancake warm with the others.
Step 13: Complete the Tree Top (2-inch) For the tiny top pancake, use just 2 tablespoons batter. Pour it in a small, concentrated circle. This delicate pancake needs constant attention – it will bubble and be ready to flip in under 1 minute. Flip gently as it’s more fragile than larger pancakes. Cook the second side for just 30-45 seconds.
Phase 4: Assembling Your Festive Pancake Christmas Tree (7 minutes)
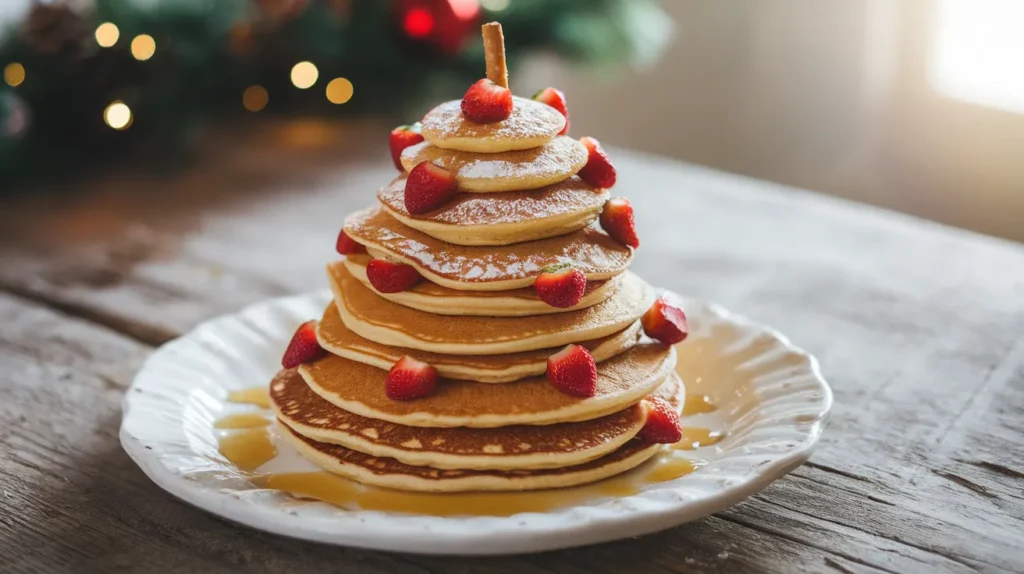
Step 14: Prepare Your Serving Plate Choose a large, flat serving plate – at least 10 inches wide to accommodate your pancake Christmas tree. Place it on your counter where everyone can see your creation. Have your powdered sugar, strawberries, and pretzel stick within easy reach.
Step 15: Build the Foundation Remove the 8-inch pancake from the oven and place it in the exact center of your serving plate. Press gently to ensure it lies flat against the plate. This largest pancake is your tree’s foundation – everything else depends on proper placement here.
Step 16: Stack the Second Layer Take your 6-inch pancake and center it perfectly on top of the large pancake. Look from above to ensure equal spacing on all sides. Press very gently – just enough to make contact but not enough to compress the fluffy texture.
Step 17: Add the Third Layer Place your 4-inch pancake on top, again centering carefully. Your pancake Christmas tree should now clearly show the classic triangular tree shape from the side. Each layer should be perfectly centered for the best visual impact.
Step 18: Crown with the Tree Top Gently place your 2-inch pancake at the very top. Take your pretzel stick and carefully push it down through the center of all four layers until it reaches the plate. This “trunk” holds everything together and adds authentic tree appeal. About ½ inch of pretzel should remain visible above the top pancake.
Step 19: Add the Magical Snow Effect Using a fine-mesh sieve, dust your entire pancake Christmas tree with powdered sugar. Hold the sieve 6 inches above the stack and tap gently to create even coverage. The sugar should look like fresh snow covering your tree – don’t worry about getting some on the plate.
Step 20: Decorate with Festive Ornaments Wash and hull your strawberries, then slice them in half lengthwise. Arrange these berry “ornaments” around each layer of your pancake Christmas tree, placing them randomly for a natural look. Press each piece gently against the pancake so it stays in place. Drizzle with maple syrup just before serving.
Chef’s Notes
• Perfect Pancake Christmas Tree Temperature: Maintain consistent medium heat throughout cooking. Your pan temperature directly affects the success of your pancake Christmas tree – too hot creates burnt outsides with raw centers.
• Batter Consistency Matters: The ideal batter for your pancake Christmas tree should ribbon off your spoon but not be too thick to pour smoothly. Adjust with milk or flour as needed.
• Make-Ahead Success: Prepare your pancake Christmas tree batter the night before for even fluffier results. Cold batter creates better texture due to flour hydration.
• Size Precision: Use actual measuring cups for consistent pancake Christmas tree layers. Guessing sizes leads to unstable, lopsided trees that won’t stack properly.
Nutrition Information (Per Serving)
- Calories: 385
- Protein: 12g
- Carbohydrates: 58g
- Fat: 12g
- Fiber: 2g
- Sugar: 18g
Creative Pancake Christmas Tree Variations
Chocolate Chip Christmas Tree
Transform your basic pancake Christmas tree into a chocolate lover’s paradise by folding ½ cup mini chocolate chips into the prepared batter. These create twinkling “lights” throughout each layer of your festive stack.
Cinnamon Spice Tree
Add 1 teaspoon ground cinnamon and 2 tablespoons brown sugar to your dry ingredients for a warm, spiced pancake Christmas tree. Top with cream cheese glaze instead of maple syrup.
Berry-Studded Holiday Stack
Fold ¾ cup mixed fresh berries directly into your batter before creating each layer. For more berry inspiration, try our orange cream pancakes that pair beautifully with seasonal fruits.
Protein-Packed Christmas Morning
Replace ½ cup flour with vanilla protein powder for a healthier pancake Christmas tree that still tastes indulgent. Explore our pancakes with fruit inside for additional nutritious breakfast options.
Storage & Reheating Your Pancake Christmas Tree
Refrigerator Storage: Store leftover pancake Christmas tree layers separately in airtight containers for up to 3 days. Place parchment paper between each pancake to prevent sticking and maintain texture.
Freezer Storage: Wrap individual pancakes from your pancake Christmas tree in plastic wrap, then store in freezer bags for up to 2 months. Label with the date for easy identification.
Reheating Methods:
- Oven Method: 350°F for 5-7 minutes, wrapped in foil
- Microwave: 30-45 seconds per pancake (don’t overheat)
- Toaster Method: Light setting for slightly crispy edges
Troubleshooting Your Pancake Christmas Tree
Problem: Pancake Christmas tree layers turn out flat and dense Solution: Test your baking powder freshness by mixing a small amount with hot water – it should foam vigorously. Avoid overmixing your batter.
Problem: Uneven browning ruins the appearance Solution: Adjust to medium-low heat and ensure proper preheating. Dark pans cook faster than light-colored ones, affecting your pancake Christmas tree’s appearance.
Problem: Your pancake Christmas tree keeps falling over Solution: Ensure each layer cools slightly before stacking and use a longer pretzel stick that goes completely through all layers.
Problem: Irregular shapes affect the tree silhouette Solution: Let batter rest 5 minutes to thicken naturally, or add 1-2 tablespoons flour for better pouring consistency.
Problem: Pancakes stick and tear when flipping Solution: Properly heat your pan and use adequate oil. A well-seasoned or non-stick surface is essential for pancake Christmas tree success.
Equipment Essentials for Pancake Christmas Tree Success
- Large non-stick griddle or heavy skillet
- Measuring cups (1 cup, ½ cup, ⅓ cup, ¼ cup)
- Large mixing bowls (2 minimum)
- Wire whisk for mixing
- Large, thin spatula for flipping
- Fine-mesh sieve for dusting
- Rubber spatula for folding
- Ladle for pouring batter
Shopping List for Your Pancake Christmas Tree
Dairy Section
- Large eggs (1 dozen)
- Whole milk (½ gallon)
- Unsalted butter (1 stick)
Pantry Items
- All-purpose flour (5 lb bag)
- Granulated sugar
- Baking powder (check expiration)
- Table salt
- Pure vanilla extract
- Powdered sugar
- Pure maple syrup
Produce Section
- Fresh strawberries (1 container)
Snack Aisle
- Large pretzel sticks (1 bag)
Success Secrets for the Perfect Pancake Christmas Tree
1. Temperature Mastery: Your griddle reaches perfect temperature when water droplets dance and disappear within 2 seconds of contact.
2. Gentle Mixing Technique: Fold wet into dry ingredients using a gentle scooping motion. Stop immediately when no dry flour remains visible.
3. Resting Period: Allow your pancake Christmas tree batter to rest 2-3 minutes before cooking for maximum fluffiness.
4. Strategic Timing: Start with the largest pancake first, as it takes longest to cook. This ensures all layers finish simultaneously.
5. Assembly Temperature: Stack your pancake Christmas tree while layers are still slightly warm for better adhesion and easier pretzel insertion.
Transform your holiday breakfast into a magical experience with this foolproof pancake Christmas tree recipe that brings joy to beginners and experienced cooks alike. Every bite delivers fluffy perfection while creating treasured family memories around your festive breakfast table!