Key Takeaways:
- Master butchering techniques with proper knife selection
- Create tender, flavorful venison cuts for four people
- Learn safe handling and storage methods
- Get professional results with home equipment
Why Your Knife Choice Matters for Deer Meat Success
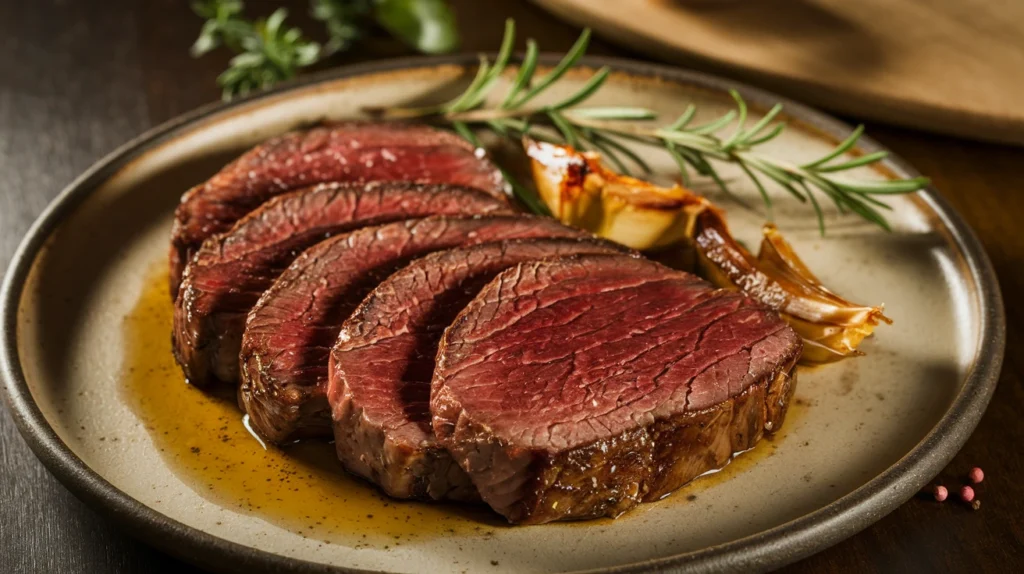
Getting the perfect deer meat dinner starts with the right knife. Many home cooks struggle with tough, chewy venison simply because they’re not using proper tools. This guide shows you exactly how to choose and use the right knives for mouthwatering results that serve four people perfectly.
Equipment & Ingredients
Essential Knives
- 8-inch fillet knife for precise cuts
- 6-inch hunting knife for initial breakdown
- Butcher knife for larger cuts
- Boning knife for detail work
Other Kitchen Tools
- Cutting board (wood or plastic)
- Meat thermometer
- Kitchen twine
- Sharp steel or knife sharpener
- Clean kitchen towels
- Food-safe gloves
Ingredients (Serves 4)
- 4 lbs deer meat (backstrap or tenderloin)
- 2 tablespoons olive oil
- 4 cloves garlic, minced
- 2 tablespoons fresh rosemary
- Salt and pepper to taste
Prep Time: 30 minutes
Cook Time: 20-25 minutes
Total Time: 55 minutes
Step-by-Step Instructions
Preparation Phase (30 minutes)
- Setting Up Your Workspace (5 minutes)
- Clear your counter completely
- Wipe surfaces with sanitizing solution
- Lay out a non-slip mat under your cutting board
- Place cutting board at hip height
- Set up a small bowl for scraps
- Position trash can within easy reach
- Keep paper towels nearby
- Knife Preparation (10 minutes)
- Check each knife’s edge by carefully running thumb perpendicular to blade
- If dull, use sharpening steel at 20-degree angle
- Make 5-6 passes on each side
- Test sharpness by slicing paper
- Sanitize blades in hot water (at least 140°F)
- Dry completely with clean towel
- Place knives on magnetic strip or clean towel to right of cutting board (if right-handed)
- Safety Setup (5 minutes)
- Put on cut-resistant gloves if available
- Cover with food-safe disposable gloves
- Ensure shoes are closed-toe
- Roll up long sleeves
- Tie back long hair
- Remove jewelry
- Check that cutting board doesn’t wobble
- Meat Preparation (10 minutes)
- Remove meat from refrigerator
- Place on bottom shelf if still packaged
- Unwrap carefully over sink
- Pat dry with paper towels (3-4 passes)
- Place on clean plate
- Let rest 20 minutes at room temperature
- Set timer to track resting time
Butchering Steps
- Initial Assessment (5 minutes)
- Look for natural seams in meat
- Identify direction of muscle fibers
- Note any silver skin or tough membranes
- Plan your cutting strategy
- Take photos if needed for reference
- Silver Skin Removal (10-15 minutes)
- Grip hunting knife with thumb on blade side
- Start at widest end of meat
- Slide knife tip under edge of silver skin
- Angle blade slightly upward
- Use smooth, steady strokes
- Keep blade against silver skin, not meat
- Work in 2-inch sections
- Remove all visible silver skin
- Check both sides of meat
- Portioning (15 minutes)
- Measure total length of meat
- Mark into 4 equal sections with knife tip
- Cut straight down with butcher knife
- Use one smooth stroke per cut
- Clean knife between cuts
- Check portion sizes
- Adjust if needed
- Place portions on clean plate
- Detail Work (20 minutes)
- Switch to fillet knife
- Check each portion for:
- Remaining silver skin
- Tough connective tissue
- Uneven areas
- Trim any visible fat
- Shape portions to even thickness
- Goal: 1.5-inch thickness throughout
- Clean knife frequently
- Keep trimmings for stock
- Final Preparation (10 minutes)
- Pat meat dry again
- Score fat cap in diamond pattern (if present)
- Make cuts 1/4 inch deep
- Space cuts 1 inch apart
- Tie with kitchen twine if needed:
- Cut 12-inch strings
- Space ties 1 inch apart
- Double-knot each tie
- Season all sides:
- 1 teaspoon salt per pound
- 1/2 teaspoon pepper per pound
- Pat seasonings in gently
Cooking Phase
- Pan Preparation (5 minutes)
- Choose heavy-bottomed pan
- Place pan on largest burner
- Set heat to medium-high
- Add olive oil
- Watch for oil to shimmer
- Test heat with water droplet
- Oil is ready when droplet dances
- Cooking Process (20-25 minutes)
- Place meat carefully away from you
- Listen for strong sizzle
- Don’t move meat for 5 minutes
- Check edge for browning
- Lift corner to check color
- Flip when golden brown
- Add garlic and rosemary
- Spoon herbs over meat
- Check temperature:
- Rare: 130°F (bright red center)
- Medium-rare: 135°F (pink center)
- Medium: 140°F (light pink center)
- Use meat thermometer in thickest part
- Clean thermometer between checks
- Resting Process (10 minutes)
- Remove meat with tongs
- Place on cutting board
- Tent loosely with foil
- Don’t wrap tightly
- Set timer for 10 minutes
- Don’t skip this step
- Keep warm in low oven if needed
- Slicing (5 minutes)
- Remove foil
- Find direction of meat grain
- Cut across grain
- Use sharp knife
- Make clean, single strokes
- Keep slices 1/4 to 1/2 inch thick
- Arrange on warm plates
- Serve immediately
Troubleshooting Guide
- Tough meat? Check knife sharpness and cutting direction
- Uneven cooking? Ensure portions are same thickness
- Sticking to pan? Pat meat drier before cooking
- Too chewy? Cut against the grain in thinner slices
Safety Notes & Tips
- Keep knives sharp – dull knives cause accidents
- Never cut toward yourself
- Clean all tools immediately after use
- Store knives properly in a block or magnetic strip
- Always use a stable cutting surface
Storage & Reheating
- Store leftover meat wrapped tightly in refrigerator
- Use within 3 days
- Reheat gently in pan with splash of broth
- Slice cold leftovers thinly for sandwiches
Recipe Variations
- Herb crust: Add crushed herbs before cooking
- Wine sauce: Deglaze pan with red wine
- Spicy version: Add crushed red pepper to seasoning
- Garlic lovers: Double the garlic amount
Pro Tips
- Keep your blade angle consistent while cutting
- Let meat rest between each major cut
- Clean your knife between different cutting tasks
- Use gentle sawing motions for tough parts
Remember: The right knife makes all the difference between a tough dinner and a tender feast. Practice these techniques, and you’ll be serving restaurant-quality venison in no time.