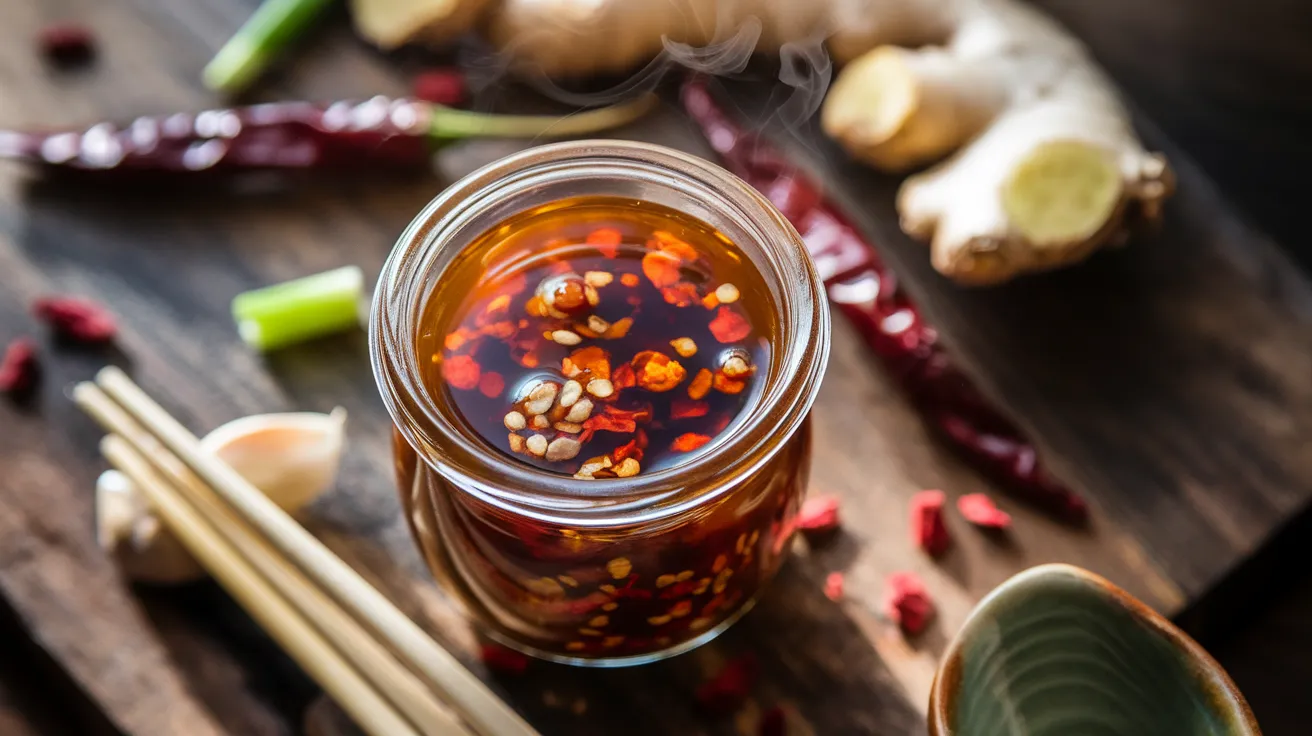
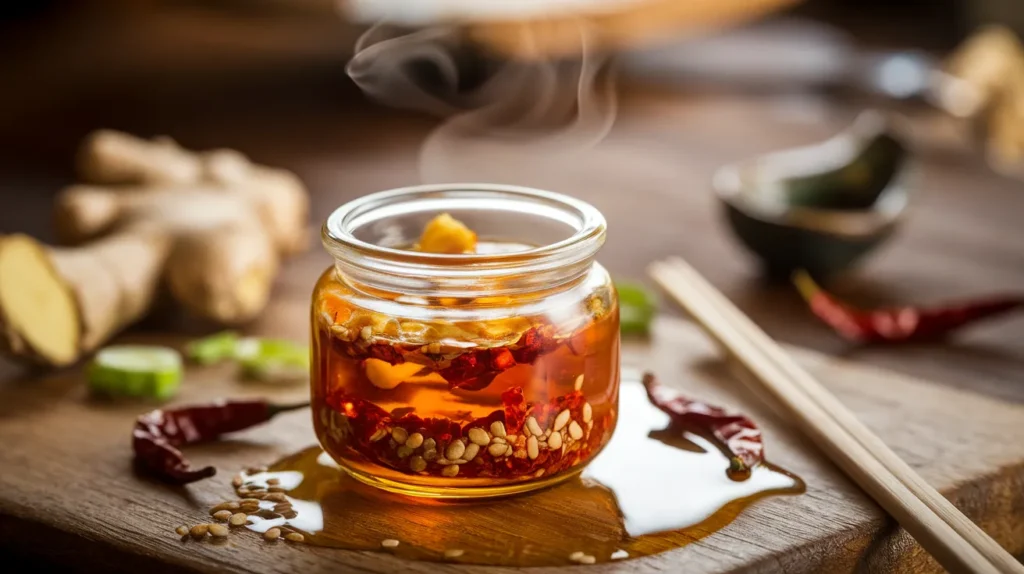
Transform your kitchen into a Japanese flavor haven with this authentic rayu sauce recipe that brings restaurant-quality heat and complexity to your table. This traditional Japanese chili oil combines aromatic spices with fiery chilies, creating a versatile condiment that elevates everything from ramen to rice bowls. Making rayu sauce at home allows you to control the heat level while enjoying the fresh, vibrant flavors that store-bought versions simply can’t match.
SERVES: 4 | PREP: 20 MIN | COOK: 15 MIN | TOTAL: 35 MIN
Essential Ingredients
Base Oil & Chilies
| Ingredient | Amount | Notes |
|---|---|---|
| Neutral oil (vegetable or canola) | 1 cup | Must have high smoke point |
| Dried red chilies | 6-8 pieces | Adjust for heat preference |
| Red pepper flakes | 2 tablespoons | Korean gochugaru preferred |
| Sesame seeds | 2 tablespoons | White or mixed variety |
Aromatics & Flavor Builders
| Ingredient | Amount | Notes |
|---|---|---|
| Garlic cloves | 4 large | Thinly sliced |
| Fresh ginger | 1-inch piece | Julienned |
| Green onions | 3 stalks | White parts only |
| Soy sauce | 1 tablespoon | Low sodium works best |
| Rice vinegar | 1 teaspoon | Adds brightness |
Step-by-Step Instructions
Phase 1: Preparation (5 minutes)
Step 1: Slice garlic cloves into thin, uniform pieces using a sharp knife. Why this matters: Even slicing ensures consistent cooking and prevents burning. Burnt garlic will make your rayu sauce bitter.
Step 2: Cut ginger into thin matchsticks, removing any tough skin first. Pro tip: Use a spoon edge to scrape away ginger skin easily without waste.
Step 3: Separate white parts of green onions and cut into 1-inch pieces. Save green tops for garnishing other dishes. Safety note: Keep aromatics separate on your cutting board for organized cooking.
Step 4: Remove stems from dried chilies and shake out most seeds. Heat control: Keep seeds for extra spice, remove completely for milder rayu sauce. Tear chilies into smaller pieces.
Phase 2: Oil Heating (8 minutes)
Step 5: Pour oil into a heavy-bottomed saucepan or small pot. Equipment matters: Heavy bottoms distribute heat evenly and prevent hot spots that could burn your ingredients.
Step 6: Heat oil over medium-low heat until it reaches 250°F (120°C). Visual cue: Oil should shimmer but not smoke. Drop a small piece of garlic in – it should gently sizzle without aggressive bubbling.
Step 7: Add sliced garlic first, stirring gently with a wooden spoon. Timing is crucial: Garlic should slowly turn golden over 3-4 minutes. If it browns too quickly, reduce heat immediately.
Step 8: Add ginger pieces when garlic is light golden. Why this sequence: Ginger takes slightly less time to cook than garlic, so adding it later prevents overcooking.
Phase 3: Building Flavor (5 minutes)
Step 9: Add green onion whites when both garlic and ginger are golden brown. Watch carefully: These will cook faster than the other aromatics.
Step 10: Stir in torn chilies and red pepper flakes. Temperature check: Oil should be bubbling gently around ingredients. Too hot will burn the chilies and create bitter flavors.
Step 11: Add sesame seeds and stir constantly for 1-2 minutes. Listen for cues: Seeds should make gentle popping sounds as they toast.
Step 12: Remove from heat immediately when sesame seeds turn golden. Critical step: Residual heat continues cooking, so timing is everything.
Phase 4: Finishing Touches (2 minutes)
Step 13: Stir in soy sauce and rice vinegar while oil is still hot. Safety warning: These liquids will splatter briefly, so stir quickly and stand back.
Step 14: Let mixture cool for 5 minutes, then taste and adjust seasonings. Flavor development: Rayu sauce tastes different hot versus cooled, so wait before making adjustments.
Step 15: Transfer to clean glass jar, ensuring all solids are covered with oil. Storage prep: Properly covered ingredients stay fresh longer and prevent spoilage.
Chef’s Notes
Heat Level Control: Start with fewer chilies for your first batch. You can always add more heat, but you can’t take it away. This rayu sauce recipe builds complexity through layered cooking rather than just raw heat.
Oil Temperature Mastery: Maintaining proper temperature is key to perfect rayu sauce. Too hot burns aromatics, too cool doesn’t extract enough flavor. Invest in a cooking thermometer for consistent results.
Make-Ahead Magic: This condiment actually improves after 24 hours as flavors meld. The initial sharp edges of raw garlic and ginger soften into a harmonious blend.
Versatility Factor: Use this rayu sauce on ramen, dumplings, rice bowls, or even pizza. It pairs beautifully with other Japanese condiments like yuzu kosho for complex flavor layering.
Nutrition Information (Per 2 tablespoon serving)
- Calories: 185
- Protein: 1g
- Carbohydrates: 2g
- Fat: 20g
- Fiber: 1g
- Sodium: 150mg
Creative Variations
Smoky Rayu Sauce: Add 1 teaspoon smoked paprika during the final cooking stage for a deeper, more complex flavor profile that works especially well with grilled meats.
Numbing Sichuan Style: Include 1 tablespoon Sichuan peppercorns with the chilies for that signature tingling sensation. Toast them separately first for maximum potency.
Umami-Rich Version: Incorporate 1 tablespoon of sake kasu paste during the final stages for added depth and fermented complexity that enhances the overall flavor profile.
Sweet Heat Blend: Mix in 1 teaspoon honey or maple syrup after removing from heat to balance the spice with subtle sweetness that complements Asian fusion dishes.
Storage & Reheating Guidelines
Proper Storage: Keep rayu sauce in an airtight glass container in the refrigerator for up to 3 months. Always ensure solids remain submerged under oil to prevent spoilage.
Room Temperature Use: Bring to room temperature before serving for best flavor release. Cold oil doesn’t distribute flavors as effectively over food.
Extending Shelf Life: Always use clean utensils when scooping out sauce to prevent contamination. The oil acts as a natural preservative when properly maintained.
Reheating Tips: Gently warm small portions in microwave for 10-15 seconds if you prefer warm rayu sauce, but most applications work better at room temperature.
Troubleshooting Common Issues
Problem 1: Burnt Garlic Taste Solution: Your oil temperature was too high. Start over with fresh ingredients and keep heat at medium-low throughout. Use a thermometer if needed and watch for gentle bubbling, not aggressive sizzling.
Problem 2: Bland Flavor Solution: Increase cooking time for aromatics to develop deeper flavors. Add more soy sauce or a pinch of salt. Let rayu sauce sit 24 hours before final taste adjustment.
Problem 3: Too Oily Consistency Solution: This is normal for authentic rayu sauce, but you can add more dry ingredients like sesame seeds or chili flakes to absorb excess oil and create more texture.
Problem 4: Not Spicy Enough Solution: Add more red pepper flakes or dried chilies to your next batch. You can also stir in a small amount of cayenne pepper after cooking for immediate heat boost.
Problem 5: Ingredients Floating Apart Solution: Stir rayu sauce before each use. This separation is natural as oil and solids settle. Proper stirring redistributes flavors evenly.
Equipment Essentials
- Heavy-bottomed saucepan – Prevents hot spots and burning
- Wooden spoon – Won’t conduct heat or scratch cookware
- Sharp chef’s knife – For precise ingredient preparation
- Cutting board – Dedicated for aromatics preparation
- Glass storage jar – Non-reactive container for storage
- Fine-mesh strainer – Optional for smoother consistency
- Cooking thermometer – Ensures proper oil temperature
Shopping List by Store Section
Produce Section
- Fresh garlic (1 head)
- Fresh ginger root (small piece)
- Green onions (1 bunch)
Asian/International Aisle
- Dried red chilies
- Red pepper flakes (Korean gochugaru preferred)
- Sesame seeds
- Rice vinegar
- Soy sauce
Cooking Oil Section
- Neutral oil (vegetable or canola)
Success Secrets
1. Temperature Control: Keep oil between 250-275°F throughout cooking for optimal flavor extraction without burning. Use visual and audio cues when thermometer isn’t available.
2. Timing Precision: Add ingredients in proper sequence based on cooking time requirements. Garlic needs longest, sesame seeds need shortest exposure to heat.
3. Quality Ingredients: Choose high-quality dried chilies and fresh aromatics for superior rayu sauce flavor. Stale spices create flat, uninteresting results.
4. Patience Pays: Allow flavors to meld for at least 4 hours before first taste. Full flavor development happens overnight as oils absorb aromatic compounds.
5. Consistent Stirring: Keep ingredients moving during cooking to ensure even browning and prevent sticking. Burnt bits will ruin the entire batch of rayu sauce.