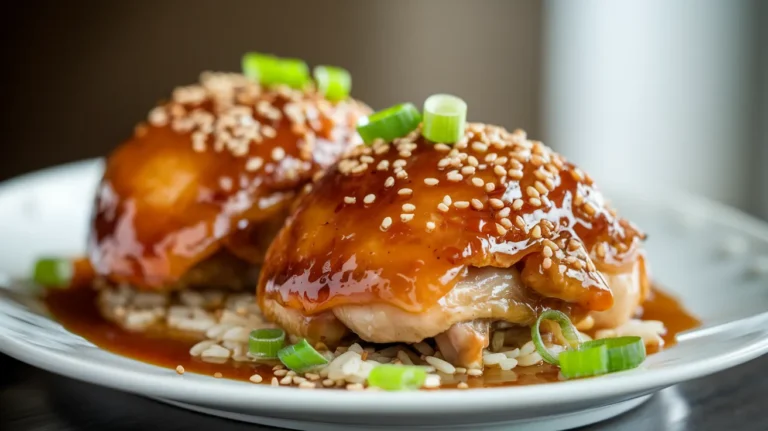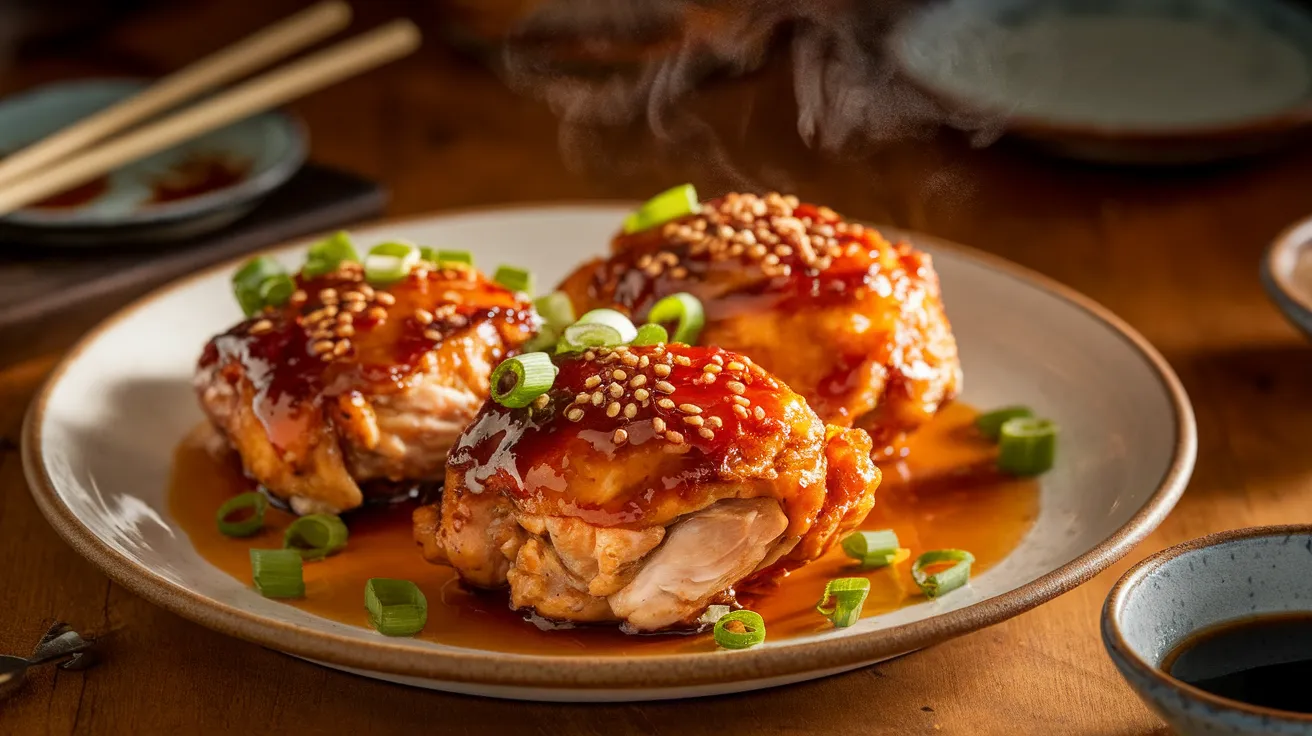
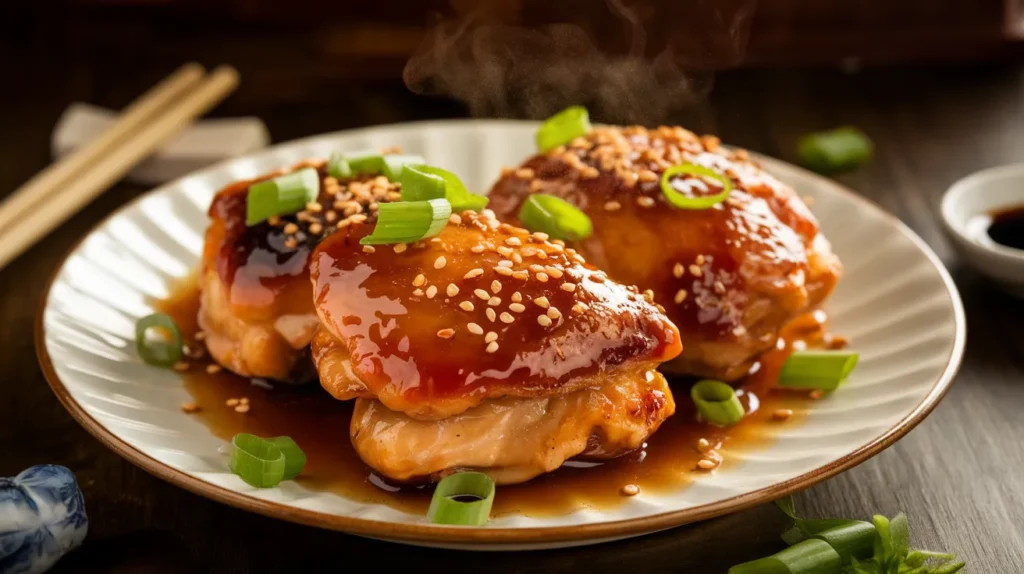
Rich, sticky honey soy glazed chicken thighs that deliver restaurant-quality flavor right from your home kitchen. These tender, juicy honey soy glazed chicken thighs feature a perfect balance of sweet honey and savory soy sauce, creating an irresistible glaze that caramelizes beautifully during cooking. This foolproof recipe transforms simple ingredients into an impressive dinner that’s ready in under an hour.
SERVES: 4 | PREP: 15 MIN | COOK: 35 MIN | TOTAL: 50 MIN
Ingredients
Main Proteins
| Ingredient | Amount | Notes |
|---|---|---|
| Bone-in chicken thighs | 8 pieces (2-2.5 lbs) | Skin-on preferred |
| Salt | 1 teaspoon | Kosher salt works best |
| Black pepper | 1/2 teaspoon | Freshly ground |
Honey Soy Glaze
| Ingredient | Amount | Notes |
|---|---|---|
| Honey | 1/3 cup | Use pure honey |
| Soy sauce | 1/4 cup | Low sodium recommended |
| Rice vinegar | 2 tablespoons | White vinegar substitute |
| Fresh garlic | 4 cloves, minced | Pre-minced works too |
| Fresh ginger | 1 tablespoon, grated | Ground ginger: 1 teaspoon |
| Sesame oil | 1 tablespoon | Adds nutty flavor |
| Red pepper flakes | 1/4 teaspoon | Adjust to taste |
Garnish & Finishing
| Ingredient | Amount | Notes |
|---|---|---|
| Green onions | 3 stalks, sliced | Scallions work perfectly |
| Sesame seeds | 1 tablespoon | Toasted preferred |
Step-by-Step Instructions
Phase 1: Preparation (10 minutes)
Step 1: Remove chicken thighs from refrigerator 20 minutes before cooking. This allows even cooking throughout the meat. Pat each thigh completely dry with paper towels – moisture prevents proper browning and crispy skin development.
Step 2: Season both sides of chicken thighs generously with salt and black pepper. Press the seasoning into the skin to ensure it adheres properly. The salt will help draw out moisture and create better browning.
Step 3: Preheat your oven to 425°F (220°C). Position the oven rack in the center for optimal heat circulation around the chicken pieces.
Phase 2: Glaze Preparation (5 minutes)
Step 4: In a medium mixing bowl, whisk together honey, soy sauce, and rice vinegar until completely combined. The mixture should be smooth without any honey clumps.
Step 5: Add minced garlic, grated ginger, sesame oil, and red pepper flakes to the honey mixture. Whisk thoroughly until all ingredients are evenly distributed. The glaze should smell fragrant and aromatic.
Step 6: Set aside 3 tablespoons of glaze in a small bowl for finishing. This prevents contamination from raw chicken juices during cooking.
Phase 3: Searing (8 minutes)
Step 7: Heat a large oven-safe skillet or cast iron pan over medium-high heat. The pan is ready when a drop of water sizzles immediately upon contact.
Step 8: Place chicken thighs skin-side down in the hot pan. Do not move them for 4-5 minutes – this creates the golden, crispy skin. You’ll hear active sizzling throughout this process.
Step 9: Flip chicken thighs when the skin releases easily from the pan and appears golden brown. Cook the other side for 2-3 minutes to seal in juices.
Step 10: Remove chicken from heat and drain excess fat from the pan, leaving about 1 tablespoon for flavor.
Phase 4: Glazing and Baking (25 minutes)
Step 11: Brush half of the prepared glaze over the chicken thighs, coating both the skin and meat surfaces. The glaze should adhere well to the seared chicken.
Step 12: Transfer the skillet to the preheated oven. Bake for 15 minutes, allowing the glaze to set and the chicken to cook through.
Step 13: Remove from oven and brush with remaining glaze (not the reserved finishing glaze). Return to oven for 8-10 minutes until the internal temperature reaches 165°F (74°C).
Step 14: Check doneness by inserting a meat thermometer into the thickest part of the thigh, avoiding bone contact. The juices should run clear, not pink.
Phase 5: Finishing Touches (2 minutes)
Step 15: Remove from oven and immediately brush with the reserved clean glaze. This adds extra glossy finish and fresh flavor.
Step 16: Sprinkle sliced green onions and toasted sesame seeds over the hot chicken. The heat will slightly soften the green onions and release their aroma.
Chef’s Notes
Glaze Consistency: The honey soy glazed chicken thighs develop their signature sticky coating through the natural sugars in honey caramelizing during baking. If your glaze seems too thick, thin with 1-2 teaspoons of water.
Skin Crispiness: For extra crispy skin, place thighs under the broiler for 1-2 minutes after the final glaze application. Watch carefully to prevent burning.
Make-Ahead Tip: Marinate chicken in the glaze for 2-24 hours in refrigerator. Reserve some fresh glaze for cooking as mentioned in the recipe.
Flavor Balance: The sweet and salty balance in honey soy glazed chicken thighs can be adjusted by increasing honey for sweetness or soy sauce for umami depth.
Nutrition Information (Per Serving)
- Calories: 385
- Protein: 28g
- Carbohydrates: 18g
- Fat: 22g
- Sodium: 650mg
- Sugar: 16g
Delicious Variations
Spicy Honey Soy Thighs: Double the red pepper flakes and add 1 tablespoon of sriracha to the glaze for heat lovers. The spicy version pairs wonderfully with cooling cucumber salad.
Citrus Honey Soy Thighs: Add 2 tablespoons of fresh orange juice and 1 teaspoon of orange zest to brighten the glaze. This variation complements the rich flavors beautifully.
Asian-Fusion Style: For more complex flavors similar to our Indian masala chicken thighs, add 1/2 teaspoon of Chinese five-spice to the seasoning blend.
Ginger-Forward Version: Triple the ginger amount and add candied ginger pieces for an intense ginger profile, much like our popular sesame ginger chicken thighs recipe.
Storage & Reheating
Refrigerator Storage: Store leftover honey soy glazed chicken thighs in airtight containers for up to 4 days. The glaze may thicken when cold but will return to proper consistency when reheated.
Freezing Instructions: Wrap individual thighs in plastic wrap, then aluminum foil. Freeze for up to 3 months. Thaw overnight in refrigerator before reheating.
Reheating Method: Preheat oven to 350°F (175°C). Place thighs on baking sheet and cover with foil. Heat for 12-15 minutes until warmed through. Remove foil for last 3 minutes to re-crisp skin.
Microwave Alternative: Heat individual portions for 1-2 minutes on 70% power. This method works but won’t maintain the crispy skin texture.
Troubleshooting Guide
Problem: Glaze burns during cooking
Solution: Lower oven temperature to 400°F and extend cooking time by 5-10 minutes. Cover with foil if excessive browning occurs.
Problem: Chicken skin isn’t crispy
Solution: Ensure chicken is completely dry before searing. Use higher heat during the searing phase and avoid overcrowding the pan.
Problem: Glaze won’t stick to chicken
Solution: Pat chicken completely dry and let the seared surface cool slightly before applying glaze. The glaze adheres better to a slightly cooled surface.
Problem: Glaze is too salty
Solution: Add 1-2 tablespoons of additional honey and 1 teaspoon of rice vinegar to balance the saltiness from the soy sauce.
Problem: Chicken appears done but thermometer reads low
Solution: Continue cooking in 5-minute intervals, checking temperature each time. Bone-in thighs take longer than boneless cuts to reach safe temperatures.
Equipment Essentials
- Large oven-safe skillet or cast iron pan (12-inch minimum)
- Instant-read meat thermometer for accuracy
- Pastry brush for glaze application
- Medium mixing bowls (2 needed)
- Wire whisk for smooth glaze mixing
- Paper towels for drying chicken
- Sharp chef’s knife for mincing aromatics
Shopping List
Meat Counter
- 8 bone-in, skin-on chicken thighs (2-2.5 lbs total)
Pantry Staples
- Pure honey
- Low-sodium soy sauce
- Rice vinegar
- Sesame oil
- Kosher salt
- Black pepper
- Red pepper flakes
Fresh Produce
- Fresh garlic (1 head)
- Fresh ginger (1 piece)
- Green onions (1 bunch)
Specialty Items
- Toasted sesame seeds
Success Secrets
1. Temperature Control: Use an instant-read thermometer to ensure chicken reaches exactly 165°F internal temperature. Overcooked honey soy glazed chicken thighs become dry and tough.
2. Glaze Timing: Apply glaze in stages rather than all at once. This builds layers of flavor and prevents burning during the longer cooking process.
3. Rest Period: Let chicken rest for 5 minutes after cooking. This allows juices to redistribute throughout the meat, ensuring every bite stays moist and flavorful.
4. Pan Selection: Cast iron or heavy-bottomed pans retain heat better and create superior browning compared to thin pans that create hot spots.
5. Fresh Aromatics: Use fresh garlic and ginger whenever possible. The volatile oils in fresh aromatics create much more complex flavors than their dried counterparts in honey soy glazed chicken thighs.