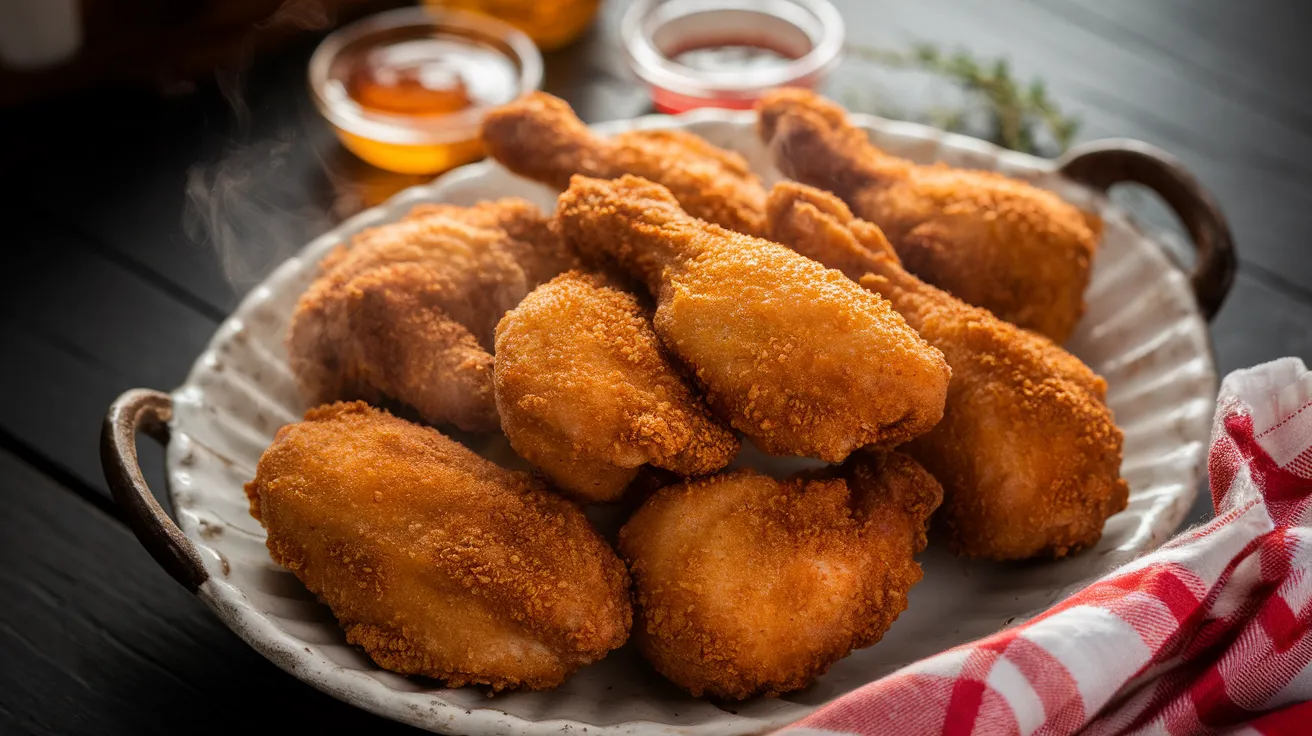
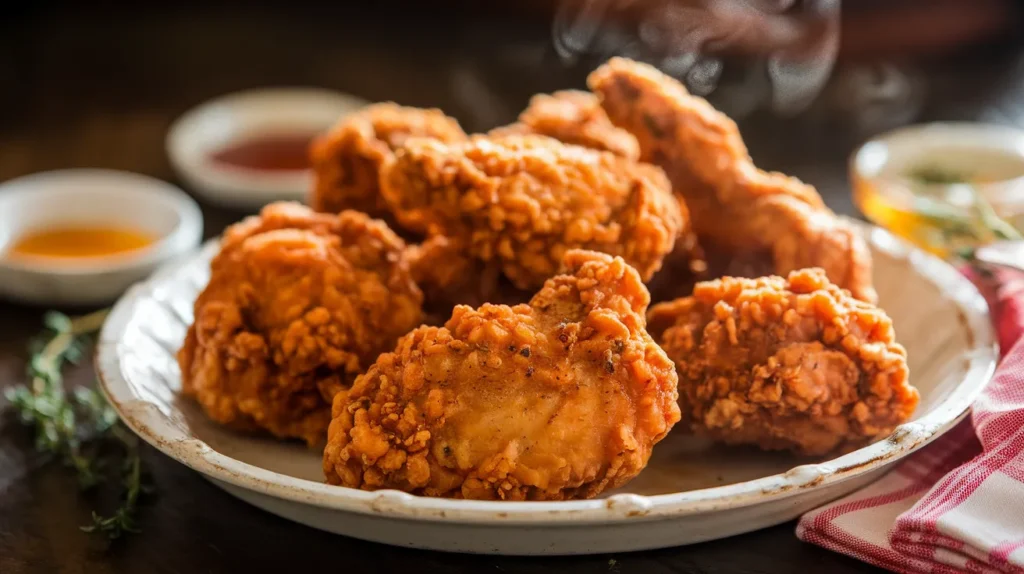
Discover how to make authentic southern buttermilk fried chicken with a perfectly seasoned, ultra-crispy coating and juicy, tender meat inside. This southern buttermilk fried chicken recipe delivers restaurant-quality results right in your home kitchen, with a secret buttermilk marinade that guarantees the most flavorful fried chicken you’ve ever tasted.
SERVES: 4 | PREP: 25 MIN (plus 4 hours marinating) | COOK: 25 MIN | TOTAL: 4 HR 50 MIN
Ingredients
For the Buttermilk Marinade
| Ingredient | Amount |
|---|---|
| Buttermilk | 2 cups |
| Hot sauce | 2 tablespoons |
| Garlic powder | 1 tablespoon |
| Paprika | 1 teaspoon |
| Salt | 2 teaspoons |
| Black pepper | 1 teaspoon |
| Whole chicken pieces | 3 pounds (8 pieces total) |
For the Coating
| Ingredient | Amount |
|---|---|
| All-purpose flour | 2½ cups |
| Cornstarch | ½ cup |
| Paprika | 2 tablespoons |
| Garlic powder | 1 tablespoon |
| Onion powder | 1 tablespoon |
| Cayenne pepper | 1 teaspoon |
| Black pepper | 2 teaspoons |
| Salt | 1 tablespoon |
| Dried thyme | 1 teaspoon |
| Vegetable oil | 6-8 cups (for frying) |
Step-by-Step Instructions
Phase 1: Marinating the Chicken (4+ Hours Before Cooking)
Step 1: Grab a large mixing bowl and pour in 2 cups of buttermilk. The acidity in buttermilk breaks down proteins in the chicken, making it incredibly tender while adding tangy flavor that’s essential for authentic southern buttermilk fried chicken.
Step 2: Add 2 tablespoons hot sauce, 1 tablespoon garlic powder, 1 teaspoon paprika, 2 teaspoons salt, and 1 teaspoon black pepper to the buttermilk. Whisk everything together for about 30 seconds until you see no clumps of spices floating on top.
Step 3: Pat your chicken pieces completely dry with paper towels. This seems small, but wet chicken dilutes the marinade and prevents proper absorption.
Step 4: Submerge all chicken pieces into the buttermilk mixture, turning each piece with your hands to coat every surface. Make sure the marinade gets into all the nooks and crannies.
Step 5: Cover the bowl tightly with plastic wrap and refrigerate for at least 4 hours, but overnight (up to 12 hours) is even better. The longer marination time allows the buttermilk to penetrate deeper into the meat.
Phase 2: Preparing the Coating Station (30 Minutes Before Frying)
Step 6: Take your chicken out of the refrigerator 30 minutes before cooking. Room temperature chicken cooks more evenly than cold chicken, preventing that dreaded “done outside, raw inside” problem.
Step 7: In a large shallow dish or baking pan, combine 2½ cups flour, ½ cup cornstarch, 2 tablespoons paprika, 1 tablespoon garlic powder, 1 tablespoon onion powder, 1 teaspoon cayenne, 2 teaspoons black pepper, 1 tablespoon salt, and 1 teaspoon dried thyme. Whisk thoroughly for 1-2 minutes—you want zero clumps.
Step 8: Take 3 tablespoons of the buttermilk marinade and drizzle it into your flour mixture. Use a fork to work it in, creating small clumps. These little nuggets create extra-craggy bits that fry up incredibly crispy.
Phase 3: Setting Up for Frying (10 Minutes)
Step 9: Pour vegetable oil into a heavy-bottomed pot or Dutch oven until it reaches 3-4 inches deep. Never fill more than halfway—hot oil expands when you add food, and you need room to prevent dangerous overflow.
Step 10: Clip a deep-fry or candy thermometer to the side of your pot, making sure the tip doesn’t touch the bottom (that gives false readings). Heat the oil over medium-high heat to exactly 350°F. This temperature is crucial—lower and your chicken absorbs grease, higher and the coating burns before the inside cooks.
Step 11: Set up a landing zone: place a wire cooling rack over a baking sheet near your stove. This lets excess oil drip off while keeping the bottom crispy. Never use paper towels—they trap steam and make your coating soggy.
Phase 4: Coating the Chicken (15 Minutes)
Step 12: Remove one piece of chicken from the buttermilk, letting excess drip off for 3-4 seconds. Don’t shake it completely dry—you want some moisture to help the flour stick.
Step 13: Place the chicken in your flour mixture and press down firmly with your palm. Flip it over and press again. Scoop flour over any bare spots and pat it on. You’re looking for complete coverage with visible texture—if it’s smooth, you didn’t press hard enough.
Step 14: Shake off excess flour vigorously for about 3 seconds over the dish. Too much loose flour falls off in the oil and burns, creating bitter specks.
Step 15: Place coated chicken on a clean plate and repeat with remaining pieces. Let coated chicken rest for 5 minutes before frying—this allows the coating to hydrate and stick better, reducing the chance of it falling off during cooking.
Phase 5: Frying to Perfection (25 Minutes Total)
Step 16: When oil reaches 350°F, gently slide 3-4 pieces into the oil using tongs, starting with the side facing away from you to prevent splashing toward yourself. Don’t overcrowd—pieces should have at least 1 inch of space between them.
Step 17: The temperature will drop to around 300-325°F when you add cold chicken—this is normal. Adjust your heat to bring it back to 325-340°F and maintain that range. Watch your thermometer constantly.
Step 18: Fry for 12-15 minutes, flipping pieces every 4 minutes with tongs. Smaller pieces (wings, drumsticks) need 12 minutes, larger pieces (breasts, thighs) need the full 15 minutes. The coating should turn deep golden brown—not pale yellow (undercooked) or dark mahogany (overcooked).
Step 19: Use an instant-read thermometer to check doneness: insert it into the thickest part without touching bone. You’re looking for 165°F for white meat and 175°F for dark meat. This is the only way to guarantee safety and quality.
Step 20: Transfer finished chicken to your wire rack and immediately sprinkle with a pinch of salt while it’s still glistening with oil. Let rest 5 minutes before serving—this allows juices to redistribute and the coating to set to maximum crispiness.
Chef’s Notes
The Buttermilk Secret: Regular milk won’t work here. Buttermilk’s acidity is essential for both tenderizing and creating that signature tangy flavor that makes southern buttermilk fried chicken so craveable. If you love bold chicken flavors, try these buffalo chicken wings for your next game day.
Cornstarch Magic: The cornstarch in the coating isn’t optional—it creates a lighter, crispier texture than flour alone. It also helps the coating stay crunchy longer after frying.
Double-Dipping Debate: Some cooks dip chicken back in buttermilk, then flour again. I skip this because it makes the coating too thick and doughy. One good coat is all you need if you press firmly.
Oil Temperature Insurance: Buy a thermometer if you don’t have one. Guessing oil temperature is the #1 reason for greasy or burnt southern buttermilk fried chicken. It’s a $10 investment that transforms your frying game.
Nutrition Facts (Per Serving)
Calories: 520 | Protein: 42g | Carbohydrates: 35g | Fat: 22g | Saturated Fat: 4g | Cholesterol: 135mg | Sodium: 890mg | Fiber: 2g
Creative Variations to Try
Spicy Nashville Hot: After frying, toss chicken in a mixture of ¼ cup reserved frying oil, 2 tablespoons cayenne pepper, 1 tablespoon brown sugar, and 1 teaspoon paprika. Serve over white bread with pickle chips.
Honey Buttermilk Drizzle: Mix ½ cup honey with 2 tablespoons buttermilk and drizzle over fried chicken just before serving. The sweet-tangy combination is addictive.
Herb Garden Coating: Add 2 tablespoons each of dried rosemary, sage, and parsley to your flour mixture for an earthy, aromatic twist on traditional southern buttermilk fried chicken.
Smoky Chipotle Version: Swap cayenne for 1 tablespoon chipotle powder in the coating. For another take on smoky chicken, check out this chipotle lime chicken that’s grilled instead of fried.
Storage & Reheating
Refrigeration: Store cooled fried chicken in an airtight container with paper towels between layers to absorb moisture. It’ll keep for 3-4 days in the refrigerator.
Freezing: Freeze individual pieces wrapped in foil, then placed in a freezer bag for up to 3 months. Thaw overnight in the refrigerator before reheating.
Reheating for Crispiness: Never use the microwave—it turns the coating into rubber. Instead, place chicken on a wire rack over a baking sheet and reheat at 375°F for 15-20 minutes. The circulating air re-crisps the coating beautifully.
Serving Cold: Southern buttermilk fried chicken is surprisingly delicious cold for picnics or lunch boxes. The flavors actually intensify after a night in the fridge.
Troubleshooting Common Problems
Problem: Coating Falls Off During Frying Your chicken was too wet when coating, or you didn’t let the coated pieces rest before frying. Make sure to let excess buttermilk drip off, press the flour firmly, and rest coated chicken for 5 minutes before hitting the oil.
Problem: Burnt Outside, Raw Inside Your oil temperature was too high. Always use a thermometer and keep oil between 325-340°F while frying. Also, make sure chicken starts at room temperature, not fridge-cold.
Problem: Greasy, Soggy Coating Oil temperature was too low, causing the chicken to absorb oil instead of frying crispy. Maintain proper temperature and don’t overcrowd the pot—this drops the temperature too much.
Problem: Coating Is Pale and Bland Not enough seasoning in your flour mixture, or you didn’t brown it long enough. Make sure you’re using the full amounts of spices listed, and fry until deep golden brown, not light tan.
Problem: Coating Is Too Thick and Doughy You probably double-dipped or pressed too much flour on. One coating layer is plenty—more isn’t better. Also, make sure to shake off excess flour before frying.
Equipment Essentials
- Heavy-bottomed pot or Dutch oven (5-6 quart capacity)
- Deep-fry or candy thermometer (essential for temperature control)
- Wire cooling rack (prevents soggy bottoms)
- Instant-read meat thermometer (for checking doneness)
- Large mixing bowl (for marinade)
- Shallow baking dish (for flour mixture)
- Long-handled tongs (keeps hands safe from hot oil)
- Spider strainer or slotted spoon (helpful but not required)
Shopping List Organized by Store Section
Dairy Section:
- Buttermilk (2 cups)
Meat Department:
- Whole chicken pieces (3 pounds/8 pieces)
Baking Aisle:
- All-purpose flour
- Cornstarch
Spice Aisle:
- Paprika
- Garlic powder
- Onion powder
- Cayenne pepper
- Black pepper
- Salt
- Dried thyme
Condiment Aisle:
- Hot sauce
Cooking Oil Section:
- Vegetable oil (large bottle or 2-3 quart container)
5 Success Secrets for Perfect Southern Buttermilk Fried Chicken
1. Temperature is Everything: The difference between restaurant-quality and disappointing southern buttermilk fried chicken is a $10 thermometer. Buy one and actually use it—maintaining 325-340°F throughout frying is non-negotiable.
2. Marinate Overnight: While 4 hours is the minimum, 8-12 hours in buttermilk makes a dramatically more tender and flavorful result. Plan ahead and thank yourself later.
3. Press the Flour, Don’t Just Dip: Actively press the coating into the chicken with your palm. This creates the craggy, crispy texture you’re after. Gentle dipping gives you smooth, boring coating.
4. Don’t Skip the Rest: Letting coated chicken rest for 5 minutes before frying allows the flour to hydrate and bond with the buttermilk layer. This prevents the heartbreaking moment when your beautiful coating slides off in the oil.
5. Fry in Batches: I know you’re hungry and want it all done at once, but overcrowding drops the oil temperature too much. Be patient, fry in batches, and you’ll have crispy perfection instead of greasy disappointment.