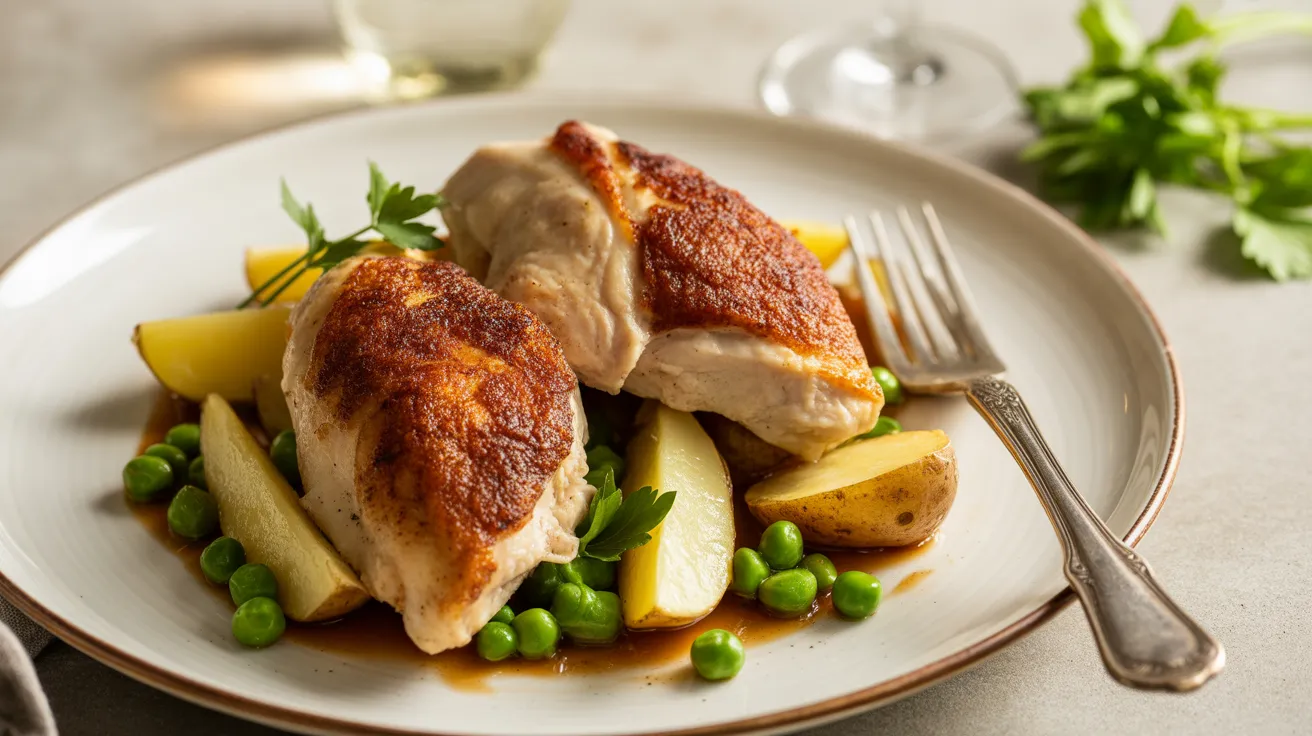
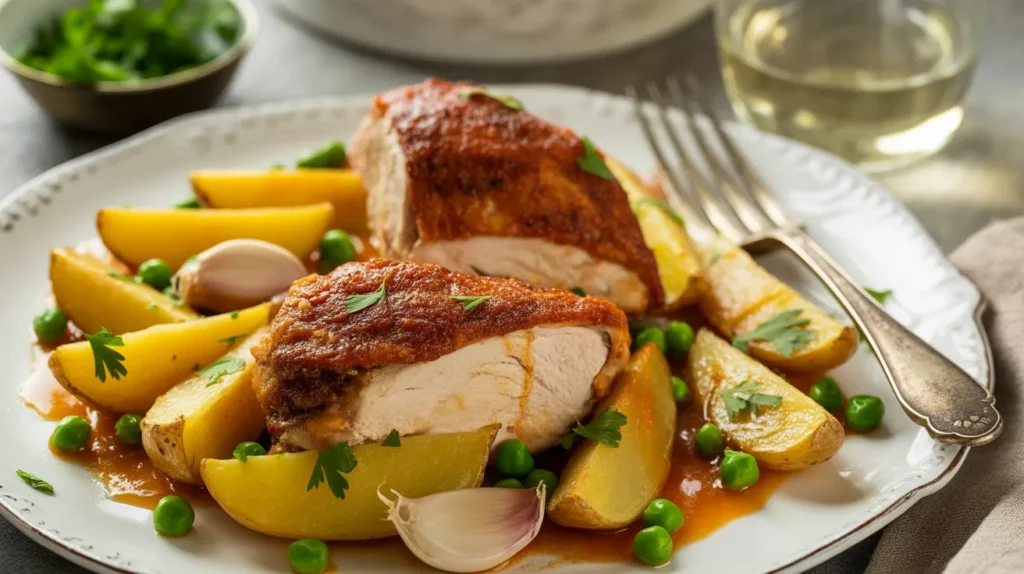
Discover the magic of authentic Chicken Vesuvio, Chicago’s beloved Italian-American treasure featuring golden-roasted chicken thighs, crispy roasted potatoes, and aromatic garlic in a white wine sauce. This restaurant-quality Chicken Vesuvio brings the Windy City’s Italian heritage straight to your dinner table with surprisingly simple techniques that deliver spectacular results.
SERVES: 4 | PREP: 20 MIN | COOK: 50 MIN | TOTAL: 70 MIN
Why Chicken Vesuvio Deserves Your Attention
This isn’t just another chicken dinner.
Chicken Vesuvio represents Chicago’s Italian-American culinary soul—crispy-skinned chicken nestled with golden potato wedges, all bathed in a garlicky white wine sauce that’ll have you scraping the pan. The secret? High heat and smart layering that creates textures you’d pay $35 for at a trattoria.
Named after Mount Vesuvius (because it’s explosively good), this dish transforms humble ingredients into something extraordinary. The chicken skin crackles, the potatoes soak up those incredible pan juices, and the garlic mellows into sweet, buttery perfection.
Ready in just over an hour, this feeds four hungry people with leftovers that taste even better the next day.
Ingredients You’ll Need
For the Chicken & Base
| Ingredient | Measurement | Notes |
|---|---|---|
| Bone-in, skin-on chicken thighs | 8 pieces (about 3 lbs) | Thighs stay juicier than breasts |
| Russet potatoes | 2 lbs (about 4 large) | Yukon Gold works too |
| Garlic cloves | 12-15 whole cloves | Yes, really this many! |
| Olive oil | ⅓ cup | Extra virgin for best flavor |
| Dried oregano | 2 teaspoons | Italian oregano preferred |
| Kosher salt | 2 teaspoons | Plus more for seasoning |
| Black pepper | 1 teaspoon | Freshly ground |
For the Sauce
| Ingredient | Measurement | Notes |
|---|---|---|
| Dry white wine | 1 cup | Pinot Grigio or Sauvignon Blanc |
| Chicken stock | ½ cup | Low-sodium preferred |
| Fresh lemon juice | 3 tablespoons | About 1 large lemon |
| Unsalted butter | 3 tablespoons | Cold, cut into pieces |
| Fresh parsley | ¼ cup chopped | For garnish |
| Frozen peas | 1 cup | Traditional Chicago addition |
Step-by-Step Instructions
Phase 1: Prep Work (10 minutes)
Step 1: Prepare Your Chicken
Pat chicken thighs completely dry with paper towels—this is critical for crispy skin. Any moisture will steam instead of crisp.
Season both sides generously with 1 teaspoon salt and ½ teaspoon pepper. Don’t be shy here; bone-in chicken needs assertive seasoning.
Let chicken sit at room temperature for 15 minutes while you prep everything else. This ensures even cooking.
Step 2: Cut Potatoes Properly
Scrub potatoes but leave skins on (they add texture and nutrition). Cut each potato lengthwise into 6-8 wedges, about ¾-inch thick at the widest point.
Why this size? Thinner wedges burn before the chicken finishes; thicker wedges stay raw inside. This Goldilocks thickness gets you golden edges with fluffy centers.
Place potato wedges in a large bowl.
Step 3: Prep Garlic the Right Way
Peel garlic cloves but keep them whole—don’t chop or mince. Whole cloves turn sweet and buttery when roasted; minced garlic would burn.
If cloves are huge, halve them lengthwise. Otherwise, leave intact.
Safety Tip: Keep raw chicken separate from vegetables on your cutting board to prevent cross-contamination.
Phase 2: Building Flavor (10 minutes)
Step 4: Season Your Potatoes
Toss potato wedges with 3 tablespoons olive oil, 1 teaspoon oregano, 1 teaspoon salt, and ½ teaspoon pepper.
Use your hands to massage seasonings into every crevice. The oil creates a barrier that helps achieve that crispy exterior.
Add garlic cloves to the potato bowl and toss to coat lightly.
Step 5: Preheat Everything
Position oven rack in the lower third of your oven. Heat to 425°F (220°C).
Place your largest oven-safe skillet (12-14 inch) or roasting pan in the oven while it preheats. A hot pan means instant sizzle when chicken hits the surface.
This 5-minute preheat makes a massive difference in getting crispy skin.
Phase 3: Searing the Chicken (12 minutes)
Step 6: Initial Sear
Carefully remove the hot skillet from oven (use oven mitts!). Add remaining olive oil and swirl to coat the pan bottom.
Place chicken thighs skin-side down in the pan, leaving space between pieces. Don’t crowd them or they’ll steam.
Return pan to stovetop over medium-high heat. Listen for that immediate sizzle—that’s the sound of crispy skin forming.
Step 7: Get That Golden Crust
Cook chicken undisturbed for 8-10 minutes. Resist the urge to peek or move the pieces.
The skin should release easily from the pan when it’s properly browned. If it sticks, give it another minute.
You’re looking for deep golden-brown color—not pale yellow, not burnt black. Think of a perfectly toasted marshmallow.
Step 8: Flip and Sear Second Side
Using tongs, flip each chicken thigh to expose the skin (skin-side up now). The underside should be lightly browned.
Sear for 3-4 minutes on this second side just to develop some color.
Transfer chicken to a plate temporarily. It’s not fully cooked yet—that happens in the oven.
Phase 4: Creating the Base (5 minutes)
Step 9: Clear Space for Potatoes
If there’s excess fat in the pan (more than 2 tablespoons), carefully pour it off into a heatproof container. Leave about 2 tablespoons of those flavorful drippings.
Those browned bits stuck to the pan (fond) are flavor gold. We’ll incorporate them into the sauce.
Step 10: Arrange Potatoes and Garlic
Scatter seasoned potato wedges across the pan in a single layer if possible. Nestle those whole garlic cloves between potatoes.
The potatoes will drink up the chicken drippings and wine as everything roasts together. This is where the magic happens.
Step 11: Nestle Chicken Back In
Place chicken thighs skin-side up on top of and around the potatoes. The elevation allows hot air to circulate underneath.
Having the skin exposed means it stays crispy instead of getting soggy from steam.
Phase 5: Oven Roasting (35 minutes)
Step 12: Add Wine and Stock
Pour white wine and chicken stock around (not over) the chicken pieces. Pouring directly on the skin would make it soggy.
The liquid should come about halfway up the potatoes, creating a braising effect on the bottom while the tops roast.
Sprinkle remaining 1 teaspoon oregano over everything.
Step 13: First Roasting Period
Transfer pan to the preheated oven (lower rack position). Roast uncovered for 25 minutes without opening the door.
During this time, potatoes begin softening, chicken fat renders into the liquid, and garlic starts caramelizing.
The kitchen will smell absolutely incredible—that’s the oregano and garlic working their magic.
Step 14: Check and Adjust
After 25 minutes, carefully remove pan and check your progress. Chicken skin should be starting to crisp; potatoes should be fork-tender.
Gently stir potatoes and garlic (not the chicken!) to ensure even cooking and coating in the sauce.
If potatoes look dry, add ¼ cup more stock. If there’s too much liquid pooling, that’s fine—it’ll reduce.
Step 15: Final Roasting
Return pan to oven for 10-15 more minutes, until a meat thermometer inserted into the thickest part of a thigh reads 165°F (74°C).
Chicken skin should be deeply golden and crispy. Potatoes should have crispy edges and give no resistance when pierced.
If skin isn’t crispy enough, turn on the broiler for 2-3 minutes, watching carefully to prevent burning.
Phase 6: Finishing Touches (8 minutes)
Step 16: Rest and Add Peas
Remove pan from oven and transfer chicken pieces to a serving platter. Tent loosely with foil.
Scatter frozen peas over the hot potatoes in the pan. The residual heat will cook them perfectly in about 3 minutes while you make the sauce.
Resting chicken allows juices to redistribute, ensuring moist, tender meat.
Step 17: Build the Pan Sauce
Place the pan over medium heat on your stovetop. The liquid should be bubbling gently.
Squeeze in fresh lemon juice—it cuts through the richness and brightens everything.
Cook, stirring gently, for 2-3 minutes to concentrate flavors. The sauce should reduce slightly and look glossy.
Step 18: Mount with Butter
Remove pan from heat. Add cold butter pieces, swirling the pan continuously until butter melts into the sauce.
This technique (called “mounting”) creates a silky, restaurant-quality sauce that clings to chicken and potatoes beautifully.
Taste and adjust seasoning—you might want a pinch more salt or a squeeze more lemon.
Step 19: Plate and Garnish
Arrange potatoes, peas, and garlic around the chicken on your serving platter. Spoon that gorgeous sauce over everything.
Scatter chopped fresh parsley on top for color and a fresh herb note.
Serve immediately while chicken skin is at peak crispiness.
Step 20: The Grand Finale
Bring the whole platter to the table family-style. Provide crusty bread for soaking up extra sauce—this is not optional!
Each person should get 2 chicken thighs, a generous helping of potatoes, and plenty of that wine-garlic sauce.
Chef’s Notes
Temperature Matters: Using a meat thermometer eliminates guesswork. Dark meat is safe at 165°F but reaches peak tenderness at 175°F if you prefer fall-off-the-bone texture.
Wine Selection: Don’t cook with wine you wouldn’t drink. The flavor concentrates as it reduces, so cheap wine tastes cheap in the final dish. Save the expensive stuff for your glass, but use something decent in the pan.
Make It Ahead: You can sear chicken and prep vegetables up to 4 hours ahead. Refrigerate separately, then bring to room temperature before proceeding with the oven steps. This Chicken Vesuvio approach works great for dinner parties.
Crispiness Secrets: The key to maintaining crispy skin is keeping it elevated above liquid during roasting. If your pan is too small and chicken pieces touch the liquid, they’ll braise instead of roast.
Nutrition Facts (Per Serving)
- Calories: 680
- Protein: 46g
- Carbohydrates: 38g
- Fat: 36g
- Fiber: 4g
- Sodium: 890mg
Creative Variations
Mediterranean Chicken Vesuvio: Swap oregano for fresh rosemary sprigs and add halved cherry tomatoes in the last 10 minutes. Finish with crumbled feta cheese and kalamata olives. The tangy feta plays beautifully against the rich sauce.
Spicy Vesuvio: Add 1 teaspoon red pepper flakes with the oregano and finish with 2 tablespoons calabrian chili paste stirred into the sauce. This gives the dish a spicy kick while maintaining its Italian character, similar to the heat level in chicken pizzaiola.
Herb-Crusted Version: Before roasting, press a mixture of panko breadcrumbs, grated Parmesan, and chopped fresh herbs onto the chicken skin. The crust adds incredible texture and flavor depth.
Creamy Vesuvio: After reducing the wine sauce, stir in ½ cup heavy cream and ¼ cup grated Parmesan for a luxurious, creamy variation that rivals chicken florentine in richness. Reduce heat to low when adding cream to prevent curdling.
Storage & Reheating
Refrigerator Storage: Cool completely and transfer chicken, potatoes, and sauce to an airtight container. Refrigerate for up to 4 days. Store chicken skin-side up to maintain some crispiness.
Freezing: Freeze chicken and potatoes in sauce for up to 3 months in freezer-safe containers. Peas may become slightly mushy after freezing but still taste great.
Reheating: For best results, reheat in a 375°F oven for 20-25 minutes until heated through. This restores some skin crispiness. Microwave reheating works in a pinch (3-4 minutes) but produces softer skin.
Pro Tip: Separate chicken skin from the meat before storing, then crisp the skin separately in a hot skillet when reheating for maximum texture.
Troubleshooting Common Problems
Problem 1: Chicken Skin is Rubbery, Not Crispy
Solution: You didn’t dry the chicken well enough before searing, or liquid splashed onto the skin during roasting. Always pat chicken completely dry and pour liquids carefully around (not over) the pieces. If skin stays soft, finish under the broiler for 2-3 minutes.
Problem 2: Potatoes are Mushy or Falling Apart
Solution: You cut wedges too thin or used a waxy potato variety instead of starchy russets. Aim for ¾-inch thick wedges. Russets hold their shape better during long roasting. If potatoes are already cut too thin, reduce oven time by 10 minutes.
Problem 3: Sauce is Too Thin and Watery
Solution: Too much liquid was added, or potatoes released excess moisture. Remove chicken and vegetables after roasting, then reduce sauce on the stovetop over medium-high heat for 5-7 minutes until thickened. Alternatively, whisk 1 teaspoon cornstarch into 1 tablespoon cold water and stir into simmering sauce.
Problem 4: Garlic Burned and Tastes Bitter
Solution: Garlic cloves were too small or exposed directly to high heat. Always use large whole cloves and nestle them between potatoes where they’re protected. If garlic does burn, remove those pieces and add fresh minced garlic to the finished sauce instead.
Problem 5: Chicken is Dry and Overcooked
Solution: You likely overcooked past 165°F internal temperature or used chicken breasts instead of thighs. Dark meat (thighs) is much more forgiving and stays moist even at higher temperatures. If using breasts, reduce cooking time by 10 minutes and monitor temperature closely.
Equipment Essentials
- Large oven-safe skillet (12-14 inch) or roasting pan with 2-inch sides
- Meat thermometer for perfect doneness every time
- Sharp chef’s knife for cutting potato wedges uniformly
- Tongs for flipping chicken without tearing skin
- Large mixing bowl for tossing potatoes with seasonings
- Cutting board (dedicated for raw poultry if possible)
- Measuring cups and spoons
- Citrus juicer for extracting lemon juice efficiently
Helpful But Optional: Cast iron skillet (retains heat beautifully), kitchen timer, oven mitts rated to 500°F
Shopping List by Section
Meat Department
- Bone-in, skin-on chicken thighs (8 pieces, about 3 lbs)
Produce Section
- Russet potatoes (2 lbs, about 4 large)
- Garlic bulb (need 12-15 cloves)
- Fresh lemons (1 large)
- Fresh parsley (1 bunch)
Frozen Foods
- Frozen peas (1 cup, about 6 oz bag)
Pantry & Dry Goods
- Dried oregano
- Kosher salt
- Black pepper
- Olive oil (extra virgin)
Alcohol/Wine Section
- Dry white wine (1 bottle—you need 1 cup)
Dairy Case
- Unsalted butter (1 stick)
Canned Goods
- Chicken stock (low-sodium, 14 oz can)
5 Success Secrets from the Pros
Secret 1: Temperature Contrast Creates Texture
The combination of high oven heat (425°F) and liquid in the pan creates two cooking environments simultaneously—roasting on top, braising on bottom. This dual-action technique produces crispy tops and tender, flavorful undersides you can’t achieve with a single cooking method.
Secret 2: Bone-In Thighs are Non-Negotiable
Professional chefs choose bone-in, skin-on thighs for Chicken Vesuvio because bones conduct heat slowly, preventing overcooking, while the skin protects meat and becomes deliciously crispy. Boneless chicken cooks too quickly and dries out before potatoes finish.
Secret 3: Don’t Skip the Resting Period
Resting chicken for 5-8 minutes after roasting allows muscle fibers to relax and reabsorb juices. Cut into chicken immediately and those precious juices run onto the plate instead of staying in the meat. Patience here makes the difference between good chicken and extraordinary chicken.
Secret 4: Layer Your Aromatics Strategically
Adding oregano at two different stages—once on potatoes before roasting, once with the liquid—creates complexity. The first addition roasts and concentrates, developing deep flavor; the second addition stays fresher and brighter. This layering technique is what separates home cooking from restaurant-quality results.
Secret 5: Sauce Temperature Controls Texture
Mounting butter into the pan sauce off heat prevents the butter from breaking and becoming greasy. Cold butter emulsifies into the warm (not hot) sauce, creating that silky, glossy coating that makes the dish look and taste professional. Add butter while sauce is boiling and it’ll separate into oil slicks.
Your Chicken Vesuvio awaits—golden, crispy, and absolutely worth every minute spent in the kitchen.