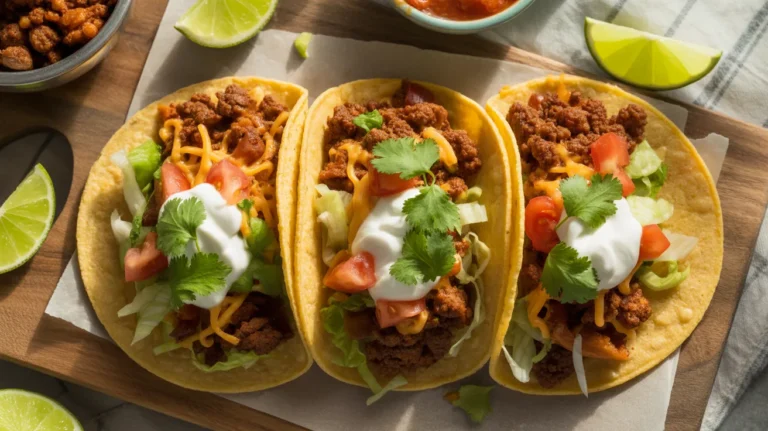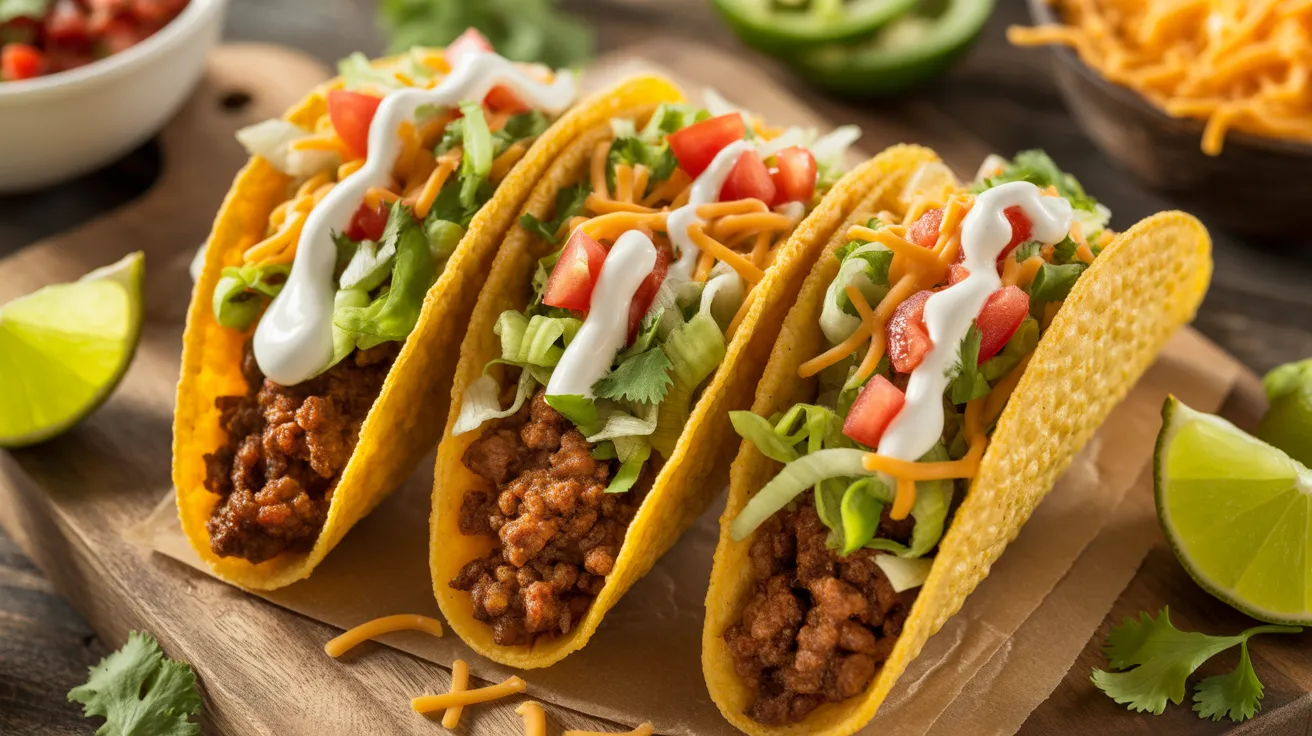
These ground beef crunchy tacos deliver restaurant-quality flavor right in your kitchen. My ground beef crunchy tacos recipe creates perfectly seasoned meat, crispy shells, and fresh toppings that make Tuesday nights feel special.
SERVES: 4 | PREP: 15 MIN | COOK: 15 MIN | TOTAL: 30 MIN
Ingredients
For the Taco Meat
| Ingredient | Amount |
|---|---|
| Ground beef (80/20) | 1 pound |
| Yellow onion, diced | 1 medium |
| Garlic cloves, minced | 3 cloves |
| Chili powder | 2 tablespoons |
| Ground cumin | 1 tablespoon |
| Paprika | 1 teaspoon |
| Dried oregano | 1 teaspoon |
| Salt | 1 teaspoon |
| Black pepper | ½ teaspoon |
| Tomato paste | 2 tablespoons |
| Beef broth | ½ cup |
| Vegetable oil | 1 tablespoon |
For Assembly
| Ingredient | Amount |
|---|---|
| Crunchy taco shells | 12 shells |
| Romaine lettuce, shredded | 2 cups |
| Roma tomatoes, diced | 2 medium |
| Sharp cheddar cheese, shredded | 1½ cups |
| Sour cream | ¾ cup |
| Fresh salsa | 1 cup |
| Jalapeños, sliced (optional) | ¼ cup |
| Fresh cilantro, chopped | ¼ cup |
Step-by-Step Instructions
Phase 1: Preparing Your Ingredients (5 minutes)
Step 1: Take your ground beef out of the refrigerator 10 minutes before cooking. Room temperature meat browns more evenly and develops better flavor. Cold meat releases moisture too quickly and ends up steaming instead of browning.
Step 2: Dice your onion into small ¼-inch pieces. Smaller pieces cook faster and distribute flavor better throughout the meat. Keep them uniform so they all finish cooking at the same time.
Step 3: Mince your garlic cloves finely. I press mine through a garlic press for the strongest flavor. Minced garlic releases more oils than chopped garlic, giving you that punch of flavor tacos need.
Step 4: Mix all your dry spices together in a small bowl. Combining chili powder, cumin, paprika, oregano, salt, and pepper beforehand means you’ll add even seasoning. This prevents clumping and ensures every bite tastes the same.
Phase 2: Browning the Meat (8 minutes)
Step 5: Heat a large skillet over medium-high heat for 2 minutes. The pan needs to be hot before you add oil. Test it by flicking a tiny drop of water—it should sizzle immediately.
Step 6: Add 1 tablespoon vegetable oil and swirl to coat the pan. Oil prevents sticking and helps transfer heat evenly to the beef. Wait 30 seconds until the oil shimmers before adding meat.
Step 7: Add your ground beef to the hot pan, breaking it into large chunks. Don’t stir for 2-3 minutes. Leaving it alone creates a brown crust that adds incredible flavor. You’ll hear it sizzle—that’s the sound of flavor developing.
Step 8: Break the beef into smaller crumbles using a wooden spoon. Press down firmly to break up clumps. Smaller pieces (about pea-sized) give you better texture in your tacos. Continue cooking until no pink remains, about 5 more minutes.
Step 9: Push the browned beef to the sides of the pan, creating a well in the center. This technique lets you cook the aromatics without overcrowding. Overcrowding creates steam instead of the caramelization you want.
Phase 3: Building Flavor (7 minutes)
Step 10: Add your diced onions to the center well and cook for 3 minutes. Stir the onions occasionally until they turn translucent and start browning at the edges. The onions should soften completely—crunchy onions ruin taco texture.
Step 11: Add minced garlic and cook for 30 seconds while stirring constantly. Garlic burns quickly, turning bitter. Keep it moving in the pan. You’ll smell an amazing aroma when it’s ready—that’s your signal to move fast.
Step 12: Sprinkle your spice mixture over everything and stir for 1 minute. Cooking spices in the hot pan “blooms” them, releasing essential oils. This step transforms raw spice powder into deep, complex flavor. The mixture should smell toasted and fragrant.
Step 13: Stir in 2 tablespoons tomato paste and cook for 2 minutes. Tomato paste adds umami richness and helps the spices stick to the meat. Cook it until it darkens slightly and smells sweet rather than acidic.
Step 14: Pour in ½ cup beef broth and stir everything together. The liquid picks up all the browned bits stuck to the pan—that’s pure flavor. Let it simmer for 3 minutes until it reduces by half and thickens into a sauce that coats the meat.
Step 15: Taste your taco meat and adjust seasoning. Add more salt if needed. The meat should taste slightly more seasoned than you think—some flavor gets absorbed by the shells and toppings.
Phase 4: Assembly (5 minutes)
Step 16: Warm your taco shells in a 350°F oven for 3-5 minutes. Warm shells are crispier and less likely to crack when you fill them. Place them upside down between the oven rack bars so they stay open.
Step 17: Fill each crunchy shell with 2-3 tablespoons of meat. Don’t overfill—too much meat makes shells crack and toppings fall out. Start with less than you think you need.
Step 18: Layer your toppings in this order: lettuce, meat, cheese, tomatoes, sour cream, salsa. This order prevents shells from getting soggy. Lettuce creates a barrier between the hot meat and the shell. Cheese melts slightly from the meat’s heat.
Chef’s Notes
Meat-to-Fat Ratio Matters: I always use 80/20 ground beef for tacos. Leaner beef dries out and lacks flavor. The fat keeps your meat juicy and carries the spices beautifully. Similar to how I prepare my hearty ground beef chili, the right fat content makes all the difference.
Spice Blooming is Key: Toasting your spices in the hot pan releases aromatic compounds. This single step separates restaurant-quality tacos from boring ones. Never skip the blooming step.
Shell Temperature Trick: Warming shells prevents cracking and improves crunch. Cold shells shatter when you bite them. Warm shells bend slightly before breaking, giving you that satisfying crunch without falling apart.
Make-Ahead Secret: Cook the ground beef mixture up to 3 days ahead. Reheat gently before serving. The flavors actually improve overnight as the spices marry together. Perfect for game day spreads, just like my ground beef football food favorites.
Nutrition Information (Per Serving – 3 Tacos)
Calories: 485 | Protein: 28g | Carbohydrates: 32g | Fat: 26g | Fiber: 4g | Sugar: 4g | Sodium: 890mg
Delicious Variations
Breakfast Tacos: Add scrambled eggs and breakfast sausage to your ground beef. Top with hash browns, cheese, and hot sauce. Cook the eggs separately and combine them with the meat just before serving.
Loaded Nacho Tacos: Layer crushed tortilla chips inside your shells before adding meat. This creates extra crunch and prevents sogginess. Top with nacho cheese sauce, pickled jalapeños, and black olives.
Southwestern Style: Mix black beans and corn into your cooked ground beef. Add a squeeze of lime juice and top with avocado slices. The beans add protein and stretch the recipe to feed more people.
Spicy Fire Tacos: Double the chili powder and add cayenne pepper to your spice mix. Use pepper jack cheese instead of cheddar. Top with diced habaneros and chipotle sour cream for serious heat.
Storage & Reheating
Refrigerator Storage: Keep cooked taco meat in an airtight container for up to 4 days. Store it separately from toppings and shells. Add a splash of beef broth when reheating to restore moisture.
Freezer Storage: Freeze the meat mixture in freezer bags for up to 3 months. Lay bags flat to freeze—they stack better and thaw faster. Label with the date and reheating instructions.
Reheating Method: Warm ground beef in a skillet over medium heat for 5 minutes. Add 2-3 tablespoons of water or broth to prevent drying. Stir frequently until heated through to 165°F.
Shell Storage: Keep unused taco shells in their original packaging in a cool, dry place. Once opened, transfer to an airtight container. They’ll stay crispy for 2-3 weeks if protected from humidity.

Troubleshooting Common Problems
Problem 1 – Soggy Shells: Your shells get soft and break immediately.
Solution: Warm shells in the oven right before serving. Pat your ground beef with paper towels to remove excess grease. Use lettuce as a barrier between hot meat and shell.
Problem 2 – Bland Meat: Your taco filling tastes flat and boring.
Solution: You didn’t bloom your spices or use enough salt. Always cook spices in the hot pan for at least 1 minute. Taste and adjust seasoning before assembly—the meat should taste slightly over-seasoned on its own.
Problem 3 – Greasy Tacos: Oil pools at the bottom of your shells.
Solution: Drain excess fat after browning the beef. Tilt your pan and use a spoon to remove liquid fat, or transfer meat to a paper towel-lined plate briefly.
Problem 4 – Tough, Dry Meat: Your ground beef turns into hard little pebbles.
Solution: You cooked at too high heat or used meat that’s too lean. Medium-high heat is perfect—not a rolling boil. Use 80/20 ground beef and don’t overcook past the point where pink disappears.
Problem 5 – Cracking Shells: Every taco breaks in half when you bite it.
Solution: Don’t overfill shells—use only 2-3 tablespoons of meat per taco. Warm shells before filling so they’re more flexible. Hold tacos horizontally when eating, not vertically.
Equipment Essentials
- Large skillet (12-inch) – Cast iron works best
- Wooden spoon or sturdy spatula for breaking up meat
- Sharp knife for dicing vegetables
- Cutting board (preferably two—one for meat, one for vegetables)
- Small mixing bowl for combining spices
- Measuring spoons and cups
- Grater for shredding cheese (unless using pre-shredded)
- Baking sheet for warming taco shells
- Meat thermometer (optional but recommended)
Shopping List
Meat Counter
- 1 pound ground beef (80/20)
Produce Section
- 1 medium yellow onion
- 1 head garlic
- 2 Roma tomatoes
- 1 head romaine lettuce
- Fresh cilantro
- Jalapeños (optional)
Dairy Case
- Sharp cheddar cheese (8 oz block)
- Sour cream (6 oz container)
Pantry Aisle
- Crunchy taco shells (12-count box)
- Chili powder
- Ground cumin
- Paprika
- Dried oregano
- Vegetable oil
- Tomato paste
Refrigerated Section
- Fresh salsa (16 oz)
- Beef broth (14 oz can)
5 Success Secrets
1. Use Fresh Spices: Check the dates on your chili powder and cumin. Spices lose potency after 6 months. Fresh spices create vibrant flavor while old ones taste dusty and flat.
2. Don’t Rush the Browning: Let your ground beef sit undisturbed for 2-3 minutes. Patience creates a flavorful brown crust. Moving meat constantly prevents proper browning and releases too much moisture.
3. Build Your Tacos Strategically: Always put lettuce down first as a moisture barrier. Then add hot meat, followed by cheese which melts slightly. Cold toppings go on last to prevent shells from steaming.
4. Season in Layers: Add salt during cooking, not just at the end. Season the meat, taste it, then adjust. Seasoning throughout the cooking process builds deeper flavor than adding it all at once.
5. Serve Immediately: Assemble tacos right before eating. Pre-filled tacos get soggy within 10 minutes. Set up a taco bar where everyone builds their own—it stays fresh and makes serving fun.
Pro Tip: Make a double batch of the seasoned ground beef and freeze half. You’ll thank yourself on busy weeknights when dinner is just 10 minutes away. These ground beef crunchy tacos prove that simple ingredients and smart techniques create restaurant-worthy results at home.