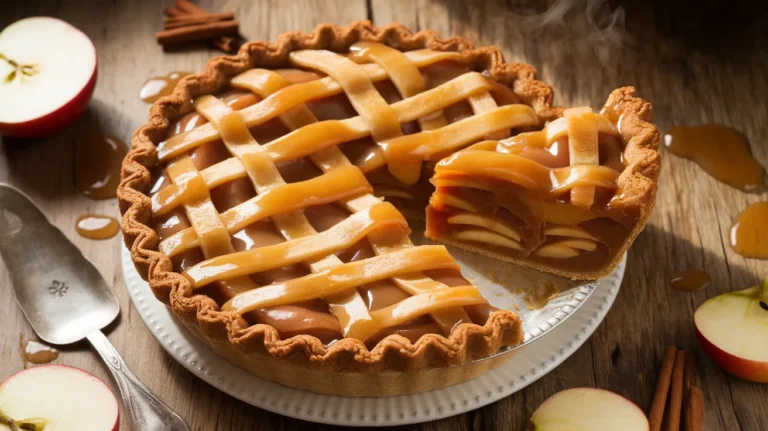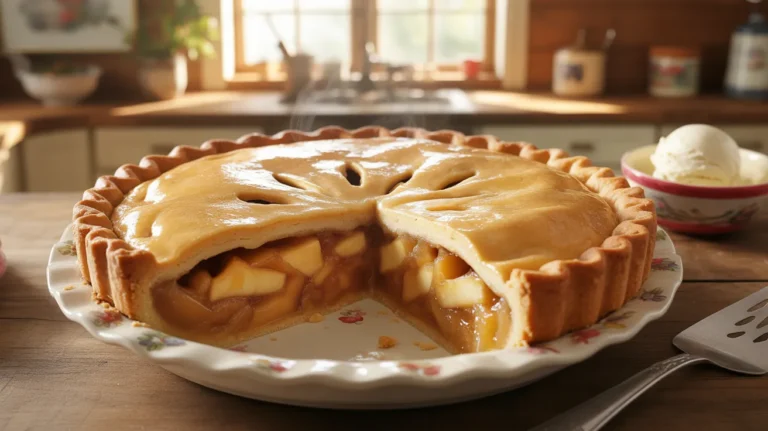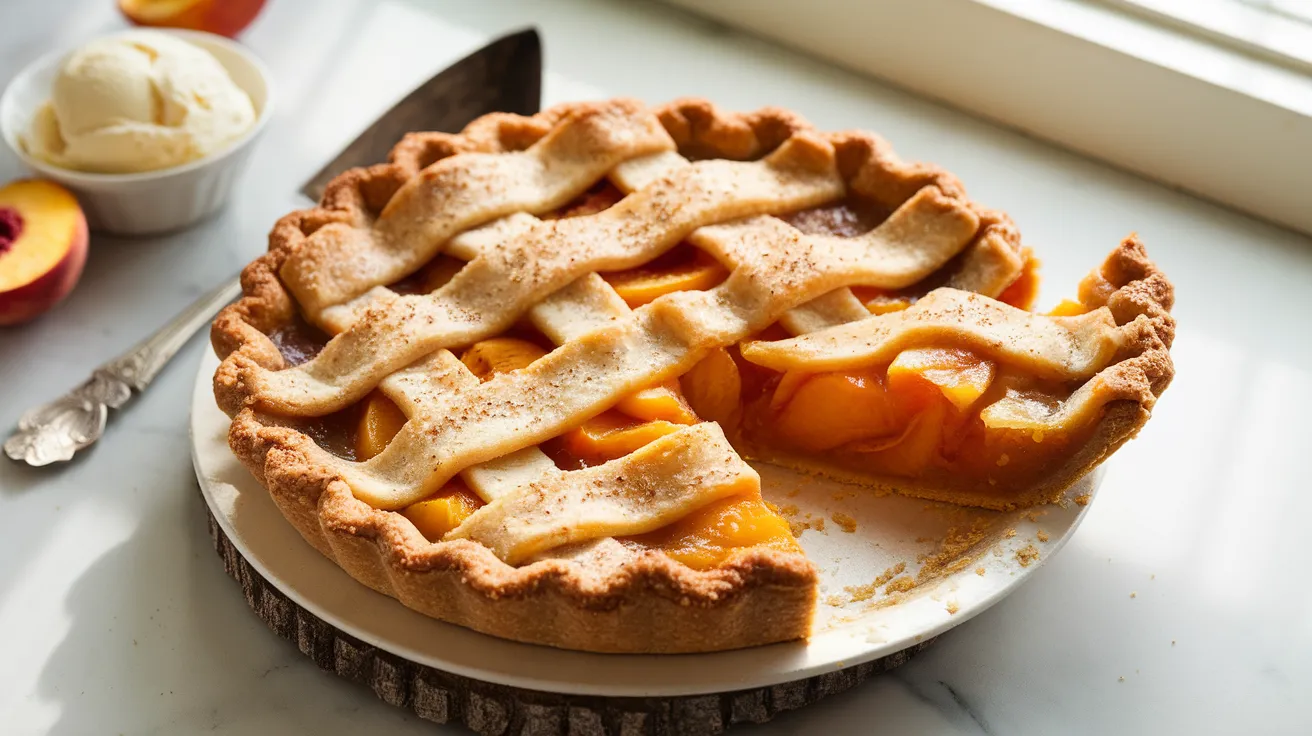
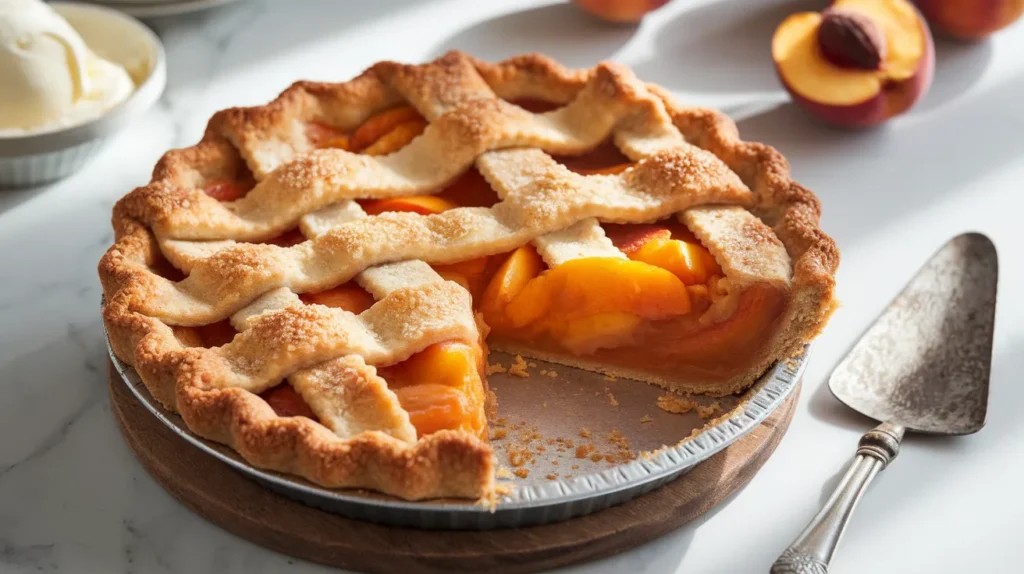
This peach pie brings together juicy summer peaches wrapped in buttery, flaky crust with a hint of cinnamon and vanilla. The golden lattice top gives way to bubbling fruit filling that’s neither too sweet nor too tart—just perfectly balanced peach perfection. Making your own peach pie from scratch might seem ambitious, but this beginner-friendly recipe breaks down every step so you’ll pull a bakery-worthy dessert from your oven. Whether you’re serving it warm with vanilla ice cream or enjoying a slice for breakfast (we won’t tell), this classic peach pie delivers that homemade magic that store-bought versions just can’t match.
SERVES: 4 | PREP: 35 MIN | COOK: 55 MIN | TOTAL: 90 MIN
Ingredients
For the Pie Crust
| Ingredient | Amount |
|---|---|
| All-purpose flour | 2½ cups |
| Unsalted butter (cold, cubed) | 1 cup |
| Granulated sugar | 1 tablespoon |
| Salt | 1 teaspoon |
| Ice water | 6-8 tablespoons |
For the Peach Filling
| Ingredient | Amount |
|---|---|
| Fresh peaches (peeled, sliced) | 5 cups |
| Granulated sugar | ¾ cup |
| Light brown sugar | ¼ cup |
| Cornstarch | 3 tablespoons |
| Fresh lemon juice | 2 tablespoons |
| Ground cinnamon | 1 teaspoon |
| Vanilla extract | 1 teaspoon |
| Salt | ¼ teaspoon |
| Unsalted butter (cut into small pieces) | 2 tablespoons |
For Assembly
| Ingredient | Amount |
|---|---|
| Egg (beaten) | 1 |
| Turbinado sugar (for sprinkling) | 2 tablespoons |
Step-by-Step Instructions
Phase 1: Making the Pie Crust (15 minutes)
Step 1: Combine 2½ cups flour, 1 tablespoon sugar, and 1 teaspoon salt in a large mixing bowl. Whisk these dry ingredients together for about 30 seconds to distribute everything evenly. This prevents salty or sweet pockets in your crust.
Step 2: Add the cold cubed butter directly from the fridge into the flour mixture. Using a pastry cutter or two forks, cut the butter into the flour until the mixture looks like coarse breadcrumbs with some pea-sized butter chunks remaining. These butter pieces create the flaky layers you want, so don’t overwork it. The process takes about 3-4 minutes.
Step 3: Drizzle 6 tablespoons ice water over the mixture one tablespoon at a time. Use a fork to gently mix after each addition. The dough should start clumping together. If it’s still too dry and crumbly after 6 tablespoons, add one more tablespoon at a time until the dough holds together when squeezed. Too much water makes tough crust, so add carefully.
Step 4: Divide the dough into two portions—one slightly larger than the other (about 60/40 split). The larger portion becomes your bottom crust. Form each into a flat disk, wrap tightly in plastic wrap, and refrigerate for 30 minutes minimum. This rest time relaxes the gluten and re-chills the butter, which is crucial for flakiness.
Phase 2: Preparing the Peach Filling (10 minutes)
Step 5: While your dough chills, bring a large pot of water to a boil. Cut a small “X” on the bottom of each peach with a sharp knife. Drop peaches into boiling water for 45-60 seconds—you’ll see the skin start to wrinkle and pull away. This blanching technique makes peeling incredibly easy.
Step 6: Transfer peaches immediately to a bowl of ice water to stop the cooking process. The skins should slip right off when you gently pull them. If they don’t, the peaches needed another 15-20 seconds in the boiling water.
Step 7: Slice your peeled peaches into ½-inch thick slices, discarding the pits. You need 5 cups of sliced peaches total. Place them in a large bowl.
Step 8: Add ¾ cup granulated sugar, ¼ cup brown sugar, 3 tablespoons cornstarch, 2 tablespoons lemon juice, 1 teaspoon cinnamon, 1 teaspoon vanilla, and ¼ teaspoon salt to the peaches. Gently toss everything together with a large spoon until the peaches are evenly coated. The lemon juice brightens the flavor and prevents browning, while the cornstarch thickens the juices during baking. Let this mixture sit while you roll out the dough—the peaches will release some juice, which is exactly what you want.
Phase 3: Assembling Your Peach Pie (10 minutes)
Step 9: Preheat your oven to 400°F (200°C). Position the rack in the lower third of your oven. This bottom heat helps the crust crisp up properly instead of getting soggy.
Step 10: Remove the larger dough disk from the fridge. On a lightly floured surface, roll it out into a 12-inch circle about ⅛-inch thick. Roll from the center outward, rotating the dough a quarter-turn every few rolls to maintain an even circle. If the dough cracks at the edges, it’s too cold—let it sit for 5 minutes.
Step 11: Carefully transfer the rolled dough to a 9-inch pie dish by rolling it loosely around your rolling pin, then unrolling it over the dish. Gently press the dough into the bottom and sides without stretching it. Stretched dough shrinks during baking. Let any excess hang over the edges—you’ll trim it later.
Step 12: Pour the peach filling into the crust-lined dish, spreading it evenly. Dot the top of the filling with the 2 tablespoons butter pieces. These butter bits melt during baking and enrich the filling with extra flavor and silkiness.
Step 13: Roll out the second dough disk the same way you did the first. For a lattice top, cut the dough into 10-12 strips about ¾-inch wide using a pizza cutter or sharp knife. Lay 5-6 strips across the pie in one direction, spacing them about ½-inch apart. Fold back every other strip halfway, lay a perpendicular strip down, then unfold the folded strips over it. Repeat this weaving pattern until you’ve created a lattice. If this feels complicated, you can simply lay the whole circle on top and cut vents instead.
Step 14: Trim the overhang to about ½ inch beyond the pie dish rim. Fold the edges under themselves and crimp by pressing with a fork or pinching with your fingers to create a decorative edge. This seal prevents filling from bubbling out.
Step 15: Brush the entire top crust with the beaten egg using a pastry brush. This egg wash creates that gorgeous golden-brown shine. Sprinkle the turbinado sugar over the top for extra crunch and sparkle.
Phase 4: Baking Your Peach Pie (55 minutes)
Step 16: Place the pie on a rimmed baking sheet (this catches any drips) and bake at 400°F for 20 minutes. The high initial heat sets the crust and starts the browning process.
Step 17: After 20 minutes, reduce the oven temperature to 350°F (175°C) without opening the door. Continue baking for 35-40 more minutes until the crust is deep golden brown and you can see the filling actively bubbling through the vents or lattice. The bubbling means the cornstarch has activated and thickened the juices. If the edges brown too quickly, tent them loosely with aluminum foil strips.
Step 18: Remove the pie from the oven and let it cool on a wire rack for at least 3-4 hours before slicing. This cooling time is absolutely essential—it allows the filling to set up properly. Cut into a warm pie and you’ll have peach soup. The wait is brutal but necessary.
Chef’s Notes
Peach Selection: Ripe but firm peaches work best for this peach pie. Squeeze them gently—they should give slightly but not feel mushy. Overly soft peaches turn to mush during baking, while rock-hard ones won’t soften enough. Late summer peaches (July-August) typically have the best flavor.
Crust Troubleshooting: If your crust shrinks during baking, you likely stretched it when placing it in the dish or skipped the chilling time. Always let the dough rest in the fridge and handle it gently. Cold dough = flaky crust.
Thickener Adjustments: Some peaches are juicier than others. If your peaches seem particularly wet after sitting with the sugar mixture, add an extra tablespoon of cornstarch. Better to have slightly firm filling than a soggy bottom crust.
Flavor Boost: Add ¼ teaspoon almond extract to your filling along with the vanilla for a deeper, more complex flavor that complements peaches beautifully. This is a professional baker’s secret.
Nutrition Information (Per Serving)
Calories: 520 | Protein: 6g | Carbohydrates: 72g | Fat: 24g
Delicious Variations
Peach-Blueberry Pie: Swap 1½ cups of peaches for fresh blueberries to create a gorgeous color contrast and flavor combination. The blueberries add tartness that balances the sweet peaches perfectly.
Spiced Peach Pie: Add ¼ teaspoon nutmeg and ¼ teaspoon cardamom to your filling along with the cinnamon for a warming, aromatic twist. This variation is especially good when served alongside apple pecan cobbler for a fall dessert spread.
Bourbon Peach Pie: Stir 2 tablespoons bourbon into your filling mixture for a sophisticated, adult version. The bourbon enhances the peach flavor without tasting boozy after baking.
Streusel-Topped Peach Pie: Skip the lattice and top your pie with a crumbly streusel made from ½ cup flour, ⅓ cup brown sugar, ¼ cup cold butter, and ½ cup chopped pecans. This easier option tastes just as impressive and pairs wonderfully with creamy desserts like banana pudding at summer gatherings.
Storage & Reheating
Room Temperature Storage: Cover your cooled peach pie loosely with aluminum foil and store at room temperature for up to 2 days. Don’t seal it tightly or the crust will soften.
Refrigerator Storage: For longer storage, refrigerate the covered pie for up to 5 days. Let slices come to room temperature or warm them slightly before serving for best flavor.
Freezing Instructions: Freeze the unbaked assembled pie tightly wrapped in plastic wrap and foil for up to 3 months. Bake directly from frozen, adding 15-20 extra minutes to the baking time. You can also freeze baked pie slices individually wrapped for quick single servings.
Reheating Tips: Warm individual slices in a 300°F oven for 10-12 minutes to restore the crust’s crispness. Microwaving makes the crust soggy, so use the oven when possible.
Troubleshooting Common Problems
Problem: Soggy Bottom Crust Your oven rack was probably too high, or you didn’t bake the pie long enough. The filling needs to bubble vigorously to activate the cornstarch properly. Always bake on the lower rack and don’t pull it out until you see active bubbling. You can also blind-bake (pre-bake) the bottom crust for 10 minutes before adding filling.
Problem: Filling Overflows You overfilled the pie or didn’t seal the edges properly. Stick to the 5-cup measurement for peaches and make sure you’ve crimped the edges well. Always use a rimmed baking sheet underneath to catch drips—even perfectly made pies sometimes bubble over.
Problem: Crust Burns Before Pie Is Done Your oven runs hot, or the pie needs shielding. Check the crust after 30 minutes—if it’s already deep golden, create foil strips to cover just the edges while the center continues baking. Some ovens have hot spots, so rotate the pie halfway through baking.
Problem: Runny Filling After Cooling You didn’t let the pie cool long enough, or you used overripe peaches that released too much liquid. The filling absolutely needs 3-4 hours to set up completely. If your peaches seem very juicy, increase the cornstarch to 4 tablespoons next time.
Problem: Tough, Chewy Crust You overworked the dough or added too much water. Handle pie dough as little as possible—mix just until it comes together. The less you work it, the more tender and flaky it becomes. Also ensure your butter stays cold throughout the process.
Equipment Essentials
- 9-inch pie dish (glass or ceramic shows browning best)
- Rolling pin (marble or wood both work great)
- Pastry cutter or two forks for cutting in butter
- Large mixing bowls (at least two)
- Measuring cups and spoons
- Sharp knife and pizza cutter for lattice strips
- Pastry brush for egg wash
- Rimmed baking sheet to catch drips
- Wire cooling rack
- Large pot for blanching peaches
Shopping List
Baking Aisle
- All-purpose flour
- Granulated sugar
- Light brown sugar
- Cornstarch
- Ground cinnamon
- Vanilla extract
- Turbinado sugar
Dairy Section
- Unsalted butter (cold)
- Eggs
Produce Section
- Fresh peaches (6-7 medium peaches)
- Fresh lemon (for juice)
Pantry Staples
- Salt
Success Secrets
1. Temperature is Everything: Keep your butter cold, your dough chilled, and your patience strong. Warm dough equals tough crust. If the dough feels too soft while rolling, pop it back in the fridge for 10 minutes.
2. Don’t Skip the Blanching: Peeling peaches without blanching is frustrating and wasteful. The 60-second boil makes the job effortless and ensures you keep all the precious peach flesh.
3. Let the Filling Rest: When you toss the peaches with sugar and cornstarch, let that mixture sit for 10-15 minutes. The sugar draws out juice that helps you see if you need more thickener before baking.
4. Visual Cues Over Time: Every oven is different. Bake until you see vigorous bubbling and deep golden color rather than strictly following time. Your eyes are better than any timer.
5. Serve It Right: Peach pie shines when served barely warm (not hot) with a scoop of vanilla ice cream or a dollop of fresh whipped cream. The contrast between warm pie and cold cream creates the ultimate summer dessert experience.