Light, airy sponge cake layered with fresh whipped cream and sweet strawberries—this fluffy Japanese strawberry shortcake recipe transforms simple ingredients into an elegant dessert that’s surprisingly easy to master at home. Unlike dense American-style cakes, this Japanese strawberry shortcake features a delicate chiffon-style sponge that practically dissolves on your tongue, making it the perfect celebration cake for birthdays, holidays, or any special occasion.
SERVES: 4 | PREP: 35 MIN | COOK: 25 MIN | TOTAL: 60 MIN
Ingredients
For the Sponge Cake
| Ingredient | Amount |
|---|---|
| Eggs (separated) | 4 large |
| Granulated sugar | ½ cup (divided: ¼ cup + ¼ cup) |
| Cake flour | ¾ cup |
| Whole milk | 3 tablespoons |
| Vanilla extract | 1 teaspoon |
| Vegetable oil | 2 tablespoons |
| Cream of tartar | ¼ teaspoon |
| Salt | Pinch |
For the Whipped Cream Filling
| Ingredient | Amount |
|---|---|
| Heavy whipping cream | 1½ cups |
| Powdered sugar | 3 tablespoons |
| Vanilla extract | ½ teaspoon |
For the Strawberry Layers
| Ingredient | Amount |
|---|---|
| Fresh strawberries | 1 pound (about 16 medium) |
| Granulated sugar | 1 tablespoon |
Step-by-Step Instructions
Phase 1: Prep Work (10 minutes)
Step 1: Preheat your oven to 340°F (170°C) and position the rack in the middle.
Line two 6-inch round cake pans with parchment paper on the bottom only—don’t grease the sides. This allows the fluffy Japanese strawberry shortcake batter to climb up the sides as it bakes, creating that signature height.
Step 2: Separate your eggs while they’re still cold from the refrigerator.
Place egg whites in a completely clean, dry mixing bowl (even a drop of yolk will prevent proper whipping). Put egg yolks in a separate medium bowl. Let both sit at room temperature for 15 minutes—this helps them whip to maximum volume.
Step 3: Sift the cake flour three times into a bowl.
This extra sifting might seem fussy, but it’s crucial for the cloud-like texture in authentic Japanese strawberry shortcake recipe results. The multiple sifts remove any lumps and incorporate air into the flour.
Step 4: Wash and hull your strawberries thoroughly.
Pat them completely dry with paper towels—excess moisture will make your cake soggy. Slice 12 strawberries into ¼-inch rounds for the filling. Reserve 4 whole strawberries for decorating the top.
Phase 2: Making the Egg Yolk Base (5 minutes)
Step 5: Add ¼ cup of sugar to your egg yolks.
Whisk vigorously for 2-3 minutes until the mixture becomes pale yellow and thick like ribbon—when you lift the whisk, the mixture should fall in thick ribbons that hold their shape for 3 seconds before disappearing.
Step 6: Mix in the milk, vanilla extract, and vegetable oil.
Whisk until completely smooth and glossy. The oil creates moisture while keeping the cake light—don’t substitute with butter or you’ll lose that fluffy texture.
Step 7: Add the sifted flour to the yolk mixture all at once.
Gently fold using a rubber spatula with broad, sweeping motions from the bottom of the bowl up and over. Stop as soon as no flour streaks remain—overmixing develops gluten and makes the cake tough. The batter will be thick and smooth.
Phase 3: Creating Perfect Meringue (8 minutes)
Step 8: Begin beating your egg whites on medium speed until they become foamy and opaque.
Add the cream of tartar and salt—these stabilizers help the meringue hold its structure during baking.
Step 9: Gradually add the remaining ¼ cup of sugar, one tablespoon at a time.
Wait 20 seconds between each addition to let the sugar dissolve properly. Adding sugar too quickly will result in a grainy, unstable meringue that deflates.
Step 10: Increase speed to high and beat until stiff peaks form.
This takes 3-4 minutes. To test: lift the beaters straight up—the peaks should stand straight up without drooping. The meringue should be glossy and smooth, not dry or clumpy. Underbeaten meringue creates a dense cake; overbeaten meringue becomes grainy and won’t incorporate smoothly.
Phase 4: Combining and Baking (30 minutes)
Step 11: Add one-third of the meringue to the egg yolk mixture.
Fold gently using a rubber spatula with a J-motion: cut down through the center, sweep across the bottom, and bring the spatula up the side while rotating the bowl. This initial fold lightens the yolk base, making it easier to incorporate the remaining meringue without deflating it.
Step 12: Pour the lightened yolk mixture into the remaining meringue.
Continue folding with the same gentle J-motion until just combined—you should see a few small white streaks remaining. Stop immediately! Overmixing deflates the air bubbles you worked so hard to create. The batter should be light, fluffy, and pale yellow.
Step 13: Divide the batter evenly between your two prepared pans.
Tap each pan firmly on the counter 3-4 times to release any large air bubbles that could create holes in your Japanese strawberry shortcake.
Step 14: Bake for 23-25 minutes until the tops are golden and spring back when gently pressed.
A toothpick inserted in the center should emerge with just a few moist crumbs—not wet batter. The cakes will rise significantly and dome slightly in the center.
Step 15: Immediately invert the pans onto a wire rack.
Let them cool completely upside down for at least 1 hour. This prevents the delicate cakes from collapsing under their own weight. If your pans have feet, great! If not, balance them upside down on drinking glasses.
Phase 5: Assembly (15 minutes)
Step 16: Run a thin knife around the edges of the cooled cakes and gently unmold them.
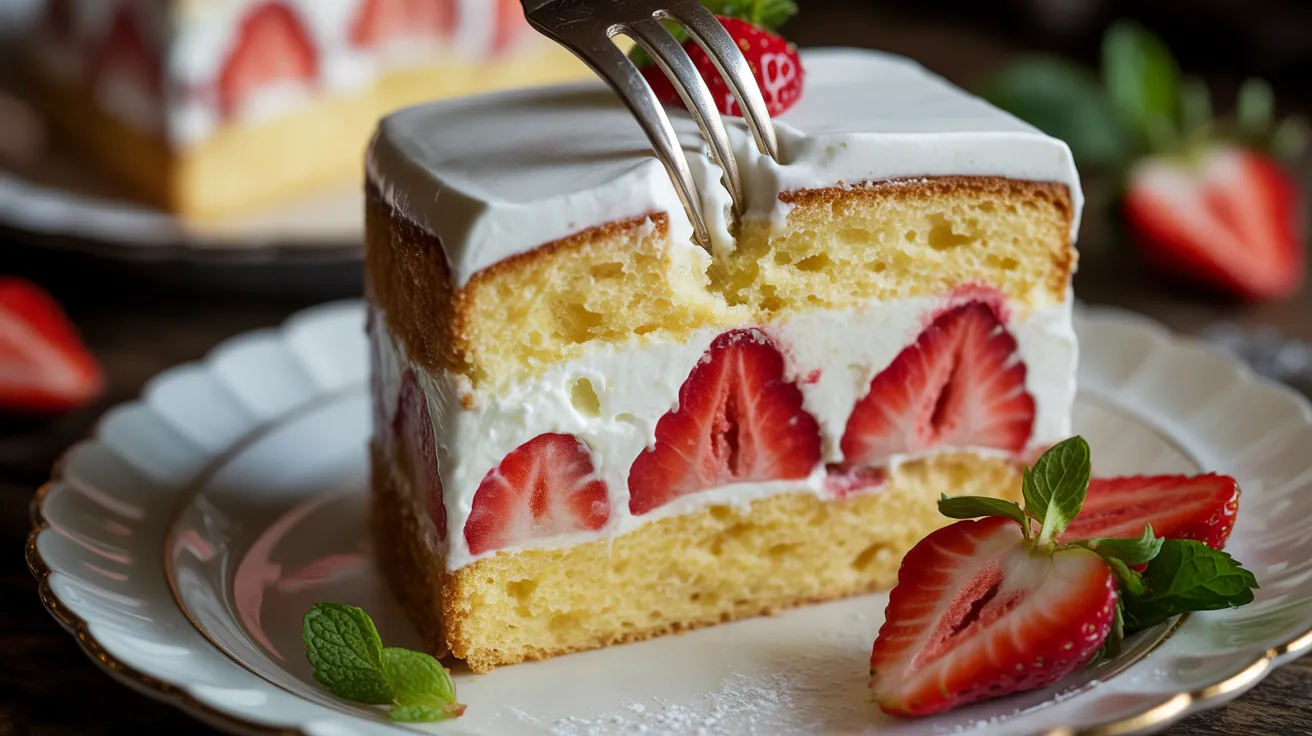
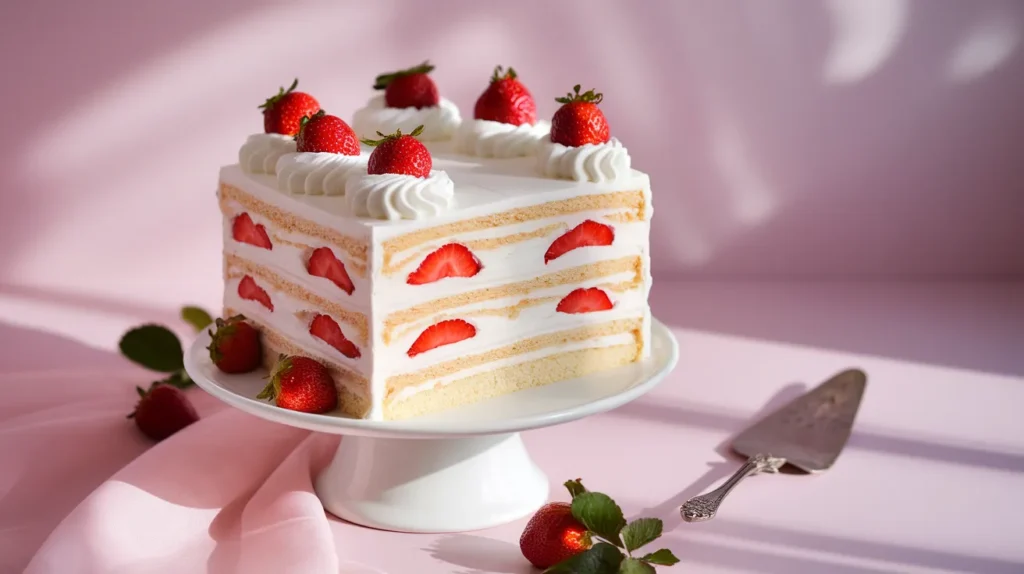
Peel off the parchment paper. Using a long serrated knife, carefully slice each cake horizontally in half. You now have 4 thin layers—this creates the beautiful striped effect when you cut into the finished cake.
Step 17: Prepare your whipped cream filling by beating the heavy cream, powdered sugar, and vanilla on medium-high speed.
Watch carefully and stop when soft peaks form—the cream should hold its shape but still have a slight droop at the tips. Overwhipped cream becomes grainy and buttery. For a richer filling similar to what you’d find in this indulgent brownie cookie bar, add an extra tablespoon of powdered sugar.
Step 18: Toss your sliced strawberries with 1 tablespoon of sugar and let them sit for 5 minutes.
This draws out their natural juices, creating a light syrup that adds moisture to each layer.
Step 19: Place the first cake layer on your serving plate and spread with ⅓ of the whipped cream (about ½ cup).
Use an offset spatula to create an even layer right to the edges. Arrange ⅓ of the sugared strawberry slices on top, pressing them gently into the cream.
Step 20: Repeat with the second and third layers.
Top with the final cake layer. Spread the remaining whipped cream over the top and sides in a thin, even coating—this is called a crumb coat. Refrigerate for 20 minutes to set, then apply a final generous layer of whipped cream for that professional bakery finish. Arrange the 4 whole strawberries on top and serve immediately.
Chef’s Notes
Egg Temperature Matters: Room temperature eggs whip to 30% greater volume than cold eggs, giving your fluffy Japanese strawberry shortcake recipe that signature height.
Flour Accuracy: Weigh your cake flour if possible (¾ cup = 90g). Scooping directly from the bag compacts the flour, adding up to 2 tablespoons extra—this makes the cake dense and dry.
Same-Day Assembly: Assemble your Japanese strawberry shortcake no more than 2 hours before serving. The cream and fruit release moisture over time, making the sponge soggy.
Meringue Rescue: If your meringue won’t reach stiff peaks after 6 minutes of beating, add ⅛ teaspoon more cream of tartar and beat another minute—old egg whites sometimes need extra help stabilizing.
Nutrition Information (Per Serving)
| Nutrient | Amount |
|---|---|
| Calories | 485 |
| Protein | 9g |
| Carbohydrates | 48g |
| Fat | 28g |
| Fiber | 2g |
| Sugar | 32g |
Creative Variations
Matcha Japanese Strawberry Shortcake: Replace 2 tablespoons of cake flour with sifted matcha powder for an elegant green tea flavor that pairs beautifully with strawberries.
Mixed Berry Version: Substitute half the strawberries with fresh blueberries and raspberries for a colorful, antioxidant-rich twist that works perfectly for summer celebrations.
Chocolate Drizzle Upgrade: Melt 3 ounces of dark chocolate and drizzle over the finished cake for a flavor combination as indulgent as this bright lemon raspberry cake.
Honey-Mascarpone Filling: Replace half the whipped cream with softened mascarpone cheese and sweeten with honey instead of powdered sugar for a richer, more Italian-inspired dessert.
Storage & Reheating
Refrigeration: Store assembled Japanese strawberry shortcake covered loosely with plastic wrap for up to 24 hours. Beyond this, the strawberries release too much liquid.
Cake Layers Only: Bake the sponge layers up to 2 days ahead. Wrap tightly in plastic wrap and store at room temperature. Don’t refrigerate unfrosted cake layers—they’ll dry out.
Freezing: The sponge layers freeze beautifully for up to 1 month when wrapped in plastic wrap then aluminum foil. Thaw completely at room temperature before assembling. Never freeze the assembled cake—the whipped cream will separate and become watery.
Whipped Cream Prep: Make stabilized whipped cream by adding 1 teaspoon of powdered gelatin dissolved in 1 tablespoon of warm water to the cream while beating. This holds for up to 3 days refrigerated.
Troubleshooting Guide
Problem #1: Dense, Heavy Cake
Cause: Deflated meringue from overmixing or underbeaten egg whites.
Solution: Beat egg whites to true stiff peaks (they should stand straight up), then fold the batter with only 15-20 gentle strokes. You should still see a few white streaks when you stop—they’ll disappear during baking.
Problem #2: Cake Sinks in the Middle
Cause: Opening the oven door too early or underbaking.
Solution: Don’t open the oven for the first 20 minutes. The dramatic temperature drop causes the delicate structure to collapse. Bake until a toothpick comes out with moist crumbs, not wet batter.
Problem #3: Tough, Rubbery Texture
Cause: Overmixing the flour into the egg yolks, developing too much gluten.
Solution: Fold the flour in with only 10-12 broad strokes until just barely combined. A few small flour streaks are fine—they’ll disappear during the final meringue fold.
Problem #4: Soggy Bottom Layers
Cause: Too much moisture from strawberries or assembling too far in advance.
Solution: Pat strawberries completely dry before slicing. Assemble your fluffy Japanese strawberry shortcake no more than 2 hours before serving, or keep the layers separate until serving time.
Problem #5: Whipped Cream Melts and Slides Off
Cause: Overbeaten cream (turns to butter) or assembling on warm cake layers.
Solution: Beat cream only to soft peaks—it should hold its shape but still look silky and smooth. Make absolutely certain your cake layers are completely cool before spreading any cream.
Equipment Essentials
- Two 6-inch round cake pans (springform pans work great)
- Electric mixer (stand or hand-held)
- Three mixing bowls (one must be completely grease-free for egg whites)
- Fine-mesh sifter for aerating flour multiple times
- Rubber spatula for gentle folding motions
- Long serrated knife for splitting cake layers evenly
- Offset spatula for spreading whipped cream smoothly
- Wire cooling rack for inverted cooling
- Parchment paper for lining pans
Shopping List
Dairy Section
- 4 large eggs
- 1½ cups heavy whipping cream
- 3 tablespoons whole milk
Baking Aisle
- Cake flour (not all-purpose!)
- Granulated sugar
- Powdered sugar
- Vanilla extract
- Cream of tartar
- Vegetable oil
Produce Section
- 1 pound fresh strawberries (choose firm, bright red berries)
Success Secrets
1. Temperature Control is Everything: Room temperature eggs whip to maximum volume, while cold heavy cream whips best. Plan accordingly by separating eggs 30 minutes before baking but keeping cream refrigerated until ready to whip.
2. The Fold Matters More Than You Think: Use broad, confident strokes when folding meringue into batter—timid stirring takes too many strokes and deflates your carefully beaten egg whites. Aim for 15-20 decisive folds maximum.
3. Invert for Perfect Texture: Cooling the cakes upside down stretches the delicate crumb structure, preventing collapse and creating that signature tender, airy texture that defines authentic Japanese strawberry shortcake recipe results.
4. Fresh is Non-Negotiable: This fluffy Japanese strawberry shortcake showcases simple ingredients, so quality matters immensely. Use peak-season strawberries and real vanilla extract—imitation vanilla adds an artificial chemical taste.
5. Practice Your Cake Splitting: Place one hand gently on top of the cooled cake while sawing horizontally with a serrated knife using a gentle back-and-forth motion. Rotate the cake rather than moving the knife around—this creates even layers every time.