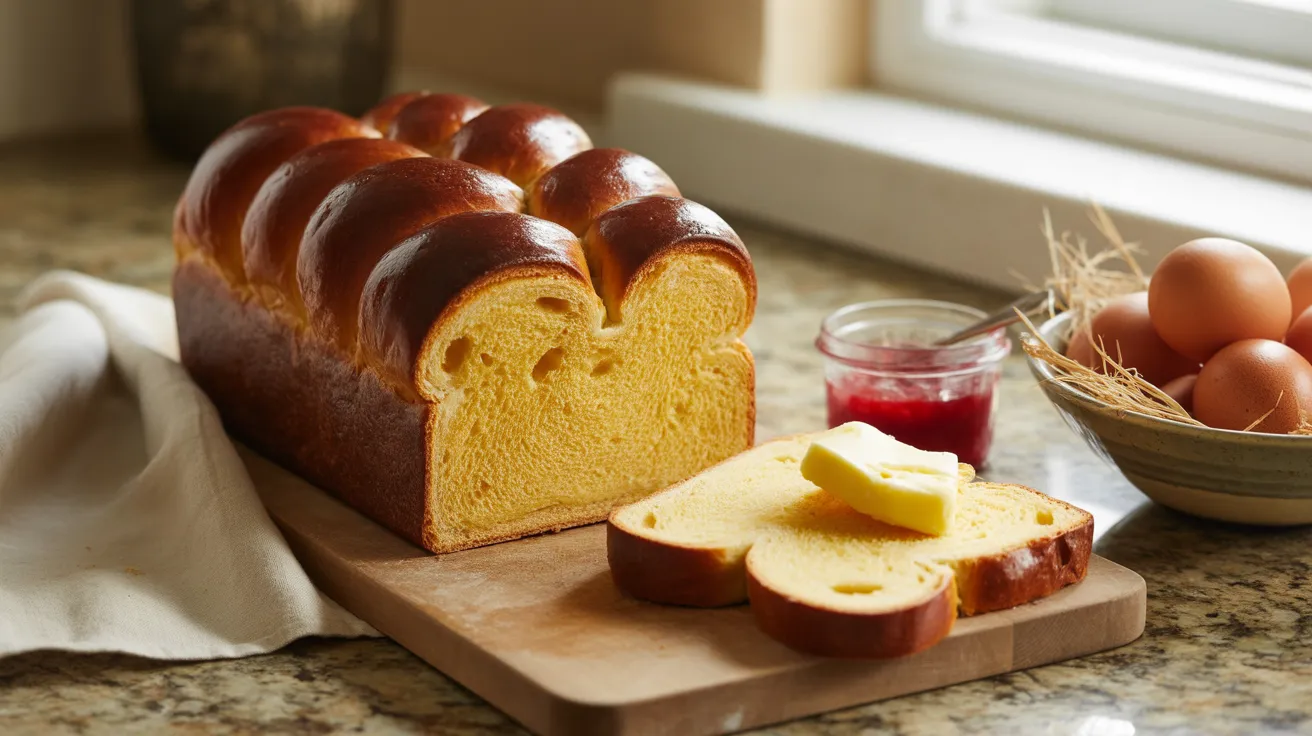
This bread machine zopf (swiss egg bread) transforms your kitchen into a Swiss bakery with its golden, glossy crust and tender, buttery interior. I’ve perfected this bread machine zopf recipe to give you bakery-quality results without the intimidation of hand-braiding, making it perfect for weekend brunches or special occasions.
SERVES: 4 | PREP: 15 MIN | COOK: 35 MIN | TOTAL: 3 HR 50 MIN
Ingredients
For the Dough:
| Ingredient | Amount |
|---|---|
| Whole milk, warmed to 110°F | ¾ cup |
| Large eggs | 2 |
| Unsalted butter, softened | 4 tablespoons |
| Granulated sugar | 3 tablespoons |
| Salt | 1 teaspoon |
| Bread flour | 3 cups |
| Active dry yeast | 2¼ teaspoons |
For the Egg Wash:
| Ingredient | Amount |
|---|---|
| Large egg yolk | 1 |
| Heavy cream | 1 tablespoon |
Instructions
Phase 1: Dough Preparation (10 minutes)
1. Prepare your ingredients. Warm the milk to exactly 110°F using a thermometer—too hot kills the yeast, too cold won’t activate it. I learned this the hard way after several failed loaves!
2. Load the bread machine pan. Add the warmed milk first, followed by the 2 eggs (slightly beaten), then the softened butter in small pieces. This liquid-first method prevents flour from sticking to the corners.
3. Add dry ingredients strategically. Pour the bread flour over the liquids to create a protective layer. Sprinkle the sugar and salt on opposite sides of the pan—they shouldn’t touch the yeast directly yet.
4. Create a yeast well. Make a small indentation in the center of the flour (don’t let it reach the liquid) and add the active dry yeast. This keeps the yeast dry until mixing begins.
5. Select the dough cycle. Close the lid and choose your machine’s “Dough” setting, which typically runs 90 minutes. Some machines have a specific “Sweet Bread Dough” option—use that if available since this dough is enriched.
Phase 2: Monitoring & Braiding (30 minutes)
6. Check dough consistency at 5 minutes. Open the lid during mixing and observe the dough ball. It should be slightly tacky but not sticky. Add 1 tablespoon of flour if it’s too wet, or 1 teaspoon of milk if it looks dry and crumbly.
7. Let the machine complete the cycle. The dough will rise to nearly double its size. You’ll hear the machine beep when finished—this is your signal to move quickly before over-proofing happens.
8. Prepare your work surface. Lightly flour a clean countertop or large cutting board. Line a baking sheet with parchment paper and set aside.
9. Divide the dough. Turn out the puffy dough and divide it into 3 equal portions using a bench scraper or sharp knife. Each piece should weigh approximately 8 ounces if you want perfect uniformity.
10. Shape into ropes. Roll each portion into a 14-inch rope by starting from the center and working outward with even pressure. The ropes should be uniform in thickness—this ensures even baking and a professional appearance.
11. Braid the dough. Place the three ropes parallel on your prepared baking sheet. Pinch the top ends together, then braid by crossing the right rope over the middle, then the left rope over the new middle. Continue until you reach the end, then pinch and tuck both ends underneath.
12. Set up for second rise. Cover the braided loaf loosely with a clean kitchen towel. Place it in a warm, draft-free spot. I use my oven with just the light on—it creates the perfect environment at about 75-80°F.
Phase 3: Final Rise & Baking (2 hours 15 minutes)
13. Monitor the second rise. Let the bread rise for 60-75 minutes until it looks puffy and nearly doubles in size. When you gently press the dough with your finger, the indentation should slowly spring back halfway.
14. Preheat your oven. About 15 minutes before baking, set your oven to 375°F. Position the rack in the center for even heat distribution.
15. Prepare the egg wash. Whisk together the egg yolk and heavy cream in a small bowl until smooth and glossy. This creates that signature shiny, golden crust that makes zopf so beautiful.
16. Apply the egg wash carefully. Using a soft pastry brush, gently coat the entire surface of the braided loaf. Get into the crevices of the braid but don’t let it pool—excess egg wash can burn and create dark spots.
17. Bake to golden perfection. Place the baking sheet in the preheated oven and bake for 30-35 minutes. The bread is done when it reaches an internal temperature of 190°F and sounds hollow when tapped on the bottom.
18. Cool before slicing. Transfer the loaf to a wire rack immediately. Let it cool for at least 20 minutes before slicing—cutting too early releases steam and creates a gummy texture inside.
Chef’s Notes
Temperature matters: Swiss bakers insist on using ingredients at room temperature except the milk, which should be warm. Cold butter or eggs straight from the fridge will slow down yeast activity and affect the texture of your bread machine zopf.
The overnight method: For even better flavor, stop after the dough cycle, punch down the dough, wrap it tightly in plastic, and refrigerate overnight. Let it come to room temperature for 30 minutes before braiding the next day.
Butter alternatives: While traditional Swiss egg bread uses butter, I’ve successfully substituted with vegetable oil (use 3 tablespoons instead of 4 tablespoons butter) for a slightly lighter crumb, similar to techniques used in bread machine whole wheat yeasted banana bread.
Freshness tip: Zopf is best eaten the day it’s baked, but wrapping it in foil extends its life. The enriched dough stays softer longer than lean breads.
Nutrition Information (Per Serving)
Calories: 425 | Protein: 13g | Carbohydrates: 62g | Fat: 14g | Fiber: 2g | Sugar: 10g | Sodium: 610mg
Variations
Cinnamon Sugar Zopf: After rolling out your ropes, brush them with melted butter and sprinkle with a mixture of 3 tablespoons sugar and 1 tablespoon cinnamon before braiding. The swirls create beautiful patterns when sliced.
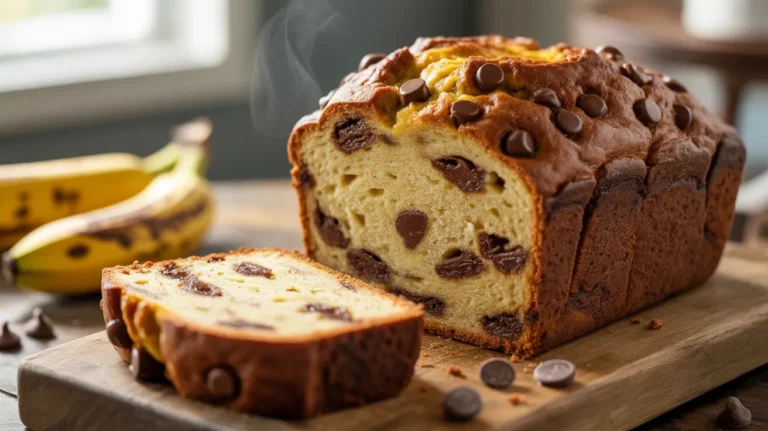
Chocolate Chip Zopf: Knead ¾ cup mini chocolate chips into the dough after the machine’s kneading cycle completes. The chips melt slightly during baking, creating pockets of chocolatey goodness throughout.
Whole Wheat Swiss Bread: Replace 1 cup of the bread flour with whole wheat flour for a nuttier flavor and extra fiber. You’ll need to add an extra 2 tablespoons milk since whole wheat absorbs more liquid. This technique works well if you enjoy heartier breads like gluten-free bread machine sandwich bread.
Orange Cardamom Zopf: Add 1 tablespoon orange zest and ½ teaspoon ground cardamom with the dry ingredients. This Scandinavian-inspired twist adds floral notes that pair beautifully with afternoon coffee.
Storage & Reheating
Room temperature storage: Wrap the completely cooled loaf in aluminum foil and keep at room temperature for up to 2 days. Don’t use plastic bags—they trap moisture and make the crust soft and chewy instead of crisp.
Freezing instructions: Slice the bread first, then wrap tightly in plastic wrap followed by foil. Freeze for up to 3 months. Thaw individual slices at room temperature for 20 minutes or toast directly from frozen.
Reheating whole loaf: Wrap in foil and warm in a 300°F oven for 10-15 minutes. Remove the foil for the last 3 minutes to re-crisp the crust.
Refreshing day-old bread: Lightly mist the loaf with water and heat in a 350°F oven for 5-7 minutes. This steam treatment revives the crust beautifully.
Troubleshooting
Problem: Dough didn’t rise in the bread machine
Your yeast might be expired or the milk was too hot (over 120°F kills yeast). Always check the yeast expiration date and use a thermometer for the milk. Also ensure your yeast didn’t touch the salt directly—salt inhibits yeast activity.
Problem: Bread is dense and heavy
This usually means you added too much flour or the dough was under-kneaded. Next time, measure flour by spooning it into the cup and leveling off—scooping directly from the bag compacts it. The dough should feel slightly sticky to the touch after kneading.
Problem: Crust is too dark but inside is undercooked
Your oven temperature runs hot. Reduce the temperature to 350°F and add 5-10 minutes to the baking time. You can also tent the loaf with foil after 20 minutes if the crust is browning too quickly.
Problem: Braid unraveled during baking
The dough was either over-proofed (too puffy) or you didn’t pinch the ends tightly enough. Make sure to really seal those ends and tuck them under firmly. The second rise should increase volume by about 75%, not double.
Problem: Egg wash looks streaky or uneven
You either didn’t mix the egg wash thoroughly or used too much at once. Whisk the egg and cream until completely smooth with no streaks, then apply in thin, even coats. Two light coats work better than one heavy application.
Equipment Essentials

- Bread machine with dough cycle
- Instant-read thermometer for milk temperature
- Kitchen scale (optional but helpful for dividing dough evenly)
- Bench scraper for cutting dough portions
- Baking sheet (preferably light-colored to prevent over-browning)
- Parchment paper for easy cleanup
- Pastry brush for egg wash application
- Wire cooling rack for proper cooling
- Clean kitchen towels for covering during rises
Shopping List
Dairy Section:
- Whole milk (¾ cup)
- Unsalted butter (4 tablespoons)
- Heavy cream (1 tablespoon)
- Large eggs (3 total)
Baking Aisle:
- Bread flour (3 cups)
- Granulated sugar (3 tablespoons)
- Active dry yeast (2¼ teaspoons/one packet)
- Salt (1 teaspoon)
Success Secrets
1. Room temperature wins. Let your eggs and butter sit out for 30 minutes before starting. Room temperature ingredients blend more smoothly and create better gluten development, which means a lighter, fluffier texture.
2. Watch the dough, not the clock. Every kitchen has different temperatures and humidity levels. Your dough is ready when it looks puffy and passes the finger-poke test, whether that takes 60 minutes or 90 minutes.
3. Invest in an oven thermometer. Most home ovens run 25°F hotter or cooler than the dial indicates. Knowing your actual temperature prevents over-baking or under-baking disasters.
4. The shine matters. That egg wash isn’t just for looks—it creates a protective barrier that keeps the crust tender while adding rich color. Don’t skip this step even if you’re short on time.
5. Slice with a serrated knife. Use a gentle sawing motion rather than pressing down. This preserves the beautiful braid pattern and prevents squashing the soft interior that makes this bread so special.