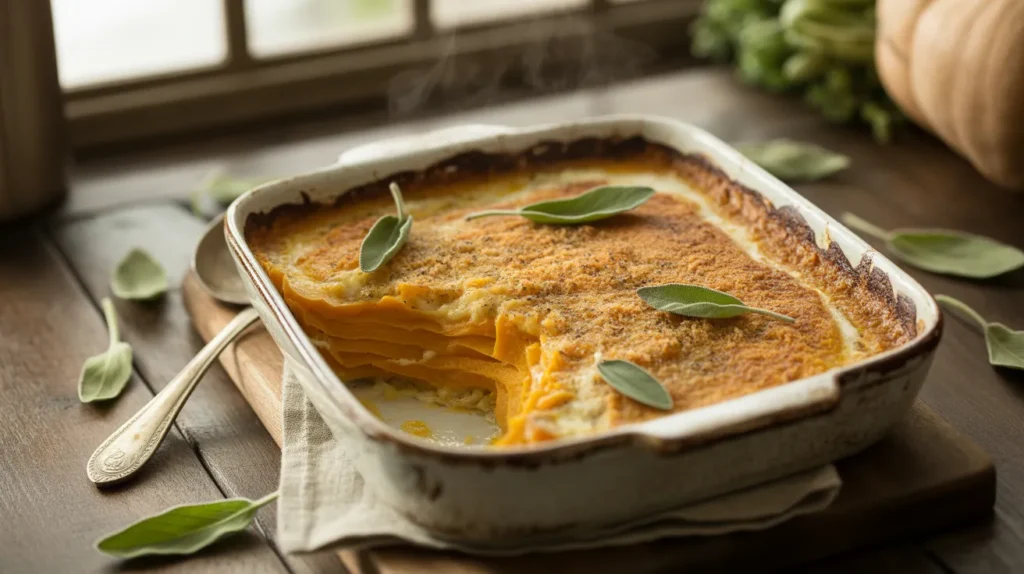
Looking for a show-stopping side dish that tastes like autumn on a plate? This sage butternut squash gratin delivers creamy, caramelized layers with crispy edges and aromatic herbs. I’ll show you how to make this sage butternut squash gratin recipe that serves four people perfectly, with every step explained so you can’t mess it up.
SERVES: 4 | PREP: 20 MIN | COOK: 55 MIN | TOTAL: 1 HR 15 MIN
Ingredients
For the Squash Layers
| Ingredient | Amount |
|---|---|
| Butternut squash (peeled, seeded) | 2 lbs |
| Fresh sage leaves | 15-20 leaves |
| Heavy cream | 1 cup |
| Whole milk | ½ cup |
| Garlic cloves (minced) | 3 cloves |
| Salt | 1 tsp |
| Black pepper | ½ tsp |
| Ground nutmeg | ¼ tsp |
For the Topping
| Ingredient | Amount |
|---|---|
| Gruyere cheese (shredded) | 1 cup |
| Parmesan cheese (grated) | ½ cup |
| Panko breadcrumbs | ⅓ cup |
| Butter (melted) | 2 tbsp |
Step-by-Step Instructions
Phase 1: Prep Work (15 minutes)
Step 1: Preheat your oven to 375°F and position the rack in the middle. The middle position gives you even heat from top and bottom, which prevents burning while ensuring the center cooks through.
Step 2: Grease a 9×9-inch baking dish with butter, getting into all the corners. I use about 1 tablespoon of softened butter and spread it with a paper towel to coat every surface.
Step 3: Slice your butternut squash into ⅛-inch thick rounds using a sharp knife or mandoline. Thin, uniform slices are critical here because they cook evenly and create those beautiful layers you see in magazine photos.
Step 4: Finely chop 12 sage leaves, saving the rest whole for layering. The chopped sage goes into the cream mixture, while whole leaves add visual appeal between layers.
Phase 2: Creating the Cream Base (5 minutes)
Step 5: Combine 1 cup heavy cream and ½ cup whole milk in a medium saucepan over medium heat. Don’t skip the milk—using all cream makes the dish too rich and heavy.
Step 6: Add 3 minced garlic cloves, chopped sage, 1 tsp salt, ½ tsp pepper, and ¼ tsp nutmeg to the cream mixture. Nutmeg might seem odd, but it’s the secret ingredient that makes squash dishes taste restaurant-quality.
Step 7: Heat the cream mixture until it just starts to steam and tiny bubbles form around the edges (about 3-4 minutes). You’re infusing the cream with flavors, not making a sauce, so don’t let it boil or the dairy can separate.
Step 8: Remove from heat and let it sit for 5 minutes so the flavors blend. This resting time lets the garlic mellow and the sage release its oils into the cream.
Phase 3: Building the Gratin (10 minutes)
Step 9: Arrange one-third of your squash slices in the bottom of the baking dish, overlapping them slightly like shingles on a roof. Overlapping creates more surface area for the cream to cling to and helps the layers stick together when serving.
Step 10: Tuck 3-4 whole sage leaves between the squash slices in this first layer. Place them where they’ll be visible when you cut into the finished dish—it looks beautiful and adds bursts of flavor.
Step 11: Pour one-third of your infused cream mixture over the first squash layer, tilting the dish to spread it evenly. Make sure the cream reaches the edges; dry spots won’t cook properly and can burn.
Step 12: Sprinkle ⅓ cup Gruyere cheese evenly across this layer. The cheese acts like glue, holding the layers together and adding that nutty, melty goodness.
Step 13: Repeat steps 9-12 two more times to create three complete layers. Each layer should look identical—this creates that stunning cross-section when you slice into the finished gratin.
Phase 4: The Crunchy Topping (3 minutes)
Step 14: Mix ⅓ cup panko breadcrumbs, ½ cup Parmesan cheese, and 2 tbsp melted butter in a small bowl until it looks like wet sand. This topping protects the squash from drying out while creating that golden, crunchy cap everyone fights over.
Step 15: Sprinkle the breadcrumb mixture evenly over the top layer of your gratin. Don’t press it down—just scatter it loosely so it stays crispy instead of getting soggy.
Phase 5: Baking to Perfection (55 minutes)
Step 16: Cover the baking dish tightly with aluminum foil and place it in the preheated oven. The foil traps steam, which helps the squash cook through without the top burning.
Step 17: Bake covered for 35 minutes, then remove the foil carefully (watch for steam). The squash should feel tender when you poke it with a knife, but not mushy.
Step 18: Continue baking uncovered for another 20 minutes until the top turns golden brown and you see bubbling around the edges. Those bubbles tell you the cream has thickened into a sauce and the flavors have concentrated.
Step 19: Remove from oven and let it rest for 10 minutes before cutting. This rest time is essential—if you cut immediately, the cream will run everywhere instead of staying in neat, sliceable layers.
Step 20: Garnish with fresh sage leaves if desired and serve while still warm. The gratin should hold its shape when you cut it, with distinct layers visible and a golden, crispy top.
Chef’s Notes
Mandoline Magic: A mandoline slicer creates perfectly uniform slices in seconds. If cutting by hand, go slow and keep your fingers curved back from the blade.
Cheese Choices: Gruyere melts beautifully and adds nutty depth, but you can substitute Swiss, Fontina, or even sharp cheddar if that’s what you have.
Make-Ahead Strategy: Assemble the entire sage butternut squash gratin up to step 15, cover with plastic wrap, and refrigerate for up to 24 hours. Add 10 minutes to the covered baking time.
Timing is Everything: This gratin pairs perfectly with roasted meats. Pop it in the oven when your main dish comes out to rest—the timing works out beautifully.
Nutrition Information (Per Serving)
| Nutrient | Amount |
|---|---|
| Calories | 425 |
| Protein | 15g |
| Carbohydrates | 32g |
| Fat | 28g |
| Fiber | 5g |
| Sodium | 780mg |
Delicious Variations
Spicy Kick Version: Add ¼ tsp red pepper flakes to the cream mixture and sprinkle ¼ cup crispy bacon between layers for a sweet-spicy-smoky combination that’ll wake up your taste buds.
Herb Garden Style: Replace sage with fresh thyme and rosemary for a different flavor profile. If you’re looking for more herb-forward butternut squash dishes, try this pesto butternut squash bake for a completely different take.
Protein-Packed: Layer in 1 cup cooked Italian sausage between the squash for a heartier main dish. The sausage apple stuffed butternut squash recipe uses similar flavor combinations if you want to explore that direction.
Dairy-Light Version: Swap half the heavy cream for chicken stock and reduce cheese to ½ cup total. You’ll lose some richness but save about 150 calories per serving.
Storage & Reheating
Refrigerator: Store covered in the baking dish or transfer to an airtight container for up to 4 days. The flavors actually improve overnight as the cream continues to soak into the squash.
Freezing: Freeze individual portions wrapped in plastic wrap, then foil, for up to 2 months. Thaw overnight in the fridge before reheating.
Reheating: Cover with foil and warm at 325°F for 15-20 minutes until heated through. Add 5 minutes uncovered at the end to re-crisp the topping. Microwave works in a pinch (2-3 minutes on 70% power), but you’ll lose that crunchy top.
Serving Temperature: This gratin tastes best warm, not piping hot. Let it cool for those critical 10 minutes after baking every time.
Troubleshooting Guide
Problem: Squash is still crunchy after baking. Solution: Your slices were too thick or oven temperature was too low. Cover with foil and bake another 15-20 minutes at 400°F. Next time, slice thinner.
Problem: The top is burning but the middle is still raw. Solution: Your oven runs hot or the rack was too close to the heating element. Move to a lower rack and reduce temperature to 350°F. Cover with foil immediately to protect the top.
Problem: The cream separated and looks curdled. Solution: The cream mixture boiled instead of just steaming, or you used ultra-pasteurized cream. It’s still safe to eat and tastes fine, just doesn’t look perfect. Use regular (not ultra-pasteurized) heavy cream next time.
Problem: The gratin is soupy and won’t slice. Solution: You didn’t let it rest long enough, or you added too much liquid. Let it cool for 15 minutes instead of 10. If still soupy, return to a 375°F oven uncovered for 10 minutes to evaporate excess moisture.
Problem: The sage tastes bitter. Solution: You burned the whole sage leaves against the hot pan sides, or used dried sage instead of fresh. Fresh sage is essential for this recipe—dried sage concentrates the flavor and can taste medicinal in cream-based dishes.
Equipment Essentials
- 9×9-inch baking dish (ceramic or glass works best)
- Sharp chef’s knife or mandoline slicer
- Measuring cups and spoons
- Medium saucepan for heating cream
- Cheese grater or food processor
- Mixing bowls (at least 2)
- Aluminum foil
- Cutting board
Shopping List
Produce Section
- Butternut squash (2 lbs)
- Fresh sage (1 bunch)
- Garlic bulb
Dairy Case
- Heavy cream (8 oz)
- Whole milk (4 oz)
- Gruyere cheese (8 oz block)
- Parmesan cheese (2 oz)
- Butter
Pantry/Baking Aisle
- Panko breadcrumbs
- Ground nutmeg
- Salt
- Black pepper
Success Secrets
- Uniform slicing is non-negotiable. Inconsistent thickness means some pieces are mushy while others are crunchy. Invest in a $15 mandoline—it pays for itself in perfect gratins.
- Don’t rush the resting time. Those final 10 minutes out of the oven let the starches in the squash absorb excess liquid and set up the structure so you get clean slices.
- Layer your cheese strategically. Put more cheese in the middle layers and less on top under the breadcrumbs. This prevents the top from getting greasy while keeping the interior creamy.
- Watch for the bubble test. When you see steady bubbling around the entire edge of the dish, the sage butternut squash gratin is done. Those bubbles mean the cream has thickened properly.
- Use the freshest sage possible. Old sage tastes musty and bitter. Fresh sage should smell bright and slightly peppery when you tear a leaf. Buy it the day you’re cooking if possible.
This sage butternut squash gratin transforms a simple squash into something special enough for holiday tables but easy enough for a Tuesday night. The layers of tender squash, aromatic sage, and melted cheese create comfort food that looks impressive when you slice into it. Make it once and it’ll become your go-to fall side dish.