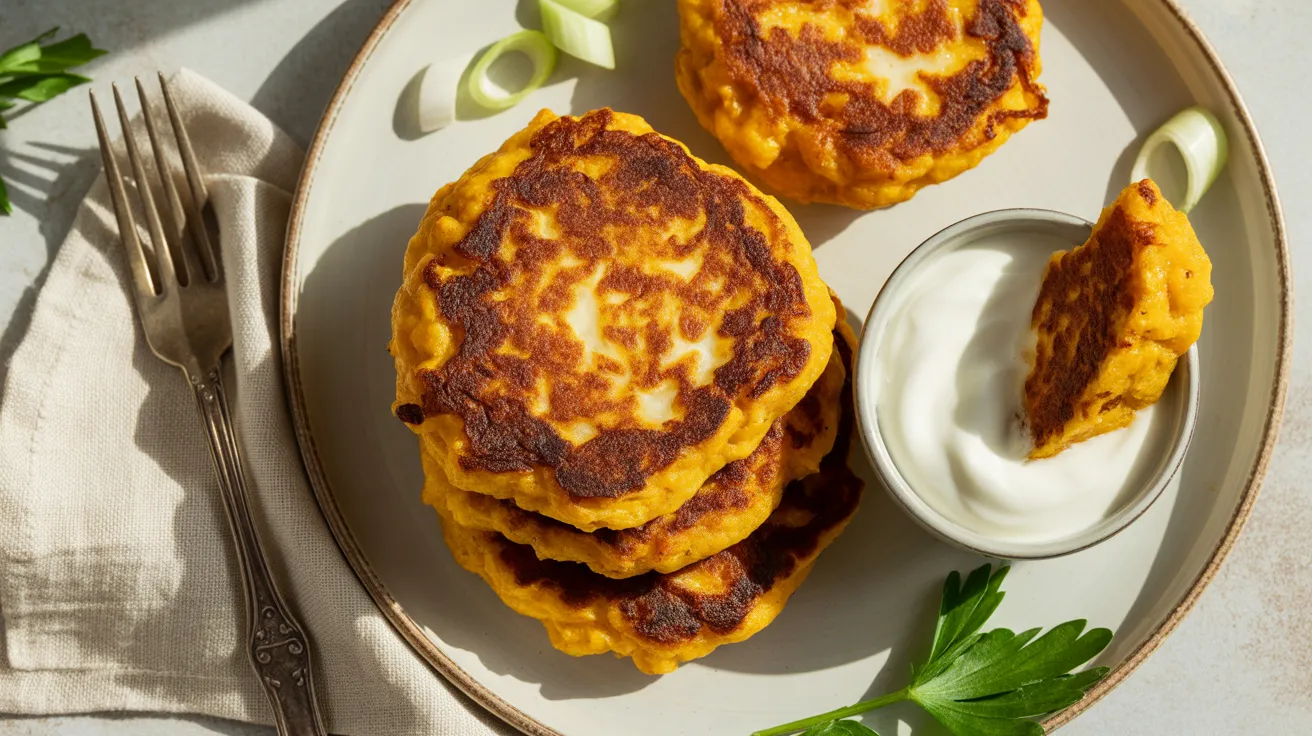
Golden, crispy cheesy butternut squash fritters transform sweet roasted squash into savory comfort food perfection. These tender-on-the-inside, crunchy-on-the-outside fritters pack melty cheese, fresh herbs, and caramelized edges into every bite – perfect for breakfast, lunch, or a satisfying dinner side that’ll have everyone asking for seconds.
SERVES: 4 | PREP: 20 MIN | COOK: 35 MIN | TOTAL: 55 MIN
Ingredients
Main Fritter Base
| Ingredient | Amount |
|---|---|
| Butternut squash (peeled, cubed) | 3 cups |
| Sharp cheddar cheese (shredded) | 1 cup |
| All-purpose flour | ½ cup |
| Large eggs | 2 |
| Green onions (finely chopped) | ¼ cup |
Seasonings & Binding
| Ingredient | Amount |
|---|---|
| Garlic powder | 1 teaspoon |
| Smoked paprika | ½ teaspoon |
| Salt | ¾ teaspoon |
| Black pepper | ¼ teaspoon |
| Baking powder | ½ teaspoon |
For Cooking
| Ingredient | Amount |
|---|---|
| Vegetable oil | 3 tablespoons |
| Fresh parsley (chopped, for garnish) | 2 tablespoons |
Step-by-Step Instructions
Phase 1: Preparing the Butternut Squash (15 minutes)
Step 1: Peel your butternut squash using a sharp vegetable peeler, working from top to bottom in long strokes. Remove all the orange skin until you see only the bright orange flesh underneath. This prevents any tough bits in your finished fritters.
Step 2: Cut the squash in half lengthwise and scoop out all the seeds and stringy pulp with a spoon. You want only the solid flesh for the best texture.
Step 3: Dice the squash into ½-inch cubes – keep them uniform so they cook evenly. You need exactly 3 cups of cubed squash measured after cutting.
Step 4: Place the cubed squash in a microwave-safe bowl with 2 tablespoons water. Cover tightly with plastic wrap, leaving one corner vented for steam to escape.
Step 5: Microwave on high for 8-10 minutes until the squash is fork-tender but not mushy. It should mash easily but still hold some texture. Let it cool for 5 minutes – this prevents the eggs from cooking when you mix everything together.
Step 6: Use a potato masher or fork to mash the squash until mostly smooth with some small chunks remaining. You want about 80% smooth texture. Don’t puree it completely – those little pieces add character to your fritters.
Phase 2: Making the Fritter Batter (5 minutes)
Step 7: Transfer the mashed butternut squash to a large mixing bowl. Press it against the sides of the bowl with a spatula to release any excess moisture – this helps your cheesy butternut squash fritters hold together better during cooking.
Step 8: Add 1 cup shredded sharp cheddar cheese to the warm squash. The residual heat will slightly melt the cheese, creating better binding. Stir until the cheese is evenly distributed throughout.
Step 9: Crack 2 eggs into the mixture and beat them in thoroughly using a fork. The eggs act as the glue that holds everything together, so mix until you see no streaks of yellow.
Step 10: Sprinkle in the ½ cup flour, ½ teaspoon baking powder, 1 teaspoon garlic powder, ½ teaspoon smoked paprika, ¾ teaspoon salt, and ¼ teaspoon black pepper. Fold everything together gently until just combined – overmixing makes tough fritters.
Step 11: Stir in the ¼ cup chopped green onions. These add a fresh bite that cuts through the richness. Your batter should be thick enough to hold its shape on a spoon but not stiff. If it’s too wet, add 1-2 tablespoons more flour.
Phase 3: Cooking the Fritters (15 minutes)
Step 12: Heat 3 tablespoons vegetable oil in a large non-stick skillet over medium heat for 2-3 minutes. Test the temperature by dropping a tiny bit of batter into the oil – it should sizzle immediately but not smoke.
Step 13: Scoop ¼ cup portions of batter into the hot skillet, using the back of your spoon to flatten each mound into a 3-inch circle about ½-inch thick. Don’t crowd the pan – cook 4 fritters at a time with space between them for easy flipping.
Step 14: Let the fritters cook undisturbed for 4-5 minutes. You’ll see the edges turn golden brown and start to look set. Resist the urge to peek underneath – moving them too early causes them to fall apart.
Step 15: Carefully slide a thin spatula under each fritter and flip in one confident motion. The bottom should be deep golden brown with crispy edges. If it’s pale, give it another minute before flipping.
Step 16: Cook the second side for 3-4 minutes until equally golden and crispy. Press gently with your spatula – the fritters should feel firm, not squishy. The internal temperature should reach 165°F if you want to check with a thermometer.
Step 17: Transfer the cooked cheesy butternut squash fritters to a paper towel-lined plate to drain excess oil. Keep them warm in a 200°F oven while you cook the remaining batches.
Step 18: Add another tablespoon of oil to the skillet between batches if needed. Repeat the cooking process until all your batter is used – you should get 12 fritters total (3 per person).
Step 19: Arrange the finished fritters on a serving platter and sprinkle with fresh chopped parsley while they’re still hot. The herbs stick better to warm fritters.
Step 20: Serve immediately while the outside is crispy and the cheese is still gooey inside. These are best eaten fresh but can be kept warm for up to 30 minutes.
Chef’s Notes
Moisture Control is Everything: Butternut squash contains lots of water that can make soggy fritters. After mashing, I press the squash mixture through a fine-mesh strainer or squeeze it gently in cheesecloth to remove excess liquid. This one step dramatically improves the crispy exterior texture.
Cheese Selection Matters: Sharp cheddar gives the best flavor punch, but you can mix in ¼ cup Parmesan for extra umami depth. Avoid pre-shredded cheese when possible – the anti-caking agents prevent proper melting and binding in your cheesy butternut squash fritters.
Temperature Sweet Spot: Medium heat is crucial. Too hot and the outside burns before the inside sets; too low and they absorb oil like sponges. If your first batch cooks too fast or slow, adjust the heat and let the pan stabilize for a minute before continuing.
Make-Ahead Friendly: Mix the batter up to 4 hours ahead and refrigerate. Cold batter actually fries up crispier because the flour has time to hydrate properly. Just give it a quick stir before cooking since some liquid may separate.
Nutrition Information (Per Serving – 3 Fritters)
- Calories: 285
- Protein: 12g
- Carbohydrates: 28g
- Fat: 14g
- Fiber: 4g
- Sugar: 4g
- Sodium: 520mg
Delicious Variations
Herb & Garlic Fritters: Add 2 tablespoons fresh minced herbs (rosemary, thyme, or sage) and 2 cloves minced fresh garlic to the batter. These aromatic additions pair beautifully with the sweet squash, much like the herb-forward flavors in this butternut squash apple bake that combines sweet and savory elements.
Spicy Southwest Version: Replace the cheddar with pepper jack cheese and add ½ teaspoon cumin, ¼ teaspoon cayenne pepper, and 2 tablespoons chopped cilantro. Serve with sour cream and salsa for a Mexican-inspired twist.
Italian-Style Fritters: Swap cheddar for ¾ cup mozzarella and ¼ cup Parmesan. Add 1 teaspoon Italian seasoning and 2 tablespoons chopped sun-dried tomatoes. These work beautifully alongside butternut squash pasta sauce for a complete Italian-themed meal.
Vegan Alternative: Replace eggs with 2 flax eggs (2 tablespoons ground flaxseed mixed with 6 tablespoons water, left to gel for 5 minutes). Use nutritional yeast instead of cheese for a dairy-free option that still delivers savory flavor.
Storage & Reheating
Refrigerator Storage: Cool fritters completely on a wire rack before storing. Layer them between parchment paper sheets in an airtight container. They’ll stay fresh for 3-4 days in the fridge.
Freezer Instructions: Freeze cooked fritters in a single layer on a baking sheet until solid (2 hours), then transfer to freezer bags with parchment paper between each fritter. They keep well for 2 months frozen.
Reheating for Best Results: Never microwave these – you’ll lose the crispy exterior. Instead, reheat in a 375°F oven for 8-10 minutes, flipping halfway through. For frozen fritters, add 5 extra minutes to the oven time.
Keeping Warm for Serving: If making these for a brunch or party, keep finished batches warm on a baking sheet in a 200°F oven for up to 30 minutes. They’ll stay crispy without drying out.
Troubleshooting Common Problems
Problem 1: Fritters Fall Apart When Flipping Your batter is too wet or you’re flipping too early. Add 2 tablespoons extra flour to the mixture and make sure you see golden brown edges before attempting to flip. Wait the full 4-5 minutes on the first side.
Problem 2: Soggy, Oil-Soaked Fritters The oil temperature is too low. Increase your heat slightly and always test with a small drop of batter first – it should sizzle vigorously. Also, don’t skip the paper towel draining step after cooking.
Problem 3: Raw Centers with Burnt Exteriors Your heat is too high or the fritters are too thick. Reduce to medium or medium-low heat and flatten each scoop to no more than ½-inch thickness. Thinner fritters cook through more evenly.
Problem 4: Bland Flavor Despite Following Recipe Butternut squash is naturally sweet and mild, so it needs proper seasoning. Taste your batter before cooking (it’s safe since you’ll be cooking it thoroughly) and add ¼ teaspoon more salt if needed. Don’t skimp on the cheese either.
Problem 5: Fritters Spread Too Much in the Pan Your batter is too thin from excess squash moisture or not enough flour. Let your mashed squash cool completely and press out moisture, then add flour 1 tablespoon at a time until the mixture holds its shape on a spoon without running.
Equipment Essentials

- Large non-stick skillet (12-inch works best for cooking multiple fritters)
- Potato masher or sturdy fork (for achieving the right squash texture)
- Mixing bowls (one large for batter, one medium for squash)
- Measuring cups and spoons (accurate measurements prevent texture issues)
- Vegetable peeler (sharp peeler makes squash prep much easier)
- Chef’s knife (for clean, uniform squash cubes)
- Thin metal spatula (flexible spatula helps flip delicate fritters)
- Microwave-safe bowl with lid (for quick squash cooking)
- Box grater (if shredding cheese yourself for better melting)
- Paper towels and plate (for draining excess oil)
Shopping List by Store Section
Produce Section:
- 1 medium butternut squash (about 2 pounds)
- 1 bunch green onions
- Fresh parsley
Dairy Case:
- Sharp cheddar cheese (8 ounces)
- Large eggs (need 2)
Baking Aisle:
- All-purpose flour
- Baking powder
Spice Section:
- Garlic powder
- Smoked paprika
- Black pepper
- Salt
Oils & Condiments:
- Vegetable oil or canola oil
Success Secrets
1. Room Temperature Ingredients: Take your eggs out of the fridge 30 minutes before cooking. Cold eggs can make the batter seize up and create uneven texture in your finished fritters.
2. Consistent Sizing: Use a ¼-cup measure or ice cream scoop for every fritter. Uniform size means they all cook at the same rate, preventing some from burning while others stay raw.
3. Don’t Overcrowd: Cooking too many fritters at once drops the oil temperature and creates steam, resulting in greasy, soft fritters instead of crispy ones. Give each fritter at least 1 inch of space.
4. Fresh Oil Matters: If your oil starts looking dark or develops bits of burnt batter, wipe out the pan and add fresh oil before continuing. Old cooking oil transfers bitter flavors to your food.
5. Serve with Strategic Sides: These cheesy butternut squash fritters shine alongside sour cream, Greek yogurt, maple syrup, or apple butter. The creamy or sweet accompaniments balance the savory richness perfectly.
Pro Tip: These fritters work beautifully for meal prep. Make a double batch on Sunday, freeze half, and you’ve got quick protein-packed breakfasts or lunches ready to reheat all week long!