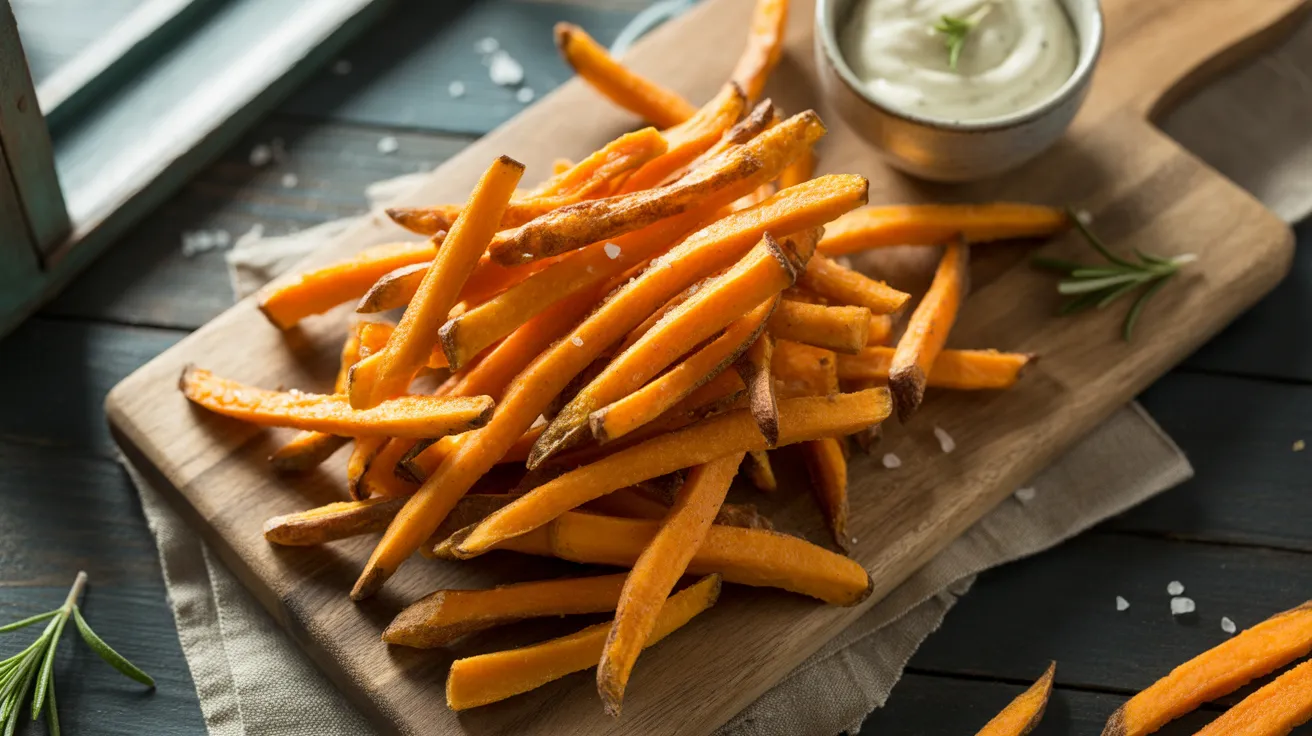
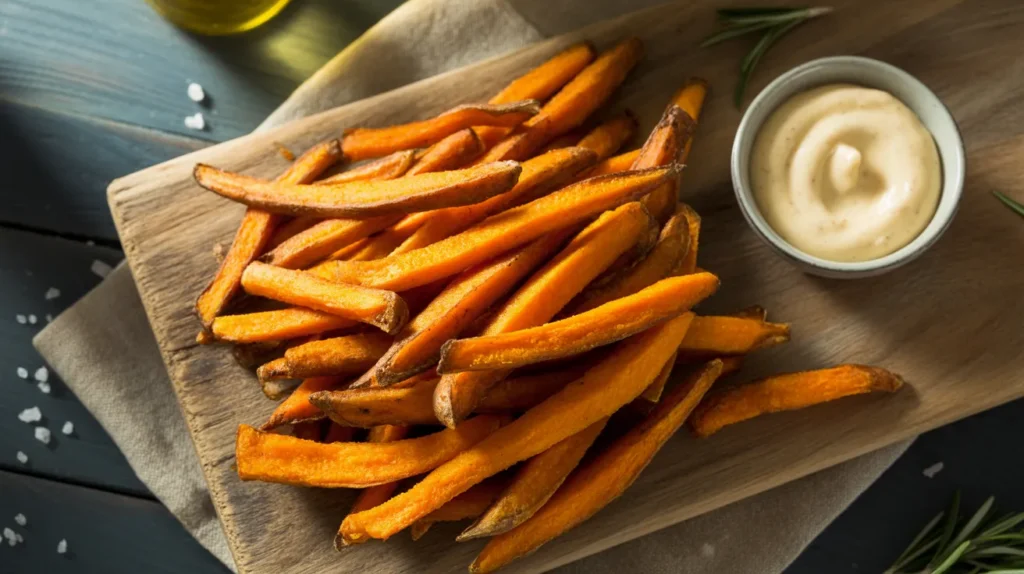
There’s something magical about sweet potato fries that transforms them from a simple side dish into the star of the meal. These golden, crispy-on-the-outside, tender-on-the-inside beauties are what I reach for when regular fries just won’t cut it, and they’re easier to make at home than you might think.
SERVES: 4 | PREP: 15 MIN | COOK: 30 MIN | TOTAL: 45 MIN
Ingredients
For the Fries:
| Ingredient | Amount | Notes |
|---|---|---|
| Sweet potatoes | 2 pounds (about 3 medium) | Look for uniform size |
| Cornstarch | 2 tablespoons | Secret to crispiness |
| Olive oil | 3 tablespoons | Or avocado oil |
| Salt | 1 teaspoon | Plus more for finishing |
| Garlic powder | ½ teaspoon | Fresh garlic burns |
| Paprika | ½ teaspoon | Smoked or regular |
| Black pepper | ¼ teaspoon | Freshly ground |
Optional Seasoning Mix:
| Ingredient | Amount |
|---|---|
| Cayenne pepper | Pinch |
| Onion powder | ¼ teaspoon |
| Brown sugar | ½ teaspoon |
Step-by-Step Instructions
Phase 1: Preparation (10 minutes)
Step 1: Preheat your oven to 425°F (220°C) and position racks in the upper and lower thirds. This high temperature is crucial because it creates that crispy exterior we’re after while the inside stays creamy.
Step 2: Line two large baking sheets with parchment paper or lightly oil them. Don’t skip the parchment—it prevents sticking and makes cleanup a breeze, plus it helps with even browning.
Step 3: Scrub the sweet potatoes thoroughly under cold running water using a vegetable brush. I leave the skins on because they add texture, fiber, and nutrients, but peel them if you prefer.
Step 4: Cut off both ends of each sweet potato to create flat, stable surfaces. This prevents rolling and ensures safer cutting.
Step 5: Slice each sweet potato lengthwise into ¼-inch thick planks. Consistency is key here—uneven pieces cook at different rates, leaving you with some burnt and some undercooked fries.
Step 6: Stack 2-3 planks and cut them lengthwise into ¼-inch thick sticks. Aim for fries that are about 3-4 inches long and ¼-inch thick on all sides. This size cooks evenly and gets properly crispy.
Step 7: Place all cut fries in a large bowl and cover with cold water. Let them soak for 10 minutes. This step removes excess starch, which is essential for achieving that crispy texture instead of soggy fries.
Phase 2: Coating and Seasoning (5 minutes)
Step 8: Drain the fries thoroughly and pat them completely dry with clean kitchen towels or paper towels. This is critical—any moisture left on the fries will steam them instead of crisping them, and wet fries won’t hold the coating.
Step 9: Return the dried fries to your bowl and sprinkle the 2 tablespoons of cornstarch evenly over them. Toss vigorously for 30 seconds until every fry has a light, even coating. The cornstarch creates a crispy shell when it hits the hot oven.
Step 10: Drizzle the 3 tablespoons of olive oil over the cornstarch-coated fries. Add the 1 teaspoon salt, ½ teaspoon garlic powder, ½ teaspoon paprika, and ¼ teaspoon black pepper. Toss everything together until each fry is evenly coated with oil and seasonings.
Phase 3: Baking (30 minutes)
Step 11: Spread the fries in a single layer across both prepared baking sheets. Give them space—crowding makes them steam and get soggy instead of crispy. Each fry should have room to breathe with minimal touching.
Step 12: Place both sheets in the preheated oven and bake for 15 minutes without opening the door. Resist the urge to peek—you’re building that initial crisp.
Step 13: After 15 minutes, remove both sheets and flip each fry using tongs or a spatula. Rotate the sheets (top to bottom, front to back) for even cooking. You should see the fries starting to get golden at the edges.
Step 14: Return the sheets to the oven and bake for another 10-15 minutes, checking at the 10-minute mark. The sweet potato fries are done when they’re golden brown with crispy, slightly darker edges and tender when pierced with a fork.
Step 15: Remove from the oven and let the fries rest on the baking sheets for 2 minutes. They’ll continue crisping as they cool slightly. Sprinkle with a pinch of flaky sea salt immediately while they’re hot.
Step 16: Transfer to a serving platter and serve right away. These are best enjoyed within 10 minutes of coming out of the oven while they’re at peak crispiness.
Chef’s Notes
The Cornstarch Secret: That light dusting of cornstarch is what separates homemade fries from restaurant-quality ones. It creates a thin, crispy shell that stays crunchy even as the fries cool.
Size Matters: Cutting your fries uniformly isn’t just about looks—it ensures every piece cooks at the same rate. Spend the extra minute getting them even, and you’ll avoid that frustrating mix of burnt and undercooked pieces.
Don’t Crowd: I know it’s tempting to pile all the fries on one sheet to save time, but spreading them across two sheets is non-negotiable. Crowded fries steam instead of roast, and you’ll end up with disappointing, limp results.
Temperature Control: If your oven runs hot or cool, adjust accordingly. Too hot and the outsides burn before the insides cook; too cool and you’ll never get that coveted crispy exterior. An oven thermometer is worth the investment.
Nutrition Information (Per Serving)
Calories: 185 | Protein: 2g | Carbohydrates: 32g | Fiber: 4g | Sugar: 7g | Fat: 6g | Saturated Fat: 1g | Sodium: 650mg | Vitamin A: 320% DV | Vitamin C: 35% DV | Potassium: 15% DV
Variations to Try
Spicy Cajun Sweet Potato Fries: Mix 2 teaspoons Cajun seasoning with ½ teaspoon cayenne into your cornstarch coating for a kick that’ll wake up your taste buds. Serve with ranch or blue cheese dipping sauce.
Sweet Cinnamon Fries: Replace the savory seasonings with 1 tablespoon brown sugar and 1 teaspoon cinnamon. These make an incredible side for breakfast or brunch, especially alongside mashed sweet potatoes for a complete sweet potato feast.
Garlic Parmesan Fries: After baking, toss the hot fries with ¼ cup grated Parmesan cheese, 1 tablespoon minced fresh parsley, and 1 teaspoon garlic powder. The cheese melts slightly and creates an irresistible coating.
Herbed Rosemary Fries: Add 1 tablespoon fresh chopped rosemary and 1 teaspoon dried thyme to your seasoning mix. These pair beautifully with sweet potato wedges for a rustic potato platter.
Storage & Reheating
Refrigerator Storage: Let the fries cool completely, then store in an airtight container lined with paper towels for up to 3 days. The paper towels absorb excess moisture that would make them soggy.
Freezing Instructions: Freeze cooled fries in a single layer on a baking sheet for 2 hours, then transfer to a freezer bag for up to 2 months. This prevents them from clumping together.
Reheating for Crispiness: Never microwave leftover fries—you’ll end up with sad, limp disappointments. Instead, reheat in a 400°F oven for 8-10 minutes until hot and crispy again. An air fryer works even better at 380°F for 5-6 minutes.
Make-Ahead Tip: Prepare through Step 10 (coated but not baked), then refrigerate on the baking sheets covered with plastic wrap for up to 4 hours. Bake directly from the fridge, adding 2-3 extra minutes to the cooking time.
Troubleshooting Guide
Problem: Fries Are Soggy Instead of Crispy
The most common culprit is moisture. Make sure you’re thoroughly drying the fries after soaking and not crowding them on the baking sheet. Also check that your oven is truly preheated to 425°F—many ovens run cooler than their display shows. Use an oven thermometer to verify, and consider bumping the temperature to 450°F if needed.
Problem: Fries Burn on the Outside Before Cooking Inside
You’ve cut them too thin or your oven runs too hot. Stick to that ¼-inch thickness consistently. If they’re still burning, lower the temperature to 400°F and increase cooking time by 5-10 minutes. Also, make sure you’re flipping them at the halfway mark.
Problem: Some Fries Are Perfect, Others Are Raw
Inconsistent cutting is your enemy here. Go back to your cutting board and focus on uniformity. Use a ruler if you need to—those extra couple minutes of careful cutting save you from disappointing results. Also ensure your sweet potatoes are similar in size and thickness throughout.
Problem: Coating Falls Off During Baking
This happens when the fries aren’t dry enough before coating or when there’s too much oil. Pat those fries bone-dry after soaking, and measure your oil carefully—3 tablespoons should coat 2 pounds of fries perfectly without being greasy. Toss gently but thoroughly to distribute evenly.
Problem: Fries Stick to the Pan
Always use parchment paper or properly oil your baking sheets. If you’re reusing parchment from a previous batch, get fresh—old parchment loses its non-stick properties. Metal spatulas work better than plastic for lifting stubborn fries, and letting them rest for 2 minutes after baking helps them release more easily.
Equipment Essentials
Large Baking Sheets (2): You need two to avoid crowding. Heavy-duty sheets prevent warping at high temperatures.
Sharp Chef’s Knife: A dull knife makes cutting uniform fries nearly impossible and is actually more dangerous.
Large Mixing Bowl: Must hold at least 4 quarts to comfortably toss all the fries with seasonings.
Kitchen Towels or Paper Towels: Essential for drying—moisture is the enemy of crispiness.
Measuring Spoons: Accuracy matters for that perfect seasoning balance.
Parchment Paper: Makes cleanup effortless and prevents sticking.
Tongs or Spatula: For flipping fries halfway through without burning your fingers.
Oven Thermometer (Optional but Recommended): Ensures your oven temperature is accurate for consistent results.
Shopping List
Produce Section:
- Sweet potatoes (2 pounds, about 3 medium)
Baking Aisle:
- Cornstarch
- Parchment paper
Oil & Vinegar Aisle:
- Olive oil
Spice Aisle:
- Salt
- Garlic powder
- Paprika
- Black pepper
Optional Add-Ins:
- Cayenne pepper
- Onion powder
- Brown sugar
Success Secrets
1. The Soak Is Non-Negotiable: That 10-minute cold water bath removes surface starch that prevents crisping. Skip it, and you’ll get gummy fries. Some cooks soak for up to an hour for even better results.
2. Dry, Dry, Dry: I can’t stress this enough—wet fries will never crisp up. After patting dry, let them air dry on the towel for 5 extra minutes if you have time. Every drop of water you remove is a step toward crispier fries.
3. Space Them Out: Think of each fry as needing its own personal space in the oven. They should barely touch, if at all. Yes, using two baking sheets is more work, but the difference in texture is dramatic.
4. High Heat Wins: Don’t be scared of 425°F—sweet potatoes can handle it. That high temperature creates the rapid moisture evaporation needed for a crispy exterior. Lower temperatures just dry them out without crisping.
5. Serve Immediately: These sweet potato fries are at their absolute best in that 10-minute window after baking. Plan your meal timing so they’re the last thing out of the oven, and watch them disappear before anything else on the table.