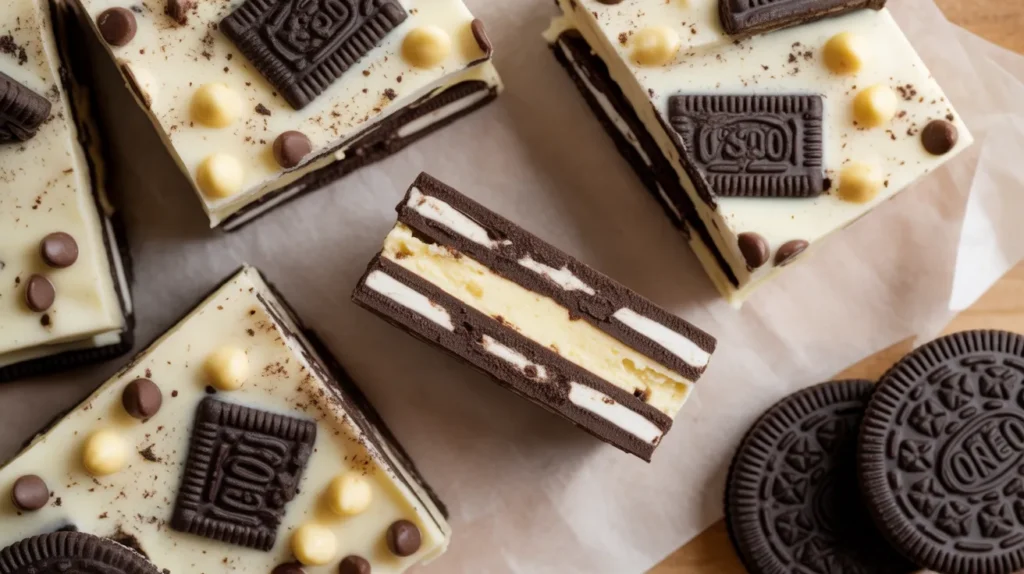
This milk and cookies candy bark combines crushed chocolate sandwich cookies with creamy white chocolate for a no-bake treat that tastes just like dunking cookies in milk. You’ll have four generous servings of this addictive candy ready in minutes, making it perfect for holiday gifts or a quick sweet fix when cravings strike.
SERVES: 4 | PREP: 10 MIN | COOK: 5 MIN | TOTAL: 15 MIN
Ingredients
Base Layer
| Ingredient | Amount |
|---|---|
| White chocolate chips | 2 cups |
| Coconut oil | 1 tablespoon |
Cookie Mix-ins
| Ingredient | Amount |
|---|---|
| Chocolate sandwich cookies (like Oreos) | 12 cookies |
| Mini chocolate chips | 1/3 cup |
Topping
| Ingredient | Amount |
|---|---|
| Sea salt flakes | 1/4 teaspoon |
| Extra cookie crumbs | 2 tablespoons |
Step-by-Step Instructions
Phase 1: Preparation (5 minutes)
Step 1: Line a 9×9-inch baking pan with parchment paper, leaving 2 inches of overhang on two sides. The overhang acts as handles for easy removal later. Press the paper into corners so it lies flat.
Step 2: Place 8 cookies in a sealed plastic bag. Use a rolling pin to crush them into bite-sized pieces, not fine crumbs. You want chunks ranging from quarter-sized pieces down to pea-sized bits for texture variety.
Step 3: Finely crush the remaining 4 cookies into powder-like crumbs. Set these aside for the topping layer. The contrast between chunky pieces and fine dust creates visual interest.
Phase 2: Melting Chocolate (3 minutes)
Step 4: Combine 2 cups white chocolate chips and 1 tablespoon coconut oil in a microwave-safe bowl. The coconut oil helps the chocolate spread smoothly and creates a glossier finish.
Step 5: Microwave on 50% power for 30 seconds, then stir. The lower power prevents scorching, which turns white chocolate grainy and unusable.
Step 6: Continue microwaving in 20-second intervals, stirring between each, until 90% melted. The residual heat will melt the remaining chips when you stir. Total time should be 2-3 minutes.
Step 7: Stir vigorously for 30 seconds until completely smooth. If any stubborn chips remain, microwave for 10 more seconds. The chocolate should flow like honey off your spoon.
Phase 3: Assembly (5 minutes)
Step 8: Pour the melted white chocolate into your prepared pan. Use a silicone spatula to spread it into an even layer, reaching all corners. The layer should be about 1/4-inch thick.
Step 9: Immediately sprinkle the chunky cookie pieces evenly across the surface. Press them gently into the chocolate so they stick but still peek out on top.
Step 10: Scatter 1/3 cup mini chocolate chips over the bark. These add pockets of dark chocolate that balance the sweetness, similar to how you might enjoy coconut cream bark with contrasting flavors.
Step 11: Sprinkle the fine cookie crumbs over everything. They’ll catch in the white chocolate and create a cookies-and-cream appearance.
Step 12: Finish with 1/4 teaspoon sea salt flakes scattered across the top. The salt cuts through sweetness and makes each bite more complex.
Phase 4: Setting (2 minutes + chill time)
Step 13: Gently tap the pan on your counter 3-4 times. This releases air bubbles and helps toppings settle into the chocolate.
Step 14: Refrigerate for 1 hour or freeze for 20 minutes until completely firm. The bark should feel hard when you press it, not tacky.
Step 15: Lift the bark from the pan using the parchment overhang. Place it on a cutting board. Let it sit at room temperature for 2 minutes so it won’t shatter when cut.
Step 16: Use a large sharp knife to cut the bark into 12 pieces (each person gets 3 pieces). For clean cuts, wipe your knife with a warm damp cloth between slices.
Chef’s Notes
Temperature Control: White chocolate seizes if it gets too hot, turning into a grainy mess that can’t be saved. Always use 50% microwave power and stir frequently. If you see any graininess starting, immediately stir in 1 teaspoon of coconut oil to bring it back together.
Cookie Choice: While traditional chocolate sandwich cookies work perfectly for milk and cookies candy bark, you can use any cream-filled cookie. Peanut butter sandwich cookies or mint versions create fun variations that your family will love.
Make-Ahead Magic: This bark actually tastes better after 24 hours in the refrigerator. The flavors meld together and the cookies soften slightly, creating that “dunked in milk” texture everyone craves.
Gifting Success: Package your milk and cookies candy bark in clear cellophane bags tied with ribbon. It stays fresh for 2 weeks at room temperature, making it ideal for holiday gift exchanges or bake sales.
Nutrition Information (Per Serving – 3 pieces)
- Calories: 385
- Protein: 4g
- Carbohydrates: 48g
- Fat: 21g
- Fiber: 1g
- Sugar: 38g
- Sodium: 210mg
Delicious Variations
Peppermint Twist: Replace 4 cookies with crushed candy canes and add 1/4 teaspoon peppermint extract to the melted chocolate. This creates a holiday version that rivals gingerbread house white chocolate bark in festive appeal.
Double Chocolate Dream: Use 1 cup white chocolate chips and 1 cup milk chocolate chips for a marbled effect. Swirl them together with a toothpick before adding toppings for a stunning presentation.
Birthday Cake Style: Swap sandwich cookies for vanilla wafer cookies and add 2 tablespoons rainbow sprinkles on top. Use birthday cake-flavored white chocolate chips if you can find them.
Salted Caramel Upgrade: Drizzle 3 tablespoons caramel sauce over the bark before adding cookies. Increase sea salt to 1/2 teaspoon for a sweet-salty combination that disappears fast.
Storage & Reheating
Store your milk and cookies candy bark in an airtight container with parchment paper between layers. It keeps at room temperature for 1 week, in the refrigerator for 3 weeks, or in the freezer for 2 months.
Keep it away from heat sources and direct sunlight. White chocolate melts at just 86°F, so summer storage requires refrigeration.
For frozen bark, let it thaw in the refrigerator for 3 hours before serving. Never thaw at room temperature, as condensation makes the chocolate sweat and look cloudy.
If refrigerated bark feels too hard, let it sit at room temperature for 10 minutes before serving. The perfect eating temperature is 65-70°F, when the chocolate has a satisfying snap but melts quickly in your mouth.
Troubleshooting Guide
Problem: White chocolate seized and turned grainy.
Solution: Immediately stir in 1 tablespoon of coconut oil or vegetable oil. Stir vigorously for 1 minute. The fat helps bring the chocolate back together. If it’s completely ruined, start over with fresh chocolate and use lower heat.
Problem: Toppings fell off after cutting.
Solution: You didn’t press them into the chocolate while it was still warm. Next time, gently press toppings with your palm right after sprinkling. For this batch, melt 1/4 cup white chocolate, brush it on bare spots, and reapply toppings.
Problem: Bark won’t release from the pan.
Solution: You forgot the parchment paper or it wasn’t large enough. Warm the bottom of the pan with a hot towel for 30 seconds, then try again. Always use parchment with 2-inch overhang for easy lifting.
Problem: Chocolate has white streaks or spots.
Solution: This is called “bloom” and happens when chocolate experiences temperature changes. It’s safe to eat but looks unappealing. Prevent it by storing bark in a cool, consistent temperature spot. The taste isn’t affected.
Problem: Bark is too thin and keeps breaking.
Solution: Your chocolate layer wasn’t thick enough. Use a smaller pan next time (try 8×8-inch instead of 9×9-inch) or increase chocolate to 2.5 cups. The ideal thickness is 1/4-inch for proper snap without shattering.
Equipment Essentials
- 9×9-inch baking pan (metal or glass)
- Parchment paper
- Microwave-safe bowl (glass or ceramic)
- Silicone spatula
- Rolling pin (or heavy can)
- Plastic bag with zipper
- Sharp chef’s knife
- Cutting board
- Measuring cups and spoons
Shopping List
Baking Aisle
- White chocolate chips (2 cups)
- Mini chocolate chips (1/3 cup)
Cookie Aisle
- Chocolate sandwich cookies (12 cookies)
Oils & Condiments
- Coconut oil (1 tablespoon)
Spices & Seasonings
- Sea salt flakes (1/4 teaspoon)
Success Secrets
1. Quality Chocolate Matters: Buy name-brand white chocolate chips, not “white morsels” or “vanilla chips.” Real white chocolate contains cocoa butter and melts smoothly, while imitation chips turn gummy and never set properly.
2. Cookie Freshness Counts: Use cookies from a freshly opened package. Stale cookies absorb moisture from the chocolate and turn soggy within 12 hours. Fresh cookies maintain their crunch for the full storage period.
3. Don’t Skip the Coconut Oil: That single tablespoon makes the chocolate easier to spread, gives it shine, and helps it release cleanly from the parchment. Vegetable oil works in a pinch, but coconut oil adds subtle flavor.
4. Work Quickly After Melting: White chocolate starts to set within 2-3 minutes of pouring. Have all your toppings measured and ready before you start melting. Once you pour the chocolate, you need to work fast.
5. The Freeze Trick: If you’re in a hurry, the freezer sets milk and cookies candy bark in 20 minutes instead of an hour. Just watch it carefully – over-freezing (more than 30 minutes) can cause cracking when you cut it.