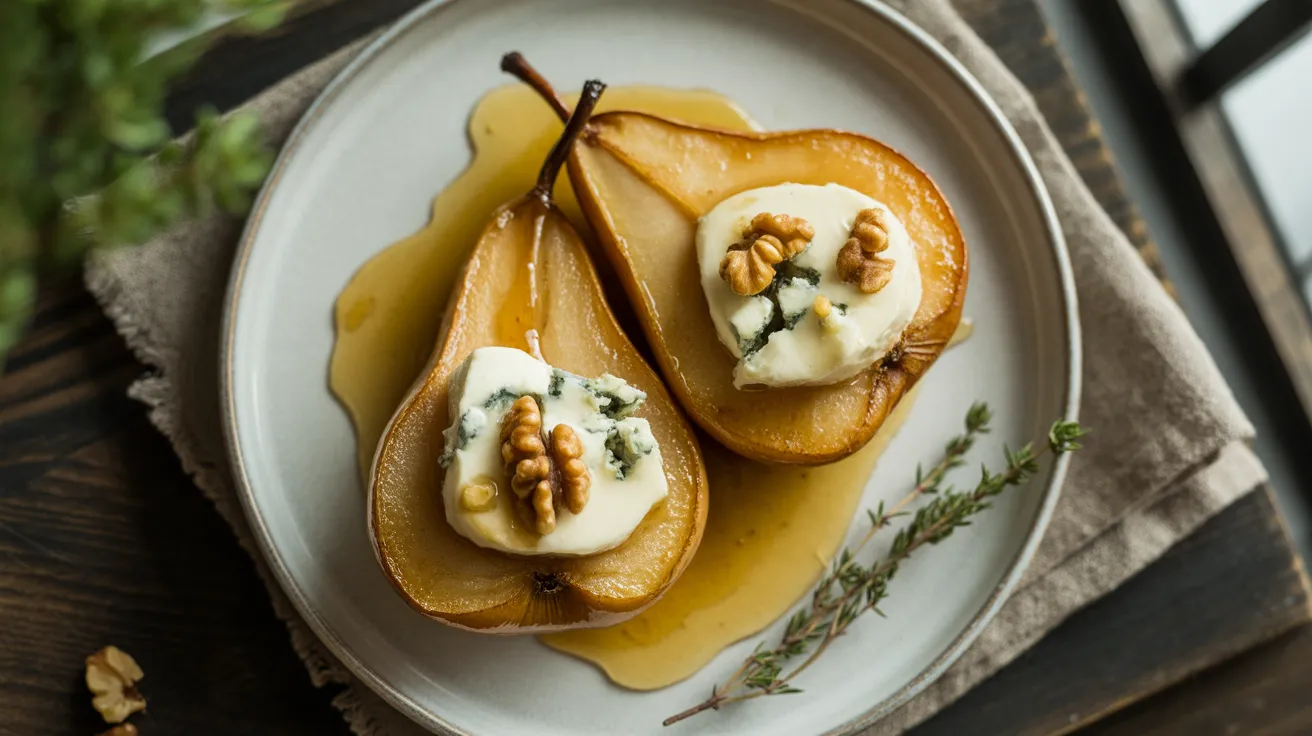
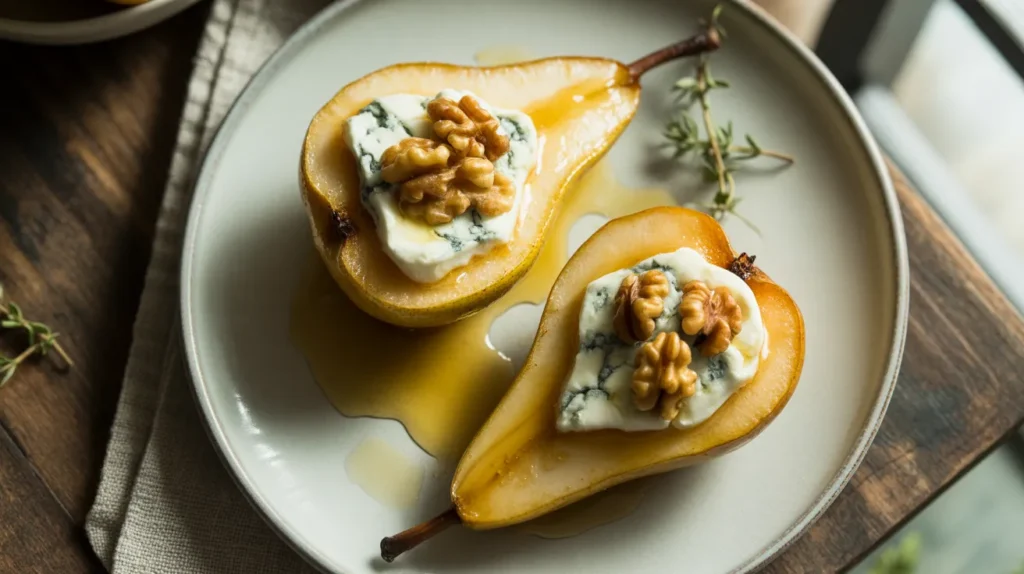
I love making blue cheese stuffed pears when I want to impress guests without spending hours in the kitchen. These elegant blue cheese stuffed pears combine sweet caramelized pears with tangy cheese and crunchy walnuts for a restaurant-quality appetizer that takes just 30 minutes.
SERVES: 4 | PREP: 15 MIN | COOK: 15 MIN | TOTAL: 30 MIN
Ingredients
For the Pears
| Ingredient | Amount |
|---|---|
| Ripe but firm pears (Bosc or Anjou) | 2 large |
| Blue cheese, crumbled | 4 oz |
| Chopped walnuts | ¼ cup |
| Honey | 3 tablespoons |
| Olive oil | 1 tablespoon |
| Fresh thyme leaves | 1 teaspoon |
| Black pepper | ¼ teaspoon |
| Salt | pinch |
Optional Garnish
| Ingredient | Amount |
|---|---|
| Fresh arugula | 1 cup |
| Balsamic glaze | 2 tablespoons |
| Extra honey | for drizzling |
Step-by-Step Instructions
Phase 1: Preparing the Pears (5 minutes)
Step 1: Preheat your oven to 400°F (200°C) and line a baking sheet with parchment paper. This temperature is hot enough to caramelize the pears without burning them.
Step 2: Wash the pears under cold water and pat them completely dry with a clean kitchen towel. Any moisture will prevent proper browning.
Step 3: Cut each pear in half lengthwise, keeping the stem on one half for presentation. Use a sharp knife and cut through slowly to maintain a clean edge.
Step 4: Use a melon baller or small spoon to scoop out the core and seeds from each pear half. Start at the center and work your way out, creating a cavity about 1 inch deep. You want enough space for the filling but don’t scoop too close to the edges or the pear will collapse during baking.
Step 5: Use the spoon to slightly enlarge the cavity where the core was, creating a small well. This well will hold your blue cheese mixture perfectly.
Phase 2: Preparing the Filling (3 minutes)
Step 6: In a small bowl, combine the 4 oz crumbled blue cheese and ¼ cup chopped walnuts. Mix gently with a fork, keeping some larger chunks of cheese intact. These chunks will get deliciously melty in the oven.
Step 7: Add 1 teaspoon fresh thyme leaves and ¼ teaspoon black pepper to the cheese mixture. Stir everything together until evenly distributed. The thyme adds an earthy note that balances the sharp blue cheese beautifully.
Step 8: Taste a tiny bit of the mixture. If your blue cheese is very mild, add a pinch of salt. If it’s already quite salty, skip the salt entirely.
Phase 3: Assembling (2 minutes)
Step 9: Brush the cut side of each pear half with 1 tablespoon olive oil, dividing it evenly among all four halves. This helps the pears brown and keeps them from sticking to the pan.
Step 10: Place the pear halves cut-side up on your prepared baking sheet, spacing them at least 2 inches apart. This spacing allows heat to circulate properly.
Step 11: Divide the blue cheese mixture evenly among the four pear halves, packing it gently into the cavity you created. Each half should get about 2 tablespoons of filling. Press it down slightly so it stays in place during baking.
Phase 4: Baking (15 minutes)
Step 12: Drizzle 1 tablespoon honey over each stuffed pear half, letting it pool slightly in the filling. The honey will caramelize as it bakes, creating a sweet glaze.
Step 13: Place the baking sheet in the preheated oven on the middle rack. Set a timer for 12 minutes. You’ll check them then, but they might need up to 15 minutes total.
Step 14: After 12 minutes, open the oven and check the pears. They should be tender when pierced with a fork and the cheese should be melted and bubbling. The edges of the pears might be slightly golden. If they need more time, bake for 2-3 minutes longer.
Step 15: Remove the baking sheet from the oven. The pears will be very hot and the honey will be bubbling, so use oven mitts and be careful not to spill the juices.
Phase 5: Final Touches (2 minutes)
Step 16: Let the pears rest on the baking sheet for 3-4 minutes. This resting time allows the honey to thicken slightly into a glaze and makes them easier to handle.
Step 17: Drizzle the remaining 1 tablespoon honey over the baked pears. If you’re using balsamic glaze, add it now in a decorative zigzag pattern.
Step 18: Transfer each pear half to individual serving plates. If you’re using arugula, place a small handful on each plate first, then set the warm pear on top. The heat from the pear will slightly wilt the greens, which is exactly what you want.
Chef’s Notes
Temperature Matters: Your oven temperature is critical for blue cheese stuffed pears. Too hot and the honey burns before the pears soften. Too cool and you’ll get mushy pears with un-melted cheese.
Pear Selection: Choose pears that are ripe but still firm when you press the neck gently. Overly soft pears will turn to mush in the oven, while rock-hard ones won’t soften enough in 15 minutes.
Blue Cheese Options: I’ve made this recipe with everything from mild Gorgonzola to sharp Roquefort. Stronger blue cheese creates a more intense flavor, so adjust based on your guests’ preferences.
Make-Ahead Trick: You can prep the pears through Step 11 up to 4 hours ahead. Cover them with plastic wrap and refrigerate. Add 2-3 extra minutes to the baking time if cooking from cold.
Nutrition Information (Per Serving)
| Nutrient | Amount |
|---|---|
| Calories | 245 |
| Protein | 7g |
| Carbohydrates | 28g |
| Fat | 13g |
| Fiber | 4g |
| Sugar | 21g |
| Sodium | 310mg |
Creative Variations
Cranberry Pecan Version: Swap the walnuts for pecans and add 2 tablespoons dried cranberries to the filling. The cranberries add a tart pop that’s perfect for fall. This variation pairs beautifully with the mini brie Christmas trees for a complete holiday appetizer spread.
Goat Cheese Substitute: Replace half the blue cheese with soft goat cheese for a milder tang. This version is perfect for people who find blue cheese too strong but still want something special.
Spicy Kick: Add ¼ teaspoon red pepper flakes and 1 tablespoon chopped fresh rosemary to the filling. The heat plays nicely against the sweet honey glaze.
Savory Side Dish: Skip the honey entirely and brush the pears with balsamic vinegar instead. Serve alongside roasted vegetables like these grilled zucchini rollups with lemon basil ricotta for a complete vegetarian plate.
Storage & Reheating
Refrigeration: Store cooled blue cheese stuffed pears in an airtight container for up to 2 days. The pears will release juice as they sit, so line the container with paper towels.
Reheating: Warm individual portions in a 350°F oven for 5-7 minutes until the cheese melts again. Don’t use the microwave—it makes the pears mushy and the cheese rubbery.
Freezing: I don’t recommend freezing these. The pear texture becomes grainy and watery when thawed, and you’ll be disappointed with the results.
Serving Temperature: These are best served warm, not piping hot. The flavors shine when the pears are just above room temperature and the cheese is soft but not scalding.
Troubleshooting Common Problems
Problem: My pears are mushy after baking. You used pears that were too ripe or you baked them too long. Next time, choose firmer pears and check them at the 10-minute mark. The pears should be tender but still hold their shape.
Problem: The cheese didn’t melt completely. Your oven temperature was too low or you didn’t pack the cheese into the cavity properly. Make sure your oven is fully preheated to 400°F, and press the cheese mixture firmly into the pear cavities so it makes good contact with the warm fruit.
Problem: The honey burned on the baking sheet. This happens when honey drips onto the bare pan. Always use parchment paper, and if honey does drip, it won’t burn as quickly. You can also place the pears in a baking dish instead of a flat sheet to contain the honey.
Problem: The pears tipped over during baking. The pear halves weren’t balanced properly or the cavity was scooped unevenly. Cut a tiny slice off the rounded bottom of each pear half (without cutting through to the cavity) to create a flat base. This gives them stability.
Problem: The blue cheese taste is too strong. You used an aged blue cheese with intense flavor. Mix in 2 tablespoons cream cheese with the blue cheese to mellow it out, or use a milder variety like Danish blue or Gorgonzola dolce next time.
Equipment Essentials
- Sharp chef’s knife
- Cutting board
- Melon baller or small spoon
- Baking sheet
- Parchment paper
- Small mixing bowl
- Fork for mixing
- Pastry brush
- Oven mitts
- Serving plates
Shopping List
Produce Section
- 2 large Bosc or Anjou pears
- Fresh thyme
- Fresh arugula (optional)
Dairy Section
- 4 oz blue cheese (or any crumbled blue)
Pantry Items
- ¼ cup walnuts
- 3 tablespoons honey
- 1 tablespoon olive oil
- Black pepper
- Salt
Optional Items
- Balsamic glaze
Success Secrets
Secret #1: Use room temperature blue cheese. Cold cheese doesn’t melt as well and can create pockets of cold filling even after baking. Take the cheese out of the fridge 30 minutes before you start cooking.
Secret #2: Don’t skip the resting time after baking. Those 3-4 minutes let the juices settle and the honey glaze thicken from syrupy to coating consistency. Rush this step and you’ll have honey running all over your serving plates.
Secret #3: Toast your walnuts first for 3-4 minutes in a dry pan over medium heat before adding them to the filling. This deepens their flavor and adds extra crunch that stays crisp even after baking.
Secret #4: For the prettiest presentation, choose pears with stems still attached. The stem makes a natural handle and looks elegant on the plate. Just make sure you leave it on when cutting the pear in half.
Secret #5: Match your wine to the pears—a late harvest Riesling or Sauternes creates an amazing pairing. The wine’s sweetness complements the honey while cutting through the rich blue cheese perfectly.