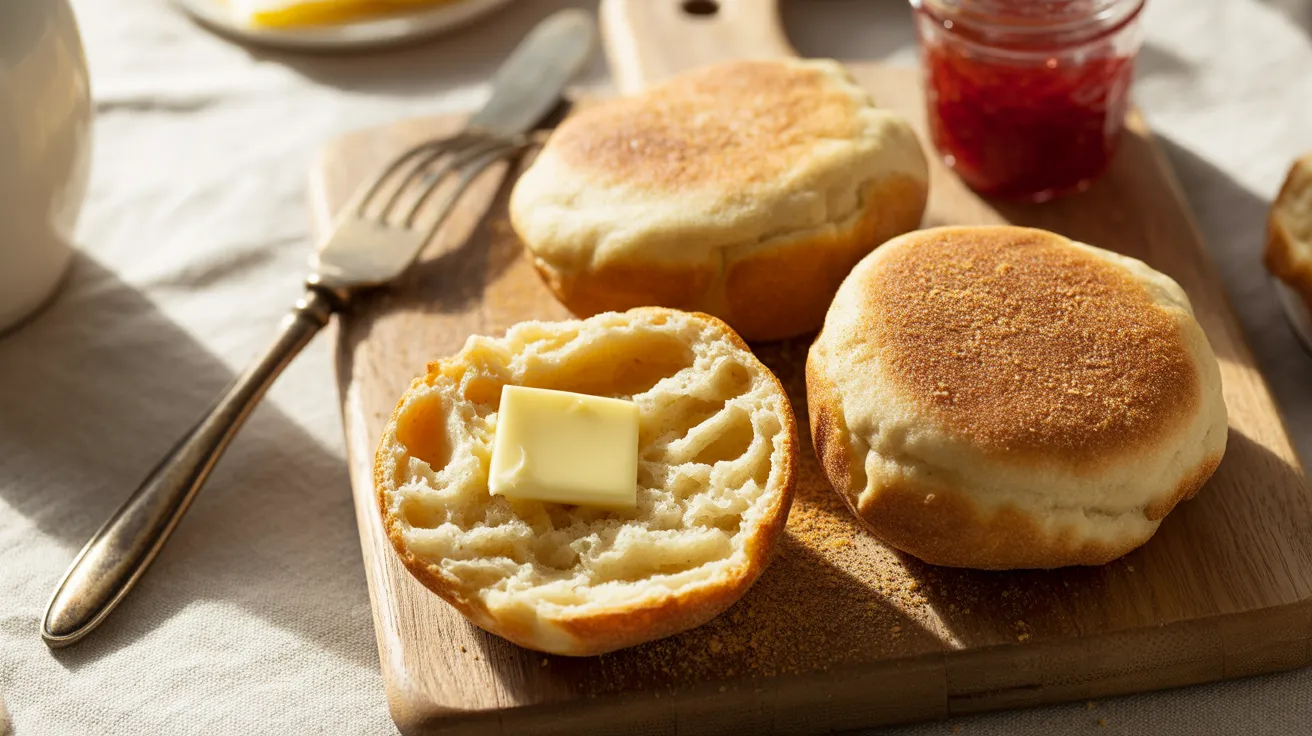
These sourdough english muffins bring bakery-quality breakfast to your kitchen with tangy flavor, crispy exteriors, and those signature nooks and crannies. I’ve perfected this sourdough english muffins recipe to create tender, golden rounds that split beautifully and toast like a dream—perfect for butter, jam, or your favorite breakfast sandwich.
SERVES: 4 (8 muffins) | PREP: 30 MIN | COOK: 20 MIN | TOTAL: 12 HOURS (includes rising time)
Ingredients
Sourdough Starter Mix
| Ingredient | Amount | Notes |
|---|---|---|
| Active sourdough starter | 1 cup (240g) | Bubbly and fed within 4-12 hours |
| Whole milk | ¾ cup (180ml) | Warmed to 100°F |
| Honey | 2 tablespoons | Or sugar |
| Melted butter | 3 tablespoons | Cooled slightly |
Dry Ingredients
| Ingredient | Amount | Notes |
|---|---|---|
| All-purpose flour | 3 cups (360g) | Plus more for dusting |
| Fine sea salt | 1½ teaspoons | Don’t skip this |
| Baking soda | ¼ teaspoon | For extra rise |
For Cooking
| Ingredient | Amount | Notes |
|---|---|---|
| Cornmeal | ¼ cup | For dusting rings and griddle |
| Neutral oil | 1 tablespoon | For greasing rings |
Step-by-Step Instructions
Phase 1: Building the Dough (Evening – Day 1)
Step 1: Grab a large mixing bowl and combine your active sourdough starter with the warmed milk. Whisk these together until the starter dissolves completely—you’ll see a cloudy, slightly bubbly mixture. The warmth helps activate the wild yeast and gets fermentation going strong. I always test my milk temperature with my finger; it should feel like warm bathwater, not hot.
Step 2: Stir in the honey and melted butter until everything blends smoothly. The fat from the butter creates those tender layers inside each muffin, while the honey feeds your sourdough starter and adds a subtle sweetness. Mix for about 30 seconds until you don’t see any butter streaks floating on top.
Step 3: In a separate bowl, whisk together your flour, salt, and baking soda. The baking soda is my secret weapon—it neutralizes some of the sourdough tang and gives an extra lift when you cook them. Whisking ensures the salt distributes evenly so you don’t get salty bites.
Step 4: Pour the dry ingredients into your wet mixture. Using a wooden spoon or Danish dough whisk, stir everything together until you can’t see any dry flour pockets. The dough will look shaggy and sticky—that’s exactly what you want. Don’t overmix here; you’re just bringing everything together. This should take about 2 minutes of stirring.
Step 5: Cover your bowl tightly with plastic wrap or a damp kitchen towel. Place it somewhere warmish in your kitchen—I put mine near (not on) the stove or on top of the refrigerator. Let this dough rest for 8-12 hours overnight. You’ll see it puff up and develop bubbles on the surface as your sourdough starter works its magic.
Phase 2: Shaping the Muffins (Morning – Day 2)
Step 6: The next morning, your dough should look puffy and smell pleasantly tangy. Sprinkle a clean countertop generously with flour—use about ¼ cup. Turn your dough out onto this floured surface. It’ll be soft and slightly sticky, which creates those perfect nooks and crannies.
Step 7: Pat the dough gently into a rectangle about ¾ inch thick. Don’t use a rolling pin—your hands are the best tool here. Press down evenly, working from the center outward. If the dough springs back, let it rest for 5 minutes, then continue. This thickness is crucial; too thin and they’ll be dense, too thick and the centers won’t cook through.
Step 8: Dust a 3-inch round cutter (or drinking glass) with flour. Cut straight down through the dough without twisting—twisting seals the edges and prevents those signature holes from forming. Cut the rounds close together to minimize scraps. You should get 8 muffins from one batch.
Step 9: Spread cornmeal generously on a large baking sheet. Place each dough round on the cornmeal, then sprinkle more cornmeal on top of each muffin. The cornmeal prevents sticking and creates that authentic crunchy exterior texture. Space them about 2 inches apart.
Step 10: Cover the muffins loosely with a kitchen towel. Let them rise for 1-2 hours in a warm spot until they’re noticeably puffy and feel airy when you gently poke them. They won’t double in size like regular bread, but you’ll see them puff up about 50%. This second rise is essential for light, fluffy muffins.
Phase 3: Cooking to Perfection
Step 11: Heat a large cast-iron skillet or griddle over medium-low heat (about 300°F if you have a thermometer). The low temperature is critical—these muffins need to cook slowly so the insides cook through without burning the outsides. Let your pan preheat for a full 5 minutes.
Step 12: Lightly grease 3-inch English muffin rings with neutral oil using a paper towel. If you don’t have rings, you can skip them, but they help the muffins keep their perfect shape and rise upward instead of spreading. Place the greased rings on your preheated griddle.
Step 13: Carefully transfer each muffin into a ring on the griddle (or directly on the griddle if not using rings). You should hear a gentle sizzle—not a loud crackling. Cook for 8-10 minutes without moving them. You’ll see the edges start to look dry and the bottoms turn golden brown. Resist peeking underneath; let them set properly.
Step 14: When the bottoms are deep golden (lift one edge to check), carefully flip each muffin using a thin spatula. Remove the rings if using—they should lift off easily now. Cook the second side for another 6-8 minutes until golden brown. The muffins should feel firm when you press the tops gently.
Step 15: Transfer cooked muffins to a wire rack immediately. Don’t stack them while hot or they’ll steam and get soggy. Let them cool for at least 15 minutes before splitting. I know it’s tempting to dig in right away, but cooling helps the interior texture set perfectly.
Chef’s Notes
Starter Strength Matters: Your sourdough starter should be fed and active within 4-12 hours of making these muffins. I test mine by dropping a spoonful in water—it should float. Weak starter means dense muffins without those beautiful air pockets.
Temperature Control is Everything: Keep your griddle at medium-low heat. I’ve burned countless batches by cooking too hot. If you smell burning cornmeal, your heat’s too high. The muffins need 14-18 minutes total cooking time to cook through.
The Fork-Split Tradition: Never cut these with a knife! Use a fork to poke around the edges, then gently pull the halves apart. This preserves all those gorgeous nooks and crannies that trap butter and jam. It’s how English muffins have been split for generations.
Overnight Timing Flexibility: The overnight rise can go anywhere from 8-14 hours depending on your kitchen temperature. Cooler kitchens need longer; warmer kitchens work faster. If you’re going past 12 hours, stick the bowl in the refrigerator to slow fermentation.
Nutrition Information (Per Muffin)
- Calories: 185
- Protein: 6g
- Carbohydrates: 32g
- Fat: 4g
- Fiber: 2g
- Sugar: 4g
- Sodium: 280mg
Creative Variations
Whole Wheat Sourdough Muffins
Replace 1 cup of all-purpose flour with whole wheat flour for earthier flavor and extra fiber. These work beautifully with savory breakfast sandwiches. Add an extra 2 tablespoons of milk since whole wheat absorbs more liquid. If you’re exploring other sourdough recipes, try my sourdough pizza crust for another way to use your active starter.
Cinnamon Raisin English Muffins
Mix in ½ cup raisins, 1 teaspoon cinnamon, and an extra tablespoon of honey after Step 4. These smell incredible cooking and taste amazing toasted with cream cheese. The raisins add natural sweetness and those chewy pockets of flavor.
Sourdough Everything Muffins
Before the second rise in Step 9, brush the tops with melted butter and sprinkle with everything bagel seasoning (2 tablespoons total). Press the seasoning gently into the dough. These rival any bagel shop muffin and pair perfectly with cream cheese and lox. Speaking of bagels, my sourdough bagels use similar techniques if you want to expand your sourdough breakfast game.
Cheese and Herb Muffins
Fold in ½ cup shredded sharp cheddar and 2 tablespoons fresh chopped chives during Step 4. These savory muffins are incredible with eggs or as burger buns. The cheese melts slightly during cooking, creating pockets of gooey goodness.
Storage & Reheating
Room Temperature: Store completely cooled muffins in an airtight container or zip-top bag for up to 3 days. Don’t refrigerate them—the cold dries them out fast.
Freezing: These freeze beautifully for up to 3 months. Split them first with a fork, then freeze in a single layer on a baking sheet. Once frozen solid, transfer to a freezer bag. This way you can toast them straight from frozen.
Reheating: Toast split muffins directly from frozen or room temperature. I set my toaster to medium and toast until golden and crispy. You can also split and toast them cut-side down in a dry skillet for 3-4 minutes.
Make-Ahead Strategy: Prepare the dough through Step 5, then refrigerate for up to 24 hours instead of leaving it out overnight. Cold fermentation develops even better flavor. Just let the dough come to room temperature before shaping in Step 6.
Troubleshooting Common Problems
Problem 1: Muffins Are Too Dense Your starter likely wasn’t active enough, or the dough didn’t rise long enough. Make sure your starter passes the float test before starting. The dough should look noticeably puffy after the overnight rise. Also check that you measured flour correctly—too much flour makes heavy muffins. Spoon flour into your measuring cup and level it off rather than scooping.
Problem 2: Burned Outsides, Raw Insides Your heat’s too high. English muffins need low, slow cooking to cook through without burning. Drop your temperature to medium-low or even low. Use a thermometer if possible; you want the griddle around 300°F. It should take 14-18 minutes total cooking time. Patience pays off here.
Problem 3: No Nooks and Crannies You might have overworked the dough or used too much flour when shaping. Keep the dough soft and sticky—don’t add extra flour beyond what’s needed to prevent sticking. Also make sure you’re cutting straight down without twisting your cutter, and don’t compress the dough when moving the cut rounds.
Problem 4: Muffins Spread Instead of Rising The dough was too wet, or you skipped the second rise. Make sure you measure ingredients accurately. The dough should be tacky but hold its shape when patted out. Also, those English muffin rings really help contain the dough while cooking. Let the shaped muffins rise fully before cooking—they should feel puffy and airy.
Problem 5: Sour or Bitter Taste Your dough over-fermented during the overnight rise. If your kitchen’s warm (above 75°F), reduce the rise time to 8 hours or move the bowl to a cooler spot. You can also refrigerate the dough after 6-8 hours at room temperature. The baking soda should balance the tang, but too much fermentation creates harsh sourness.
Equipment Essentials

- Large mixing bowls (at least 3-quart capacity)
- Whisk and wooden spoon for mixing
- 3-inch round cutter (or drinking glass)
- Cast-iron skillet or griddle (12-inch works great)
- English muffin rings (optional but helpful)
- Wire cooling rack
- Digital thermometer (helpful for milk and griddle temp)
- Bench scraper (makes moving dough easier)
- Kitchen scale (for accurate measurements)
Shopping List
Baking Aisle
- All-purpose flour (3 cups)
- Cornmeal (¼ cup)
- Baking soda
- Fine sea salt
Dairy Section
- Whole milk (¾ cup)
- Butter (3 tablespoons)
Sweeteners
- Honey (2 tablespoons)
Oils
- Neutral oil for greasing
Already in Your Kitchen
- Active sourdough starter (1 cup)
Success Secrets
1. Temperature precision wins. I keep an instant-read thermometer nearby to check both my milk (100°F) and griddle (300°F). These two temperatures make the difference between perfect muffins and frustrating failures.
2. Embrace the sticky dough. Resist adding extra flour when the dough feels tacky. That slightly wet texture creates all those beautiful air pockets inside. Dust your hands with flour instead of adding more to the dough.
3. Watch for visual cues. After the overnight rise, you should see bubbles throughout the dough and smell that pleasant sourdough tang. During cooking, the edges dry out and pull away from the rings—that’s your flip signal.
4. Master the fork split. Run a fork around the muffin’s equator, poking deeply to create perforations. Then gently pull the halves apart. This rough surface catches butter and jam better than any knife-cut surface ever could.
5. Fresh is best, frozen is next. These taste incredible the day you make them, but freezing preserves that fresh-baked quality better than room-temperature storage. I always make a double batch and freeze half for easy breakfasts all month long.
These sourdough english muffins transform your morning routine with their complex tangy flavor and incredible texture. The overnight fermentation does most of the work while you sleep, and cooking them on the griddle fills your kitchen with the most amazing bakery smell. Split one open while it’s still warm, slather it with butter, and watch it melt into all those perfect little holes. That first bite—crispy on the outside, tender and chewy inside—makes every minute of waiting worth it.