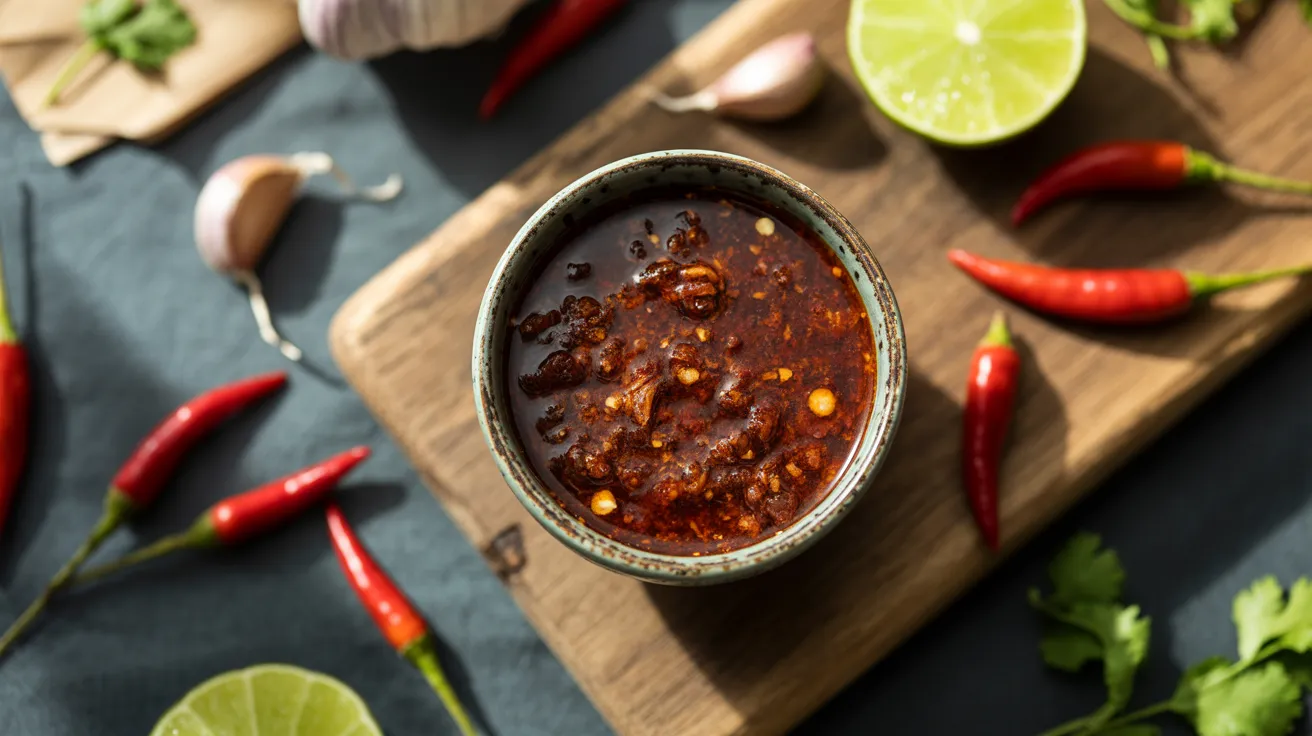
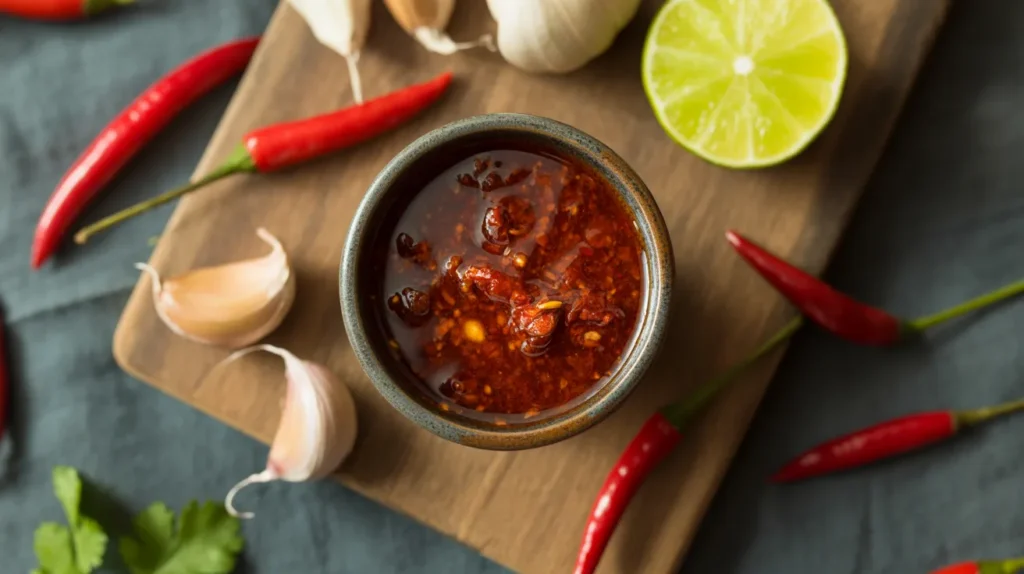
This Thai chili garlic sauce spicy dipping sauce recipe is bold, fiery, and ready in just 10 minutes. Whether you’re dunking spring rolls, grilling chicken, or drizzling over noodles, this Thai chili garlic sauce spicy dipping sauce recipe delivers that perfect punch of heat, tang, and garlicky goodness every single time.
SERVES: 4 | PREP: 10 MIN | COOK: 5 MIN | TOTAL: 15 MIN
What You Need for This Thai Chili Garlic Sauce Spicy Dipping Sauce Recipe
Sauce Base
| Ingredient | Amount |
|---|---|
| Fresh red Thai chilies | 8–10 chilies |
| Garlic cloves, peeled | 6 large cloves |
| Fresh lime juice | 3 tablespoons |
| Fish sauce | 2 tablespoons |
| Rice vinegar | 1 tablespoon |
Sweetener & Thickener
| Ingredient | Amount |
|---|---|
| Granulated white sugar | 2 tablespoons |
| Warm water | 2 tablespoons |
| Cornstarch | 1 teaspoon |
| Cold water | 1 tablespoon |
Optional Add-Ins
| Ingredient | Amount |
|---|---|
| Fresh cilantro, chopped | 1 tablespoon |
| Toasted sesame oil | ½ teaspoon |
| Green onion, finely sliced | 1 stalk |
Step-by-Step Instructions
Phase 1 — Prep Your Ingredients
Step 1: Gather everything before you start.
Set all your ingredients on the counter. When you’re working with hot chilies, you want to move quickly and confidently. Having everything measured and ready means you won’t scramble mid-cook.
Step 2: Wash and dry the Thai red chilies.
Rinse your 8–10 fresh red Thai chilies under cool water. Pat them completely dry with a paper towel. Wet chilies can splatter when you chop them, which is both messy and a little dangerous near your eyes.
Step 3: Remove the stems, then decide on heat level.
Use a small knife or scissors to cut off the green stems. If you want a slightly milder sauce, slice each chili open and scrape out some of the seeds with a spoon. The seeds hold a lot of the heat. If you love intense spice, leave them all in. Either way, this sauce will still have a fantastic kick.
⚠️ Safety Note: Avoid touching your face, eyes, or lips while handling fresh chilies. The oils in Thai chilies are very strong. Rinse your hands with soap and cold water immediately after handling them.
Step 4: Roughly chop the chilies and garlic.
Give the chilies a rough chop — about 4 or 5 cuts each is plenty. You don’t need them perfectly minced at this point because they’ll be blended soon. Peel your 6 garlic cloves and give them a rough chop too.
Phase 2 — Blend the Sauce
Step 5: Add chilies and garlic to your blender or food processor.
Place the chopped chilies and garlic into a small blender or a mini food processor. A mini food processor works perfectly here because the batch is small. If you only have a large blender, double the recipe so the blades can catch the ingredients properly.
Step 6: Add the wet ingredients.
Pour in 3 tablespoons fresh lime juice, 2 tablespoons fish sauce, and 1 tablespoon rice vinegar directly into the blender with the chilies and garlic. The lime juice brightens the whole sauce. The fish sauce adds that deep, savory umami flavor that makes Thai sauces so addictive.
💡 Tip: Always use fresh lime juice here — not bottled. Fresh lime juice has a brightness that bottled juice simply cannot match.
Step 7: Add the sugar and warm water.
Add 2 tablespoons of granulated white sugar and 2 tablespoons warm water. The warm water helps the sugar dissolve evenly before cooking. The sugar balances the heat and the tang so the sauce isn’t one-dimensional.
Step 8: Blend until smooth — or keep it chunky.
Pulse the blender 6–8 times for a slightly chunky, restaurant-style sauce. For a completely smooth sauce, blend continuously for about 20–25 seconds. Stop and scrape down the sides of the blender once during blending to make sure all the garlic gets processed evenly.
Phase 3 — Cook the Sauce
Step 9: Pour the blended sauce into a small saucepan.
Use a rubber spatula to scrape every last drop from the blender into a small saucepan. Place the pan over medium-low heat. Medium-low is important — you want the sauce to gently simmer, not aggressively boil. A hard boil can cook off the fresh garlic flavor too quickly.
Step 10: Stir the sauce and bring to a gentle simmer.
Stir the sauce constantly with a wooden spoon or silicone spatula. After about 2 minutes, you’ll see tiny bubbles forming around the edges of the pan. That means it’s starting to simmer. The sauce will also start to smell incredible at this point — garlicky, tangy, and warm with chili heat.
Step 11: Mix the cornstarch slurry.
In a small bowl, stir together 1 teaspoon cornstarch and 1 tablespoon cold water until fully combined. It should look milky and smooth with no lumps. This slurry is what gives the sauce its glossy, slightly thick consistency — just like the dipping sauce you get at Thai restaurants.
Step 12: Stream the slurry into the simmering sauce.
While stirring the sauce with one hand, slowly pour the cornstarch slurry into the pan with the other hand. Add it in a thin, steady stream. Stir constantly for 30–45 seconds after adding it. The sauce will thicken noticeably within about 1 minute of adding the slurry.
💡 Visual Cue: The sauce is ready when it coats the back of a spoon and a line drawn through it holds its shape for 2–3 seconds.
Step 13: Taste and adjust the flavor.
Remove the pan from heat and taste the sauce carefully — it will be hot. Use a clean spoon each time you taste. Ask yourself: Does it need more lime? Add ½ teaspoon more. Too hot? Stir in ½ teaspoon extra sugar. Not salty enough? Add a few drops more fish sauce. Great sauces are always adjusted to taste at the end.
Step 14: Stir in any optional add-ins.
If you’re using chopped cilantro, green onion, or sesame oil, stir them in now while the sauce is still warm. The heat from the sauce will bloom the cilantro and sesame flavors beautifully.
Step 15: Let the sauce cool before serving.
Pour the finished sauce into a small serving bowl or a glass jar. Let it cool for 5 minutes before serving. As it cools, it thickens just a little more to that perfect dipping consistency.
Chef’s Notes
01. Fresh chilies make all the difference. The best version of this Thai chili garlic sauce spicy dipping sauce recipe uses fresh Thai bird’s eye chilies. Dried chili flakes are a backup, but the flavor won’t be as vibrant or layered.
02. Fish sauce is non-negotiable for the real thing. Fish sauce is the backbone of this recipe. Don’t substitute it with soy sauce if you want an authentic result. The fermented, salty depth of fish sauce is what makes Thai dipping sauces taste like Thailand.
03. Make it your own heat level. This recipe lands at a medium-hot spice level with all seeds included. Beginners should start with 5–6 chilies and taste as they go. Heat lovers can push to 12–15 chilies for a sauce that really bites back.
04. Refrigerate for deeper flavor. This Thai chili garlic sauce spicy dipping sauce actually tastes even better the next day. The garlic mellows slightly and all the flavors meld together after a night in the fridge.
Nutrition Information
Per serving (approximately 2 tablespoons)
| Nutrient | Amount |
|---|---|
| Calories | 45 kcal |
| Total Fat | 0.2 g |
| Carbohydrates | 10 g |
| Sugar | 8 g |
| Protein | 0.8 g |
| Sodium | 480 mg |
| Fiber | 0.5 g |
Nutrition values are estimates and may vary based on exact ingredients used.
Variations
1. Thai Sweet Chili Garlic Dipping Sauce
Want something a little gentler and sweeter? Reduce the chilies to 4–5 and double the sugar to 4 tablespoons. The result is a crowd-pleasing sauce perfect for kids’ spring rolls and grilled shrimp. For more inspiration on balancing sweet and heat, check out this homemade Thai sweet chili garlic dipping sauce recipe for an equally delicious sweeter variation.
2. Roasted Garlic Version
Roast your 6 garlic cloves in a dry pan over medium heat for 5–7 minutes before blending. Roasted garlic gives the sauce a deeper, smoky sweetness that pairs perfectly with grilled meats and satay skewers.
3. Vegan Thai Chili Garlic Sauce
Swap the fish sauce for soy sauce plus a tiny squeeze of lime to keep it vegan. Add ½ teaspoon of miso paste blended in to mimic some of that fermented depth fish sauce provides. This version works wonderfully over tofu or vegetable rice paper rolls.
4. Citrus-Forward Version
Replace half the lime juice with fresh orange juice for a brighter, fruitier dipping sauce. Add ½ teaspoon of finely grated lime zest right at the end. This version pairs beautifully with grilled salmon or coconut shrimp. For even more ways to enjoy bold Thai flavors, explore this complete guide to Thai chili garlic sauce spicy dipping sauce — it covers all the best variations and serving ideas.
Storage & Reheating
Refrigerator: Store the cooled sauce in a sealed glass jar or airtight container. It keeps well in the fridge for up to 2 weeks. The flavors continue to develop and improve after the first 24 hours.
Freezer: Pour the sauce into an ice cube tray and freeze. Once frozen, pop the cubes into a zip-lock bag. Frozen sauce cubes keep for up to 3 months. Thaw in the fridge overnight or microwave one cube for 20–30 seconds.
Reheating: Warm the sauce gently in a small saucepan over low heat, stirring constantly. Add 1–2 teaspoons of warm water if the sauce has thickened too much in the fridge. Never boil it again once it’s been made — it can turn bitter.
Room Temperature: This sauce is safe at room temperature for up to 4 hours when serving at a party or dinner. After that, refrigerate any leftovers promptly.
Troubleshooting
Problem 1: My sauce is too thin and watery. This usually means the cornstarch slurry didn’t cook long enough to activate. Return the sauce to low heat and stir constantly for another 60–90 seconds. If it’s still too thin, mix a second slurry with ½ teaspoon cornstarch and 1 teaspoon cold water and add it slowly while stirring.
Problem 2: My sauce is too thick and sticky. Add warm water, 1 teaspoon at a time, and stir over low heat until you reach the consistency you want. Thin sauces are much easier to fix than gluey ones, so go slowly.
Problem 3: The sauce tastes too salty. Fish sauce is already quite salty, so it’s easy to overdo it. Add more fresh lime juice and ½ teaspoon of sugar to balance the salt out. A tiny bit of warm water also dilutes saltiness without changing the texture too much.
Problem 4: The sauce is too spicy to enjoy. Stir in an extra 1 tablespoon of sugar and 1 tablespoon of rice vinegar. Sweetness and acid both counteract the perception of heat on the palate. You can also blend in 2 tablespoons of sweet red bell pepper to add body and cut the heat with more mild chili flavor.
Problem 5: The garlic flavor is too raw and sharp. This happens when the sauce didn’t simmer long enough after blending. Return it to low heat and simmer for an additional 3–4 minutes, stirring constantly. Gentle heat mellows raw garlic perfectly without destroying it.
Equipment Essentials
- Small blender or mini food processor — Essential for smooth blending
- Small saucepan — A 1-quart saucepan works perfectly
- Silicone spatula or wooden spoon — For constant stirring
- Small mixing bowl — For the cornstarch slurry
- Measuring spoons — Accuracy matters in sauce-making
- Glass jar with lid — For storing the finished sauce
- Cutting board and chef’s knife — For prepping chilies and garlic
- Citrus juicer — Optional but great for getting the most from your limes
Shopping List
Produce Section
- Fresh red Thai bird’s eye chilies (look near the specialty peppers)
- Fresh garlic bulb (6 cloves needed)
- Fresh limes (2 limes yields about 3 tablespoons juice)
- Fresh cilantro — optional
- Green onion — optional
Asian Foods Aisle
- Fish sauce (Tiparos or Megachef brands work great)
- Rice vinegar
- Toasted sesame oil — optional
Baking Aisle
- Granulated white sugar
- Cornstarch
5 Success Secrets for the Best Thai Chili Garlic Sauce Spicy Dipping Sauce Recipe
1. Always taste your chilies before committing. Thai chilies vary wildly in heat from bunch to bunch and season to season. Bite the very tip of one chili before you start. If it’s nuclear hot, reduce your count by 2–3 chilies. If it’s mild, add a couple more.
2. Never skip the simmer step. Some people try to serve this sauce raw, straight from the blender. Don’t. Cooking the sauce for even 5 minutes dramatically improves the flavor. The heat mellows the raw garlic, dissolves the sugar completely, and activates the cornstarch for that beautiful glossy finish.
3. Bloom the garlic before blending for extra depth. For an even richer sauce, briefly sauté your chopped garlic in ½ teaspoon of neutral oil for 60 seconds over medium heat before adding it to the blender. This one extra step pushes the garlic flavor from sharp and raw to golden and complex.
4. Use a glass jar, not plastic, for storage. Thai chili sauce can stain plastic containers and absorb odors over time. A clean glass jar with a tight lid is the best way to store this sauce and keep it tasting fresh for the full two weeks.
5. Make a double batch — you’ll always want more. This Thai chili garlic sauce spicy dipping sauce recipe disappears fast. The moment you put it on the table, everyone will want more. Double the recipe from the start and store half in the fridge. You’ll thank yourself later.