Key Takeaways:
- Master crusty French bread with just 4 ingredients
- Total time: 3 hours (30 minutes active)
- No special equipment needed – just your oven
- Perfect for sandwiches and dinner companions
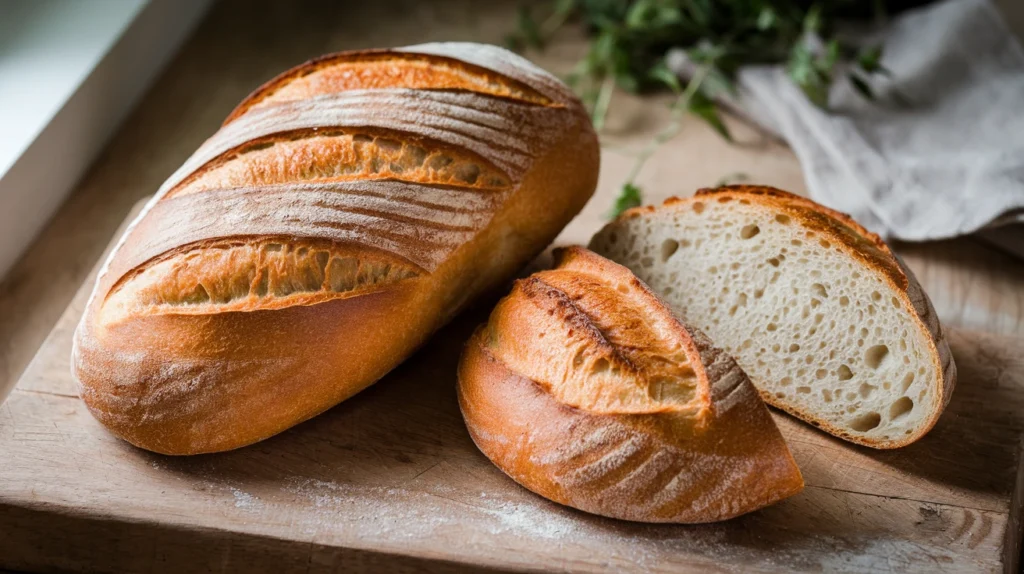
Are you tired of spending money at your local bakery for fresh French bread? This simple recipe will help you create two beautiful loaves of homemade French bread right in your kitchen. The result? A crispy crust and soft interior that rivals any bakery.
Equipment Needed
- Large mixing bowl
- Clean kitchen towel
- Sharp kitchen knife or bread lame
- Baking sheet
- Measuring cups and spoons
- Pastry brush
Ingredients
For 4 servings (2 medium loaves):
- 4 cups bread flour
- 2¼ teaspoons active dry yeast
- 2 teaspoons salt
- 1½ cups warm water (110°F)
- 1 tablespoon olive oil
- Extra flour for dusting
Step-by-Step Instructions
1. Prepare the Yeast Mixture (10 minutes)
- Start by checking your water temperature. It should feel warm but not hot when you touch it – like warm bath water. If you have a thermometer, aim for 110°F.
- Pour exactly 1½ cups warm water into a large clean bowl.
- Open a new packet of yeast or measure 2¼ teaspoons from your jar.
- Sprinkle the yeast evenly over the water’s surface – don’t dump it in one spot.
- Let it sit undisturbed for 5-10 minutes.
- Watch for the mixture to become foamy and smell slightly sweet – this means your yeast is alive and active.
- If you don’t see any foam after 10 minutes, your yeast might be old or your water was too hot/cold – start over with fresh yeast.
2. Mix the Dough (15-20 minutes)
- While waiting for the yeast, measure your flour:
- Use a spoon to fluff up the flour in its bag or container
- Spoon flour into measuring cup (don’t scoop directly with cup)
- Level off with straight edge of a knife
- Place 4 cups of measured flour in a large mixing bowl
- Add 2 teaspoons salt and mix well with a spoon
- Once yeast is ready, make a well (hole) in center of flour mixture
- Pour the foamy yeast mixture into the well
- Using a wooden spoon or rubber spatula:
- Start mixing from the center, gradually pulling in flour
- Mix until a shaggy, messy dough forms
- Don’t worry if it looks rough at this stage
- Dust your clean counter or work surface with about 2 tablespoons flour
- Scrape dough onto floured surface
- Kneading instructions:
- Fold dough in half toward you
- Push down and away with heel of your hands
- Turn dough quarter turn
- Repeat for 8-10 minutes
- Add small sprinkles of flour if dough is too sticky
- Final dough should be smooth and spring back when poked
3. First Rise (1 hour)
- Clean and dry your mixing bowl
- Add 1 tablespoon olive oil to bowl
- Use your fingers or paper towel to coat inside of bowl with oil
- Place kneaded dough in bowl
- Turn dough ball to coat all sides with oil
- Cover bowl with:
- Clean, damp kitchen towel or
- Plastic wrap
- Place in warm spot (70-75°F):
- On counter away from drafts
- Inside turned-off oven with light on
- On top of refrigerator
- Set timer for 1 hour
- Dough should double in size
- Test if ready: poke with finger – indent should remain
4. Shape the Loaves (15 minutes + 30 minutes rise)
- Gently punch down dough with your fist to release air
- Turn onto lightly floured surface
- Pat into rough rectangle
- Cut in half with sharp knife or bench scraper
- For each half:
- Pat into 8×12 inch rectangle
- Starting from long side, roll tightly like a jelly roll
- Pinch seam and ends to seal
- Place seam-side down on baking sheet
- Tuck ends under slightly
- Cover shaped loaves with damp towel
- Let rise 30 minutes until puffy
- Preheat oven to 400°F while bread rises
5. Baking (25-30 minutes)
- Remove towel from risen loaves
- Using sharp knife or razor:
- Make 3-4 diagonal slashes on each loaf
- Cut about ¼ inch deep
- Cuts should be quick and confident
- Optional: For crispier crust
- Place shallow pan of hot water on bottom oven rack
- OR mist loaves with water before baking
- Place baking sheet in center of preheated oven
- Set timer for 25 minutes
- Check bread at 25 minutes:
- Should be golden brown
- Bottom should sound hollow when tapped
- If too pale, bake 5 minutes more
- Remove from oven with oven mitts
- Transfer loaves to cooling rack
- Let cool at least 15 minutes before cutting
Troubleshooting Guide
Dense Bread:
- Dough wasn’t kneaded enough
- Rising time was too short
- Water was too hot or cold
Pale Crust:
- Oven temperature too low
- Not baked long enough
Cracked Surface:
- Dough dried during rising
- Keep dough covered well
Variations & Substitutions
- Replace ¼ of bread flour with whole wheat flour
- Add herbs like rosemary or thyme
- Create rolls instead of loaves
- Use instant yeast (reduce amount by 25%)
Storage & Reheating
- Store at room temperature up to 2 days
- Freeze for up to 3 months
- Reheat in 350°F oven for 5-10 minutes
- Wrap in foil to prevent over-crisping
Safety Tips
- Always use oven mitts
- Let bread cool before cutting
- Keep children away from hot oven
- Use proper food handling practices
- Clean all surfaces thoroughly
Pro Tips
- Room temperature ingredients work best
- Don’t rush the rising time
- Steam in the oven creates better crust
- Score bread just before baking
- Let cool completely before storing
This French bread recipe creates two perfect loaves for sharing. The crispy crust and soft interior make it ideal for sandwiches or as a side for your favorite meals. Remember, practice makes perfect – don’t get discouraged if your first loaf isn’t bakery-perfect. Happy baking!