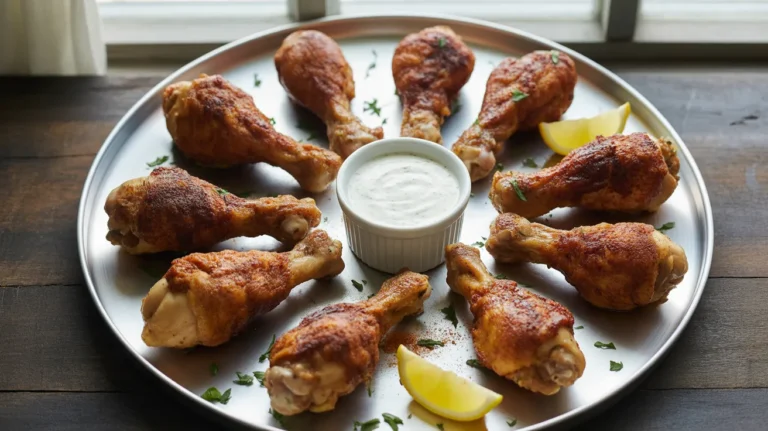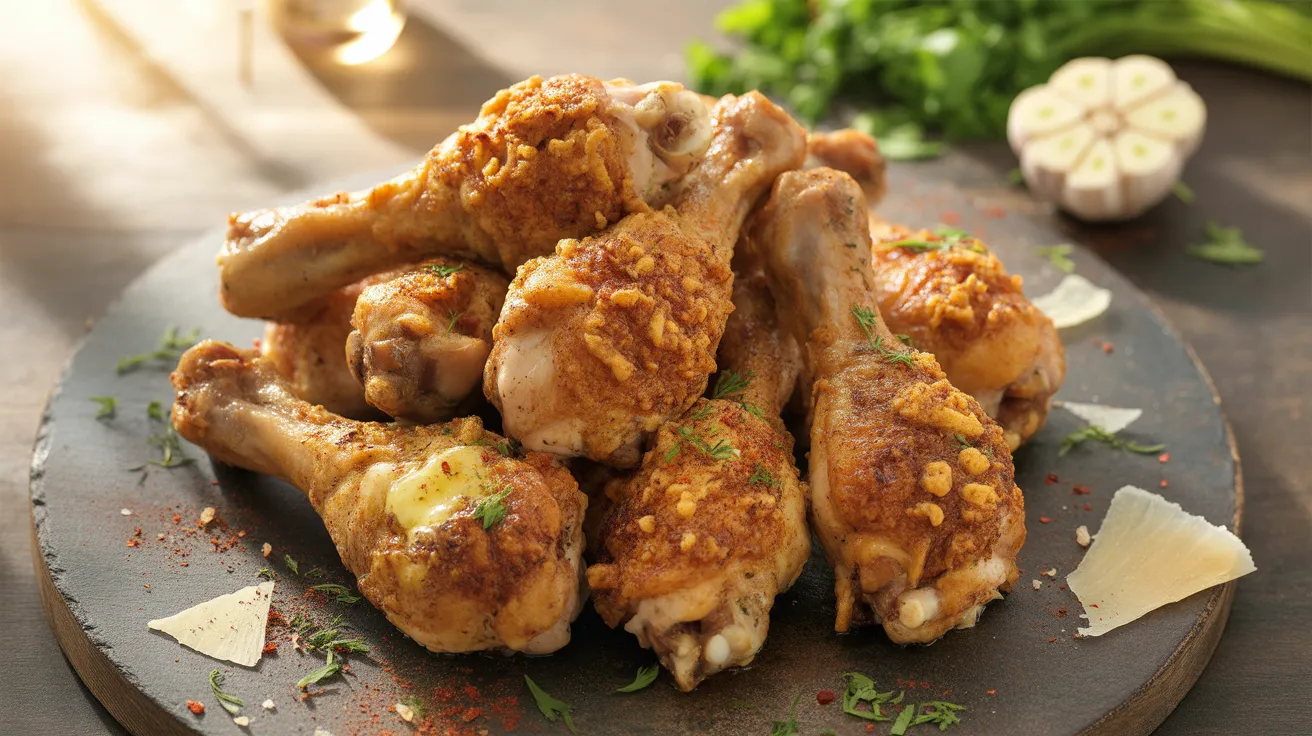
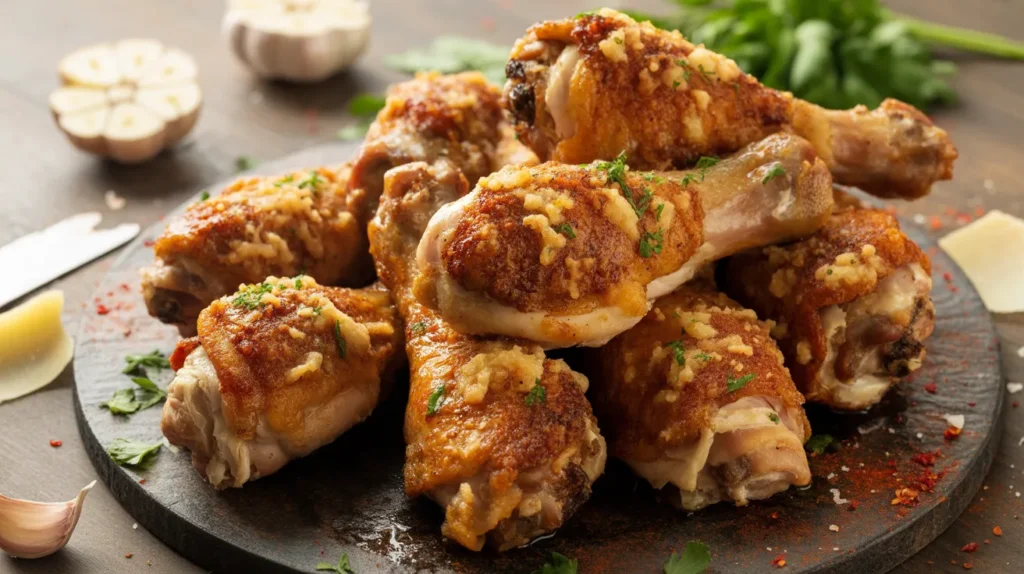
These air fryer garlic parmesan drumsticks hit the table golden, crunchy, and loaded with buttery garlic flavor in under 30 minutes. I make this air fryer garlic parmesan drumsticks recipe on busy weeknights when my family wants something hearty without a lot of cleanup.
SERVES: 4 | PREP: 10 MIN | COOK: 25 MIN | TOTAL: 35 MIN
What You Need for Air Fryer Garlic Parmesan Drumsticks
Getting the right ingredients makes all the difference. Here is everything you need, broken into easy groups.
Ingredients Table
| Category | Ingredient | Amount |
|---|---|---|
| Chicken | Chicken drumsticks | 8 pieces |
| Fat | Olive oil | 2 tablespoons |
| Fat | Unsalted butter, melted | 3 tablespoons |
| Seasoning | Garlic powder | 1 teaspoon |
| Seasoning | Onion powder | ½ teaspoon |
| Seasoning | Smoked paprika | ½ teaspoon |
| Seasoning | Salt | 1 teaspoon |
| Seasoning | Black pepper | ½ teaspoon |
| Seasoning | Italian seasoning | ½ teaspoon |
| Coating | Grated Parmesan cheese | ½ cup |
| Coating | Panko breadcrumbs | ¼ cup |
| Garnish | Fresh garlic, minced | 4 cloves |
| Garnish | Fresh parsley, chopped | 2 tablespoons |
| Garnish | Red pepper flakes (optional) | ¼ teaspoon |
Step-by-Step Instructions
Phase 1: Prep the Chicken (5 minutes)
Step 1: Pat the Drumsticks Completely Dry
Take all 8 drumsticks out of their packaging and place them on a cutting board lined with paper towels. Press more paper towels firmly on top and pat every side of each drumstick until no moisture is visible. This step is not optional. Wet skin creates steam inside the air fryer, and steam stops the skin from getting crispy. Spend a full 60 seconds patting each batch dry. The skin should feel almost paper-like when you are done.
Step 2: Let the Chicken Sit at Room Temperature
Set the dried drumsticks on a clean plate and leave them out for 10 minutes. Cold chicken straight from the fridge cooks unevenly — the outside burns before the inside finishes. Room-temperature chicken cooks at the same rate from edge to bone. While you wait, measure and prep your other ingredients.
Step 3: Trim Any Extra Skin or Fat
Look at each drumstick. If large pieces of loose skin are hanging off the end, use kitchen scissors to snip them away. Loose skin does not crisp up — it just gets rubbery. Leave all the skin that is tightly attached to the meat because that is what turns golden and crunchy.
Phase 2: Season the Chicken (5 minutes)
Step 4: Make the Dry Seasoning Mix
In a small bowl, combine 1 teaspoon garlic powder, ½ teaspoon onion powder, ½ teaspoon smoked paprika, 1 teaspoon salt, ½ teaspoon black pepper, and ½ teaspoon Italian seasoning. Stir everything together with a fork until the spices are fully combined. Taste a tiny pinch — it should be savory, a little smoky, and well-salted.
Step 5: Coat the Drumsticks in Olive Oil
Place all 8 drumsticks in a large mixing bowl. Drizzle 2 tablespoons of olive oil over them. Use your hands or tongs to toss and roll each drumstick until the entire surface is lightly coated in oil. The oil is the glue that makes the seasoning stick and helps the skin crisp. Do not skip or reduce the oil.
Step 6: Add the Dry Seasoning Mix
Pour the seasoning mix over the oiled drumsticks. Toss and press the seasoning into the skin with your hands. Massage it into every surface — the front, back, top, and the meaty bottom end. You want to see color on all sides. Set the bowl aside.
Phase 3: Make the Parmesan Coating (3 minutes)
Step 7: Combine the Parmesan Coating
In a separate shallow bowl or plate, mix ½ cup grated Parmesan with ¼ cup panko breadcrumbs. Stir them together with a fork. The Parmesan gives buttery, salty flavor and the panko gives crunch. Make sure the mixture is spread out flat so you can press drumsticks into it easily.
Step 8: Press the Coating onto the Drumsticks
Take one drumstick at a time and press each side firmly into the Parmesan-panko mixture. Use your fingers to gently press the coating so it sticks to the oil and seasoning underneath. You do not need to fully bread these — a light, uneven coating is perfect. Place the coated drumsticks back on the plate. Repeat for all 8 pieces.
Phase 4: Preheat and Cook (25 minutes)
Step 9: Preheat Your Air Fryer
Set your air fryer to 400°F (200°C) and run it empty for 3-5 minutes. Preheating is the same as preheating an oven — it brings the cooking chamber to the right temperature before food goes in. If you skip this, the first few minutes of cooking time are wasted just warming up, and the skin will not get that immediate sear that makes it crispy.
Step 10: Arrange Drumsticks in the Basket
Lightly spray the air fryer basket with nonstick cooking spray. Place the drumsticks in the basket in a single layer. The pieces should not touch each other. Air fryers cook by circulating hot air all around the food — if pieces are stacked or crowded, the air cannot get between them and the skin stays soft. If your air fryer basket is small, cook in two batches.
Step 11: Cook the First Side
Slide the basket into the air fryer and cook at 400°F for 12 minutes. Do not open the basket during this time. The heat inside needs to stay steady. You will start to smell garlic and toasted cheese around the 8-minute mark — that means things are going exactly right.
Step 12: Flip the Drumsticks
At the 12-minute mark, open the basket carefully. The steam that escapes is very hot — keep your face back. Use tongs to flip each drumstick to the other side. You should see a golden crust on the bottom side. If the bottoms look pale, that is fine — they will finish on the second side. Close the basket and cook for another 10-13 minutes.
Step 13: Check the Internal Temperature
At the 22-minute mark, open the basket and use an instant-read meat thermometer to check the thickest part of one drumstick — push the probe toward the bone but not touching it. You are looking for 165°F (74°C). This is the safe internal temperature for chicken. If you do not have a thermometer, cut into the thickest drumstick — the juice should run clear and the meat should not look pink near the bone. Cook in 2-minute increments if more time is needed.
Step 14: Rest the Drumsticks
Once the drumsticks hit 165°F, pull the basket out and let the drumsticks rest in the basket (with the air fryer off) for 3 minutes. Resting lets the juices redistribute back into the meat. If you cut into chicken the second it comes out of heat, all the juice runs out onto the plate and the meat tastes dry.
Phase 5: Make the Garlic Butter Finish (3 minutes)
Step 15: Cook the Fresh Garlic in Butter
While the chicken rests, melt 3 tablespoons of unsalted butter in a small saucepan over medium-low heat. Add 4 cloves of minced fresh garlic and stir constantly for 60-90 seconds. Watch the garlic carefully — it goes from fragrant and golden to burnt very fast. The moment you see the garlic turn light gold and smell a toasted, nutty aroma, pull the pan off the heat. Burnt garlic is bitter and will overpower everything.
Step 16: Toss the Drumsticks in Garlic Butter
Place the rested drumsticks in a large clean bowl. Pour the warm garlic butter over them. Using tongs, roll each drumstick through the butter so every surface gets coated. The heat from the chicken will keep the butter liquid for a minute or two. Work quickly so the butter does not solidify before everything is coated.
Phase 6: Plate and Serve (2 minutes)
Step 17: Add the Finishing Garnish
Arrange the garlic butter-coated air fryer garlic parmesan drumsticks on a serving platter. Sprinkle 2 tablespoons of fresh chopped parsley over the top. If you like a little heat, add a pinch of red pepper flakes. Grate or sprinkle a little extra Parmesan over the top if you have it — it melts slightly on the hot chicken and looks great.
Step 18: Serve Immediately
These are best eaten hot, right off the platter. The crust stays crispiest in the first 10-15 minutes after cooking. Set out napkins — these are genuinely finger-food messy and that is part of the fun.
Chef’s Notes
Tip 1: Dry Brine for Even Better Results
Season your drumsticks with salt the night before and leave them uncovered in the fridge on a wire rack. This is called dry brining. The salt draws a tiny bit of moisture out, then that moisture gets reabsorbed into the meat seasoned. The skin also dries out overnight so it crisps up even faster in the air fryer. This trick takes your air fryer garlic parmesan drumsticks from great to really impressive.
Tip 2: Use Freshly Grated Parmesan
The pre-shredded Parmesan in green cans contains anti-caking agents that make it dry and grainy. A fresh block of Parmesan grated on the fine side of a box grater melts slightly during cooking and sticks better to the skin. You will taste a clear difference.
Tip 3: Do Not Crowd the Basket
I know it is tempting to load the basket to save time. Even two drumsticks touching each other creates a soft steamed patch on the skin right where they make contact. One layer, no touching, every single time.
Tip 4: Match Your Air Fryer Model
Basket-style air fryers and oven-style air fryers cook at slightly different speeds. Basket models tend to run hotter. If you have an oven-style model, add 2-3 extra minutes of cook time and check the temperature carefully. Always trust your thermometer over the clock.
Nutrition Information (Per Serving — 2 Drumsticks)
| Calories | 420 |
| Protein | 34g |
| Total Fat | 28g |
| Saturated Fat | 10g |
| Carbohydrates | 7g |
| Fiber | 0.5g |
| Sodium | 720mg |
Nutrition is estimated based on standard ingredient amounts. Values will vary with ingredient brands.
Recipe Variations
Variation 1: Buffalo Garlic Parmesan Drumsticks
Skip the Italian seasoning and add 1 teaspoon cayenne to the dry rub. After the garlic butter toss, mix in 2 tablespoons of hot sauce (Frank’s RedHot works great). Finish with Parmesan and blue cheese crumbles. This gives you all the crunch of the original with a tangy, spicy kick. Serve with celery sticks and ranch dipping sauce.
Variation 2: Honey Garlic Parmesan Drumsticks
Add 2 tablespoons of honey to the garlic butter at the end of cooking. Stir it in off the heat before tossing the chicken. The honey caramelizes slightly on the hot drumsticks and gives a sweet-savory glaze. This version is great for kids or anyone who likes a touch of sweetness in their chicken.
Variation 3: Lemon Herb Drumsticks
Love bright citrus flavors? My air fryer lemon pepper chicken uses a similar technique with lemon zest and cracked pepper that works beautifully with this same parmesan crust. Add 1 tablespoon lemon zest to the dry rub and squeeze half a lemon over the finished drumsticks before serving.
Variation 4: Breadcrumb-Free Keto Version
Drop the panko breadcrumbs completely and double the Parmesan to ¾ cup. Add 1 tablespoon almond flour in its place. The Parmesan alone creates a solid crust that gets just as crunchy. This version has fewer than 4g of carbs per serving, making it a solid low-carb option.
Storage and Reheating
Refrigerator: Let the drumsticks cool completely — about 20 minutes at room temperature. Place them in an airtight container or zip-top bag. They will keep well for up to 4 days. Do not store them while they are still warm; trapped steam will soften the crust.
Freezer: Place completely cooled drumsticks in a single layer on a baking sheet and freeze for 1 hour until solid. Transfer to a freezer-safe zip bag and freeze for up to 2 months. Label the bag with the date.
Reheating in the Air Fryer: This is the only method that brings the crust back to crispy. Set the air fryer to 375°F and cook refrigerated drumsticks for 5-7 minutes, flipping once halfway through. Frozen drumsticks need 12-15 minutes at the same temperature. Check the internal temp reaches 165°F before eating.
Reheating in the Oven: Place drumsticks on a wire rack over a baking sheet. Bake at 375°F for 10-12 minutes. The wire rack keeps the bottom from getting soggy.
Microwave: Only use this as a last resort. The skin will lose all its crunch. If you must, heat on 50% power in 30-second intervals to avoid drying out the meat.
Troubleshooting
Problem 1: The skin is not crispy
This happens for three reasons — the chicken was too wet, the basket was crowded, or the air fryer was not preheated. Pat the chicken completely dry next time, make sure pieces have space between them, and always run the air fryer for 3-5 minutes before adding food. If your current batch came out soft, pop them back in at 400°F for 3-4 minutes — do not stack them.
Problem 2: The Parmesan coating fell off
The coating needs the oil layer underneath it to stick. If you reduced the oil or if the chicken was very smooth and dry before coating, the Parmesan has nothing to grab onto. Press the coating firmly onto the skin with your fingers rather than just rolling the drumstick through it. A light press makes a real difference.
Problem 3: The garlic in the butter burnt
Garlic burns fast on medium-high heat. Use medium-low heat only and stir constantly the entire time. The moment the garlic smells toasted and turns light gold, pull the pan off the burner. The residual heat in the pan will keep it cooking for another 30 seconds even off the flame. If your garlic went dark brown, start the butter step over — burnt garlic cannot be saved and will make the whole dish taste bitter.
Problem 4: The chicken is cooked outside but still pink at the bone
Thick drumsticks need the full cook time. If the outside looks done but the inside is underdone, lower the temperature to 375°F and continue cooking in 3-minute increments until the thermometer reads 165°F. Cooking at lower temp for longer gives the heat more time to penetrate without burning the crust further.
Problem 5: The drumsticks are dry and tough
Overcooking is the culprit. Once chicken passes 175°F, the proteins tighten and squeeze out moisture fast. Use a thermometer every time. Pull them at 165°F and rest them before cutting. Another cause is skipping the olive oil coating — oil seals in moisture while the skin crisps.
Equipment Essentials
- Air fryer (basket or oven-style, at least 4-quart capacity)
- Instant-read meat thermometer — this is the most important tool for safe, juicy chicken
- Large mixing bowl — for tossing drumsticks in oil and seasoning
- Shallow bowl or plate — for the Parmesan-panko coating
- Kitchen tongs — for flipping drumsticks safely
- Small saucepan — for the garlic butter finish
- Cutting board and paper towels — for drying and prepping the chicken
- Nonstick cooking spray — to coat the air fryer basket
No air fryer? You can bake these on a wire rack over a foil-lined baking sheet at 425°F for 35-40 minutes, flipping once at the 20-minute mark.
Shopping List
Meat Section
- [ ] Chicken drumsticks (package of 8)
Dairy Section
- [ ] Block of Parmesan cheese (or pre-grated, fine shred)
- [ ] Unsalted butter (small stick)
Produce Section
- [ ] Fresh garlic (1 head — you need 4 cloves)
- [ ] Fresh flat-leaf parsley (small bunch)
Dry Goods / Baking Aisle
- [ ] Panko breadcrumbs
- [ ] Garlic powder
- [ ] Onion powder
- [ ] Smoked paprika
- [ ] Italian seasoning
- [ ] Black pepper
- [ ] Red pepper flakes (optional)
Oil / Condiment Aisle
- [ ] Olive oil
- [ ] Nonstick cooking spray
5 Success Secrets
1. Dry the skin like you mean it. Every extra second you spend patting those drumsticks dry pays off in crunch. Keep extra paper towels nearby and go over each piece twice.
2. Preheat every single time. Skipping the preheat is the number one reason air fryer chicken comes out soft instead of crispy. Set the timer for 5 minutes and walk away while it heats up.
3. Trust the thermometer, not the clock. Every air fryer model runs slightly differently. A thermometer at 165°F is the only guarantee your chicken is safe and done. Clocks are a guide, temperature is the truth.
4. Garlic butter last, not first. Adding garlic butter before cooking burns the garlic and turns it bitter. Cook the chicken completely first, then add the garlic butter as a glaze right before serving.
5. Space equals crispiness. More airflow equals crunchier skin. Always leave at least ½ inch between each drumstick in the basket. If that means two batches, two batches it is.
If you love bold air fryer chicken recipes, my air fryer chicken shawarma uses a similar spice-forward technique with a completely different flavor profile — it is one of my most-made recipes and comes together in about the same amount of time.
Made this recipe? I would love to hear how it went! Leave a comment below and let me know how your air fryer garlic parmesan drumsticks turned out.