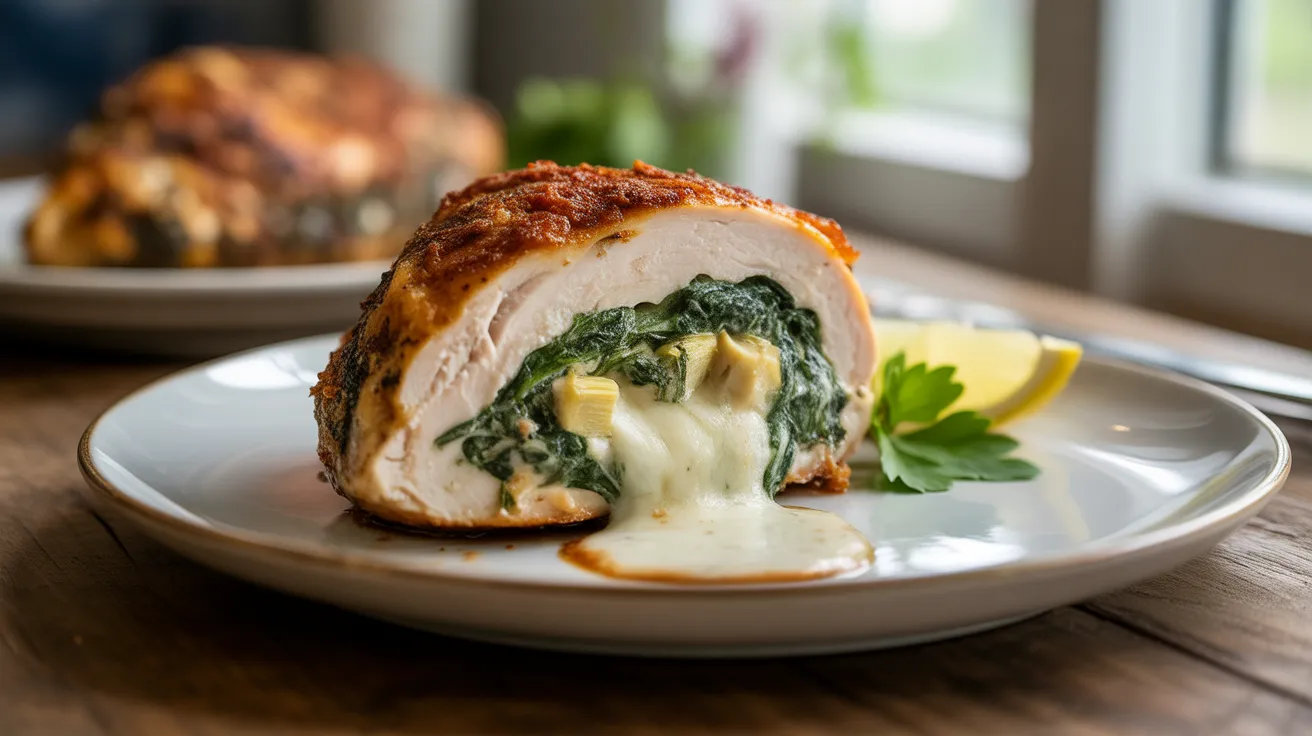
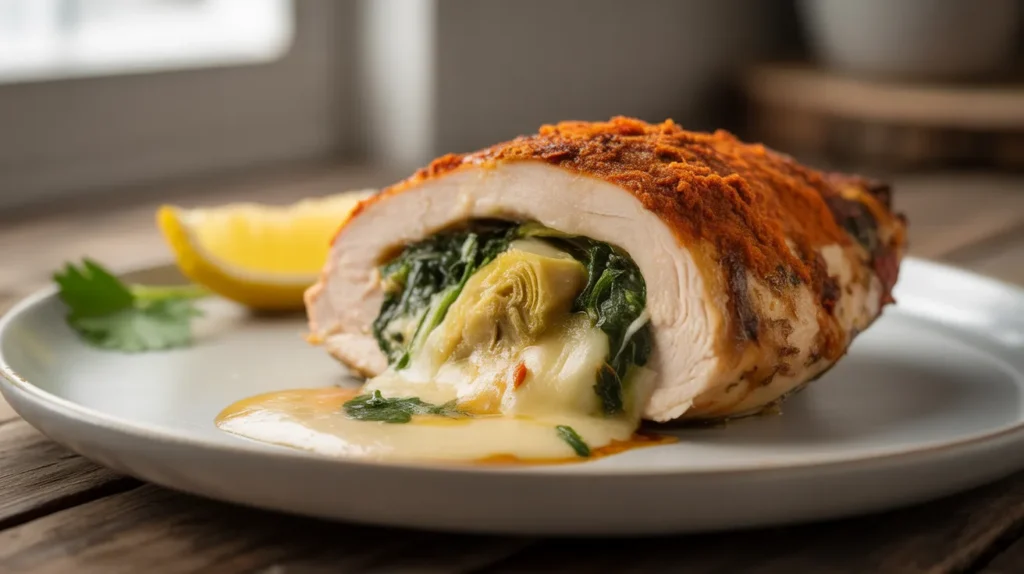
This air fryer spinach artichoke stuffed chicken is the weeknight dinner you didn’t know you needed. Juicy chicken breasts packed with a creamy, cheesy spinach artichoke filling cook up fast and perfectly golden in the air fryer. Once you try air fryer spinach artichoke stuffed chicken, plain chicken nights are gone for good.
SERVES: 4 | PREP: 15 MIN | COOK: 22 MIN | TOTAL: 37 MIN
What You Need for Air Fryer Spinach Artichoke Stuffed Chicken
Ingredients Table
| Category | Ingredient | Amount |
|---|---|---|
| Chicken | Boneless, skinless chicken breasts | 4 large (about 8 oz each) |
| Chicken | Olive oil | 2 tablespoons |
| Chicken | Garlic powder | 1 teaspoon |
| Chicken | Onion powder | 1 teaspoon |
| Chicken | Smoked paprika | 1 teaspoon |
| Chicken | Salt | 1 teaspoon |
| Chicken | Black pepper | ½ teaspoon |
| Filling | Cream cheese, softened | 4 oz |
| Filling | Frozen spinach, thawed and drained | ½ cup |
| Filling | Canned artichoke hearts, drained and chopped | ½ cup |
| Filling | Shredded mozzarella cheese | ½ cup |
| Filling | Grated Parmesan cheese | ¼ cup |
| Filling | Garlic cloves, minced | 2 |
| Filling | Red pepper flakes (optional) | ¼ teaspoon |
| Filling | Salt and pepper | To taste |
Step-by-Step Instructions
Phase 1: Get Ready to Cook
Step 1: Preheat your air fryer.
Set your air fryer to 375°F (190°C). Let it preheat for about 3-5 minutes before you add any food. A hot air fryer means the chicken starts cooking right away and gets a better crust on the outside. This step matters — don’t skip it.
Step 2: Drain your spinach completely.
Take your thawed frozen spinach and place it in a clean kitchen towel or several layers of paper towels. Squeeze it hard over the sink. You want to get out as much water as you can. This is really important. If the spinach is too wet, your filling will be watery and it can leak out of the chicken while it cooks. Squeeze it twice to be sure.
Step 3: Drain and chop the artichoke hearts.
Open your can of artichoke hearts and pour them into a strainer. Let them drain for a couple of minutes, then press gently with a paper towel. Chop them into small pieces, about ¼-inch chunks. Smaller pieces stay inside the pocket better and give you filling in every bite.
Phase 2: Make the Spinach Artichoke Filling
Step 4: Soften the cream cheese.
Your cream cheese needs to be soft so it mixes easily. If you forgot to take it out ahead of time, microwave it in a bowl for 15-20 seconds. It should feel like soft butter when you press it with a spoon — not melted, just soft. Cold cream cheese won’t mix well and you’ll end up with lumps.
Step 5: Mix the filling.
In a medium bowl, add the softened cream cheese, drained spinach, chopped artichoke hearts, shredded mozzarella, Parmesan, minced garlic, and red pepper flakes if using. Use a fork or spatula to mix everything together until well combined. Taste it and add salt and pepper as needed. The filling should taste cheesy and a little garlicky. Set the bowl aside.
Phase 3: Prepare the Chicken
Step 6: Pat the chicken dry.
Lay your four chicken breasts on a clean cutting board. Use paper towels to pat them dry on all sides. Dry chicken gets a much better golden-brown color in the air fryer. Wet chicken tends to steam instead of sear, and you want that nice outer crust.
Step 7: Cut the pocket.
This is the most important step in the whole recipe. Using a sharp knife, cut a deep pocket into the thickest side of each chicken breast. Hold the chicken flat on the board with one hand, and cut horizontally into the thick edge — almost all the way through, but stop about ½ inch from the other edges on three sides. Think of it like opening a book. The pocket needs to be big enough to hold a good scoop of filling. If your knife feels like it’s slipping, the blade may be dull — use a better knife or ask someone to help. Be careful to cut away from your fingers at all times.
Step 8: Season the outside of the chicken.
In a small bowl, mix together the garlic powder, onion powder, smoked paprika, salt, and pepper. Rub 2 tablespoons of olive oil all over each chicken breast — top, bottom, and sides. Then sprinkle the spice mix evenly over the outside of each breast. Make sure to get seasoning around the cut opening too. This spice rub gives the chicken great flavor and helps it brown beautifully.
Phase 4: Stuff and Secure the Chicken
Step 9: Fill each chicken breast.
Take about 2-3 tablespoons of filling for each chicken breast. Use a spoon to push the filling deep into the pocket, spreading it toward the far end first, then filling back toward the opening. Don’t overstuff — if you cram in too much, the filling will push out during cooking. Leave just a little bit of room near the opening.
Step 10: Secure the pockets with toothpicks.
Take 2-3 wooden toothpicks per chicken breast and use them to close the opening like little pins. Push each toothpick through both sides of the opening so the pocket stays shut. This keeps the filling inside where it belongs. Count how many toothpicks you use — you’ll need to remove every single one before eating. A quick trick: write the number on a sticky note so you don’t forget.
Phase 5: Air Fry the Chicken
Step 11: Place chicken in the air fryer basket.
Set the stuffed chicken breasts in a single layer in your air fryer basket. Do not stack them on top of each other. The hot air needs to circulate all the way around each piece for even cooking. If your air fryer is small and the pieces don’t all fit, cook them in two batches.
Step 12: Cook the first side.
Air fry at 375°F for 12 minutes. Don’t open the air fryer during this time. Let it do its job. The outside should start turning golden brown and you may smell that delicious garlic and cheese starting to cook.
Step 13: Flip and finish cooking.
Using tongs, carefully flip each chicken breast over. Cook for another 8-10 minutes, or until the outside is golden brown and the internal temperature reads 165°F (74°C) on a meat thermometer. A meat thermometer is the only reliable way to know the chicken is safe to eat. Insert it into the thickest part of the breast — not through the filling pocket. If it hasn’t hit 165°F yet, add 2-3 more minutes and check again.
Step 14: Check for filling leakage.
A small amount of filling may bubble out during cooking — this is normal. The cheese gets melty and golden where it touches the hot basket. This is actually a delicious bonus. If a lot of filling has escaped, your pocket may have been overstuffed or the toothpicks may have come loose.
Phase 6: Rest and Serve
Step 15: Rest the chicken before cutting.
Take the chicken out of the air fryer and place it on a plate or cutting board. Let it rest for 5 minutes before cutting in. Resting lets the juices settle back into the meat. If you cut it too soon, the juices run out onto the plate and the chicken dries out.
Step 16: Remove all toothpicks.
Before serving, remove every toothpick from each piece of chicken. Check the count you wrote down. This step is non-negotiable — a toothpick in someone’s food is a bad surprise.
Step 17: Slice and serve.
Cut each stuffed chicken breast in half on a slight diagonal to show off the gorgeous filling inside. Serve right away while the filling is still hot and melty.
Chef’s Notes
Tip 1 – Go thick with the chicken. For air fryer spinach artichoke stuffed chicken, bigger chicken breasts are actually easier to work with. Thicker breasts are easier to cut a deep pocket into without going all the way through. Look for breasts that are at least 8 ounces each at the store.
Tip 2 – Cream cheese is key. Don’t swap out the cream cheese for anything else — it’s what holds the filling together and keeps it creamy even as it melts. Full-fat cream cheese works best for rich flavor and the right texture.
Tip 3 – Every air fryer runs slightly different. If your air fryer tends to run hot, check the chicken at the 10-minute mark after flipping. Always use a thermometer — color alone can fool you.
Tip 4 – Make the filling ahead. You can mix the spinach artichoke filling up to 2 days in advance and keep it covered in the fridge. This makes the actual cooking night much faster.
Nutrition Information (Per Serving)
| Nutrient | Amount |
|---|---|
| Calories | ~420 kcal |
| Protein | ~52g |
| Carbohydrates | ~5g |
| Fat | ~21g |
| Saturated Fat | ~9g |
| Sodium | ~680mg |
| Fiber | ~1g |
Nutrition values are estimates based on standard ingredient brands and may vary.
Variations
1. Sun-Dried Tomato Version Add ¼ cup chopped sun-dried tomatoes (packed in oil, drained) to the filling mix. The tangy-sweet tomatoes work perfectly with the creamy artichoke base. This version pairs especially well with pasta on the side.
2. Jalapeño Popper Style Swap the mozzarella for shredded cheddar cheese and add 2 tablespoons diced pickled jalapeños to the filling. This gives you a spicy kick in every bite without changing the basic recipe much.
3. Greek-Inspired Filling Replace the mozzarella with crumbled feta cheese and add ¼ cup diced roasted red peppers and a pinch of dried oregano. The feta gives a salty, tangy flavor that feels totally different from the original.
4. Bacon and Spinach Cook and crumble 4 strips of bacon and mix them into the filling instead of the artichokes. If you love crispy, smoky flavor, this is your version. It’s also a great match alongside air fryer lemon pepper chicken for a full chicken dinner spread.
Storage & Reheating
In the fridge: Let the chicken cool to room temperature first, then store in an airtight container. It keeps well for up to 3 days in the refrigerator.
In the freezer: Wrap each piece tightly in plastic wrap, then place in a freezer-safe bag. Remove as much air as you can. Frozen stuffed chicken keeps for up to 2 months. Thaw overnight in the fridge before reheating.
Reheating in the air fryer: This is the best method. Place leftover chicken in your air fryer at 350°F for 6-8 minutes, flipping once halfway through. The outside gets crispy again and the filling warms up perfectly.
Reheating in the oven: Place chicken in a baking dish, cover with foil, and heat at 325°F for 15-18 minutes. Remove the foil for the last few minutes if you want the outside to crisp up again.
Microwave (last resort): Cover with a damp paper towel and heat at 50% power in 60-second intervals. The chicken won’t be crispy but the filling will still taste great.
Troubleshooting
Problem 1: My filling keeps falling out during cooking. Solution: Make sure you’re using enough toothpicks — at least 2-3 per breast — and that they’re placed close enough to the opening’s edge. Also check that you haven’t overstuffed. About 2-3 tablespoons of filling is the right amount. Too much filling creates pressure that pushes it out.
Problem 2: The chicken is brown outside but still raw inside. Solution: Your chicken breasts may be extra thick. Lower the temperature to 360°F and add 5 more minutes to the cooking time. Always rely on a meat thermometer for the final call — you want 165°F at the thickest point.
Problem 3: The outside looks pale and not golden. Solution: This usually means the chicken was wet when it went in. Make sure you pat it completely dry before adding oil and seasoning. Also confirm your air fryer was fully preheated before you added the chicken.
Problem 4: The filling is watery and loose. Solution: The spinach wasn’t squeezed dry enough. Go back and read Step 2 — you really need to press out almost all the moisture. Even a small amount of extra water makes the filling runny. Squeeze once in a towel, then again with paper towels for good measure.
Problem 5: The chicken breasts are different sizes and cook unevenly. Solution: Try to buy chicken breasts that are similar in size and weight. If you have one that’s much thicker than the others, gently pound it with a meat mallet or heavy pan to even it out a bit. You can also check smaller pieces a few minutes early and pull them out when they reach 165°F, letting the thicker pieces finish.
Equipment Essentials
- Air fryer (4-quart or larger works best for 4 breasts)
- Sharp chef’s knife or boning knife
- Cutting board
- Medium mixing bowl
- Wooden toothpicks
- Meat thermometer (essential — don’t skip this)
- Tongs
- Paper towels
- Small bowl for spice mix
Shopping List
Meat & Dairy Section
- [ ] 4 large boneless, skinless chicken breasts (about 8 oz each)
- [ ] 4 oz cream cheese
- [ ] Shredded mozzarella cheese (½ cup needed)
- [ ] Parmesan cheese, grated (¼ cup needed)
Produce Section
- [ ] Fresh garlic (2 cloves) or pre-minced jarred garlic
Frozen Foods
- [ ] Frozen chopped spinach (½ cup needed after thawing)
Canned Goods
- [ ] 1 can (14 oz) artichoke hearts in water
Pantry / Spices
- [ ] Olive oil
- [ ] Garlic powder
- [ ] Onion powder
- [ ] Smoked paprika
- [ ] Salt and black pepper
- [ ] Red pepper flakes (optional)
- [ ] Wooden toothpicks
5 Success Secrets for Air Fryer Spinach Artichoke Stuffed Chicken
1. Dry everything — twice. Dry chicken breasts, dry spinach, dry artichoke hearts. Extra moisture is the enemy of good browning and tight filling. A quick pat-down takes 30 seconds and makes a big difference in the final result.
2. Soft cream cheese is non-negotiable. Mixing cold cream cheese is a struggle and leaves you with clumps. Take it out of the fridge 30 minutes before you start, or give it a quick 15-second microwave blast. Your filling will be silky smooth.
3. Use a meat thermometer every single time. Air fryers vary. Chicken breasts vary in size. The only real way to know your air fryer spinach artichoke stuffed chicken is safe and perfectly cooked is to check the internal temperature. 165°F is the target, every time.
4. Don’t crowd the basket. Each piece of chicken needs room for hot air to move around it. Crowding means steaming, and steaming means pale, soft chicken skin instead of that golden crust you’re after. Cook in batches if needed.
5. Let it rest before you cut. Five minutes feels like forever when dinner smells that good, but it’s worth it. Resting keeps the juices inside the meat and the filling in the pocket where it belongs. Set a timer so you don’t cave in early.
Looking for more easy air fryer chicken ideas? Try this crowd-pleasing air fryer whole chicken wings recipe next — crispy, golden, and ready in under 30 minutes.