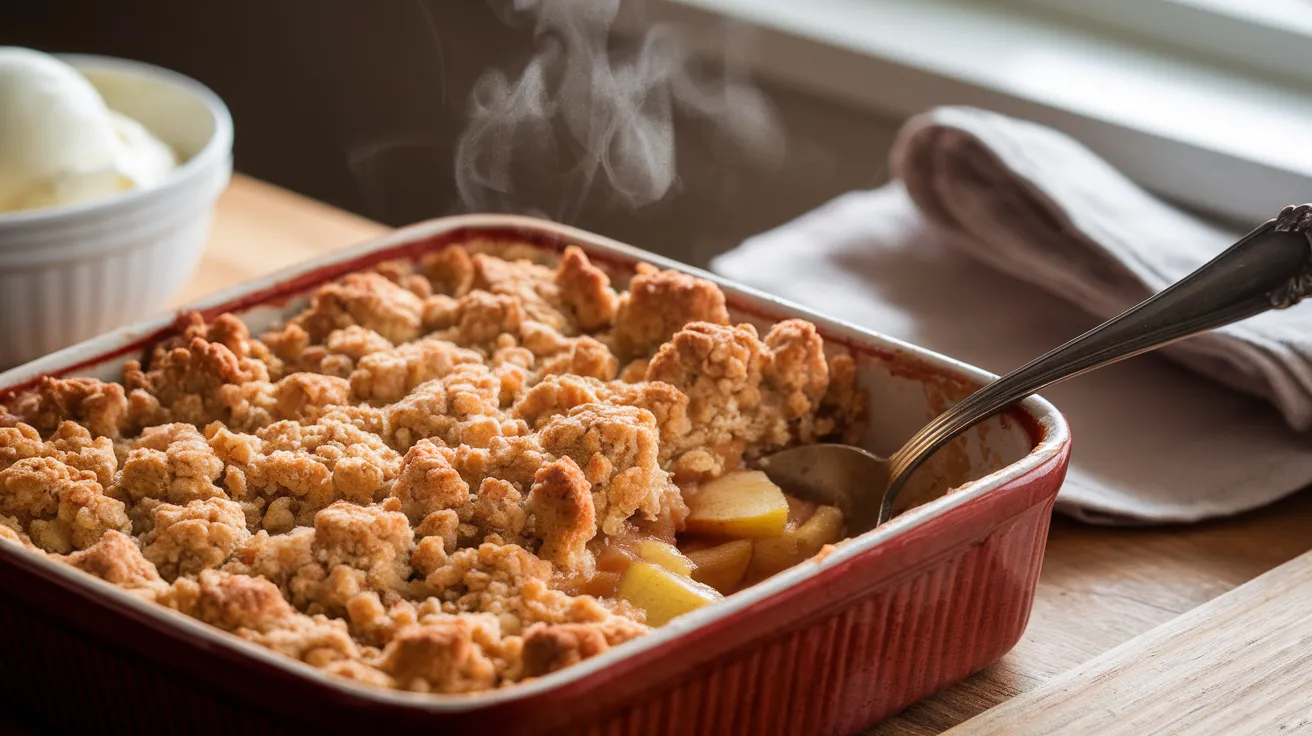
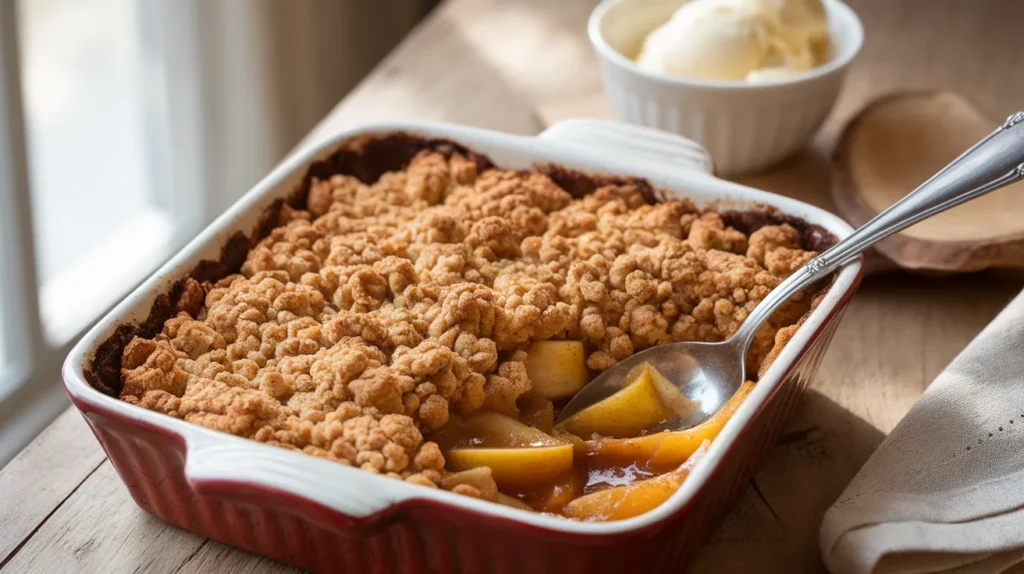
This foolproof apple crumble recipe transforms simple ingredients into a bubbling, golden dessert that tastes like a warm hug. With tender cinnamon-spiced apples beneath a buttery, crispy topping, this apple crumble becomes your go-to comfort food—ready in just one hour and perfect for any occasion.
SERVES: 4 | PREP: 20 MIN | COOK: 40 MIN | TOTAL: 60 MIN
Why This Apple Crumble Works
This isn’t just another apple dessert. The secret lies in three game-changing details: tossing apples with cornstarch keeps the filling perfectly thick, cold butter creates those irresistible crispy clusters, and a hot oven guarantees that golden-brown crust everyone fights over.
You’ll love how forgiving this recipe is. No fancy skills needed—just simple mixing and assembling.
Ingredients
For the Apple Filling
| Ingredient | Amount |
|---|---|
| Granny Smith apples | 4 large (about 2 lbs) |
| Granulated sugar | ¼ cup |
| Brown sugar | 2 tablespoons |
| Cornstarch | 1 tablespoon |
| Ground cinnamon | 1½ teaspoons |
| Fresh lemon juice | 1 tablespoon |
| Vanilla extract | 1 teaspoon |
| Salt | ¼ teaspoon |
For the Crumble Topping
| Ingredient | Amount |
|---|---|
| All-purpose flour | ¾ cup |
| Old-fashioned rolled oats | ½ cup |
| Brown sugar | ½ cup (packed) |
| Granulated sugar | ¼ cup |
| Ground cinnamon | ½ teaspoon |
| Salt | ¼ teaspoon |
| Unsalted butter | 6 tablespoons (cold, cubed) |
Step-by-Step Instructions
Phase 1: Prep Work (10 minutes)
Step 1: Preheat your oven to 375°F (190°C). Place the rack in the middle position so heat circulates evenly around your dish. This temperature is the sweet spot—hot enough to cook apples tender but not so hot that the topping burns before the filling bubbles.
Step 2: Grab an 8×8-inch baking dish and give it a light coating of butter or non-stick spray. This prevents sticking and makes cleanup way easier. Set it aside on your counter.
Step 3: Peel all 4 apples using a vegetable peeler. Work over a large bowl to catch any juice. Why peel? The skins get chewy when baked and interrupt that smooth, spoonable texture we’re after.
Step 4: Cut each peeled apple into quarters, then remove the core with a sharp knife. Slice each quarter into ¼-inch thick pieces. You want them thin enough to cook through but thick enough to hold their shape. Too thick and they’ll stay crunchy; too thin and they’ll turn to mush.
Phase 2: Building the Filling (5 minutes)
Step 5: In your large bowl with the sliced apples, add the ¼ cup granulated sugar, 2 tablespoons brown sugar, and 1 tablespoon cornstarch. The cornstarch is your insurance policy against a watery filling—it thickens all those apple juices into a luscious sauce.
Step 6: Sprinkle in 1½ teaspoons cinnamon, ¼ teaspoon salt, 1 tablespoon lemon juice, and 1 teaspoon vanilla extract. The lemon juice brightens the flavor and prevents apples from browning. Pro tip: Use fresh lemon juice, not bottled—it makes a noticeable difference.
Step 7: Using clean hands or a large spoon, toss everything together for about 30 seconds until every apple slice is coated with the sugar-spice mixture. You should see no dry spots of cornstarch remaining. This coating ensures even sweetness in every bite.
Step 8: Pour the apple mixture into your prepared baking dish. Use a spatula to spread them into an even layer, pressing gently to eliminate air pockets. The surface should look relatively flat—this helps the topping sit evenly.
Phase 3: Creating the Perfect Crumble (5 minutes)
Step 9: In a medium bowl, combine ¾ cup flour, ½ cup oats, ½ cup packed brown sugar, ¼ cup granulated sugar, ½ teaspoon cinnamon, and ¼ teaspoon salt. Whisk these dry ingredients together with a fork until completely mixed. You’re creating the base that’ll turn into those crispy clusters.
Step 10: Take your cold butter (this is crucial—warm butter won’t work!) and cut it into small cubes, about ½-inch each. Add them to the flour mixture. Why cold butter? It creates steam pockets as it melts, resulting in a crispier, flakier topping instead of a dense, greasy one.
Step 11: Using your fingertips, rub the butter into the dry ingredients. Press and squeeze the mixture between your thumbs and fingers, breaking up the butter pieces. Work for about 2-3 minutes until the mixture looks like coarse breadcrumbs with some pea-sized butter chunks remaining. These larger pieces create the best crunchy bits. Warning: Don’t overwork it or the butter will melt from your hand heat.
Step 12: The mixture should hold together when squeezed but still look crumbly. If it seems too dry and won’t clump at all, add ½ tablespoon of cold water and toss gently. You want some large clumps and some smaller pieces for texture variety.
Phase 4: Assembly & Baking (40 minutes)
Step 13: Scatter the crumble topping over the apples, distributing it evenly across the entire surface. Don’t press it down! Just let it sit loosely on top. Those air gaps between crumbles are where the magic happens—they let steam escape and allow the topping to crisp up beautifully.
Step 14: Place the dish on a rimmed baking sheet (trust me on this). As the apple crumble bakes, those sweet juices might bubble over. The baking sheet catches any drips and saves you from a smoky kitchen and messy oven cleanup.
Step 15: Slide the baking sheet with your dish into the preheated oven. Set a timer for 40 minutes. The dessert is done when you see vigorous bubbling around the edges and the topping turns deep golden brown. The bubbling is important—it means your filling has thickened properly.
Step 16: If the topping browns too quickly (before 30 minutes), tent loosely with aluminum foil. If it’s not brown enough at 40 minutes, crank the oven to 400°F and bake for 5 more minutes, watching carefully.
Phase 5: Cooling & Serving (15 minutes minimum)
Step 17: Remove from the oven and place on a wire cooling rack. Let it rest for at least 15 minutes before serving. I know waiting is torture, but this resting time lets the filling set up. If you scoop too early, you’ll get apple soup instead of that perfect spoonable consistency.
Step 18: Serve warm with a scoop of vanilla ice cream or a dollop of whipped cream. As the cold cream melts into the warm apple crumble, it creates this incredible sweet sauce. Chef’s trick: A small pinch of flaky sea salt on top takes this from great to mind-blowing.
Chef’s Notes
Temperature matters: Cold butter in the topping and hot oven temperature aren’t negotiable. This combination creates the texture difference between a soggy mess and a perfectly crispy apple crumble that impresses everyone.
Apple choice is strategic: Granny Smith apples hold their shape during baking and provide tartness that balances the sweet topping. Avoid Red Delicious—they turn to mush. Honeycrisp works too if you prefer sweeter filling.
The cornstarch trick: Never skip the cornstarch in your apple filling. It absorbs excess moisture and creates that thick, scoopable sauce instead of watery juice pooling in your dish.
Oat texture tip: Old-fashioned rolled oats work perfectly here. Don’t substitute instant oats (they’ll turn mushy) or steel-cut oats (they’ll stay too crunchy). If you want extra crunch, similar to what you’d find in an apple crisp, toast the oats for 5 minutes before mixing.
Nutrition Facts (Per Serving)
- Calories: 385
- Protein: 3g
- Carbohydrates: 64g
- Fat: 14g
- Fiber: 5g
- Sugar: 42g
Creative Variations
Mixed Berry Apple Crumble: Replace 1 cup of apples with fresh or frozen mixed berries (blueberries, raspberries, blackberries). Increase cornstarch to 2 tablespoons since berries release more liquid. The tartness adds incredible depth.
Nutty Maple Apple Crumble: Add ½ cup chopped pecans or walnuts to the topping mixture and replace 2 tablespoons of brown sugar with pure maple syrup mixed into the apples. This creates a more complex, autumn-inspired flavor profile.
Slow Cooker Version: For a hands-off approach, try adapting this into a crockpot apple crisp method—combine ingredients in your slow cooker and cook on low for 3-4 hours. The texture differs slightly but the convenience can’t be beaten.
Gluten-Free Apple Crumble: Swap all-purpose flour for gluten-free 1-to-1 baking flour and use certified gluten-free oats. Add 1 tablespoon of almond flour to the topping for better texture. Works perfectly without anyone noticing the difference.
Storage & Reheating
Room temperature: Cover loosely with foil and keep for up to 2 days. The topping will soften over time but still tastes delicious.
Refrigerator: Store covered in the fridge for up to 5 days. The filling thickens even more when cold, making it perfect for breakfast (yes, dessert for breakfast!).
Freezing: Cool completely, then wrap tightly in plastic wrap and aluminum foil. Freeze for up to 3 months. Thaw overnight in the fridge before reheating.
Reheating: Place portions in a 350°F oven for 15-20 minutes to restore crispiness. Microwave works for the filling but turns the topping soggy—your call on convenience versus texture. For best results, reheat in an oven-safe dish uncovered.
Make-ahead tip: Assemble completely but don’t bake. Cover tightly and refrigerate up to 24 hours. Add 5-10 minutes to the baking time since it starts cold.
Troubleshooting Common Problems
Problem: Watery filling that won’t thicken Solution: You either skipped the cornstarch or didn’t bake long enough. The filling must bubble vigorously for at least 5 minutes to activate the cornstarch. Next time, make sure you see those big bubbles around the edges before removing from the oven.
Problem: Burnt topping but raw apples Solution: Your oven temperature was too high or the topping layer was too thin. Tent with foil at the first sign of over-browning. Also, cut apples thinner (¼-inch max) so they cook faster. Some ovens run hot—get an oven thermometer to verify actual temperature.
Problem: Soggy, greasy topping instead of crispy clusters Solution: You used warm butter or overworked the mixture. Butter must be cold and you should see distinct butter pieces in the crumble. Work quickly with light hands. If your kitchen is hot, chill the mixed topping in the freezer for 10 minutes before sprinkling over apples.
Problem: Apples taste bland and one-dimensional Solution: You need more contrast. Add that lemon juice (it’s not optional!) and don’t skimp on the salt—it amplifies all the other flavors. Try using a mix of tart and sweet apples next time for more complexity.
Problem: The topping slides off when serving Solution: You pressed the topping down too firmly or served it too hot. The topping should sit loosely on the apples, and the filling needs at least 15 minutes to set after baking. Patience pays off here—resist the urge to dig in immediately.
Equipment Essentials
- 8×8-inch baking dish (glass or ceramic works best for even heating)
- Large mixing bowl (for tossing apples)
- Medium mixing bowl (for crumble topping)
- Vegetable peeler (for quick apple peeling)
- Sharp knife (for coring and slicing)
- Measuring cups and spoons (accuracy matters in baking)
- Rimmed baking sheet (catches drips during baking)
- Wire cooling rack (for proper cooling)
- Fork or pastry cutter (for mixing topping—hands work great too)
Nice to have but optional: Box grater for faster apple prep, bench scraper for cutting butter, kitchen scale for weighing apples.
Shopping List
Produce Section
- 4 large Granny Smith apples
- 1 lemon (for fresh juice)
Baking Aisle
- All-purpose flour
- Granulated sugar
- Brown sugar (light or dark)
- Old-fashioned rolled oats
- Cornstarch
- Ground cinnamon
- Vanilla extract
Dairy Section
- Unsalted butter (1 stick)
Already in Your Pantry
- Salt
Shopping tip: Buy apples that feel firm and heavy for their size. Avoid any with soft spots or wrinkled skin. Check the bulk bins for oats—they’re usually cheaper than pre-packaged.
Success Secrets
1. Temperature contrast is everything. Keep that butter cold until the moment you mix it in. The shock of cold butter hitting a hot oven creates steam pockets that make the topping extra crispy and irresistible.
2. Don’t crowd your apples. Use the right size dish (8×8 inches for this recipe). Apples piled too high won’t cook through. Too shallow and you’ll have more topping than filling. The 2:1 apple-to-topping ratio is perfect.
3. Listen for the bubbles. When your apple crumble sounds like it’s quietly simmering in the oven, that’s your cue it’s almost ready. Those bubbling sounds mean the filling is thickening into that perfect saucy consistency.
4. Embrace the clumps. When making the topping, some big clusters and some small crumbles create the best texture. Don’t aim for uniformity—variety is what makes each bite interesting with both crispy shards and buttery chunks.
5. The waiting game wins. That 15-minute rest after baking isn’t a suggestion. It’s when the magic finalizes—the filling sets, the flavors meld, and everything becomes spoonable instead of soupy. Walk away from the kitchen if you must. Your patience will be rewarded.
Now you’ve got everything you need to make an apple crumble that’ll have people asking for seconds before they’ve finished their first serving. The house-filling aroma alone is worth making this recipe!