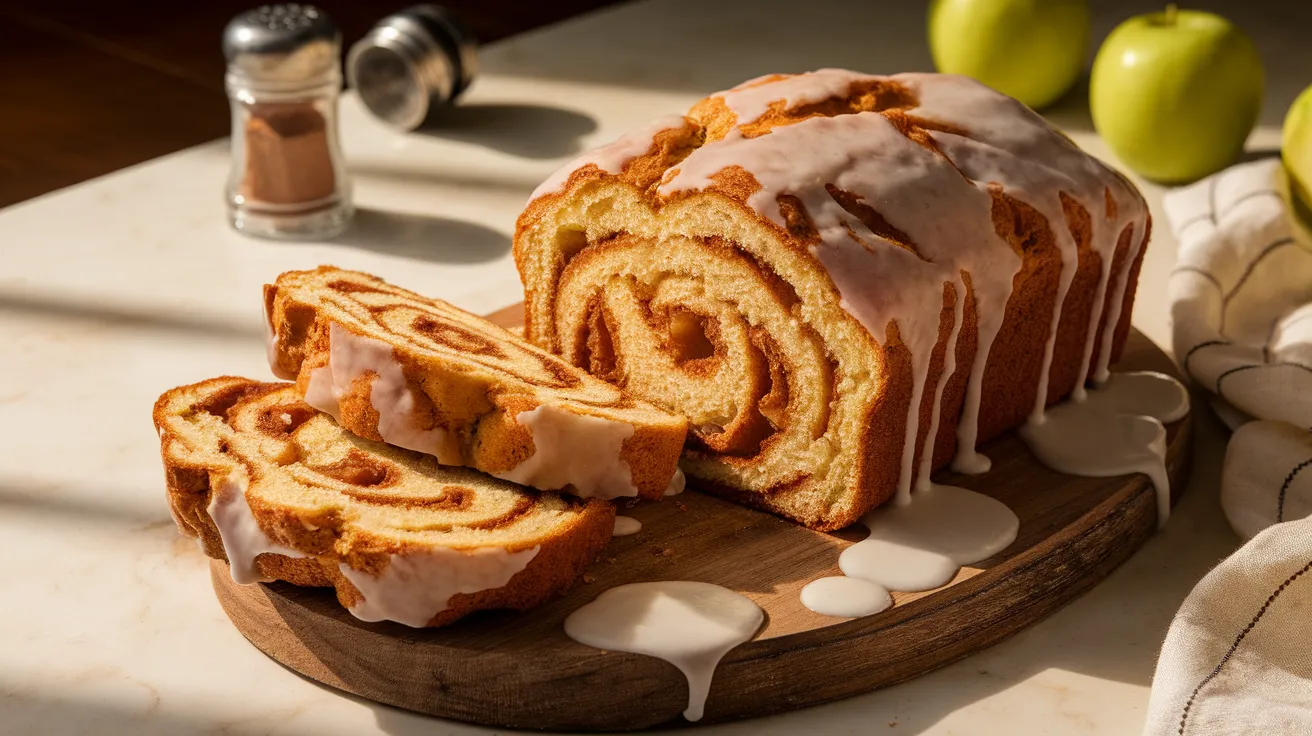
Imagine biting into warm, cinnamon-swirled apple fritter bread with a sweet glaze dripping down the sides—that’s exactly what you’re about to create. This apple fritter bread transforms the classic donut shop favorite into an easy-to-make loaf that’s perfect for breakfast, brunch, or anytime you’re craving something sweet and comforting.
SERVES: 4 | PREP: 20 MIN | COOK: 50 MIN | TOTAL: 70 MIN
Why This Apple Fritter Bread Works
This isn’t just another quick bread recipe. The magic happens when you layer apple-cinnamon filling between vanilla batter, creating those signature swirls you’d find in an authentic apple fritter. The result? A tender crumb that’s moist but not dense, with pockets of caramelized apples and a crackly glaze on top.
You’ll love this recipe because it delivers bakery-quality results without any special skills or equipment.
Ingredients You’ll Need
For the Bread Base:
| Ingredient | Amount |
|---|---|
| All-purpose flour | 1½ cups |
| Baking powder | 1½ teaspoons |
| Salt | ½ teaspoon |
| Unsalted butter (softened) | ⅓ cup |
| Granulated sugar | ⅔ cup |
| Large eggs | 2 |
| Vanilla extract | 2 teaspoons |
| Whole milk | ½ cup |
For the Apple Filling:
| Ingredient | Amount |
|---|---|
| Granny Smith apples (peeled, diced) | 2 medium |
| Light brown sugar | ⅓ cup |
| Ground cinnamon | 1 tablespoon |
| Nutmeg | ¼ teaspoon |
For the Glaze:
| Ingredient | Amount |
|---|---|
| Powdered sugar | ½ cup |
| Whole milk | 2-3 tablespoons |
| Vanilla extract | ½ teaspoon |
Step-by-Step Instructions
Phase 1: Prep Work (5 minutes)
Step 1: Position your oven rack in the center and preheat to 350°F (175°C). This ensures even heat distribution for a perfectly baked loaf. While the oven heats, grease a 9×5-inch loaf pan generously with butter or cooking spray, then dust lightly with flour. Tap out excess flour—this creates a non-stick barrier that helps the bread release cleanly.
Step 2: Grab a small bowl and whisk together 1½ cups flour, 1½ teaspoons baking powder, and ½ teaspoon salt. Mix for 30 seconds until the baking powder is evenly distributed. Set this aside—we’ll need it soon.
Step 3: Peel your 2 Granny Smith apples using a vegetable peeler, then cut them into ¼-inch dice. Why Granny Smith? Their tartness balances the sweetness perfectly and they hold their shape during baking instead of turning to mush.
Phase 2: Creating the Apple Filling (3 minutes)
Step 4: In a medium bowl, combine your diced apples with ⅓ cup brown sugar, 1 tablespoon cinnamon, and ¼ teaspoon nutmeg. Toss everything together with a spoon until each apple piece is coated. The sugar will start drawing moisture from the apples immediately—this is perfect. Set aside while you make the batter.
Phase 3: Building the Batter (7 minutes)
Step 5: In a large mixing bowl, add ⅓ cup softened butter and ⅔ cup granulated sugar. Using an electric mixer on medium speed, beat for 2-3 minutes until the mixture looks fluffy and pale yellow. You’re incorporating air here, which makes the bread tender. Pro tip: Butter should be room temperature—press it with your finger and it should indent easily.
Step 6: Crack in your 2 eggs, one at a time, beating for 30 seconds after each addition. Then add 2 teaspoons vanilla extract. Beat everything for another minute until fully combined and slightly foamy. The mixture might look slightly curdled—don’t worry, that’s normal.
Step 7: Now we’re alternating wet and dry ingredients. Add half of your flour mixture to the butter mixture. Mix on low speed just until you see a few flour streaks remaining—about 10 seconds. Stop mixing.
Step 8: Pour in half of the ½ cup milk. Mix again on low for 10 seconds, just until incorporated. Add the remaining flour mixture, mix briefly, then add the remaining milk. Here’s the crucial part: Mix only until you can’t see any dry flour, about 15-20 seconds total. Overmixing develops gluten and makes tough, dense bread.
Phase 4: Layering Magic (5 minutes)
Step 9: Pour half of your batter into the prepared loaf pan. Use a spatula to spread it evenly across the bottom and slightly up the sides. It’ll seem like a thin layer—that’s exactly right.
Step 10: Take half of your apple-cinnamon mixture and distribute it evenly over the batter layer. Don’t pour the liquid that’s accumulated in the bowl yet—just the apples. Use a knife to gently press the apples into the batter so they make contact.
Step 11: Add the remaining batter on top, spreading carefully to cover the apples. It’s okay if some apple pieces peek through. Now add the rest of your apple mixture on top. This time, you can drizzle some of that cinnamon-sugar liquid over everything.
Step 12: Here’s where the apple fritter bread gets its signature swirl. Take a butter knife and insert it vertically into the batter all the way to the bottom. Draw a zigzag pattern through the entire loaf, length-wise twice, then width-wise twice. This marbles the filling throughout without overmixing. You should see beautiful swirls on top.
Phase 5: Baking to Perfection (50 minutes)
Step 13: Place your pan in the preheated oven on the center rack. Set a timer for 50 minutes. Your apple fritter bread is done when a toothpick inserted in the center comes out with just a few moist crumbs (not wet batter). Visual cue: The top should be golden brown and slightly cracked, with a dome shape. If the top is browning too quickly after 35 minutes, tent it loosely with aluminum foil.
Step 14: When done, remove from oven and let cool in the pan for 15 minutes. This resting period lets the structure set so the bread doesn’t fall apart. After 15 minutes, run a thin knife around the edges and turn out onto a cooling rack. Important: Let it cool completely before glazing—warm bread will make the glaze too runny.
Phase 6: The Finishing Touch (5 minutes)
Step 15: In a small bowl, whisk together ½ cup powdered sugar, 2 tablespoons milk, and ½ teaspoon vanilla. The glaze should be thick but pourable—like honey. Too thick? Add another tablespoon of milk, a teaspoon at a time. Too thin? Add more powdered sugar.
Step 16: Once your bread is completely cool (wait at least 30 minutes), drizzle the glaze back and forth over the top using a spoon or whisk. Let it cascade down the sides naturally. The glaze will set in about 10 minutes, creating that classic bakery finish.
Chef’s Notes
Apple Selection Matters: Granny Smith apples are my go-to for this apple fritter bread because their tartness cuts through the sweetness and they maintain texture. If you prefer sweeter, try Honeycrisp, but reduce the sugar in the filling by 2 tablespoons.
The Swirl Technique: Don’t over-swirl your apple fritter bread. Three or four passes with the knife is plenty. Too much swirling actually blends everything together instead of creating distinct ribbons.
Room Temperature Ingredients: This isn’t just fussy baker talk. Cold eggs and milk can cause your butter to seize up, creating a lumpy batter that bakes unevenly. Set everything out 30 minutes before you start.
Testing for Doneness: Quick breads continue cooking slightly after you remove them from the oven. Pull your apple fritter bread when the toothpick has a few moist crumbs, not when it’s completely clean, or you’ll end up with dry bread.
Nutrition Information (Per Serving)
- Calories: 385
- Protein: 6g
- Carbohydrates: 58g
- Fat: 15g
- Fiber: 2g
- Sugar: 38g
Creative Variations to Try
Caramel Apple Fritter Bread: Drizzle 3 tablespoons of caramel sauce over each apple layer before adding the next batter layer. The caramel creates pockets of gooey sweetness that taste incredible. If you love caramel and apple combinations, you’ll also want to try this apple crumble that features a similar flavor profile.
Maple Pecan Version: Replace the cinnamon-sugar filling with ⅓ cup maple sugar mixed with ½ cup chopped pecans. Use maple syrup instead of milk in the glaze for an autumn-inspired twist that’s absolutely divine.
Streusel-Topped Apple Fritter Bread: Skip the glaze and top the unbaked loaf with a quick streusel made from ¼ cup flour, ¼ cup brown sugar, 2 tablespoons cold butter, and ½ teaspoon cinnamon. Crumble this over the top before baking for extra crunch. For more streusel inspiration, check out this delicious apple strudel bread that uses a similar topping technique.
Mini Loaves: Divide the batter among four mini loaf pans (5¾ x 3 inches). Reduce baking time to 25-30 minutes. These make perfect gifts or portion-controlled treats.
Storage & Reheating Guide
Room Temperature: Wrap your cooled, glazed apple fritter bread tightly in plastic wrap. It’ll stay moist for 3 days on the counter. The glaze will soften slightly but that’s normal.
Refrigerator Storage: For longer storage, refrigerate in an airtight container for up to 1 week. The cold temps firm up the glaze nicely. Bring slices to room temperature before eating, or warm for 10 seconds in the microwave.
Freezing Instructions: Skip the glaze if you’re freezing. Wrap the completely cooled loaf in plastic wrap, then aluminum foil, then place in a freezer bag. Freeze for up to 3 months. Thaw overnight in the refrigerator, then glaze before serving.
Reheating: For the best texture, warm individual slices in a 300°F oven for 5-7 minutes. This refreshes the bread and slightly melts the glaze. Microwave works in a pinch—15-20 seconds per slice, but the texture won’t be quite as good.

Troubleshooting Common Problems
Problem 1: Dense, Heavy Bread Solution: You likely overmixed the batter after adding the flour. Once flour meets liquid, gluten starts developing. Mix only until you can’t see dry flour streaks—usually 15-20 seconds with an electric mixer on low. The batter should look slightly lumpy, not smooth.
Problem 2: Apples Sink to the Bottom Solution: This happens when the batter is too thin or the apple pieces are too large. Make sure you’re using ¼-inch dice, not larger chunks. Also, tossing apples in the cinnamon-sugar mixture creates a light coating that helps them suspend in the batter better.
Problem 3: Bread Raw in the Middle, Burnt on Top Solution: Your oven temperature is running hot. Invest in an oven thermometer to check accuracy. If the top browns too quickly, tent with foil at the 35-minute mark and continue baking. Next time, reduce oven temp to 325°F and bake slightly longer.
Problem 4: Glaze Too Runny or Too Thick Solution: The consistency depends on the powdered sugar brand and humidity. Start with 2 tablespoons milk and add more by the teaspoon until you get a honey-like consistency. Make sure your bread is completely cool—warm bread will thin out even perfect glaze.
Problem 5: Bread Sticks to the Pan Solution: Even with greasing, sometimes bread sticks. After greasing with butter or spray, dust the pan with flour or use parchment paper. Create a sling by cutting parchment to fit the bottom and up two sides with overhang—this gives you handles to lift the bread out easily.
Equipment Essentials
- 9×5-inch loaf pan (metal works best for even browning)
- Electric mixer (hand or stand mixer both work)
- Mixing bowls (one large, two medium, one small)
- Whisk and rubber spatula
- Measuring cups and spoons (liquid and dry)
- Vegetable peeler and sharp knife
- Cooling rack
- Toothpicks (for testing doneness)
Shopping List by Store Section
Baking Aisle:
- All-purpose flour
- Granulated sugar
- Light brown sugar
- Powdered sugar
- Baking powder
- Ground cinnamon
- Ground nutmeg
- Vanilla extract
Dairy Section:
- Unsalted butter
- Whole milk
- Large eggs
Produce Section:
- 2 Granny Smith apples
Success Secrets from the Test Kitchen
1. The Butter Test: Press your softened butter with a finger—it should indent easily but not be greasy or melted. This perfect softness (around 65°F) creams beautifully with sugar and creates the lightest texture in your apple fritter bread.
2. Apple Prep Timing: Don’t cut your apples until you’re ready to use them. Once exposed to air, they brown quickly. Toss them with the cinnamon-sugar mixture immediately after dicing to prevent oxidation.
3. The Toothpick Trick: Insert your toothpick at a slight angle, not straight down. This way you’re testing more of the bread’s interior. Look for a few moist crumbs clinging to it—that’s perfect doneness for apple fritter bread.
4. Glaze Temperature: Make your glaze while the bread cools, but don’t apply it until the bread is completely cool. Warm bread creates steam that prevents the glaze from setting properly, resulting in a sticky mess instead of a beautiful finish.
5. Slicing Strategy: Use a serrated knife and a gentle sawing motion to cut clean slices. Wipe the knife between cuts to keep the glaze from smearing. Let glazed bread set for at least 15 minutes before slicing for the neatest presentation.
This apple fritter bread brings all the joy of biting into a warm apple fritter without the hassle of frying. The tender crumb, ribbons of cinnamon apples, and sweet glaze create the perfect balance. Whether you’re serving it for weekend brunch or enjoying a slice with afternoon coffee, this recipe delivers bakery-quality results every single time.