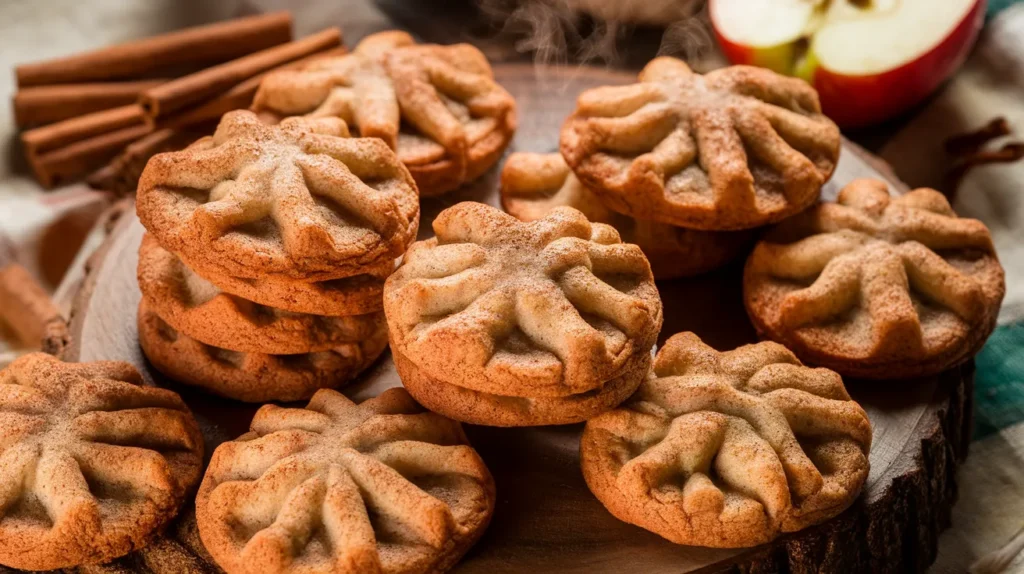
These apple pie cookies combine everything you love about classic apple pie in a soft, chewy cookie that’s easier to make and perfect for sharing. With real apple chunks, warm cinnamon, and a buttery base, each apple pie cookie delivers that cozy autumn flavor without the fuss of rolling pie dough.
SERVES: 4 | PREP: 20 MIN | COOK: 12 MIN | TOTAL: 32 MIN
Ingredients
Cookie Base
| Ingredient | Amount |
|---|---|
| All-purpose flour | 1 cup |
| Unsalted butter, softened | 4 tablespoons |
| Granulated sugar | ¼ cup |
| Brown sugar, packed | ¼ cup |
| Large egg | 1 |
| Vanilla extract | ½ teaspoon |
| Baking soda | ½ teaspoon |
| Salt | ¼ teaspoon |
Apple Pie Filling
| Ingredient | Amount |
|---|---|
| Granny Smith apple, peeled and diced | 1 medium |
| Ground cinnamon | 1 teaspoon |
| Ground nutmeg | ¼ teaspoon |
| Cornstarch | 1 teaspoon |
| Lemon juice | 1 teaspoon |
Optional Topping
| Ingredient | Amount |
|---|---|
| Cinnamon sugar | 2 tablespoons |
| Coarse sugar | 1 tablespoon |
Step-by-Step Instructions
Phase 1: Prepare the Apple Filling (5 minutes)
Step 1: Peel your apple completely and dice it into ¼-inch pieces. Why this matters: Small, uniform pieces distribute evenly throughout the cookie and cook at the same rate. Larger chunks will release too much moisture and make your cookies soggy.
Step 2: Toss the diced apple with lemon juice in a small bowl. The acid prevents browning and balances the sweetness. Let this sit while you prep other ingredients.
Step 3: In the same bowl, add cinnamon, nutmeg, and cornstarch to the apples. Mix until every piece is coated. Pro tip: The cornstarch absorbs excess apple moisture during baking, preventing wet cookie centers.
Phase 2: Make the Cookie Dough (8 minutes)
Step 4: Place your softened butter in a mixing bowl. It should leave a fingerprint when pressed but not be greasy or melting. Temperature check: Butter at 65-68°F works best.
Step 5: Add both granulated and brown sugar to the butter. Beat with a fork or hand mixer for 2 minutes until the mixture looks fluffy and lighter in color. You’ll see the texture change from grainy to creamy.
Step 6: Crack in your egg and add vanilla extract. Beat for another minute until everything’s completely smooth with no streaks of egg white visible.
Step 7: In a separate small bowl, whisk together flour, baking soda, and salt. Why separate? This distributes the leavening agent evenly, so your cookies rise uniformly.
Step 8: Pour the flour mixture into your wet ingredients. Stir gently with a wooden spoon just until no white streaks remain. Stop mixing here. Over-mixing develops gluten and makes tough cookies instead of tender ones.
Step 9: Fold in your prepared apple mixture using a spatula. Use a scooping motion from the bottom up to distribute apples evenly. The dough will look chunky—that’s perfect.
Phase 3: Shape and Prep for Baking (5 minutes)
Step 10: Preheat your oven to 350°F (175°C). Position the rack in the center for even heat distribution.
Step 11: Line a baking sheet with parchment paper. Why parchment? It prevents sticking without added grease and promotes even browning on the bottom.
Step 12: Scoop dough using a tablespoon measure, creating portions about 2 tablespoons each. You should get 8 cookies total (2 per person). Roll each scoop between your palms into a ball.
Step 13: Place dough balls on your prepared sheet, spacing them 3 inches apart. They’ll spread significantly during baking. Common mistake: Crowding cookies causes them to merge into one giant cookie blob.
Step 14: Gently press each ball down slightly with your palm to create a disc about ½-inch thick. This helps them bake evenly instead of staying domed in the center.
Step 15: If using toppings, sprinkle cinnamon sugar over each cookie now. The sugar creates a delicate crispy top layer that contrasts beautifully with the soft interior.
Phase 4: Bake to Perfection (12 minutes)
Step 16: Slide the baking sheet into your preheated oven. Set a timer for 10 minutes initially.
Step 17: At the 10-minute mark, check your cookies. They should look slightly underdone in the centers with golden edges. Visual cue: The edges will be set, but the center will look puffy and soft.
Step 18: Bake for 2 more minutes if needed. Total baking time is typically 11-13 minutes depending on your oven. Safety tip: Every oven runs slightly different—yours might need 30 seconds more or less.
Step 19: Remove the pan from the oven when cookies still look soft in the center. They’ll continue cooking on the hot pan for another 3-4 minutes. This is crucial: Cookies baked until they look “done” in the oven become hard and dry after cooling.
Step 20: Let cookies rest on the baking sheet for 5 minutes. Then transfer them to a wire rack using a spatula. Cool completely before storing, about 15 minutes.
Chef’s Notes
Timing matters: These apple pie cookies taste best within 48 hours of baking when the apple pieces are still tender and moist.
Apple variety: Granny Smith works perfectly because its tartness balances the sugar and it holds its shape during baking. Avoid Red Delicious—they turn mushy.
Make-ahead option: You can freeze shaped dough balls for up to 3 months. Bake directly from frozen, adding 2 extra minutes to the baking time.
Texture preference: For crispier cookies, bake an additional minute. For ultra-chewy centers, pull them at exactly 11 minutes.
Nutrition Information (Per Cookie)
Calories: 185
Protein: 2g
Carbohydrates: 26g
Fat: 8g
Fiber: 1g
Sugar: 14g
Creative Variations
Caramel Apple Version: Drizzle cooled cookies with salted caramel sauce and sprinkle with sea salt flakes. The salty-sweet combo rivals any amaretti cookie you’ve tried.
Oatmeal Apple Pie Hybrid: Replace ¼ cup flour with old-fashioned oats for added texture and a heartier bite. This creates a more rustic apple pie cookie.
Pecan Crunch Addition: Fold in ¼ cup chopped pecans with the apples for extra crunch and nutty flavor depth.
Chocolate Chip Twist: Add 2 tablespoons mini chocolate chips to the dough. Sounds unusual, but chocolate and apple create magic together—similar to how brownie cookie bars combine unexpected flavors successfully.
Storage & Reheating
Room temperature: Store in an airtight container with parchment paper between layers for up to 3 days. The apples keep these cookies naturally moist.
Refrigeration: These keep for 5 days in the fridge in a sealed container. Let them sit at room temperature for 10 minutes before eating for best flavor.
Freezing: Freeze baked cookies in a freezer bag with air pressed out for up to 2 months. Thaw at room temperature for 30 minutes.
Reheating: Warm individual cookies in the microwave for 8-10 seconds to recreate that fresh-baked softness. Don’t overdo it—apples can get hot quickly.
Troubleshooting Guide
Problem: Cookies spread too thin and burn at edges
Solution: Your butter was too warm or you overmixed the dough. Chill shaped dough balls for 15 minutes before baking next time. Also check your oven temperature with a thermometer—many run 25°F hotter than displayed.
Problem: Centers are gummy and undercooked
Solution: Your apple pieces were too large or too wet. Dice smaller (no bigger than ¼-inch) and make sure you used the cornstarch in the filling. Also, let cookies cool completely—they firm up significantly during cooling.
Problem: Cookies taste bland
Solution: You may have used an apple variety that’s too sweet or skimped on the spices. Granny Smith apples are essential for tartness. Double-check you added the full teaspoon of cinnamon.
Problem: Cookies are dry and crumbly
Solution: You overbaked them or your measurements were off. Pull cookies when they still look slightly underdone. Also ensure you’re measuring flour correctly—spoon it into the measuring cup and level it off rather than scooping directly.
Problem: Apples turned mushy inside cookies
Solution: Your apples were overripe or you baked too long. Use firm, crisp apples and watch baking time carefully. The cornstarch coating also helps prevent this issue if you mixed it thoroughly.
Equipment Essentials
- Mixing bowls (1 large, 1 small)
- Measuring cups and spoons
- Baking sheet (standard half-sheet pan)
- Parchment paper
- Hand mixer or sturdy fork
- Wooden spoon or rubber spatula
- Wire cooling rack
- Apple peeler
- Sharp knife and cutting board
- Tablespoon measure for scooping
Shopping List
Baking Aisle
- All-purpose flour
- Granulated sugar
- Brown sugar
- Baking soda
- Vanilla extract
- Ground cinnamon
- Ground nutmeg
- Cornstarch
Dairy Section
- Unsalted butter
- Large eggs
Produce Section
- Granny Smith apples
- Lemon (for juice)
Optional Items
- Coarse decorating sugar
- Pecans (for variation)
Success Secrets
1. Room temperature matters. Softened butter (not melted) creates the perfect cookie texture. Take it out 30 minutes before baking.
2. Don’t skip the cornstarch. This simple ingredient is the difference between perfect cookies and soggy disasters when baking with fresh fruit.
3. Watch, don’t just time. Your oven is unique. Trust visual cues (golden edges, soft centers) over the clock.
4. Cool properly. Patience during cooling prevents broken cookies and allows the texture to set perfectly. Resist eating them straight from the oven.
5. Fresh is best. These apple pie cookies showcase fresh ingredients. Use crisp apples and fresh spices for maximum flavor impact.
These apple pie cookies deliver all the comfort of autumn’s favorite dessert in a portable, shareable form that’s ready in half an hour. Perfect for beginners and guaranteed to impress.