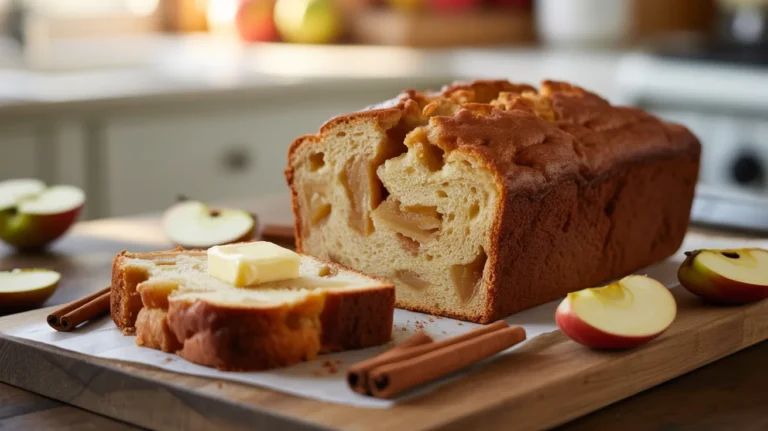
This apple strudel bread brings together flaky layers of buttery dough swirled with cinnamon-spiced apples and a delicate glaze. Perfect for weekend brunch or an afternoon treat, this apple strudel bread transforms your kitchen into a Viennese bakery with its irresistible aroma and bakery-quality results. You’ll love how this recipe makes sophisticated European baking accessible for home bakers.
SERVES: 4 | PREP: 30 MIN | COOK: 45 MIN | TOTAL: 75 MIN
What Makes This Apple Strudel Bread Special
This isn’t your ordinary quick bread.
Apple strudel bread combines the best of two worlds—the ease of bread baking with the elegant layers and spiced apple filling of traditional Austrian strudel. Unlike authentic strudel that requires paper-thin dough stretched by hand, this recipe uses a manageable yeast-enriched dough that still delivers those beautiful swirls and flaky texture. The filling features tender apple chunks coated in cinnamon sugar, while a simple vanilla glaze adds the perfect finishing touch.
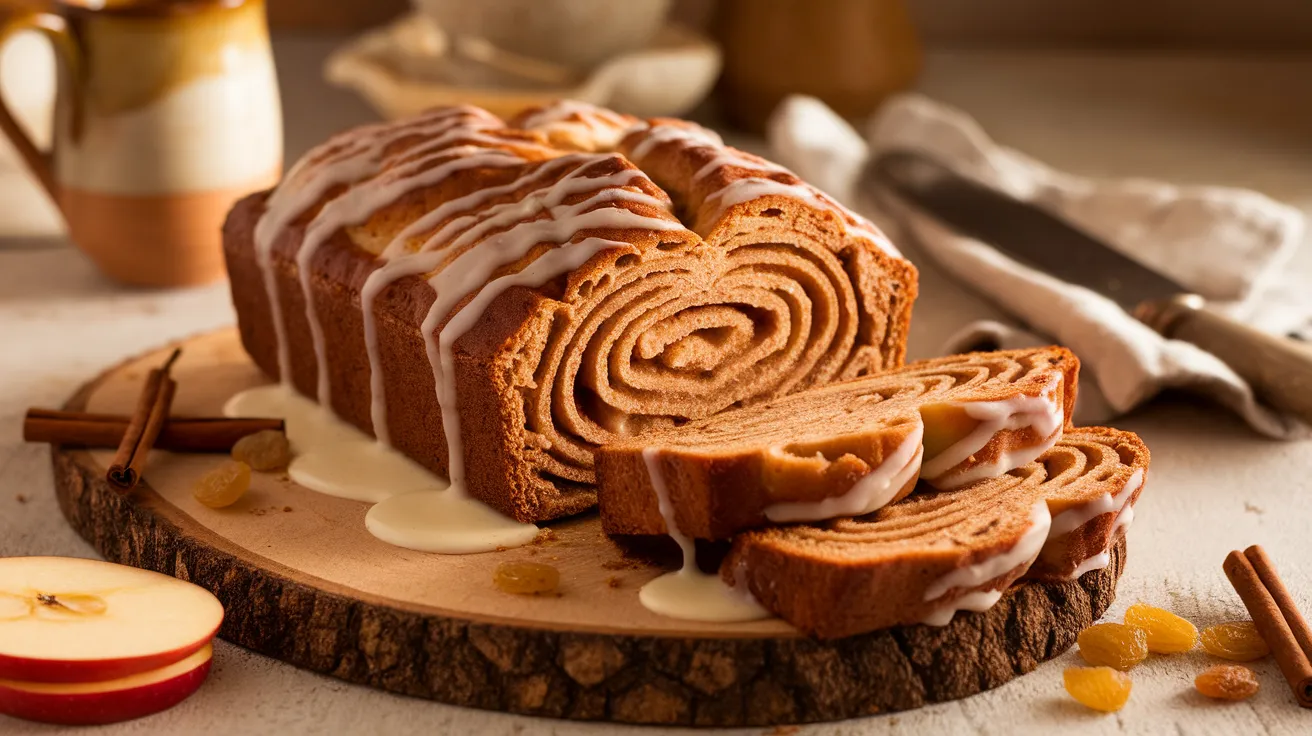
What sets this apart from other apple breads is the laminated dough technique that creates visible layers throughout each slice.
Ingredients
For the Dough:
| Ingredient | Measurement |
|---|---|
| All-purpose flour | 3 cups |
| Granulated sugar | ¼ cup |
| Active dry yeast | 2¼ teaspoons (1 packet) |
| Whole milk (warmed to 110°F) | ¾ cup |
| Unsalted butter (melted) | 4 tablespoons |
| Large egg | 1 |
| Salt | ½ teaspoon |
| Vanilla extract | 1 teaspoon |
For the Apple Filling:
| Ingredient | Measurement |
|---|---|
| Granny Smith apples (peeled, diced) | 2 medium |
| Brown sugar (packed) | ½ cup |
| Ground cinnamon | 2 teaspoons |
| Ground nutmeg | ¼ teaspoon |
| Lemon juice | 1 tablespoon |
| Cornstarch | 1 tablespoon |
| Unsalted butter (melted) | 2 tablespoons |
For the Glaze:
| Ingredient | Measurement |
|---|---|
| Powdered sugar | 1 cup |
| Whole milk | 2 tablespoons |
| Vanilla extract | ½ teaspoon |
Step-by-Step Instructions
Phase 1: Preparing the Dough (15 minutes)
Step 1: Activate the Yeast Pour the warmed milk (it should feel like bathwater—about 110°F) into a small bowl and sprinkle the yeast over the surface. Add a pinch of the sugar from your measured amount. Let this sit for 5-7 minutes until it becomes foamy and bubbly on top. This foam tells you the yeast is alive and ready to work—if you don’t see bubbles, your yeast might be expired or your milk was too hot (which kills yeast) or too cold (which keeps it dormant).
Step 2: Mix the Wet Ingredients In a large mixing bowl, whisk together the egg, melted butter, remaining sugar, vanilla extract, and salt until well combined. The mixture will look slightly glossy. Pour in your activated yeast mixture and stir gently with a wooden spoon. The ingredients should blend smoothly without any streaks of egg.
Step 3: Form the Dough Add 2½ cups of flour to the wet mixture, reserving the remaining ½ cup for adjustments. Stir with a wooden spoon until a shaggy dough forms—it will look rough and sticky at this point, which is perfect. The dough should pull away from the sides of the bowl slightly but still feel tacky to the touch.
Step 4: Knead the Dough Turn the dough onto a lightly floured surface. Knead for 8-10 minutes using the heel of your hand to push the dough away from you, then fold it back over itself and rotate a quarter turn. Repeat this motion—push, fold, turn. Add small amounts of the reserved flour if the dough sticks to your hands, but don’t add too much or your bread will be dense. The dough is ready when it feels smooth, elastic, and springs back when you poke it with your finger.
Step 5: First Rise Place the dough in a greased bowl, turning it once so the top is lightly coated with oil (this prevents a dry crust from forming). Cover with a clean kitchen towel or plastic wrap. Let it rise in a warm, draft-free spot for 1 hour until doubled in size. A good trick: place the bowl in your oven with just the light on—the gentle warmth is perfect for rising.
Phase 2: Making the Apple Filling (10 minutes)
Step 6: Prepare the Apples While your dough rises, peel and dice the Granny Smith apples into ½-inch cubes. Granny Smith apples work best because they hold their shape during baking and provide a tart contrast to the sweet bread. Place the diced apples in a medium bowl immediately after cutting.
Step 7: Season the Filling Squeeze lemon juice over the apples and toss quickly—this prevents browning and adds brightness to balance the sweetness. Add the brown sugar, cinnamon, nutmeg, and cornstarch to the bowl. The cornstarch is crucial because it absorbs excess moisture from the apples as they bake, preventing a soggy bottom in your bread. Toss everything together until each apple piece is evenly coated with the spice mixture. Set aside at room temperature.
Phase 3: Assembling the Apple Strudel Bread (15 minutes)
Step 8: Roll Out the Dough Once your dough has doubled, punch it down gently in the center to release gas bubbles. Turn it onto a lightly floured surface. Using a rolling pin, roll the dough into a 16×12-inch rectangle. Try to maintain even thickness throughout—about ¼-inch thick. If the dough springs back while rolling, let it rest for 5 minutes to relax the gluten, then continue rolling.
Step 9: Add Butter Layer Brush the entire surface of the dough with the 2 tablespoons of melted butter from your filling ingredients, leaving a ½-inch border around all edges. This butter creates separation between layers and adds richness. Make sure you get into all the corners.
Step 10: Distribute the Filling Scatter the prepared apple mixture evenly over the buttered dough, again leaving that ½-inch border clean. Press the apples gently into the dough with your fingertips so they stick. This border is important—it gives you a clean edge to seal later and prevents filling from leaking out during baking.
Step 11: Roll the Bread Starting from one of the longer edges (the 16-inch side), begin rolling the dough tightly like a jelly roll. Keep the roll tight as you go, but don’t pull so hard that you tear the dough. Use both hands and work slowly. When you reach the end, pinch the seam closed firmly, then pinch the ends closed as well. Place the roll seam-side down in a greased 9×5-inch loaf pan. The seam-side-down position ensures it stays sealed during baking.
Step 12: Second Rise Cover the pan loosely with a kitchen towel. Let the shaped loaf rise for 30-40 minutes until it’s puffy and risen about 1 inch above the rim of the pan. This second rise is essential for a light, fluffy texture. Don’t skip it even though you’re eager to bake—patience here makes all the difference.
Phase 4: Baking (45 minutes)
Step 13: Preheat and Prepare About 15 minutes before your second rise finishes, preheat your oven to 350°F. Position the rack in the center of the oven for even heat distribution. This gives your oven plenty of time to reach the proper temperature throughout.
Step 14: Bake the Bread Place the loaf pan in the preheated oven on the center rack. Bake for 45-50 minutes until the top is deep golden brown. At the 25-minute mark, check the bread—if it’s browning too quickly, loosely tent a piece of aluminum foil over the top to prevent burning while the center finishes cooking. The bread is done when an instant-read thermometer inserted into the center reads 190°F, or when you tap the top and it sounds hollow. If you see any liquid bubbling out the sides, that’s normal—it’s just apple juice caramelizing.
Step 15: Cool the Bread Remove the pan from the oven and let it cool in the pan for 10 minutes. This brief cooling allows the structure to set so the bread doesn’t fall apart. After 10 minutes, carefully run a butter knife around the edges to loosen any stuck bits, then turn the loaf out onto a wire cooling rack. Let it cool for at least 30 minutes before glazing. Cutting too early releases steam that makes the interior gummy.
Phase 5: Glazing and Finishing (5 minutes)
Step 16: Make the Glaze In a small bowl, whisk together the powdered sugar, milk, and vanilla extract until completely smooth. The glaze should be thick but pourable—like a thin pancake batter. If it’s too thick, add milk by the teaspoon; if too thin, add more powdered sugar.
Step 17: Glaze the Bread Once the bread has cooled to warm (not hot), drizzle the glaze over the top using a spoon, letting it cascade down the sides naturally. The glaze will set into a thin, sweet crust as it cools completely. For a prettier presentation, use a fork to create decorative drizzle patterns.
Step 18: Slice and Serve Allow the glaze to set for 10 minutes, then slice with a serrated knife using a gentle sawing motion. Each slice should reveal beautiful swirls of apple filling throughout. This apple strudel bread is best served slightly warm or at room temperature.
Chef’s Notes
Temperature Matters: The difference between good and great apple strudel bread comes down to precision with temperatures. Use an instant-read thermometer for both the milk (110°F for yeast activation) and the finished bread (190°F internal temperature).
Apple Choice: While Granny Smith apples are recommended, you can use a mix of varieties. Combine Granny Smith with Honeycrisp for a balance of tart and sweet, but avoid Red Delicious as they become mushy when baked.
Make-Ahead Dough: You can prepare the dough the night before. After the first rise, punch it down, wrap tightly in plastic wrap, and refrigerate overnight. The next morning, let it sit at room temperature for 30 minutes, then proceed with rolling and filling.
Preventing Soggy Bottom: The cornstarch in the filling is your insurance policy against a wet bottom. If you’re worried about excess moisture, you can also sprinkle 2 tablespoons of breadcrumbs over the buttered dough before adding the apples.
Nutrition Information (Per Serving)
Calories: 485
Protein: 8g
Carbohydrates: 78g
Fat: 16g
Fiber: 3g
Sugar: 42g
Sodium: 285mg
Delicious Variations
Caramel Apple Strudel Bread: Replace half the brown sugar with caramel sauce drizzled over the apples before rolling. Add ½ cup of chopped pecans to the filling for extra crunch. This version pairs beautifully with apple fritter bread for a complete apple-themed brunch spread.
Cranberry-Apple Version: Mix ½ cup of dried cranberries into the apple filling for a tart, festive twist perfect for holiday gatherings. Reduce the brown sugar to ⅓ cup to compensate for the cranberries’ natural tartness.
Spiced Rum Glaze: Replace the milk in the glaze with spiced rum for an adult version. Add ¼ teaspoon of rum extract if you want the flavor without the alcohol.
Cinnamon Roll Style: Instead of rolling into a log, cut the filled rectangle into 8 strips and stack them in the loaf pan for distinct layers. This creates a pull-apart effect similar to cinnamon applesauce bread but with fresh apple chunks.
Storage & Reheating
Room Temperature: Wrap the cooled, glazed bread tightly in plastic wrap or aluminum foil. It will stay fresh for 2-3 days on the counter. The glaze helps seal in moisture.
Refrigeration: For longer storage, wrap well and refrigerate for up to 5 days. The cold actually helps the flavors meld together beautifully.
Freezing: Freeze un-glazed loaves wrapped in plastic wrap, then aluminum foil, for up to 3 months. Thaw overnight in the refrigerator, bring to room temperature, then add fresh glaze before serving.
Reheating: Slice individual portions and microwave for 15-20 seconds, or wrap the whole loaf in foil and warm in a 300°F oven for 10-15 minutes. The apple filling becomes wonderfully soft and fragrant when gently reheated.

Troubleshooting Common Problems
Problem: Dense, Heavy Bread
Solution: This usually means the yeast didn’t activate properly or you added too much flour during kneading. Always check that your yeast foams during activation—if it doesn’t, start over with fresh yeast. When kneading, add flour sparingly; the dough should feel slightly tacky but not stick to your hands completely.
Problem: Filling Leaking Out During Baking
Solution: You likely rolled the dough too loosely or didn’t seal the edges properly. Make sure to leave that ½-inch border clear of filling, pinch all seams firmly, and place the loaf seam-side down in the pan. If filling still leaks, it’s not a disaster—the caramelized bits on the pan are delicious and can be scraped onto the finished bread.
Problem: Raw Center with Burnt Edges
Solution: Your oven temperature is too high or the bread needs tenting. Always use an oven thermometer to verify your oven’s accuracy—many run hot. Tent with foil at the 25-minute mark if browning too quickly, and bake until the internal temperature reaches 190°F.
Problem: Bread Collapsed After Cooling
Solution: The bread was underbaked or removed from the pan too soon. Always check the internal temperature and let it rest in the pan for a full 10 minutes. The structure needs time to set before being disturbed.
Problem: Glaze Sliding Off Completely
Solution: The bread was too hot when you glazed it. Wait until it’s cooled to just warm (you should be able to comfortably touch it). The glaze needs a slightly cooler surface to cling to properly. If your glaze is too thin, add more powdered sugar a tablespoon at a time.
Equipment Essentials
- 9×5-inch loaf pan (metal works better than glass for even browning)
- Stand mixer with dough hook (optional but makes kneading easier)
- Rolling pin (at least 12 inches long)
- Instant-read thermometer (for checking yeast water and bread doneness)
- Wire cooling rack
- Pastry brush (for applying melted butter)
- Serrated bread knife (for clean slicing)
- Large mixing bowl
- Medium mixing bowl
- Measuring cups and spoons
Shopping List
Dairy Section:
- Whole milk (¾ cup + 2 tablespoons)
- Unsalted butter (6 tablespoons total)
- Large eggs (1)
Baking Aisle:
- All-purpose flour (3 cups)
- Granulated sugar (¼ cup)
- Brown sugar (½ cup)
- Powdered sugar (1 cup)
- Active dry yeast (1 packet)
- Vanilla extract
- Ground cinnamon
- Ground nutmeg
- Cornstarch
- Salt
Produce Section:
- Granny Smith apples (2 medium)
- Lemon (for juice)
Success Secrets
1. Perfect Yeast Activation Every Time
Use a thermometer to ensure your milk is exactly 110°F. Too hot kills the yeast, too cold leaves it dormant. The sweet spot feels like a comfortable bath on your wrist.
2. The Windowpane Test
To know if you’ve kneaded enough, stretch a small piece of dough between your fingers. If it stretches thin enough to see light through without tearing, the gluten is properly developed. This ensures a tender, well-structured bread.
3. Create the Perfect Rising Environment
Turn your oven on for 30 seconds, then turn it off. Place your covered dough bowl inside with the door closed—this creates an ideal 75-80°F environment for rising. Never put dough in an oven that’s actually on.
4. Slice Like a Pro
Always use a serrated knife with a gentle sawing motion. Pressing down with a straight blade crushes the delicate layers you worked so hard to create. Let the knife do the work.
5. Maximum Flavor Development
Let your baked bread rest completely before slicing, even though it’s tempting. Those 30 minutes allow the moisture to redistribute evenly and the flavors to settle, resulting in much better texture and taste in every bite.
This apple strudel bread transforms humble ingredients into a show-stopping centerpiece that’s worthy of any special occasion—or just Tuesday morning coffee.