Prep Time: 30 minutes | Cook Time: 3-4 hours | Total Time: 4-4.5 hours | Servings: 4 persons
Key Takeaways
- Real Italian gravy takes time but most is hands-off simmering
- Uses a mix of three meats for unmatched depth of flavor
- Makes enough for 4 hungry people with potential leftovers
- Freezes beautifully for quick future weeknight meals
Why This Recipe Stops People In Their Tracks
Ever tried passing off jarred sauce as homemade? Let’s be honest – it never fools anyone.
Real Italian gravy (what Italian-Americans call their hearty meat sauce) is a game-changer for pasta night. This isn’t your quick 30-minute sauce. This is the Sunday sauce that fills the house with mouthwatering aromas for hours.
Many home cooks fear making authentic Italian gravy because it seems too complex. But I’ll show you how surprisingly simple it is to create this rich, meaty sauce that will make your family beg for seconds.
Nutritional Information
| Nutrient | Amount per Serving |
|---|---|
| Calories | 485 |
| Protein | 32g |
| Carbs | 15g |
| Fat | 32g |
| Fiber | 4g |
| Sugar | 8g |
| Sodium | 890mg |
Note: Nutrition values based on sauce only (pasta not included)
Everything You’ll Need
Ingredients
| Ingredient | Amount | Notes |
|---|---|---|
| San Marzano tomatoes (whole, canned) | 2 28-oz cans | Crush by hand |
| Tomato paste | 2 Tbsp | |
| Beef chuck | 1 lb | Cut into 2-inch cubes |
| Italian pork sausage | 1 lb | Sweet or hot, based on preference |
| Meatballs (prepared) | 12 oz | Store-bought or homemade |
| Yellow onion | 1 large | Finely diced |
| Garlic | 6 cloves | Minced |
| Olive oil | 3 Tbsp | Extra virgin |
| Red wine | 1 cup | Dry variety like Chianti |
| Fresh basil | 8-10 leaves | Torn |
| Bay leaves | 2 | Whole |
| Dried oregano | 1 tsp | |
| Red pepper flakes | ¼ tsp | Optional |
| Salt | 1 tsp | Or to taste |
| Black pepper | ½ tsp | Freshly ground |
| Parmesan cheese rind | 1 piece | Optional but recommended |
Equipment Needed
| Tool | Purpose |
|---|---|
| Dutch oven or heavy pot (5-6 qt) | Main cooking vessel |
| Wooden spoon | For stirring without scratching pot |
| Sharp knife | For meat and vegetable prep |
| Cutting board | For prep work |
| Measuring cups & spoons | For accuracy |
| Can opener | For tomatoes |
| Tongs | For handling meat |
| Ladle | For serving |
Possible Substitutions
- San Marzano tomatoes: Regular canned whole tomatoes work, but flavor will be less rich
- Chuck roast: Beef short ribs can work as a premium substitute
- Red wine: Beef stock can replace wine (though you’ll miss some flavor complexity)
- Fresh basil: 1 tablespoon dried basil (add earlier in cooking)
Step-By-Step Instructions For Complete Beginners
Getting Ready: Preparation Phase (30 minutes)
- Start with a clean kitchen
- Clear your countertops of any clutter
- Make sure your sink is empty for easy cleanup as you go
- Pull out all equipment listed above and place within reach
- Wash your hands thoroughly with soap and water
- Gather and organize all ingredients
- Place all ingredients on your counter
- Group them by when they’ll be used in the recipe
- Check that you have everything before starting
- Prepare the tomatoes
- Open the cans of San Marzano tomatoes with your can opener
- Place a colander over a large bowl
- Pour tomatoes into the colander
- Let drain for 5 minutes, saving the juice in the bowl below
- Pick up each tomato and gently squeeze to remove excess juice into the bowl
- Transfer drained tomatoes to a separate bowl
- Keep the reserved tomato juice nearby for later use
- Prep the vegetables (Onion & Garlic):
- Place cutting board on counter and secure it (place damp paper towel underneath if it slides)
- For the onion:
- Cut off both ends of the onion
- Peel away the outer skin
- Cut onion in half from top to bottom
- Place flat side down on cutting board for stability
- Make lengthwise cuts, about ¼-inch apart, without cutting all the way through the root end
- Make crosswise cuts, ¼-inch apart, to create small cubes
- Transfer diced onion to a small bowl
- For the garlic:
- Separate 6 cloves from the head
- Place flat side of knife on each clove and press firmly with heel of hand to crush slightly
- Peel away papery skin
- Mince garlic by making very fine cuts in multiple directions
- (Alternative: Use a garlic press if you have one)
- Transfer minced garlic to a separate small bowl
- Prepare the meat:
- Unwrap all meats and place on a large plate or tray
- For the beef chuck:
- If not pre-cut, place on cutting board
- Using a sharp knife, trim away excess fat (leave some for flavor)
- Cut into 2-inch cubes (about the size of two dice)
- For the sausages:
- Remove any packaging
- No need to cut them before cooking
- For the meatballs:
- If frozen, place in refrigerator to thaw overnight before using
- If using store-bought, keep in original packaging until needed
- Pat all meat dry with paper towels (this helps with browning)
- Sprinkle beef chunks with ½ teaspoon salt and ¼ teaspoon pepper, turning to coat all sides
- Prepare the herbs and seasonings:
- Measure out oregano, red pepper flakes, remaining salt, and pepper into small bowls
- For the basil:
- Rinse leaves under cool water
- Pat dry with paper towels
- Stack leaves on top of each other
- Tear gently into small pieces (don’t cut with knife as it can bruise the leaves)
- For the bay leaves:
- Simply count out 2 whole leaves
- Check that they’re not crumbled or damaged
- Measure remaining ingredients:
- Measure 3 tablespoons olive oil into a small bowl
- Measure 1 cup red wine (use a liquid measuring cup)
- Measure 2 tablespoons tomato paste
- If using Parmesan rind, cut a roughly 2×3-inch piece
Building Flavor: Cooking Phase (3-4 hours)
Browning the Meats (25 minutes)
- Heat your Dutch oven
- Place pot on stove over medium-high heat
- Add 2 tablespoons olive oil (save the remaining tablespoon for later)
- Wait 1-2 minutes until oil is hot but not smoking
- Test readiness by carefully flicking a tiny drop of water into the pot – if it sizzles immediately, it’s ready
- CAUTION: Stand back slightly to avoid any oil splatter
- Brown the beef chunks
- Add half of the beef cubes to the hot oil (don’t overcrowd)
- Leave space between pieces so they brown properly
- Let them cook undisturbed for 2-3 minutes
- Using tongs, turn each piece to brown on all sides
- Total browning time should be about 8 minutes for all sides
- IMPORTANT: You’re not trying to cook the meat through, just creating a brown crust
- Remove browned pieces to a clean plate
- Repeat with remaining beef chunks
- Brown the sausages
- Add sausages to the same pot (no need to add more oil)
- Cook for about 1-2 minutes per side, turning with tongs
- You want to develop color on all sides (about 5-6 minutes total)
- Remove to the same plate with the beef
- NOTE: Sausages will not be fully cooked – they’ll finish cooking in the sauce
Creating the Flavor Base (15 minutes)
- Cook the onion
- Reduce heat to medium
- Add remaining tablespoon of olive oil
- Add all diced onions to the pot
- Sprinkle with a pinch of salt (about ⅛ teaspoon)
- Stir with wooden spoon, scraping up some of the browned bits from the bottom
- Cook for 5-6 minutes, stirring occasionally
- Onions should become soft and translucent (not brown)
- If onions start to brown, reduce heat slightly
- Add the garlic
- Add all minced garlic to the softened onions
- Stir constantly for 30-45 seconds
- CAUTION: Garlic burns easily! Keep it moving and watch carefully
- You’ll smell the garlic becoming fragrant
- Add the tomato paste
- Add 2 tablespoons tomato paste to the pot
- Stir constantly, coating the onions and garlic
- Cook for 2 minutes, continuing to stir
- The tomato paste will darken slightly in color
- This step caramelizes the sugars in the paste, adding depth of flavor
- Deglaze with wine
- Pour in the 1 cup of red wine
- Using wooden spoon, scrape all browned bits from bottom of pot
- These browned bits (called fond) contain lots of flavor
- Let wine bubble gently for 2-3 minutes
- It should reduce by about half in volume
- The alcohol will cook off, leaving just the flavor
The Long Simmer (3-4 hours)
- Add tomatoes and seasonings
- Add the drained whole tomatoes to the pot
- Using wooden spoon or clean hands, crush each tomato into smaller pieces
- Pour in the reserved tomato juice you saved earlier
- Add oregano, red pepper flakes (if using), and bay leaves
- If using Parmesan rind, add it now
- Stir gently to combine everything
- Return the meat to the pot
- Place the browned beef chunks back into the pot
- Add the browned sausages
- Push meat pieces down slightly so they’re mostly covered by sauce
- Add remaining ½ teaspoon salt and ¼ teaspoon black pepper
- Stir gently to distribute seasonings
- Begin the long simmer
- Bring the mixture to a gentle boil over medium heat
- You’ll see bubbles starting to break the surface consistently
- Once boiling, reduce heat to lowest setting
- The sauce should bubble very gently – just a few bubbles breaking the surface every few seconds
- Cover pot partially with lid (leave about a 1-inch gap for steam to escape)
- TIP: If your lowest heat setting is still too hot, you can use a heat diffuser under the pot
- Monitor during first 30 minutes
- Check sauce after 15 minutes to ensure it’s at the right simmer
- Too rapid a boil will burn the sauce; too low and it won’t develop flavor
- Adjust heat if needed
- Stir gently, scraping the bottom to prevent sticking
- Continue the long simmer
- After the first 30 minutes, stir every 30-45 minutes
- Each time, scrape the bottom and sides of the pot with wooden spoon
- The sauce will slowly darken and thicken
- Total simmering time before adding meatballs: 2.5 hours
- Add the meatballs
- After 2.5 hours of simmering, gently add the meatballs
- Use a spoon to nestle them into the sauce
- Don’t stir vigorously at this point to avoid breaking the meatballs
- If using homemade meatballs that aren’t pre-cooked, ensure they’re fully submerged in sauce
- Cover partially again and continue simmering for 30-45 minutes more
Finishing the Sauce (15 minutes)
- Check meat tenderness
- After the final simmer, test the beef
- Remove a piece and press with a fork – it should be very tender and almost fall apart
- If still tough, continue simmering for 30-minute increments until tender
- The sausage should be fully cooked through (no pink inside if you cut one open)
- Meatballs should be heated through
- Remove inedible items
- Using tongs or spoon, find and remove:
- Bay leaves (count to make sure you found both)
- Parmesan rind (if used)
- These items added flavor but aren’t meant to be eaten
- Using tongs or spoon, find and remove:
- Prepare the meat for serving
- Remove beef chunks to a cutting board
- Let cool slightly (about 2 minutes) so you can handle them
- Using two forks, pull the beef chunks apart into shreds
- Insert forks into opposite sides of each chunk
- Pull in opposite directions to shred
- Return shredded beef to the sauce
- For the sausages:
- Remove to cutting board
- Cut into bite-sized slices (about ½-inch thick)
- Return slices to sauce
- Stir gently to distribute meat throughout sauce
- Add the fresh basil
- Sprinkle torn basil leaves over the sauce
- Stir in gently
- The residual heat will release the basil’s flavor and aroma
- Final adjustments
- Taste the sauce carefully (it will be hot!)
- If needed, add more salt or pepper in small amounts, tasting after each addition
- If sauce seems too thick, add ¼ cup water and stir
- If too thin, simmer uncovered for 10-15 minutes, stirring occasionally
- Turn off heat once you’re happy with the flavor and consistency
Serving Your Italian Gravy (5 minutes)
- Prepare for serving
- Let sauce sit for 5 minutes before serving (this allows flavors to settle)
- Have pasta ready if serving immediately
- For 4 people, cook 1 pound of pasta according to package directions
- Reserve ½ cup pasta cooking water before draining
- Warm serving bowls or plates if possible (run under hot water and dry)
- Have grated Parmesan cheese ready for topping
- Serve the gravy
- For family-style:
- Place cooked pasta in a large serving bowl
- Ladle sauce generously over pasta
- Toss gently to coat pasta
- Top with additional sauce
- For individual plates:
- Place portion of pasta on each plate
- Ladle sauce over each portion
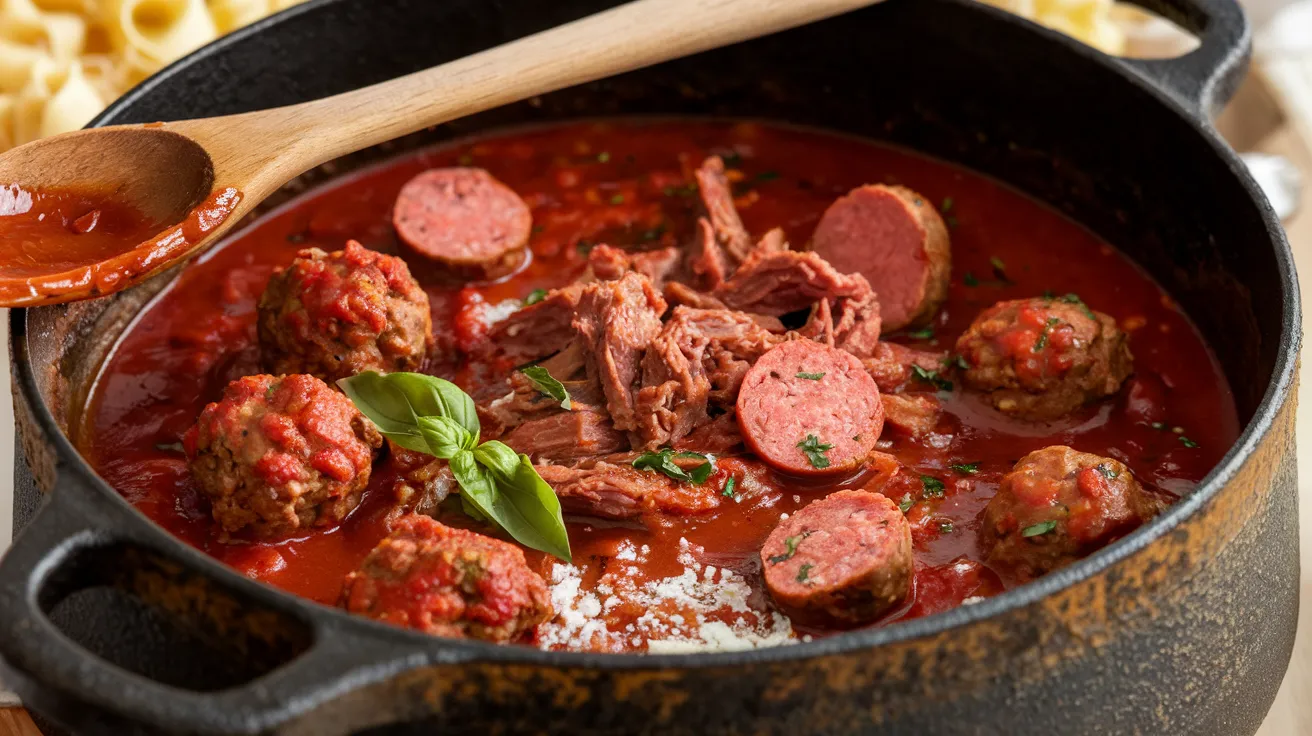
- Ensure each serving gets beef, sausage, and meatballs
- Sprinkle with freshly grated Parmesan cheese
- Add extra torn basil leaves on top if desired
- For family-style:

When Things Go Wrong: Troubleshooting
Sauce is too acidic
Problem: Your sauce tastes too sharp or tangy. Solution: Add ½ teaspoon of granulated sugar and stir well. Taste and add more if needed, ¼ teaspoon at a time. The sweetness balances acidity without making it taste sweet.
Meat is tough even after hours of cooking
Problem: Beef is still chewy or difficult to shred. Solution:
- Your simmer may be too high. Lower heat to the absolute minimum.
- Continue cooking for an additional 30-60 minutes.
- Make sure there’s enough liquid in the pot – add ¼ cup water if it seems dry.
- Quality of meat affects tenderness – next time, choose well-marbled cuts with visible fat.
Sauce is too thin
Problem: Your gravy isn’t thick enough to coat pasta well. Solution:
- Remove lid completely
- Increase heat to medium-low
- Simmer uncovered, stirring occasionally to prevent sticking
- Continue until reduced to desired consistency (can take 15-30 minutes)
- Alternative solution: Mix 1 tablespoon cornstarch with 2 tablespoons cold water, then stir into simmering sauce
Sauce is too thick
Problem: Gravy is paste-like rather than pourable. Solution:
- Add ¼ cup of liquid at a time, stirring after each addition
- Best liquids (in order of preference):
- Reserved pasta cooking water (starchy water helps sauce cling to pasta)
- Beef broth (adds flavor)
- Plain water (neutral option)
Burnt bottom
Problem: You smell burning or see black specks in the sauce. Solution:
- Stop stirring immediately (to avoid mixing burnt bits throughout)
- Carefully transfer non-burnt sauce to a clean pot using a ladle
- Leave burnt layer behind
- Continue cooking in new pot
- Prevention: Check simmer level frequently and stir regularly, especially in the last hour
Too salty
Problem: You’ve added too much salt. Solution:
- Add a peeled, raw potato cut into chunks
- Simmer for 15 minutes
- Remove potato chunks (they absorb some salt)
- If still too salty, dilute with unsalted tomato puree or sauce
Make It Your Own: Variations & Substitutions
Spicy Version
- Increase red pepper flakes to 1 teaspoon instead of ¼ teaspoon
- Add 1 fresh hot pepper (jalapeño or Fresno), seeded and minced
- Use hot Italian sausage instead of sweet
Wine-Free Version
- Replace wine with 1 cup beef broth
- Add 1 tablespoon balsamic vinegar for depth
- Add 1 teaspoon sugar to replace wine’s natural sweetness
Vegetable-Boosted Version
- Add with the onions:
- 1 diced carrot (peeled, ¼-inch dice)
- 1 diced celery stalk (¼-inch dice)
- 1 diced bell pepper (seeds removed, ¼-inch dice)
- This version adds nutrition and natural sweetness
Short-Cut Version (for busy weeknights)
- Use boneless short ribs instead of chuck (reduces cook time by about 45 minutes)
- Use pre-minced garlic (1 tablespoon equals about 3 cloves)
- Use crushed San Marzano tomatoes instead of whole (saves crushing time)
Pork-Free Version
- Replace pork sausage with turkey or chicken sausage
- Use all beef meatballs
- Add 1 tablespoon olive oil to compensate for reduced fat
Storage & Reheating Instructions
Refrigerator Storage
- Allow gravy to cool completely at room temperature (no more than 2 hours)
- Transfer to airtight containers with lids
- Leave ½-inch space at top
- Refrigerate for up to 4 days
- TIP: The flavor actually improves after a day in the refrigerator!
Freezer Storage
- For short-term (1 month): Use freezer-safe plastic containers
- For long-term (up to 3 months): Use vacuum-sealed bags
- Portion into meal-sized amounts before freezing
- Leave 1-inch headspace in containers for expansion
- Label with date and contents using masking tape and marker
- Lay bags flat in freezer until solid, then stack to save space
Reheating From Refrigerated
- Stovetop Method (best for preserving texture):
- Place desired amount in saucepan
- Add 1-2 tablespoons water
- Heat over medium-low heat
- Stir occasionally to prevent sticking
- Heat until bubbling and internal temperature reaches 165°F (about 10 minutes)
- Microwave Method (quickest):
- Place portion in microwave-safe container
- Cover with microwave-safe lid or paper towel (prevents splatters)
- Heat on 70% power for 2 minutes
- Stir thoroughly
- Continue heating in 1-minute intervals until hot throughout (165°F)
Reheating From Frozen
- Recommended Method:
- Thaw overnight in refrigerator (place container on plate to catch potential leaks)
- Reheat using methods above
- Quick Thaw Method:
- Place sealed container in bowl of cool water for 30 minutes
- Change water every 30 minutes until thawed enough to remove from container
- Transfer to saucepan and heat slowly over medium-low heat, stirring frequently
- Emergency Method:
- Use microwave’s defrost function based on weight
- Once partially thawed, break into smaller pieces
- Continue heating on 50% power, stirring every minute until fully thawed
- Then heat on normal power until hot throughout (165°F)
Safety Notes & Important Tips
Food Safety
- Keep meat refrigerated until ready to use
- Wash hands after handling raw meat
- Use separate cutting boards for meat and vegetables
- Don’t leave gravy at room temperature for more than 2 hours
- Always reheat to at least 165°F before serving leftovers
- If sauce has been left out over 2 hours, discard it
Beginner Warnings
- The hardest part: Patience! Don’t rush the long simmer – it’s necessary for flavor development and meat tenderness
- Common mistake: Heat too high during simmer can burn sauce or make it reduce too quickly
- Watch out for: Oil splatter when browning meat – stand back and use splatter guard if available
- Be careful: Steam burns can occur when lifting lid – lift away from your face
- Don’t skip: Browning the meat is essential for flavor; don’t be tempted to put raw meat directly into the sauce
Pro Tips
- Use a wide, heavy pot with thick bottom for better heat distribution and to prevent burning
- Don’t skimp on browning – those caramelized bits are where much of the flavor comes from
- Save Parmesan rinds in your freezer specifically for recipes like this
- Taste as you go to develop your palate and learn how flavors develop over time
- Cook one day ahead if possible – the flavor improves dramatically overnight
- Adjust heat based on your stove – gas and electric stoves have different “low” settings
- Use wooden spoons instead of metal to prevent scratching your pot
- Trust your senses – the smell will change from sharp/acidic to rich/sweet as it cooks
Why This Recipe Works
The magic of authentic Italian gravy happens through the slow cooking process. The collagen in the beef breaks down, creating a silky richness. The pork adds fatty sweetness. The tomatoes slowly mellow from bright and acidic to deep and complex.
Unlike quick sauces, this gravy develops layered flavors impossible to achieve in short cooking times. The meat doesn’t just cook in the sauce—it transforms it.
This is why your Italian grandmother (or the one you wish you had) spent all Sunday making sauce while the family gathered around, stealing tastes with torn pieces of bread.