Prep Time: 20 minutes | Cook Time: 35 minutes | Total Time: 55 minutes | Servings: 4
- Juicy chicken breasts stuffed with cream cheese, spinach, and herbs
- Crispy bacon wrapping seals in moisture while adding smoky flavor
- One-pan meal perfect for weeknight dinners or special occasions
- Simple 5-ingredient filling with countless customization options
Why You Need This Bacon Wrapped Stuffed Chicken Recipe
Ever stared at plain chicken breasts wondering how to make them exciting? This bacon wrapped stuffed chicken solves that problem instantly.
When you bite into this chicken, you’ll get crispy bacon, juicy meat, and creamy filling all in one delicious mouthful. It looks fancy but takes just 20 minutes to prep.
Let’s make this bacon wrapped stuffed chicken your new go-to dinner hero!
Nutrition Comparison
| Nutrient | Bacon Wrapped Stuffed Chicken | Plain Grilled Chicken | Chicken Parmesan |
|---|---|---|---|
| Calories | 425 per serving | 165 per serving | 490 per serving |
| Protein | 39g | 31g | 34g |
| Fat | 28g | 4g | 27g |
| Carbs | 3g | 0g | 24g |
| Fiber | 1g | 0g | 2g |
| Cooking Time | 55 minutes | 20 minutes | 45 minutes |
What You’ll Need
Ingredients
| Ingredient | Amount | Notes |
|---|---|---|
| Boneless, skinless chicken breasts | 4 large (about 2 lbs total) | Even thickness works best |
| Bacon | 12 slices | Regular cut, not thick-cut |
| Cream cheese | 8 oz | Softened at room temperature |
| Fresh spinach | 2 cups | Roughly chopped |
| Garlic | 3 cloves | Minced |
| Mozzarella cheese | 1 cup | Shredded |
| Dried Italian herbs | 1 tablespoon | Or mix of oregano, basil, thyme |
| Salt | 1 teaspoon | |
| Black pepper | 1/2 teaspoon | |
| Olive oil | 2 tablespoons | |
| Paprika | 1 teaspoon | For garnish |
Kitchen Tools
| Tool | Purpose |
|---|---|
| Sharp knife | For butterflying chicken |
| Cutting board | Prep surface |
| Mixing bowl | For filling ingredients |
| Toothpicks | To secure bacon |
| Meat mallet | For evening chicken thickness |
| Baking dish | 9×13 inch recommended |
| Instant-read thermometer | To check doneness |
| Plastic wrap | For pounding chicken |
Ingredient Substitutions
- Cream cheese: Ricotta or goat cheese
- Spinach: Kale, Swiss chard, or arugula
- Mozzarella: Provolone, Monterey Jack, or Gouda
- Bacon: Prosciutto or turkey bacon (note: turkey bacon won’t render as much fat)
Step-by-Step Instructions for Beginners
Preparation Phase (20 minutes)
- Get organized before starting.
- Take all ingredients out of the refrigerator 30 minutes before cooking.
- Read through the entire recipe once before beginning.
- Arrange all your tools and ingredients on the counter.
- Make sure you have enough counter space to work.
- Preheat your oven to 375°F (190°C).
- Turn the oven on first thing so it has time to reach the proper temperature.
- Check that the rack is positioned in the middle of the oven.
- Line your baking dish with parchment paper, leaving some overhang on the sides for easy removal.
- BEGINNER TIP: If you don’t have parchment paper, spray the dish with cooking spray instead.
- Prepare the filling ingredients.
- Unwrap the cream cheese and place in a mixing bowl to soften.
- Rinse the spinach leaves thoroughly under cold water.
- Pat spinach dry with paper towels or use a salad spinner.
- Chop the spinach into small pieces (about ½-inch pieces).
- Peel the garlic cloves by pressing them with the flat side of your knife.
- Mince the garlic into very small pieces.
- Measure out the mozzarella cheese and Italian herbs.
- Butterfly the chicken breasts one at a time.
- Place one chicken breast on the cutting board with the smooth side down.
- Hold your non-cutting hand flat on top of the breast to stabilize it.
- Position your knife at the thicker side of the breast.
- Hold your knife parallel to the cutting board.
- BEGINNER TIP: If you’re nervous about cutting, freeze the chicken for 15 minutes first to make it firmer and easier to slice.
- Carefully slice through the middle of the breast horizontally.
- Cut from the thicker side toward the thinner side, stopping about ½ inch from the edge.
- Do not cut all the way through – the chicken should open like a book.
- If you accidentally cut through completely, don’t worry! You can still use the pieces.
- Pound the chicken to even thickness.
- Open the butterflied chicken breast like a book.
- Cover it with a piece of plastic wrap to prevent splattering.
- Using the flat side of a meat mallet (or a heavy skillet if you don’t have a mallet), gently pound the chicken.
- Focus on the thicker parts until the entire breast is an even ¼-inch thickness.
- Work from the center outward with gentle, even taps.
- BEGINNER TIP: Don’t pound too hard or you might tear the meat.
- Repeat with all chicken breasts and set aside.
- Make the stuffing mixture.
- In your mixing bowl with the softened cream cheese, add the chopped spinach.
- Add the minced garlic.
- Add the shredded mozzarella cheese.
- Add the dried Italian herbs.
- Add ½ teaspoon salt and ¼ teaspoon pepper.
- Using a spatula or spoon, mix all ingredients together.
- Stir until everything is thoroughly combined and you can no longer see white streaks of cream cheese.
- BEGINNER TIP: If cream cheese is too firm, microwave the mixture for 10 seconds to soften.
- Prepare bacon slices.
- Take out the bacon from the refrigerator.
- Separate the slices and lay them out on a plate or cutting board.
- Allow them to come to room temperature for 5-10 minutes for easier wrapping.
- BEGINNER TIP: If bacon slices are sticking together, run the package under warm water for a few seconds before opening.
Assembly Steps (15 minutes)
- Season the chicken.
- Pat each chicken breast dry with paper towels to remove excess moisture.
- Sprinkle the inside surfaces with the remaining ½ teaspoon salt and ¼ teaspoon pepper.
- Use your fingers to distribute the seasoning evenly.
- Stuff each chicken breast.
- Lay one butterflied chicken breast open on your work surface.
- Place ¼ of the filling mixture (about 2-3 heaping tablespoons) in the center.
- Using the back of a spoon, spread the filling evenly over the surface.
- Leave a ½-inch border around all edges to prevent spillage.
- BEGINNER TIP: Don’t overfill! It’s better to use less filling than have it leak out.
- Roll up the chicken.
- Starting from the narrowest end of the chicken breast, begin rolling tightly.
- Use your fingers to tuck in any filling that tries to escape from the sides.
- Continue rolling until you have a neat cylinder.
- If any filling escapes, simply push it back in or wipe away excess.
- BEGINNER TIP: If the chicken is slippery and hard to roll, chill it for 5 minutes first.
- Wrap each chicken roll with bacon.
- On a clean area of your cutting board, lay out 3 bacon slices side by side.
- Overlap the slices slightly along their long edges.
- Place a rolled chicken breast at one end of the bacon strips, perpendicular to them.
- Slowly roll the chicken forward, wrapping the bacon around it.
- Make sure the bacon covers the chicken completely.
- The bacon ends should overlap on the bottom of the roll.
- Secure the bacon with toothpicks.
- Insert toothpicks at an angle through the overlapping bacon pieces and into the chicken.
- Place 2-3 toothpicks per roll.
- BEGINNER TIP: Count how many toothpicks you use so you know how many to remove later!
- Arrange in the baking dish.
- Place each bacon-wrapped chicken breast in the prepared baking dish.
- Position them seam-side down so they don’t unroll.
- Space them evenly in the dish with at least 1 inch between each roll.
- Using a pastry brush or your fingers, lightly brush each chicken roll with olive oil.
- Sprinkle paprika evenly over the top of each roll.
- BEGINNER TIP: Take a photo of your dish now to compare with the finished result!
Cooking Phase (35 minutes)
- Bake the chicken – first stage.
- Check that your oven has reached 375°F (190°C).
- Place the baking dish on the center rack of the oven.
- Set a timer for 25 minutes.
- No need to open the oven during this time – keep the heat inside!
- BEGINNER TIP: Place a sheet of foil on the rack below to catch any drips.
- Increase temperature for the second stage.
- When the timer goes off, keep the chicken in the oven.
- Increase the oven temperature to 425°F (220°C).
- Set the timer for an additional 10 minutes.
- This higher temperature will crisp up the bacon.
- BEGINNER WARNING: The dish will be VERY hot when opening the oven!
- Check the chicken for doneness.
- After the second timer goes off, check if the chicken is done.
- The bacon should be crispy and golden brown.
- Insert an instant-read thermometer into the thickest part of a chicken roll.
- The temperature should read 165°F (74°C).
- If it’s below 165°F, return to oven for 3-5 more minutes and check again.
- BEGINNER TIP: If the bacon is getting too dark but chicken isn’t done, cover loosely with foil.
- Rest before serving.
- Once done, remove the baking dish from the oven.
- Place it on a heat-safe surface.
- Let the chicken rest for 5 minutes.
- During this time, the internal temperature will continue to rise slightly.
- The juices will also redistribute throughout the meat, making it juicier.
- BEGINNER TIP: Don’t skip the resting step! It’s crucial for juicy chicken.
Finishing Touches (5 minutes)
- Remove toothpicks.
- After resting, carefully remove all toothpicks from the chicken.
- Use tongs to hold the chicken if it’s still hot.
- Count the toothpicks to make sure you’ve removed them all.
- BEGINNER WARNING: Toothpicks can be hard to see, so look carefully!
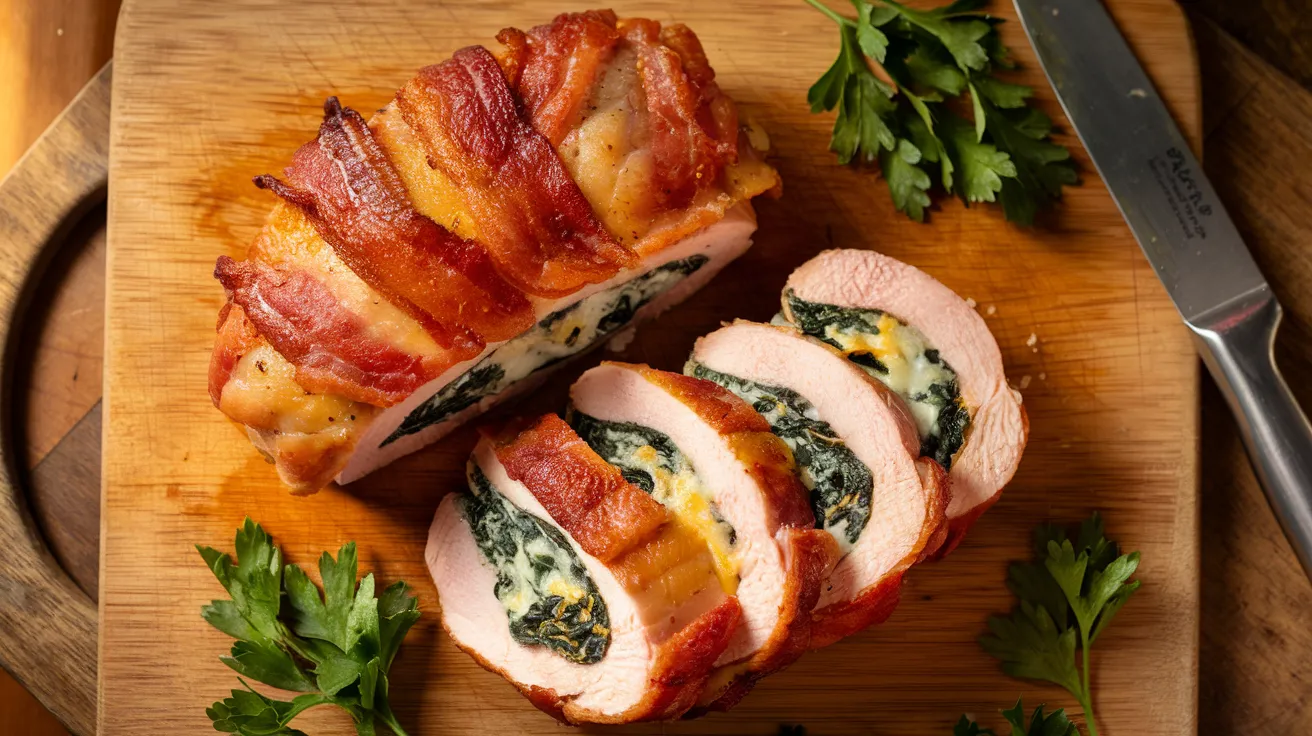
- Slice and serve.
- Transfer each chicken roll to a cutting board.
- Using a sharp knife, slice each roll into 3-4 medallions.
- Cut gently to avoid squeezing out the filling.
- For a prettier presentation, clean your knife between cuts.
- Arrange the slices on plates, showing the spiral of filling inside.
- Garnish your dish (optional).
- Sprinkle with freshly chopped parsley for color.
- Drizzle any pan juices over the chicken.
- Add a lemon wedge on the side for brightness.
- BEGINNER TIP: Even simple garnishes make your dish look professional!
- Serve immediately.
- Pair with your favorite side dishes.
- Good options include roasted potatoes, steamed vegetables, or a simple salad.
- Serve while still warm for the best flavor and texture.

Troubleshooting
| Problem | Cause | Solution |
|---|---|---|
| Filling leaking out | Too much filling or not sealed properly | Use less filling and secure edges better with toothpicks |
| Bacon not crispy | Oven temperature too low | Finish under broiler for 1-2 minutes, watching carefully |
| Chicken undercooked | Thickness inconsistency | Ensure even thickness when pounding; use meat thermometer |
| Dry chicken | Overcooked | Remove from oven at 160°F as temperature will rise during resting |
| Soggy bottom | Excess moisture from spinach | Pat spinach dry before mixing into filling |
| Toothpicks hard to remove | Inserted too deeply | Insert at an angle and leave a small portion exposed |
| Filling too runny | Cream cheese too soft | Chill the filling for 10 minutes before using |
| Bacon unwrapping during cooking | Not secured properly | Use more toothpicks and overlap bacon more |
Variations & Substitutions
Mediterranean Style
- Replace mozzarella with feta cheese
- Add sun-dried tomatoes and olives to the filling
- Use fresh basil instead of dried herbs
Mexican Inspired
- Swap the Italian herbs for taco seasoning
- Use pepper jack cheese instead of mozzarella
- Add diced jalapeños and corn to the filling
Low-Carb Option
- Use turkey bacon (fewer calories but less fat)
- Replace some cream cheese with cottage cheese
- Double the spinach for extra nutrients
Herb Lovers
- Add 2 tablespoons fresh chopped herbs like dill, basil, and parsley
- Include 1 teaspoon lemon zest in the filling
- Finish with a squeeze of fresh lemon juice
Storage & Reheating
Refrigerating
- Allow chicken to cool completely before storing.
- Place leftover chicken in an airtight container.
- Separate layers with parchment paper to prevent sticking.
- Store in the refrigerator for up to 3 days.
- BEGINNER TIP: Date your container so you know when it was made.
Freezing
- Wrap each completely cooled chicken piece individually in plastic wrap.
- Then wrap again in aluminum foil to prevent freezer burn.
- Place wrapped pieces in a freezer-safe zip-top bag.
- Press out all air before sealing.
- Label with the date and contents.
- Freezes well for up to 2 months.
- BEGINNER TIP: Slice before freezing for easier portioning later.
Reheating
From Refrigerated:
- Preheat oven to 350°F (175°C).
- Place chicken in an oven-safe dish.
- Add 1 tablespoon of water or chicken broth to the dish.
- Cover with foil to prevent drying.
- Heat for 15-20 minutes until internal temperature reaches 165°F.
- BEGINNER TIP: Covering prevents the chicken from drying out.
From Frozen:
- Thaw overnight in the refrigerator (safest method).
- Never thaw at room temperature (food safety risk).
- Once thawed, follow the refrigerated reheating instructions above.
- If reheating from frozen, double the heating time and check temperature.
- BEGINNER WARNING: Always check that reheated chicken reaches 165°F.
Microwave Method (Quick Option):
- Place chicken on a microwave-safe plate.
- Cover with a damp paper towel.
- Heat on 50% power in 1-minute intervals.
- Check temperature between intervals.
- Rotate the chicken for even heating.
- BEGINNER TIP: The microwave is convenient but may make bacon less crispy.
Safety Notes & Tips
Food Safety
- Wash hands with soap and warm water for 20 seconds before and after handling raw chicken.
- Use a separate cutting board for meat and vegetables to prevent cross-contamination.
- Sanitize all surfaces that come in contact with raw chicken.
- Never place cooked food on a plate that previously held raw chicken.
- Chicken must reach an internal temperature of 165°F (74°C) to be safe.
- Refrigerate leftovers within 2 hours of cooking.
- Never refreeze previously frozen raw chicken.
- BEGINNER WARNING: Food safety is crucial when handling raw poultry!
Beginner Tips
- Prep ahead: Make the filling the day before and refrigerate.
- Work clean: Keep a trash bowl nearby for scraps and paper towels for quick cleanup.
- Even thickness: Don’t skip the pounding step – it ensures even cooking.
- Room temperature ingredients: Let cream cheese soften naturally for easier mixing.
- Ask for help: Have the butcher butterfly the chicken for you if you’re nervous about cutting.
- Make cleanup easier: Line your workspace with parchment paper.
- Avoid mess: Keep a damp cloth nearby to wipe your hands between steps.
- Be patient: Don’t rush the cooking process – good food takes time.
- Toothpick tracking: Count your toothpicks before and after to ensure none are left in the chicken.
Perfect Pairings
- Roasted potatoes with rosemary
- Simple green salad with vinaigrette
- Steamed asparagus or broccoli
- Garlic bread for a heartier meal
- Lemon rice pilaf
- Sautéed green beans with almonds
This bacon wrapped stuffed chicken is sure to become a favorite in your recipe collection! The combination of creamy filling, juicy chicken, and crispy bacon creates a restaurant-worthy dish right in your home kitchen.