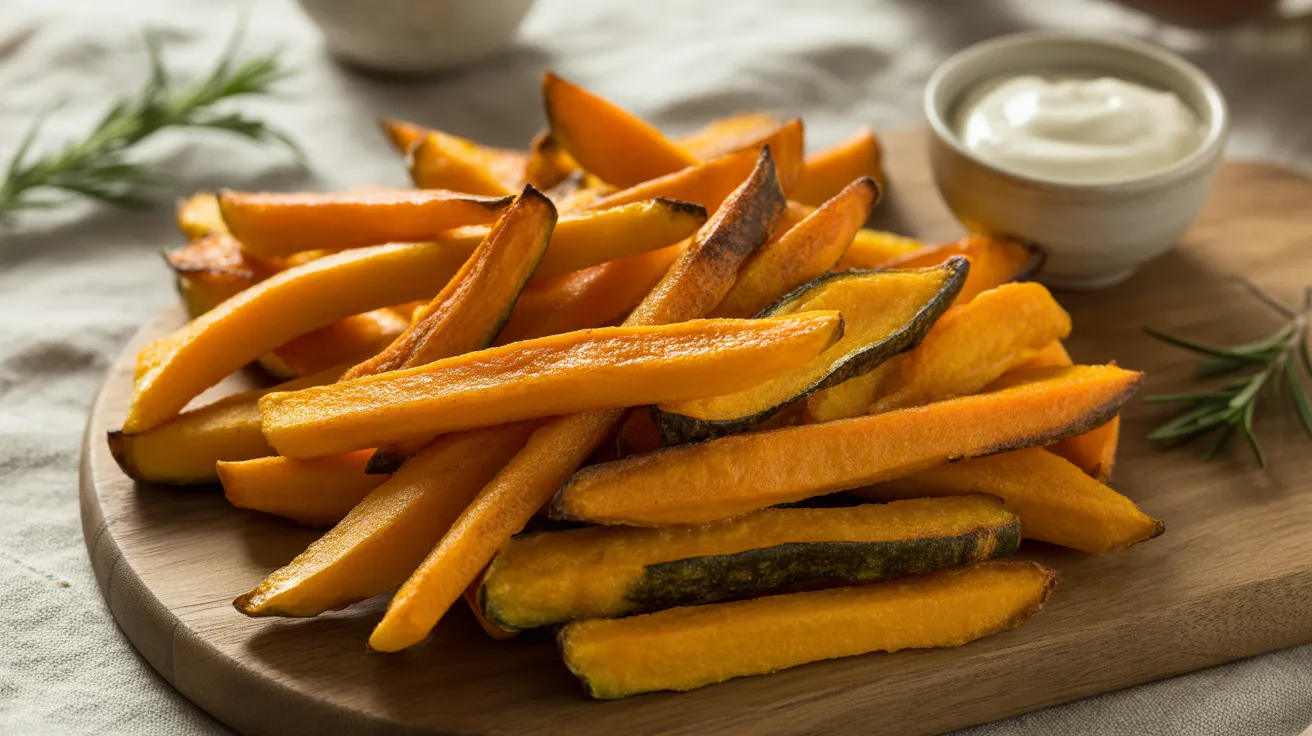
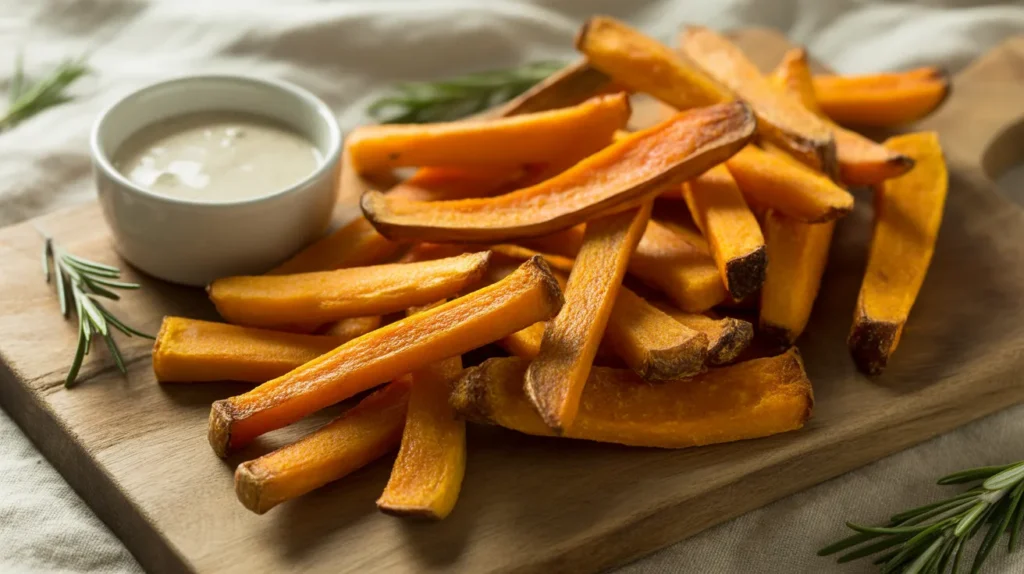
These baked butternut squash fries deliver the perfect combination of crispy caramelized edges and tender, sweet centers that’ll make you forget about regular potato fries. I’ve perfected this technique after countless batches, and these baked butternut squash fries come out golden and crispy every single time without any deep frying.
SERVES: 4 | PREP: 15 MIN | COOK: 30 MIN | TOTAL: 45 MIN
Ingredients
| Main Ingredients | Amount |
|---|---|
| Butternut squash (neck portion only) | 2 pounds |
| Cornstarch | 3 tablespoons |
| Olive oil | 3 tablespoons |
| Salt | 1 teaspoon |
| Black pepper | ½ teaspoon |
| Seasoning Mix | Amount |
|---|---|
| Garlic powder | 1 teaspoon |
| Smoked paprika | 1 teaspoon |
| Onion powder | ½ teaspoon |
| Cayenne pepper (optional) | ¼ teaspoon |
Step-by-Step Instructions
Preparation Phase (15 minutes)
1. Preheat your oven to 425°F (220°C) and position the rack in the center. This high temperature is critical for getting crispy exteriors while keeping the inside tender.
2. Line two large baking sheets with parchment paper. Never skip this step—the parchment prevents sticking and makes cleanup effortless.
3. Cut off the neck portion of the butternut squash (save the round bulb end for soup). The neck gives you uniform fries without seeds.
4. Peel the squash completely using a vegetable peeler. Go over any stubborn spots twice because any skin left on will turn tough and chewy when baked.
5. Cut the peeled squash into ½-inch thick planks first. Consistent thickness means even cooking, so take your time here.
6. Slice each plank into ½-inch wide sticks to create your fries. Aim for uniform size—fries that are too thin will burn, while thick ones stay soggy.
7. Place all the cut fries into a large mixing bowl. You should have about 6 cups of raw fries.
8. Sprinkle the 3 tablespoons cornstarch directly over the fries. This coating is your secret weapon for crispiness—it creates a dry surface that caramelizes beautifully.
9. Toss the fries with your hands until every piece has a light, even coating of cornstarch. You shouldn’t see any white powder clumps.
Seasoning Phase (3 minutes)
10. Drizzle the 3 tablespoons olive oil over the cornstarch-coated fries. Use your hands to massage the oil into every fry until they’re all glistening.
11. Combine all seasonings (salt, pepper, garlic powder, smoked paprika, onion powder, and cayenne if using) in a small bowl. Mix them first so the flavor distributes evenly.
12. Sprinkle the seasoning mixture over the oiled fries and toss thoroughly. Make sure every fry gets coated—this is where the flavor comes from.
Baking Phase (30 minutes)
13. Spread the seasoned fries in a single layer across your two prepared baking sheets. Leave space between each fry—crowding creates steam, which means soggy fries instead of crispy ones.
14. Slide both sheets into the preheated oven. If your oven has hot spots, position them on separate racks.
15. Bake for 15 minutes without opening the oven door. This initial blast of heat starts the caramelization process.
16. After 15 minutes, flip every single fry using tongs or a spatula. Yes, every one—this ensures even browning on all sides.
17. Return the pans to the oven and bake for another 12-15 minutes until the edges turn deep golden brown and slightly crispy. The fries should feel firm when you tap them with tongs.
18. Remove from the oven and let them rest on the baking sheet for 2 minutes. This brief rest allows the exterior to crisp up even more as they cool slightly.
Chef’s Notes
Squash Selection: Choose butternut squash with long, thick necks and small bulb ends. The longer the neck, the more fries you’ll get without dealing with seeds.
Cornstarch Magic: The cornstarch coating pulls moisture from the squash surface during baking, creating that crispy texture. Don’t substitute with flour—it won’t give you the same crunch.
Oil Temperature: Make sure your oven reaches full temperature before adding the baked butternut squash fries. A properly preheated oven creates immediate surface searing.
Spacing Strategy: If you need to crowd the pan, expect softer fries. For maximum crispiness, use three baking sheets if necessary to maintain proper spacing.
Nutrition Information (Per Serving)
- Calories: 165
- Protein: 2g
- Carbohydrates: 26g
- Fat: 7g
- Fiber: 4g
- Sugar: 5g
Variations
Maple Cinnamon Sweet Fries: Skip the savory seasonings and toss your fries with 2 tablespoons maple syrup, 1 teaspoon cinnamon, and a pinch of salt before baking. These pair perfectly with the techniques I use in my hasselback garlic maple butternut squash.
Parmesan Herb Fries: After baking, immediately toss the hot fries with ½ cup grated Parmesan cheese and 2 tablespoons chopped fresh rosemary. The residual heat melts the cheese into a savory coating.
Spicy Sriracha Fries: Mix 2 tablespoons sriracha with the olive oil before coating. Add an extra ½ teaspoon cayenne pepper to the seasoning mix for serious heat lovers.
Curry Coconut Fries: Replace olive oil with melted coconut oil and season with 2 teaspoons curry powder instead of the paprika and garlic powder. After baking, you can turn any leftover squash pieces into my classic roasted butternut squash soup.
Storage & Reheating
Store cooled fries in an airtight container in the refrigerator for up to 3 days. Don’t stack them while hot or they’ll steam and lose crispiness.
To reheat, spread fries on a baking sheet and warm at 400°F for 8-10 minutes. Never use the microwave—it turns them mushy.
For longer storage, freeze raw cut and seasoned fries on a baking sheet for 2 hours, then transfer to freezer bags for up to 3 months. Bake from frozen, adding 5 extra minutes to the cooking time.
Troubleshooting Common Problems
Problem: Fries Stay Soggy Your fries probably touched each other on the pan, creating steam. Always leave ½ inch space between each fry. If your pan is crowded, use a second sheet even if it means two baking sessions.
Problem: Burnt Edges, Raw Centers You cut the fries too thin or your oven runs hot. Aim for consistent ½-inch thickness and use an oven thermometer to verify your actual temperature. Drop the heat to 400°F if this keeps happening.
Problem: Fries Won’t Crisp Up You skipped the cornstarch or didn’t let the coating dry properly. The cornstarch needs to coat evenly and create that dry surface. Also, excess moisture on the raw squash prevents crisping—pat the cut fries dry with paper towels before coating.
Problem: Uneven Browning Your oven has hot spots, which most do. Rotate your pans halfway through cooking and swap their rack positions. Also flip every fry at the 15-minute mark without exception.
Problem: Fries Fall Apart When Flipping The squash was too ripe or you’re flipping too early. Choose firm squash without soft spots. Wait the full 15 minutes before the first flip—this gives the exterior time to set properly.
Equipment Essentials
- 2 large baking sheets (at least 13×18 inches)
- Parchment paper
- Sharp chef’s knife
- Vegetable peeler
- Large mixing bowl
- Measuring spoons
- Kitchen tongs or thin spatula
- Oven thermometer (optional but helpful)
Shopping List
Produce Section:
- 2 pounds butternut squash (neck portion)
Spice Aisle:
- Cornstarch
- Garlic powder
- Smoked paprika
- Onion powder
- Cayenne pepper (optional)
- Black pepper
Pantry:
- Olive oil
- Salt
Success Secrets
1. Always cut your butternut squash fries the same size so they cook evenly. I use a ruler the first few times to train my eye for that perfect ½-inch thickness.
2. The cornstarch coating needs to be dry and even. After tossing with cornstarch, let the fries sit for 2 minutes before adding oil—this helps the coating adhere better.
3. Don’t flip your fries before the 15-minute mark, even if you’re tempted. Early flipping prevents that initial caramelization from forming properly.
4. Use two baking sheets instead of crowding one pan. I learned this the hard way after making countless soggy batches—proper spacing makes or breaks this recipe.
5. These fries taste best served immediately while the edges are still crispy and the centers are tender. Make them right before serving for the best texture and flavor.