This aromatic bhuna sauce brings authentic Indian flavors to your kitchen with its thick, rich texture and complex spice blend. Perfect for creating restaurant-quality curries at home, this bhuna sauce recipe delivers deep, concentrated flavors that develop through slow-cooking techniques. Whether you’re new to Indian cooking or looking to master this essential sauce, our step-by-step guide makes it simple to achieve that perfect balance of spices and consistency.
SERVES: 4 | PREP: 15 MIN | COOK: 25 MIN | TOTAL: 40 MIN
Ingredients
Base Aromatics
- 2 large onions, finely chopped
- 4 cloves garlic, minced
- 1-inch piece fresh ginger, grated
- 2 tablespoons vegetable oil
- 1 tablespoon ghee (or extra oil)
Spice Blend
- 2 teaspoons ground cumin
- 2 teaspoons ground coriander
- 1 teaspoon turmeric powder
- 1 teaspoon garam masala
- 1/2 teaspoon red chili powder
- 1/2 teaspoon smoked paprika
Sauce Components
- 4 medium tomatoes, chopped
- 2 tablespoons tomato paste
- 1/2 cup water
- 1 teaspoon salt (adjust to taste)
- 1 teaspoon brown sugar
- 2 bay leaves
- Fresh cilantro for garnish
Step-by-Step Instructions
Phase 1: Building the Foundation (8-10 minutes)
Step 1: Heat oil and ghee in a heavy-bottomed pan over medium heat. The combination creates better flavor than oil alone. Wait until the oil shimmers but doesn’t smoke – this prevents burning the aromatics.
Step 2: Add chopped onions to the hot oil. Cook for 6-8 minutes, stirring frequently, until they turn golden brown and start caramelizing. This browning process is crucial for bhuna sauce flavor development. Don’t rush this step – properly caramelized onions create the sauce’s sweet undertones.
Step 3: Add minced garlic and grated ginger. Stir constantly for 60 seconds until fragrant. The mixture should sizzle gently. If it starts browning too quickly, reduce heat slightly. This prevents the garlic from burning and becoming bitter.
Phase 2: Spice Activation (3-4 minutes)
Step 4: Add all ground spices (cumin, coriander, turmeric, garam masala, chili powder, and paprika) to the onion mixture. Stir immediately to prevent burning. Cook for 30-45 seconds until the spices become fragrant and slightly darker.
Step 5: If the mixture looks too dry, add 1-2 tablespoons of water to prevent sticking. The spices should coat the onions evenly without clumping. This technique, called “bhuna-ing,” gives the sauce its name and distinctive taste.
Step 6: Add bay leaves and stir them into the spice mixture. They’ll infuse their subtle flavor throughout the cooking process.
Phase 3: Tomato Integration (8-10 minutes)
Step 7: Add chopped tomatoes and tomato paste. Stir well to combine with the spiced onion mixture. The tomatoes will initially look chunky – this is normal.
Step 8: Increase heat to medium-high and cook for 3-4 minutes, stirring frequently. The tomatoes will start breaking down and releasing their juices. Use your spoon to mash larger pieces against the pan sides.
Step 9: Continue cooking until the tomatoes completely break down and the mixture becomes thick and paste-like. This takes 4-6 minutes. You’ll know it’s ready when the oil starts separating around the edges – a key indicator in Indian cooking.
Phase 4: Final Development (8-10 minutes)
Step 10: Add 1/2 cup water gradually while stirring. The mixture will bubble vigorously initially. This creates steam that helps blend all flavors together.
Step 11: Add salt and brown sugar. The sugar balances the acidity from tomatoes and enhances the overall flavor profile. Stir until dissolved.
Step 12: Reduce heat to low and simmer for 8-10 minutes, stirring occasionally. The bhuna sauce should thicken to coat the back of a spoon. If it becomes too thick, add water 1 tablespoon at a time.
Step 13: Taste and adjust seasoning. Add more salt if needed, or a pinch more garam masala for extra warmth. Remove bay leaves before serving.
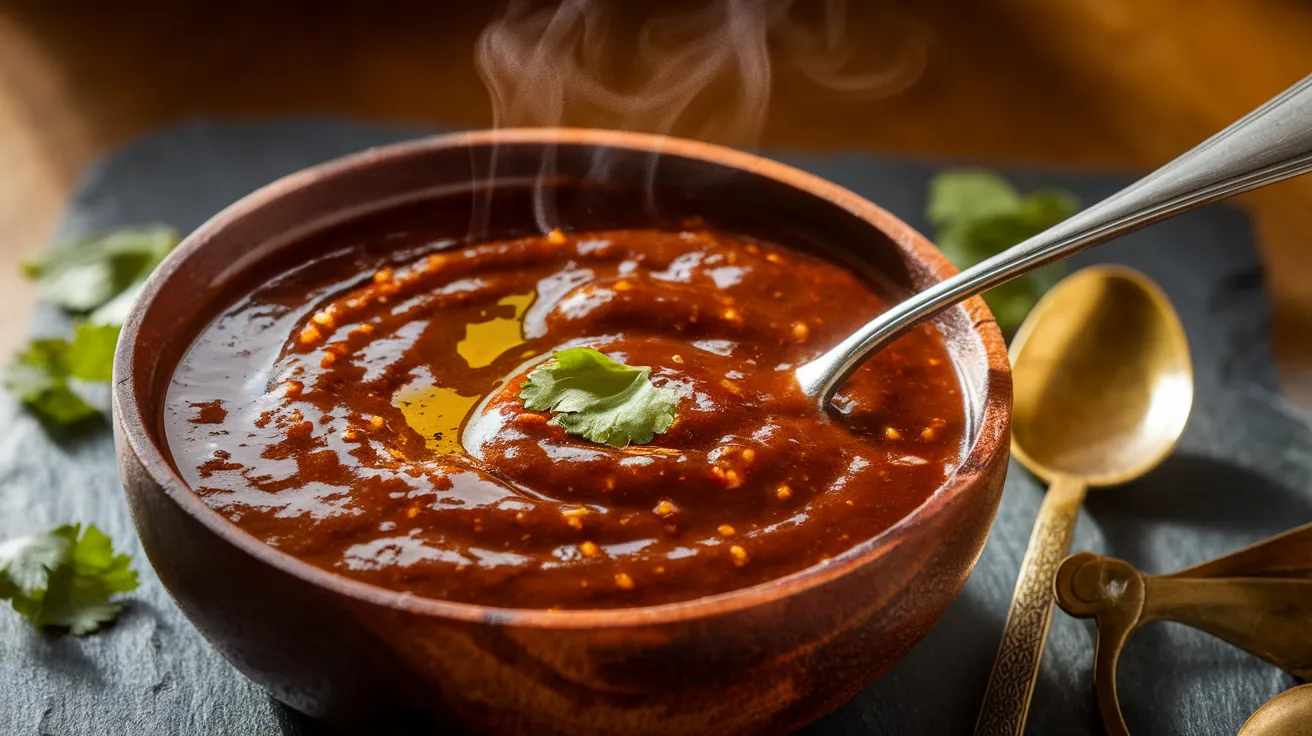
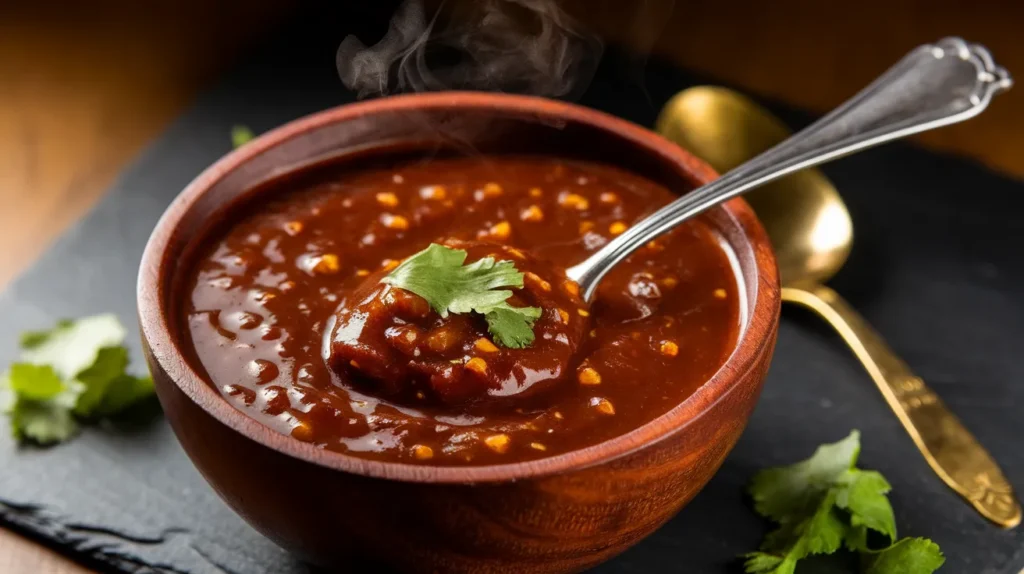
Step 14: Garnish with fresh cilantro and serve immediately, or let cool for storage. The sauce should have a rich, dark color and cling to your spoon without being too thick.
Chef’s Notes
Bhuna Technique Mastery: The word “bhuna” means “to fry” in Hindi, referring to the slow-cooking method that concentrates flavors. Keep stirring to prevent sticking, and don’t rush the browning process.
Oil Separation Signal: Watch for oil separating around the sauce edges – this indicates proper cooking and flavor development. It’s the traditional sign that your bhuna sauce is ready.
Consistency Control: A perfect bhuna sauce should be thick enough to coat ingredients but not so thick it becomes paste-like. Adjust with water as needed during cooking.
Make-Ahead Advantage: This sauce actually improves in flavor when made ahead. The spices meld beautifully overnight, making it perfect for meal prep and busy weeknight dinners.
Nutrition Information (Per Serving)
- Calories: 95
- Protein: 3g
- Carbohydrates: 12g
- Fat: 5g
- Fiber: 3g
- Sodium: 590mg
Delicious Variations
Creamy Bhuna Sauce: Stir in 1/4 cup heavy cream or coconut milk during the final 2 minutes of cooking for a richer, milder version that pairs beautifully with chicken or paneer.
Smoky Bhuna Sauce: Add 1/2 teaspoon smoked paprika and a pinch of chipotle powder for a deeper, smokier flavor profile that complements grilled meats perfectly.
Restaurant-Style Bhuna: Blend the finished sauce until smooth for a restaurant-texture base. This creates the perfect foundation for dishes similar to our butter chicken sauce, offering that silky consistency many people love.
Herb-Infused Bhuna: Add 2 tablespoons fresh mint leaves and extra cilantro during the last minute of cooking. This variation brings freshness that pairs wonderfully with lamb or beef dishes.
Storage & Reheating
Refrigerator Storage: Cool completely before transferring to airtight containers. Properly stored bhuna sauce keeps for 4-5 days in the refrigerator. The flavors actually improve after the first day.
Freezer Storage: Pour cooled sauce into freezer-safe containers or ice cube trays for portion control. Freezes well for up to 3 months. Thaw overnight in the refrigerator before using.
Reheating Instructions: Warm gently in a saucepan over low heat, adding 1-2 tablespoons of water if the sauce has thickened too much. Stir frequently to prevent sticking and ensure even heating.
Texture Recovery: If the sauce separates during storage, simply whisk vigorously while reheating, or blend briefly to restore smoothness.
Troubleshooting Guide
Problem: Sauce is too thin Solution: Simmer uncovered for 5-10 additional minutes, stirring frequently. The excess moisture will evaporate, concentrating the flavors and thickening the consistency naturally.
Problem: Bitter taste Solution: This usually means the garlic or spices burned. Add 1 teaspoon of brown sugar and a splash of cream to balance the bitterness. Next time, reduce heat during the initial cooking stages.
Problem: Sauce lacks depth Solution: The onions weren’t caramelized enough. Add 1 tablespoon tomato paste and cook for 2-3 more minutes. This concentrates flavors and adds richness to your bhuna sauce.
Problem: Oil separating excessively Solution: This happens when the sauce cooks too quickly. Reduce heat and add 2-3 tablespoons of water while stirring. The emulsion will restore with gentle cooking.
Problem: Spices taste raw Solution: Return to heat and cook for 3-4 more minutes, stirring constantly. Raw spice taste means they need more cooking time to develop their full flavor potential.
Equipment Essentials
- Heavy-bottomed pan or Dutch oven – Prevents burning and ensures even heat distribution
- Wooden spoon – Won’t scratch your pan and handles high heat well
- Sharp knife – For precise onion and garlic chopping
- Cutting board – Preferably separate one for aromatics
- Measuring spoons and cups – Accuracy matters for spice balance
- Fine-mesh strainer – Optional, for ultra-smooth sauce texture
Shopping List
Produce Section
- 2 large onions
- 4 cloves garlic
- 1-inch piece fresh ginger
- 4 medium tomatoes
- Fresh cilantro
Pantry/Spice Aisle
- Ground cumin
- Ground coriander
- Turmeric powder
- Garam masala
- Red chili powder
- Smoked paprika
- Bay leaves
- Brown sugar
- Salt
Oil/Condiments
- Vegetable oil
- Ghee (or butter)
- Tomato paste
Success Secrets
1. Master the Onion Base: Properly caramelized onions are the foundation of exceptional bhuna sauce. Take your time with this step – it makes all the difference in final flavor depth.
2. Control Your Heat: Medium heat is your friend throughout most of the cooking process. High heat burns spices and creates bitter flavors that can’t be fixed later.
3. Watch for Visual Cues: Oil separation around the edges signals proper cooking completion. This traditional Indian cooking indicator never fails.
4. Layer Your Flavors: Add ingredients in the correct order – aromatics first, then spices, then tomatoes. Each layer builds complexity in your bhuna sauce.
5. Taste and Adjust: Indian cooking is about balance. Taste frequently and adjust salt, sugar, and spices as needed. Your palate is the best guide for perfect seasoning.
This versatile bhuna sauce serves as an excellent base for countless Indian dishes. Its rich, concentrated flavors work beautifully with chicken, lamb, vegetables, or paneer. The slow-cooking technique creates depth that rivals your favorite Indian restaurant, and once you master this foundation, you’ll find yourself using it in creative ways beyond traditional curries. For those interested in exploring more sauce-making techniques, our tarako sauce offers a completely different flavor profile that showcases how mastering basic sauce techniques opens up endless culinary possibilities.