Quick Highlights:
- Transform leftover ham into a delicious Black Beans and Ham masterpiece
- Ready in 30 minutes using canned beans (3 hours with dried beans)
- Budget-friendly Black Beans and Ham meal that feeds 4 people generously
- Freezes beautifully for quick weeknight dinners
Ever stare at that chunk of leftover ham in your fridge, wondering what to do with it? I’ve been there! This Black Beans and Ham recipe transformed my leftover ham dilemma into a delicious solution my whole family devours. Simmered with aromatic vegetables and savory broth, these Black Beans and Ham create a rich, hearty meal that tastes like it’s been cooking all day—even when you use the quick-version with canned beans.
I love how this Black Beans and Ham dish bridges the gap between comfort food and healthy eating. The combination of protein-packed beans and smoky ham creates a satisfying meal that’s both nutritious and crave-worthy. Plus, it’s incredibly versatile—serve it over rice, with cornbread, or as a standalone bowl with your favorite toppings.
Nutrition Profile of Black Beans and Ham
| Nutrient | Amount Per Serving | % Daily Value |
|---|---|---|
| Calories | 380 | – |
| Protein | 29g | 58% |
| Carbohydrates | 42g | 14% |
| Fiber | 15g | 54% |
| Fat | 12g | 15% |
| Sodium | 820mg | 36% |
| Iron | 5mg | 28% |
| Potassium | 890mg | 19% |
Values based on using canned low-sodium beans and lean ham
Kitchen Equipment for Black Beans and Ham
| Essential Tools | Optional Tools |
|---|---|
| Large pot or Dutch oven | Pressure cooker |
| Cutting board | Food processor (for dicing) |
| Sharp chef’s knife | Garlic press |
| Measuring cups and spoons | Ladle |
| Wooden spoon | Storage containers |
| Can opener (if using canned beans) | |
| Colander |
Black Beans and Ham Ingredients
| Ingredient | Amount | Notes |
|---|---|---|
| Black beans | 2 (15 oz) cans or 1 pound dried | Drained and rinsed if canned |
| Ham | 1 pound | Diced into ½-inch cubes |
| Yellow onion | 1 large | Finely diced |
| Garlic | 4 cloves | Minced |
| Red bell pepper | 1 medium | Diced |
| Olive oil | 2 tablespoons | Extra virgin preferred |
| Chicken broth | 2 cups | Low-sodium recommended |
| Wine vinegar | 1 tablespoon | Red or white both work |
| Bay leaf | 1 large | Remove before serving |
| Black pepper | ½ teaspoon | Freshly ground |
| Salt | To taste | Add at the end |
| Fresh cilantro (optional) | ¼ cup | Chopped for garnish |
| Sour cream (optional) | ¼ cup | For topping |
| Hot sauce (optional) | To taste | For serving |
Dietary Notes: Gluten-free, dairy-free (without sour cream)
Optional Substitutions:
- Swap chicken broth for vegetable broth for a lighter flavor
- Replace red bell pepper with green for a different flavor profile
- Use smoked paprika (1 teaspoon) for extra smokiness
Beginner-Friendly Black Beans and Ham Instructions
Understanding Your Black Beans and Ham Preparation (Planning Phase)
- Choose Your Bean Type Decision (Before Shopping):
- Canned Beans Route:
- Fastest option: Total cooking time about 30 minutes
- Best for weeknight cooking
- Look for low-sodium options if possible
- Dried Beans Route:
- More economical but requires advance planning
- Total preparation and cooking time: about 3 hours plus overnight soaking
- Better texture and flavor control
- Planning Note: If using dried beans, start soaking the night before
- Canned Beans Route:
- Time Management Planning (Before Starting):
- Read through entire recipe first
- For Canned Beans:
- Allow 10-15 minutes for prep
- Allow 20-25 minutes for cooking
- For Dried Beans:
- Allow 10-15 minutes for prep
- Allow 2.5-3 hours for cooking
- Tip: Prep all ingredients before turning on heat
Detailed Bean Preparation Phase
If Using Dried Beans for Black Beans and Ham
- Bean Inspection Process (10 minutes):
- Find a light-colored plate or cutting board
- Pour beans in small batches onto surface
- Look for and remove any:
- Small stones or pebbles
- Wrinkled, discolored, or broken beans
- Any non-bean debris
- Visual Guide: Good beans are uniform in color and size
- Place inspected beans in a clean bowl
- Repeat until all beans are checked
- Why This Matters: Even one small stone can damage teeth
- Initial Bean Cleaning (3-5 minutes):
- Transfer beans to a large bowl
- Add cold water until beans are covered by 2-3 inches
- Use your hands to gently agitate beans
- Visual Cue: Water may become slightly cloudy
- Pour beans into colander or strainer
- Rinse under cold running water for 30 seconds
- Tip: Don’t skip this step—it removes surface dirt and debris
- Bean Soaking Process (Choose one method):
- Traditional Overnight Soak (8-12 hours, hands-off):
- Return cleaned beans to large bowl
- Add fresh cold water to cover by 3 inches
- Cover bowl with clean kitchen towel
- Leave at room temperature overnight
- Note: If kitchen is very warm, refrigerate instead
- Quick-Soak Method (about 1 hour total):
- Place cleaned beans in large pot
- Add cold water to cover by 2 inches
- Bring to a rolling boil over high heat
- Watch carefully to prevent boiling over
- Boil for exactly 2 minutes
- Remove from heat immediately
- Cover pot with lid
- Let stand undisturbed for 1 hour
- Warning: Set a timer for both the boiling and standing times
- Traditional Overnight Soak (8-12 hours, hands-off):
- Final Bean Preparation (2-3 minutes):
- Drain soaked beans in colander
- Rinse thoroughly under cold running water
- Visual Check: Water should run clear
- Allow to drain while preparing other ingredients
- Tip: Gently shake colander to remove excess water
If Using Canned Beans for Black Beans and Ham
- Can Opening Process (2 minutes):
- Check can expiration dates
- Clean can tops with damp cloth
- Use can opener to remove lids completely
- Safety Tip: Watch for sharp edges on opened cans
- Bean Draining and Rinsing (3 minutes):
- Place colander in sink
- Gently pour beans into colander
- Allow to drain for 30 seconds
- Run cold water over beans
- Use hands to gently stir beans while rinsing
- Continue rinsing until water runs completely clear
- Why This Matters: Reduces sodium and improves flavor
- Let drain thoroughly while preparing other ingredients
- Tip: Shake colander occasionally to remove excess water
Ingredient Preparation for Black Beans and Ham
- Ham Preparation Process (5-7 minutes):
- Place ham on cutting board
- If ham has large fat sections, trim these with knife
- Technique Tip: Slightly firm/cold ham is easier to cut
- Cut ham into ½-inch slices
- Stack 2-3 slices at a time
- Cut into ½-inch strips
- Cut strips crosswise into ½-inch cubes
- Visual Goal: Evenly sized ham cubes
- Safety Note: Keep fingers curled under while cutting
- Tip: Check out more ham creations for additional ham cutting techniques
- Onion Preparation Process (5 minutes):
- Place onion on cutting board
- Cut off top (stem end)
- Cut off bottom (root end)
- Stand onion on flat end
- Cut in half from top to bottom
- Peel off outer skin and first layer
- Place half onion cut-side down
- Make parallel cuts ¼ inch apart, stopping short of root end
- Rotate 90 degrees
- Make perpendicular cuts to create diced pieces
- Repeat with other half
- Visual Goal: Uniform ¼-inch pieces
- Tip: A sharp knife reduces tears when cutting onions
- Bell Pepper Preparation Process (4-5 minutes):
- Rinse pepper under cold water
- Place pepper upright on cutting board
- Cut off top just below stem
- Cut off bottom
- Stand pepper on either cut end
- Slice down from top to bottom to create a flat section
- Continue around pepper to remove all walls
- Remove any white ribs and seeds
- Place pepper pieces skin-side down
- Cut into ¼-inch strips
- Gather strips and cut crosswise into ¼-inch pieces
- Visual Goal: Uniform ¼-inch squares
- Tip: Save pepper scraps for stock or freeze for later use
- Garlic Preparation Process (3 minutes):
- Separate individual cloves from head
- Place flat side of knife on clove
- Gently press down with palm until skin cracks
- Remove all papery skin
- Trim off tough root end
- For fine mince:
- Make several parallel slices lengthwise
- Cut crosswise into small pieces
- Use knife to chop back and forth until very fine
- Visual Goal: Very fine, even pieces
- Warning: Don’t over-crush garlic or it can become bitter
- Tip: Let minced garlic rest 10 minutes before cooking for enhanced flavor
Cooking Your Black Beans and Ham Masterpiece
- Heating the Cooking Vessel (3-4 minutes):
- Place large pot or Dutch oven on burner
- Set heat to medium
- Add 2 tablespoons olive oil
- Watch for oil to warm
- Visual Cue: Oil will look thin and shimmer slightly
- Testing Method: Drop tiny piece of onion in oil
- If it sizzles gently, oil is ready
- Critical Warning: If oil smokes, it’s too hot
- If oil smokes, turn off heat, let cool, wipe out pot, start over
- Why This Matters: Proper oil temperature prevents burning
- Creating the Flavor Base (8-10 minutes):
- Add all diced onions to heated oil
- Spread in even layer
- Stirring Technique: Use wooden spoon to stir gently
- Cook 5 minutes, stirring every 1-2 minutes
- Visual Cues: Onions become translucent, soften, and shrink slightly
- Sound Cue: Sizzling should be gentle, not loud
- Aroma Cue: Sweet onion smell develops
- Temperature Adjustment: If browning too quickly, reduce heat
- Add garlic and bell pepper
- Stir immediately to combine with onions
- Cook 3 minutes more, stirring every 30-60 seconds
- Warning: Watch garlic closely as it burns easily
- Visual Goal: Vegetables should soften but not brown
- Success Check: Mixture should be aromatic but not burned
- Incorporating Ham into Black Beans and Ham (4-5 minutes):
- Add diced ham to vegetable mixture
- Stir to distribute evenly
- Cook 4-5 minutes, stirring every minute
- Visual Cue: Some ham edges may begin to brown slightly
- Aroma Cue: Smoky ham fragrance will intensify
- What’s Happening: Ham flavor infuses into oil and vegetables
- Tip: This is when the magic happens for your Black Beans and Ham
- Combining Main Components (5 minutes):
- Add prepared beans to pot
- Pour in 2 cups chicken broth
- Add 1 tablespoon wine vinegar
- Add bay leaf
- Add ½ teaspoon black pepper
- Stirring Technique: Use gentle folding motion to prevent bean breakage
- Stir until all ingredients are well combined
- Important Note: Don’t add salt yet
- Why Wait on Salt: Adding salt too early can make beans tough or prevent softening
- Tip: For more delicious bean recipes, check my corn ham recipe as a complementary dish
- Simmering Your Black Beans and Ham (15-150 minutes):
- Increase heat to medium-high
- Bring mixture to gentle boil
- Visual Cue: Small bubbles appear around edges, then throughout
- Once boiling, reduce heat to low immediately
- Cover pot with lid
- Timing Guide:
- For canned beans: Simmer 15-20 minutes
- For pre-soaked dried beans: Simmer 1.5-2.5 hours
- Set a timer for checking intervals
- Checking Schedule:
- For canned beans: Check every 5 minutes
- For dried beans: Check every 30 minutes
- When checking:
- Gently stir from bottom to prevent sticking
- Check liquid level (should barely cover beans)
- Test 2-3 beans for tenderness
- Adding Liquid: If mixture looks dry, add ¼ cup hot broth or water
- Bean Tenderness Test: Bean should mash easily between tongue and roof of mouth
- Tip: Be patient with dried beans—cooking time varies based on bean age
- Final Flavor Adjustments (5 minutes):
- Once beans are fully tender, remove bay leaf
- Important: Count in, count out—never leave bay leaf in dish
- Turn heat to lowest setting
- Take a small spoonful, let cool slightly, taste
- Add salt in ¼ teaspoon increments
- Critical Step: Taste after each addition
- Continue until desired saltiness reached
- Flavor Balance Check: May need more vinegar for brightness
- If adding more vinegar, add 1 teaspoon at a time
- Note: Flavors will continue developing after cooking
- Why This Works: Proper seasoning at end brings all Black Beans and Ham flavors together
Perfecting Your Black Beans and Ham (Finishing Phase)
- Final Consistency Check and Adjustment (3-5 minutes):
- Turn off heat
- Remove lid
- Stir thoroughly but gently
- Visual Assessment: Look at sauce thickness
- Perfect Consistency: Should coat spoon but not be pasty
- If Too Thick:
- Add hot broth or water, 2 tablespoons at a time
- Stir and assess after each addition
- If Too Thin:
- Turn heat to medium
- Simmer uncovered 5-10 minutes, stirring occasionally
- Alternative Method: Mash about ¼ cup beans against side of pot
- Success Check: Beans should remain whole but sauce should be slightly creamy
- Resting Your Black Beans and Ham (5 minutes):
- Once proper consistency achieved, keep off heat
- Cover pot
- Allow to rest 5 minutes
- What’s Happening: Flavors continue melding
- Tip: This rest period is essential for best flavor
- After resting, stir gently before serving
- Final Check: Beans should be tender, sauce slightly thickened
- Note: Dish will continue to thicken as it cools
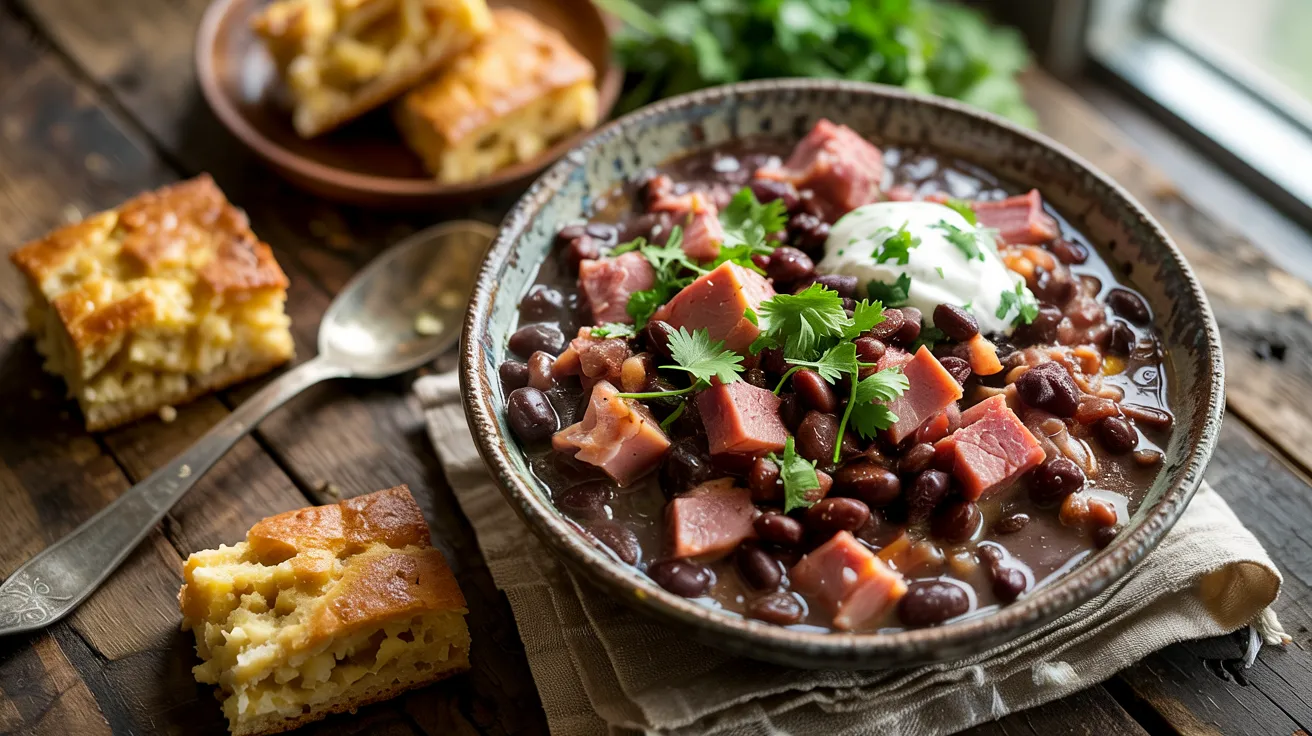
- Serving Your Black Beans and Ham Masterpiece (1-2 minutes):
- Gently stir before portioning
- Ladle into bowls
- Serving Options:
- Over rice
- Alongside cornbread
- In shallow bowls as standalone dish
- Recommended Toppings:
- Fresh chopped cilantro
- Diced raw onion
- Dollop of sour cream
- Few dashes hot sauce
- Garnish Note: Place toppings in small separate bowls for guests to add themselves
- Pairing Suggestion: For a complete meal, pair with my ham and dumplings recipe

Troubleshooting Your Black Beans and Ham
| Problem | Cause | Solution |
|---|---|---|
| Beans still hard after long cooking | • Beans too old<br>• Too acidic<br>• Hard water | • Continue cooking with lid on<br>• Add ¼ tsp baking soda<br>• If very old beans, may need to start over |
| Beans breaking apart | • Overcooked<br>• Too much stirring | • Stop cooking immediately<br>• Handle very gently<br>• Use in bean dip instead |
| Mixture too watery | • Too little cooking time<br>• Too much liquid added | • Simmer uncovered 10-15 minutes<br>• Mash some beans against pot side |
| Mixture too thick | • Too much evaporation<br>• Too long cooking time | • Add broth ¼ cup at a time<br>• Stir well between additions |
| Too salty | • Too much salt added<br>• Ham very salty | • Add potato chunk to absorb salt<br>• Add more unsalted beans<br>• Serve with unsalted rice |
| Not flavorful enough | • Insufficient seasoning<br>• Short cooking time | • Add vinegar (1 tsp at a time)<br>• Add ½ tsp cumin or smoked paprika<br>• Add fresh herbs at end |
| Beans burned on bottom | • Heat too high<br>• Insufficient stirring | • Don’t scrape burned part<br>• Carefully transfer unburned portion to new pot |
Black Beans and Ham Variations & Substitutions
Alternative Protein Options for Black Beans and Ham
- Smoked Turkey Black Beans:
- Replace ham with equal amount smoked turkey
- Add 1 tsp smoked paprika for extra smokiness
- Reduce cooking time by 5 minutes
- Taste Difference: Lighter, less fatty flavor profile
- Nutrition Change: Approximately 25% less fat
- Vegetarian Black Beans:
- Omit ham completely
- Double the beans
- Add 1 tbsp smoked paprika
- Add ½ tsp liquid smoke (optional)
- Add ½ cup diced carrots with onions
- Taste Difference: Earthier, lighter flavor
- Nutrition Change: Higher fiber, lower fat
- Bacon-Enhanced Black Beans:
- Replace ham with ½ pound cooked bacon pieces
- Start by cooking bacon in pot, remove, keep 1 tbsp fat
- Continue recipe using bacon fat instead of oil
- Add cooked bacon back during last 5 minutes
- Taste Difference: Stronger smoky flavor
- Note: Will be saltier than ham version
Bean Variety Options for Black Beans and Ham
- Pinto Bean Variation:
- Use pinto beans instead of black
- Add ½ tsp ground cumin
- Add 1 small diced jalapeño (optional)
- Texture Difference: Creamier when cooked
- Appearance Note: Lighter colored dish
- Mixed Bean Medley:
- Use 1 can/cup each: black beans and kidney beans
- Cooking time remains the same
- Visual Impact: More colorful dish
- Texture Note: Different bean textures create interest
- Navy Bean Alternative:
- Substitute navy beans for black beans
- Add 1 tsp dried thyme
- Flavor Profile: Milder, more traditional
- Regional Note: More New England-style flavor
Flavor Enhancement Options for Black Beans and Ham
- Spicy Black Beans and Ham:
- Add 1 diced jalapeño with bell pepper
- Include ½ tsp cayenne pepper
- Add 1 tsp hot sauce during cooking
- Heat Level: Medium-hot
- Cooling Option: Serve with extra sour cream
- Herb-Infused Black Beans and Ham:
- Add ½ tsp each: dried oregano, thyme during cooking
- Add 2 tbsp fresh herbs (cilantro, parsley) at end
- Aroma Difference: More complex, herbaceous
- Presentation Tip: Reserve some fresh herbs for garnish
- Cuban-Inspired Black Beans and Ham:
- Add 1 tsp ground cumin
- Include ½ tsp dried oregano
- Add 1 tbsp orange juice
- Finish with 1 tbsp lime juice instead of vinegar
- Regional Authenticity: More Caribbean flavor profile
- Serving Suggestion: Pair with yellow rice
Black Beans and Ham Storage & Reheating Guide
Refrigerator Storage for Black Beans and Ham
- Proper Cooling Process:
- Allow Black Beans and Ham to cool uncovered for 30 minutes
- Stir occasionally to release heat
- Safety Rule: Never refrigerate hot food
- Time Limit: No more than 2 hours at room temperature
- Divide large batches into smaller containers (2-inch depth)
- Why: Shallow containers cool faster, preventing bacterial growth
- Refrigeration Best Practices:
- Use airtight containers with secure lids
- Label with date prepared
- Store in refrigerator for up to 5 days
- Place containers where cool air can circulate
- Location Tip: Middle shelf is ideal, not door
- Refrigerated Black Beans and Ham Reheating:
- Stovetop Method (Preferred):
- Place in saucepan
- Add 2 tbsp water or broth per cup of beans
- Heat over medium-low heat
- Stir occasionally until bubbling and hot throughout
- Temperature Goal: 165°F internal temperature
- Microwave Method:
- Place in microwave-safe container
- Add 1 tbsp water or broth per cup
- Cover loosely (allow steam to escape)
- Heat on 70% power for 1 minute
- Stir thoroughly
- Continue heating in 30-second intervals
- Stir between intervals
- Testing: Ensure center is hot
- Stovetop Method (Preferred):
Freezer Storage for Black Beans and Ham
- Freezing Preparation Process:
- Cool completely in refrigerator first
- Portion into meal-sized amounts
- Use freezer-safe containers or heavy-duty freezer bags
- Remove as much air as possible
- Leave ½-inch headspace for expansion
- Label with contents and date
- Portioning Tip: Freeze in 2-cup portions for flexibility
- Freezer Storage Details:
- Maintains best quality for 3 months
- Safe indefinitely if kept at constant 0°F
- Store flat if using bags
- Organization Tip: Stack containers after frozen solid
- Thawing and Reheating Frozen Black Beans and Ham:
- Safest Thawing Method:
- Move container to refrigerator
- Allow 24 hours to thaw completely
- Safety Note: Never thaw at room temperature
- Quick Thaw Method:
- Place sealed container in cold water
- Change water every 30 minutes
- Warning: Never use hot water
- Reheating After Thawing:
- Transfer to pot
- Add 3-4 tbsp liquid per 2 cups
- Heat over medium-low
- Stir frequently until bubbling
- Quality Check: Taste and adjust seasonings
- Safest Thawing Method:
Black Beans and Ham Safety Notes & Pro Tips
Critical Food Safety Guidelines
- Temperature Danger Zone Awareness:
- Keep hot Black Beans and Ham above 140°F when serving
- Cool quickly and refrigerate
- Danger Zone: Bacteria multiply rapidly between 40-140°F
- Time Limit: Maximum 2 hours at room temperature
- Hot Weather Rule: Maximum 1 hour if above 90°F ambient temperature
- Reheating Safety Rules:
- Always reheat to minimum internal temperature of 165°F
- Use food thermometer when possible
- Heat throughout, not just edges
- Stir during reheating for even heating
- One-Time Rule: Only reheat once, never reheat leftovers multiple times
- Cross-Contamination Prevention:
- Use separate cutting boards for meat and vegetables
- Wash hands after handling raw meat
- Clean all surfaces thoroughly
- Equipment Note: Sanitize cutting boards after use
Black Beans and Ham Cooking Wisdom
- Bean Selection and Preparation Tips:
- Newer beans cook faster than older ones
- Beans darken and harden with age
- Shopping Tip: Buy from stores with high turnover
- Visual Check: Look for shiny, uniform beans
- Warning: One stone can cause dental damage—inspect carefully
- Ham Selection Guidance:
- Use leftover baked ham when possible
- Avoid very processed ham products
- Flavor Note: Ham hocks or shanks add deeper flavor
- Salt Awareness: Different ham types have varying salt levels
- Advanced Tip: Mix ham types for complex flavor
- Texture Perfection Techniques:
- Check beans frequently toward end of cooking
- Perfect texture: tender but holds shape
- For creamier texture, mash some beans against pot side
- Texture Tip: Some beans break during cooking—this is normal and adds to creaminess
Black Beans and Ham Time-Saving Tips
- Advance Preparation Strategies:
- Chop all vegetables the night before
- Store in airtight containers in refrigerator
- Prep Note: Garlic flavor intensifies when pre-minced
- Batch Cooking Benefits:
- Double recipe
- Portion and freeze extra
- Time Investment: Same effort, twice the meals
- Freezer Organization: Label with contents, date, and reheating instructions
- Multi-Tasking Efficiency:
- Prepare rice or cornbread while beans simmer
- Chop garnishes during final cooking stage
- Kitchen Flow: Clean as you go for less post-cooking cleanup
Time Summary for Black Beans and Ham:
- Prep Time: 15-20 minutes
- Cook Time: 30 minutes (canned beans) or 2.5-3 hours (dried beans)
- Total Time: 45 minutes to 3.5 hours
- Servings: 4 generous portions