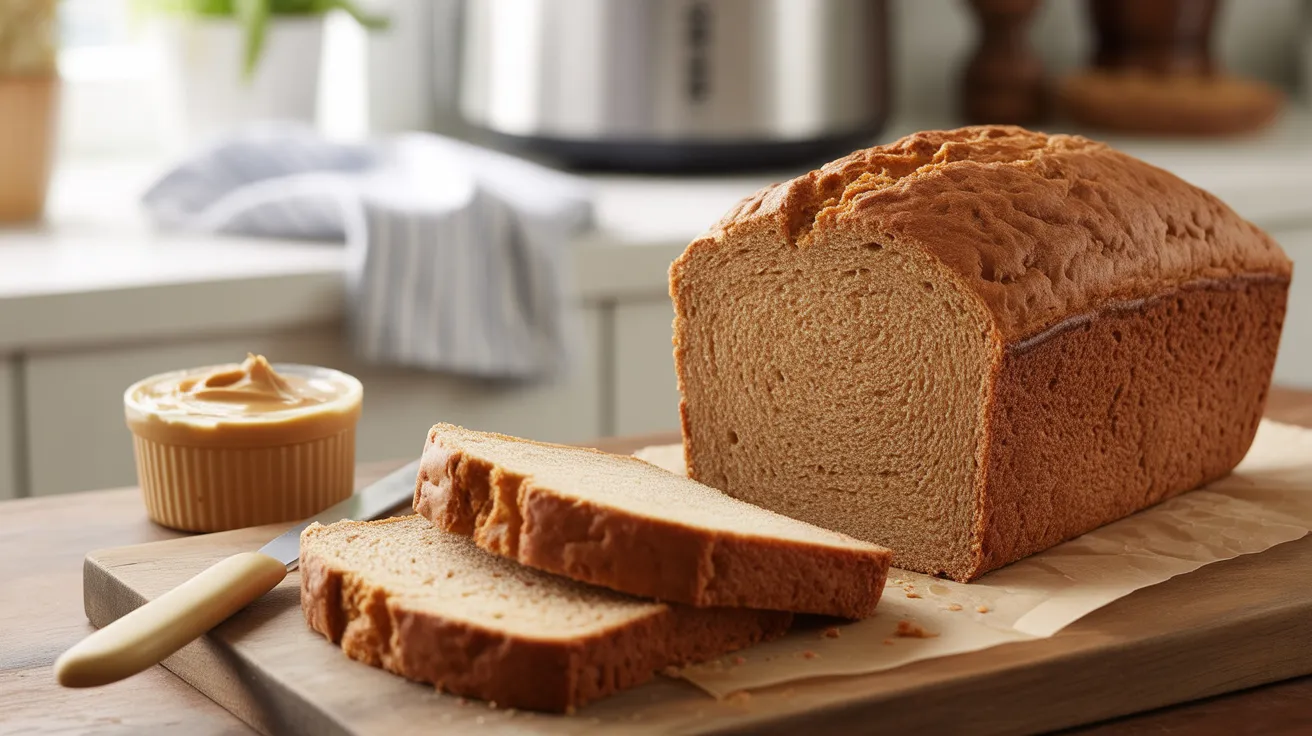
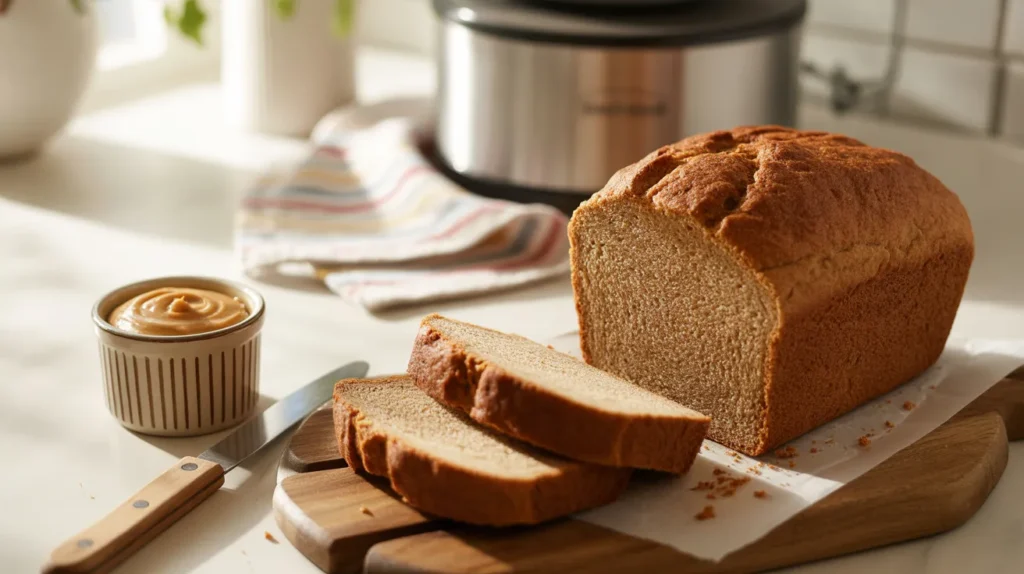
This bread machine whole wheat peanut butter bread transforms your favorite sandwich spread into a hearty, protein-packed loaf that’s perfect for breakfast toast or afternoon snacks. My bread machine whole wheat peanut butter bread recipe combines the nutty richness of peanut butter with wholesome whole wheat flour, creating a tender crumb that stays fresh for days.
SERVES: 4 | PREP: 10 MIN | COOK: 3 HRS | TOTAL: 3 HRS 10 MIN
Ingredients
| Wet Ingredients | Amount |
|---|---|
| Warm water (110°F) | ¾ cup |
| Creamy peanut butter | ⅓ cup |
| Honey | 3 tablespoons |
| Vegetable oil | 2 tablespoons |
| Large egg | 1 |
| Dry Ingredients | Amount |
|---|---|
| Whole wheat flour | 2 cups |
| Bread flour | 1 cup |
| Salt | 1 teaspoon |
| Active dry yeast | 2¼ teaspoons |
Step-by-Step Instructions
Phase 1: Preparing Your Ingredients (5 minutes)
Step 1: Check your peanut butter consistency before starting. It should be at room temperature and creamy, not separated with oil on top. If it’s separated, stir it well until smooth.
Step 2: Measure your warm water and test the temperature with your finger. It should feel like warm bathwater, not hot. Water that’s too hot will kill the yeast, while cold water won’t activate it properly.
Step 3: Crack your egg into a small bowl and whisk it lightly with a fork. This helps it blend more evenly into the dough later.
Step 4: Measure your whole wheat flour by spooning it into your measuring cup and leveling it off with a knife. Don’t pack it down or scoop directly from the bag, as this adds too much flour and makes dense bread.
Phase 2: Loading Your Bread Machine (5 minutes)
Step 5: Add the warm water to your bread machine pan first. Liquids always go in first to prevent the dry ingredients from sticking to the corners and not mixing properly.
Step 6: Spoon in the peanut butter, dropping it in dollops around the water. It doesn’t need to be perfectly mixed yet—your bread machine will handle that during the kneading cycle.
Step 7: Pour in the honey and vegetable oil, then add your whisked egg. These wet ingredients create moisture and help the bread stay soft for several days.
Step 8: Add both the whole wheat flour and bread flour on top of the wet ingredients. The bread flour adds gluten strength that whole wheat flour lacks, giving you a better rise and softer texture.
Step 9: Sprinkle the salt across the flour mixture. Salt controls yeast activity and adds flavor, but don’t let it touch the yeast directly yet.
Step 10: Make a small well in the center of the flour using your finger and add the active dry yeast into this well. This keeps it dry and away from the salt until mixing begins.
Phase 3: Machine Settings and Baking (3 hours)
Step 11: Close your bread machine lid and select the “Whole Wheat” or “Basic” cycle depending on your machine’s options. Choose the medium crust setting for the best results with this bread machine whole wheat peanut butter bread recipe.
Step 12: Press start and let the machine run its kneading cycle. After 5 minutes, open the lid and check the dough. It should form a slightly sticky ball that cleans the sides of the pan. If it’s too dry and crumbly, add water 1 tablespoon at a time. If it’s too wet and not forming a ball, add bread flour 1 tablespoon at a time.
Step 13: Let the machine complete its full cycle without opening the lid again. The dough will rise, deflate, rise again, and finally bake. Your kitchen will smell amazing as the peanut butter toasts during baking.
Step 14: When the cycle finishes and your machine beeps, put on oven mitts immediately. The pan is extremely hot and can burn you quickly.
Step 15: Remove the bread pan from the machine and let it sit for 5 minutes. This cooling period helps the loaf release from the pan without sticking or tearing.
Step 16: Turn the pan upside down and gently shake it to release the loaf onto a cooling rack. If it sticks, run a butter knife around the edges to loosen it.
Step 17: Remove the kneading paddle from the bottom of the loaf if it came out with the bread. Use a butter knife or small tongs to wiggle it free while the bread is still warm.
Step 18: Let your bread machine whole wheat peanut butter bread cool for at least 30 minutes before slicing. Cutting into hot bread creates gummy slices because the interior is still setting.
Chef’s Notes
Peanut butter quality matters. Natural peanut butter with oil separation works differently than stabilized brands. I stick with regular creamy Jif or Skippy for consistent results in this bread machine whole wheat peanut butter bread.
Room temperature ingredients mix better. If your egg and peanut butter come straight from the fridge, they’ll cool down your water and slow yeast activation. Let them sit out for 20 minutes before baking.
Watch your first loaf closely. Every bread machine runs slightly differently. Some bake hotter or have stronger kneading paddles. Take notes on your first attempt so you can adjust next time.
The bread tastes even better the next day. After cooling completely, the flavors meld and the texture becomes more even. Slice what you need and store the rest properly.
Nutrition Information (Per Serving)
- Calories: 385
- Protein: 14g
- Carbohydrates: 56g
- Fat: 13g
- Fiber: 7g
- Sugar: 11g
- Sodium: 420mg
Variations to Try
Chocolate Peanut Butter Swirl: Add ¼ cup mini chocolate chips during the last 5 minutes of the kneading cycle when your machine beeps. The chips create pockets of melted chocolate throughout the loaf.
Cinnamon Raisin Peanut Bread: Mix 1½ teaspoons cinnamon into your dry ingredients and add ½ cup raisins at the mix-in beep. This creates a breakfast bread that tastes like peanut butter on cinnamon toast.
Banana Peanut Butter Bread: Replace ¼ cup of the water with ¼ cup mashed ripe banana for extra moisture and natural sweetness. This variation works beautifully with the yeasted techniques I use in my bread machine whole wheat yeasted banana bread.
Savory Herb Peanut Bread: Skip the honey and add 1 tablespoon dried herbs (rosemary or thyme) plus ¼ teaspoon garlic powder. This creates a unique sandwich bread that pairs with soups, similar to how I approach bread machine pumpkin yeast bread with savory variations.
Storage & Reheating
Store your cooled bread machine whole wheat peanut butter bread in an airtight container or resealable plastic bag at room temperature for up to 4 days. The peanut butter’s natural oils keep it moist longer than regular whole wheat bread.
For longer storage, slice the entire loaf and freeze individual slices in a single layer on a baking sheet. Once frozen solid, transfer slices to a freezer bag. They’ll keep for 3 months and you can toast frozen slices directly without thawing.
Refresh day-old bread by wrapping it in a damp paper towel and microwaving for 15-20 seconds. This steams the bread gently and restores its soft texture.
For the best toast, use your regular toaster on a medium-high setting. The peanut butter creates a slightly caramelized exterior that’s incredible with butter or jam.
Troubleshooting Common Problems
My bread didn’t rise properly and looks dense. Your yeast was probably expired or your water temperature was off. Yeast dies in water above 120°F and won’t activate in water below 95°F. Always test yeast freshness by dissolving it in warm water with a pinch of sugar—it should foam within 10 minutes.
The loaf has a large hole or air pocket near the top. Too much yeast or too much liquid created this cave-like space. Measure your ingredients precisely next time and make sure your flour is leveled, not packed. Some bread machines also run hotter, causing over-proofing.
My bread collapsed in the middle after baking. This happens when dough over-proofs during the rising cycles. Your kitchen might be too warm (above 80°F), causing the yeast to work too quickly. Try baking on a cooler day or use ¼ teaspoon less yeast.
The crust is too thick or hard. Switch to the “light crust” setting on your bread machine next time. You can also brush the hot loaf with melted butter immediately after removing it from the pan, which softens the crust as it cools.
The bread tastes too salty or not salty enough. Measure salt carefully with measuring spoons, not by eye. Too little salt creates bland, pale bread that rises too fast. Too much salt kills yeast activity and creates a dense, dark loaf that doesn’t rise properly.
Equipment Essentials
- Bread machine (1.5 or 2-pound capacity)
- Measuring cups (dry and liquid)
- Measuring spoons
- Wire cooling rack
- Instant-read thermometer (for checking water temperature)
- Oven mitts
- Serrated bread knife
- Small mixing bowl (for whisking egg)
Shopping List
Bakery/Baking Aisle
- Whole wheat flour
- Bread flour
- Active dry yeast
- Honey
Condiments/Spreads
- Creamy peanut butter
Dairy/Refrigerated
- Large eggs
Cooking Oils
- Vegetable oil
Pantry Staples
- Salt
Success Secrets
1. Invest in an instant-read thermometer for perfect water temperature every time. This $10 tool eliminates the guessing game and gives you consistent rises.
2. Write the date on your yeast packet when you open it and store it in the freezer. Yeast loses potency quickly at room temperature but stays fresh for months when frozen.
3. Clean your bread machine pan immediately after removing the loaf. Stuck-on dough hardens quickly and becomes difficult to remove once cold. Soak it in warm water for 10 minutes if needed.
4. Slice your bread machine whole wheat peanut butter bread with a serrated knife using a gentle sawing motion. Press down too hard and you’ll compress the soft interior into gummy layers.
5. Keep a baking journal noting your machine’s brand, cycle used, and any adjustments needed. Different machines produce different results, and your notes create a personalized recipe that works perfectly every time.