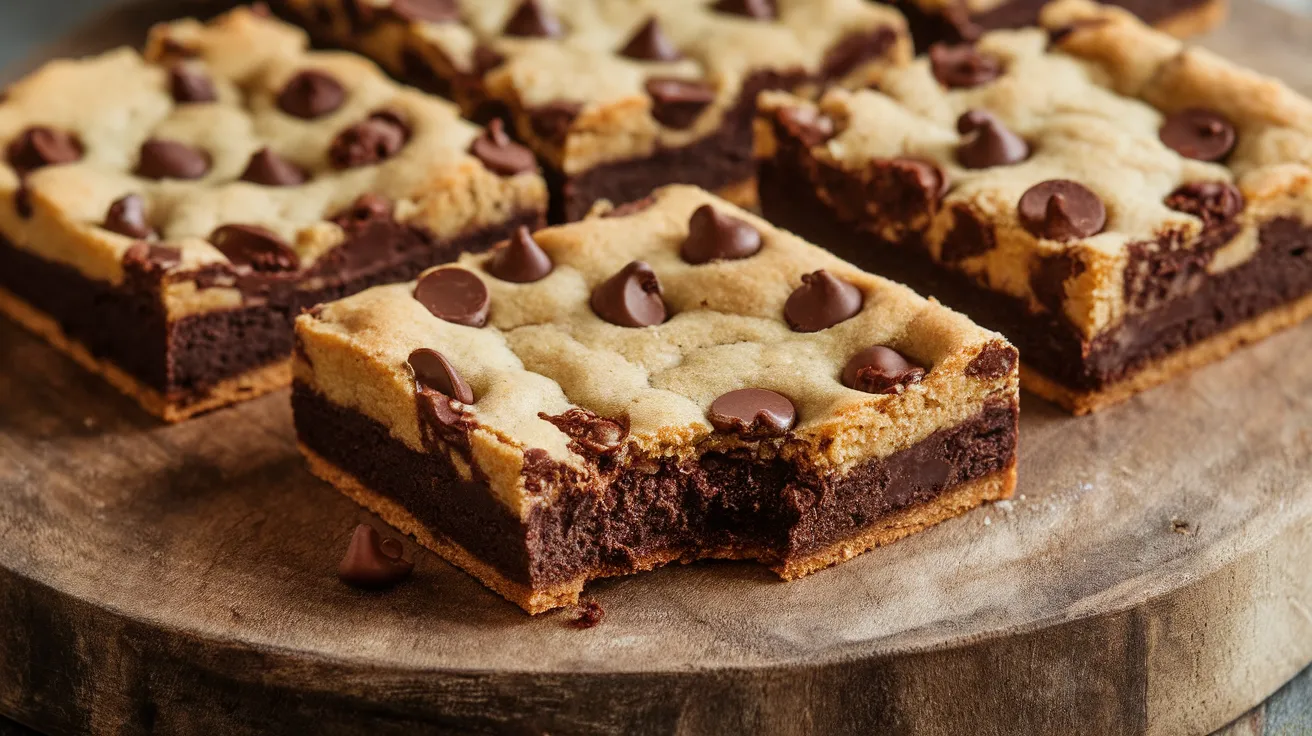
These brownie cookie bars create the perfect marriage between fudgy brownies and chewy cookies—a decadent treat that combines rich chocolate flavor with a crispy-chewy texture that’ll have everyone begging for the recipe. This brownie cookie bar delivers bakery-quality results with straightforward techniques that even first-time bakers can master.
SERVES: 4 | PREP: 20 MIN | COOK: 25 MIN | TOTAL: 45 MIN
Ingredients
For the Brownie Base Layer
| Ingredient | Amount |
|---|---|
| Unsalted butter | 6 tablespoons (¾ stick) |
| Dark chocolate chips | ¾ cup |
| Granulated sugar | ½ cup |
| Large egg | 1 |
| Vanilla extract | 1 teaspoon |
| All-purpose flour | ⅓ cup |
| Cocoa powder | 2 tablespoons |
| Salt | ¼ teaspoon |
For the Cookie Dough Top Layer
| Ingredient | Amount |
|---|---|
| Unsalted butter, softened | 4 tablespoons (½ stick) |
| Light brown sugar | ⅓ cup |
| Large egg yolk | 1 |
| Vanilla extract | ½ teaspoon |
| All-purpose flour | ⅔ cup |
| Baking soda | ¼ teaspoon |
| Salt | ⅛ teaspoon |
| Semi-sweet chocolate chips | ½ cup |
Step-by-Step Instructions
Phase 1: Prep Work (5 minutes)
Step 1: Preheat your oven to 350°F and position the rack in the center. Why this matters: Center rack placement ensures even heat distribution, preventing burnt edges or undercooked centers.
Step 2: Line an 8×8-inch square baking pan with parchment paper, leaving a 2-inch overhang on two opposite sides. Pro tip: Spray the pan lightly with cooking spray first so the parchment sticks—this prevents the paper from sliding around when you pour in the batter.
Step 3: Gather and measure all ingredients before you start mixing. Beginner’s note: This technique (called “mise en place”) prevents scrambling mid-recipe and ensures you don’t forget anything crucial.
Phase 2: Creating the Brownie Base (8 minutes)
Step 4: Melt the 6 tablespoons of butter in a medium microwave-safe bowl for 30-40 seconds until fully liquefied. Add the ¾ cup dark chocolate chips and stir continuously for 60-90 seconds. What you’re looking for: The residual heat should melt the chips into a glossy, smooth mixture. If chunks remain, microwave for 10-second bursts, stirring between each.
Step 5: Whisk in the ½ cup granulated sugar until the mixture looks slightly grainy and pulls away from the bowl sides—about 30 seconds of vigorous whisking. Temperature check: The mixture should feel warm (around 100°F) but not hot to the touch.
Step 6: Add the whole egg and 1 teaspoon vanilla extract, then whisk for 45-60 seconds until the batter becomes smooth and shiny. Visual cue: You’ll notice the batter transforms from dull to glossy when properly incorporated.
Step 7: Sift together the ⅓ cup flour, 2 tablespoons cocoa powder, and ¼ teaspoon salt directly into the chocolate mixture. Safety tip: Sifting eliminates lumps that create dry pockets in your finished brownie cookie bar.
Step 8: Fold the dry ingredients using a rubber spatula with gentle strokes (15-20 folds) until just combined. Warning: Overmixing develops gluten, creating tough, cakey brownies instead of fudgy ones. Stop when you see the last streak of flour disappear.
Step 9: Pour the brownie batter into your prepared pan and spread evenly with an offset spatula, reaching all corners. Technique: Tap the pan firmly on the counter 3-4 times to release air bubbles.
Phase 3: Making the Cookie Dough Layer (6 minutes)
Step 10: In a separate bowl, beat the 4 tablespoons softened butter with the ⅓ cup brown sugar using a hand mixer on medium speed for 90 seconds. Texture goal: The mixture should look fluffy and lighter in color, similar to peanut butter.
Step 11: Add the egg yolk and ½ teaspoon vanilla, beating for another 30 seconds until fully integrated. Why just the yolk: Egg whites add structure; yolks add richness and create that signature chewy cookie texture.
Step 12: In a small bowl, whisk together ⅔ cup flour, ¼ teaspoon baking soda, and ⅛ teaspoon salt. Add to the butter mixture and stir with a wooden spoon until a thick dough forms—about 20-25 stirs. Consistency check: The dough should be scoopable but hold its shape.
Step 13: Fold in the ½ cup semi-sweet chocolate chips until evenly distributed throughout the cookie dough.
Phase 4: Assembly and Baking (25 minutes)
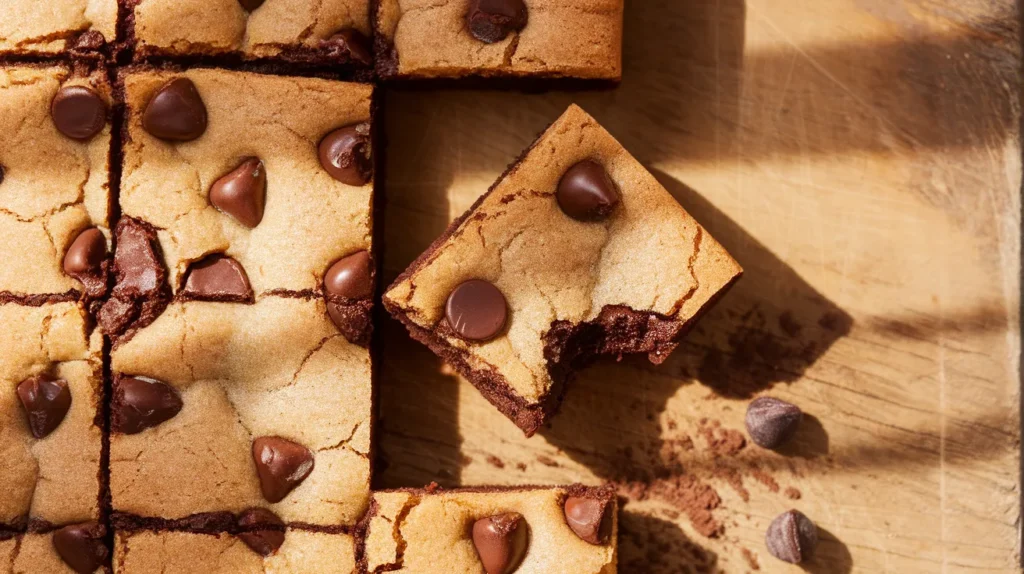
Step 14: Drop small spoonfuls of cookie dough over the brownie layer, distributing evenly but leaving small gaps. Key technique: Don’t spread the cookie dough completely—those gaps allow the brownie layer to peek through during baking, creating beautiful marbling. Similar layering techniques work wonderfully in treats like apple pie cookies, where contrasting textures create magic.
Step 15: Gently press the cookie dough pieces down with your fingertips to create partial coverage—aim for about 80% coverage with random brownie spots visible.
Step 16: Bake for 25-28 minutes, rotating the pan 180 degrees at the 15-minute mark for even browning. Doneness test: The cookie top should look golden brown with slightly darker edges, and a toothpick inserted in the center should come out with a few moist crumbs (not wet batter).
Phase 5: Cooling and Cutting (20+ minutes)
Step 17: Remove from the oven and place the pan on a wire cooling rack. Let cool in the pan for 15 minutes. Critical step: Cutting too early causes the layers to separate and crumble.
Step 18: Use the parchment overhang to lift the entire brownie cookie bar block onto a cutting board. Cool for an additional 10 minutes before slicing.
Step 19: Cut into 8 rectangular bars (2 rows of 4) using a sharp chef’s knife wiped clean between cuts. Professional trick: Run the knife under hot water, dry it, then cut—this creates clean edges without dragging.
Step 20: Serve immediately for gooey perfection, or store as directed below. Each bar showcases distinct brownie and cookie layers that rival any bakery creation.
Chef’s Notes
Chocolate Quality Matters: Using high-quality chocolate (60-70% cacao) in your brownie cookie bar creates richer flavor than standard chips. The better the chocolate, the more pronounced that fudgy brownie character becomes.
Butter Temperature Is Critical: The brownie layer needs melted butter, while the cookie layer requires softened (room temperature) butter. This temperature difference creates the distinct textures that make brownie cookie bar recipes so irresistible.
The Partial Coverage Technique: Leaving gaps in the cookie layer isn’t laziness—it’s intentional design. Those exposed brownie patches caramelize slightly, adding textural contrast and visual appeal to your finished brownie cookie bar.
Make-Ahead Magic: Prepare both layers separately, refrigerate the cookie dough in a covered bowl, and store the brownie batter in the pan covered with plastic wrap for up to 24 hours. Assemble and bake when ready—perfect for stress-free entertaining.
Nutrition Information (Per Serving)
Calories: 385 | Protein: 5g | Carbohydrates: 48g | Fat: 21g | Saturated Fat: 12g | Fiber: 2g | Sugar: 34g | Sodium: 180mg
Creative Variations
Peanut Butter Swirl Brownie Cookie Bar: Warm 3 tablespoons of peanut butter for 15 seconds and drizzle over the cookie layer before baking. Swirl with a knife for marbled beauty and nutty flavor.
Triple Chocolate Decadence: Replace the semi-sweet chips in the cookie layer with a mixture of white chocolate chips and milk chocolate chunks. Add 2 tablespoons mini chocolate chips to the brownie batter for extra intensity.
Salted Caramel Explosion: Press 8-10 soft caramel squares into the brownie batter before adding the cookie layer. Sprinkle flaky sea salt on top before baking for sophisticated sweet-salty balance that complements the layers beautifully—similar to the flavor contrast found in strawberry shortcake recipes.
Espresso-Enhanced Version: Add 1 tablespoon instant espresso powder to the brownie batter. Coffee amplifies chocolate flavor without making your brownie cookie bar taste like coffee.
Storage & Reheating
Room Temperature: Store in an airtight container with parchment between layers for up to 3 days. The texture remains perfectly chewy without refrigeration.
Refrigeration: Extend shelf life to 5 days by refrigerating in a sealed container. Let bars sit at room temperature for 10 minutes before serving to restore that fudgy texture.
Freezing: Wrap individual bars tightly in plastic wrap, then place in a freezer bag for up to 2 months. Thaw at room temperature for 30 minutes or microwave for 15-20 seconds for warm, gooey perfection.
Reheating Tip: Microwave a single bar for 12-15 seconds to recreate that just-baked warmth. The chocolate chips re-melt slightly, making each bite absolutely divine.
Troubleshooting Common Problems
Problem 1: Cookie Layer Sinks Into Brownie Base Solution: Your brownie batter was too thin or hot when you added the cookie dough. Always let the brownie layer cool for 3-4 minutes before assembly, and ensure your brownie batter is thick enough to hold its shape when tilted.
Problem 2: Dry, Cakey Texture Instead of Fudgy Solution: You overbaked or overmixed. Brownie cookie bar recipes require careful timing—remove from the oven when the toothpick shows moist crumbs, not clean. Also, fold dry ingredients gently to avoid developing excess gluten.
Problem 3: Layers Separate When Cutting Solution: You cut too soon. The layers need 25-30 minutes total cooling time to set properly. Rushing this step breaks the bond between brownie and cookie layers.
Problem 4: Burnt Edges, Raw Center Solution: Your oven runs hot or the pan is too small. Invest in an oven thermometer to verify temperature accuracy, and ensure you’re using an 8×8-inch pan—smaller pans create thick bars that bake unevenly.
Problem 5: Cookie Layer Spreads Too Thin Solution: Your butter was too soft or melted. Cookie dough butter should be softened (easily dented with a finger) but still cool—around 65-68°F. If too warm, refrigerate the cookie dough for 10 minutes before assembly.
Equipment Essentials
- 8×8-inch square baking pan (metal conducts heat better than glass)
- Parchment paper for easy removal
- Two mixing bowls (medium and large)
- Microwave-safe bowl for melting chocolate
- Whisk for brownie batter
- Hand mixer or stand mixer for cookie dough
- Rubber spatula for folding
- Offset spatula for spreading
- Wire cooling rack for proper airflow
- Sharp chef’s knife for clean cuts
- Measuring cups and spoons
- Fine-mesh sieve for sifting
Shopping List
Dairy Section
- Unsalted butter (1¼ sticks total)
- Large eggs (2 whole)
Baking Aisle
- Dark chocolate chips (¾ cup)
- Semi-sweet chocolate chips (½ cup)
- All-purpose flour (1 cup total)
- Cocoa powder (2 tablespoons)
- Granulated sugar (½ cup)
- Light brown sugar (⅓ cup)
- Vanilla extract (1½ teaspoons)
- Baking soda (¼ teaspoon)
- Salt
Equipment Section
- Parchment paper (if needed)
- 8×8-inch baking pan (if needed)
Success Secrets
1. Room Temperature Matters: Bring eggs to room temperature by placing them in warm water for 5 minutes before cracking. Room temperature eggs incorporate more easily, creating silkier batter for your brownie cookie bar.
2. Don’t Skip the Tap: After spreading the brownie layer, firmly tap the pan on the counter 3-4 times. This releases trapped air bubbles that would create holes and uneven texture.
3. The Toothpick Truth: For fudgy bars, your toothpick should emerge with moist crumbs clinging to it. A completely clean toothpick means you’ve overbaked—the bars will continue cooking slightly as they cool.
4. Knife Hygiene: Wipe your knife clean and run it under hot water between each cut. This single trick transforms messy, crumbly cuts into bakery-perfect bars with distinct layers.
5. Serve With Confidence: These bars taste incredible at any temperature, but serving slightly warm (10-15 seconds in the microwave) creates that irresistible molten chocolate experience that makes your brownie cookie bar truly unforgettable.