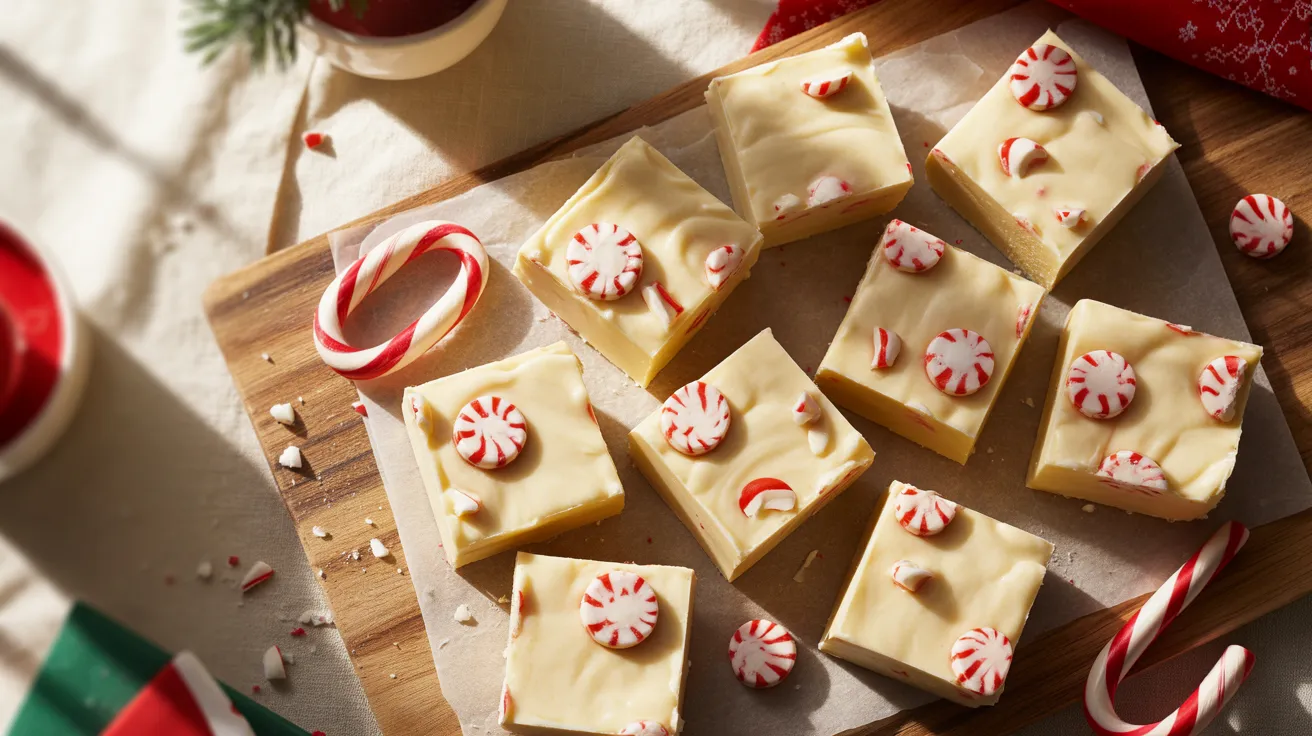
Nothing says Christmas quite like candy cane fudge melting on your tongue. This candy cane fudge transforms simple ingredients into gorgeous peppermint squares that taste like the holidays wrapped in creamy white chocolate. I make this every December, and it disappears faster than any cookie on my dessert table.
SERVES: 4 | PREP: 15 MIN | COOK: 5 MIN | TOTAL: 2 HR 20 MIN
Why This Candy Cane Fudge Works
The secret to perfect candy cane fudge lives in the temperature control. Most fudge recipes fail because people rush the melting process or skip the refrigeration time.
I learned this the hard way after three batches turned grainy. Now I watch the thermometer like a hawk and never skip the cooling steps.
Ingredients
Main Components
| Ingredient | Amount | Notes |
|---|---|---|
| White chocolate chips | 12 oz | Use quality chips, not coating chocolate |
| Sweetened condensed milk | 7 oz (half 14-oz can) | Must be sweetened, not evaporated |
| Candy canes | 6 regular size | Equals about ½ cup crushed |
| Vanilla extract | 1 tsp | Pure extract, not imitation |
| Pinch of salt | ⅛ tsp | Balances sweetness |
Optional Toppings
| Ingredient | Amount | Purpose |
|---|---|---|
| Extra crushed candy canes | 2 tablespoons | For garnish |
| Mini chocolate chips | ¼ cup | Adds contrast |
Step-by-Step Instructions
Phase 1: Preparation (5 minutes)
Step 1: Prepare Your Pan
Line an 8×8-inch baking pan with parchment paper, leaving overhang on two sides. This creates handles you’ll use later to lift the fudge out cleanly.
Spray the parchment lightly with cooking spray. Don’t skip this step—it prevents sticking even with the paper barrier.
Step 2: Crush the Candy Canes
Place 6 candy canes in a zip-top freezer bag. Seal it completely, pushing out all air.
Use a rolling pin or meat mallet to crush them into small pieces. You want chunks ranging from powder to pea-size bits—not uniform dust.
Set aside 2 tablespoons of the prettiest pieces for topping. The rest goes into the fudge base.
Step 3: Measure Your Ingredients
Open your 14-oz can of sweetened condensed milk and pour exactly half (7 oz) into a measuring cup. Save the rest for another batch or caramel coffee fudge later this week.
Measure out 12 oz white chocolate chips. Don’t use white chocolate bars—they contain different fats that won’t set properly.
Have your vanilla extract and salt ready to add quickly once the mixture melts.
Phase 2: Melting the Base (5 minutes)
Step 4: Set Up Your Double Boiler
Fill a medium saucepan with 2 inches of water. Bring it to a gentle simmer over medium heat.
Place a heat-safe bowl on top. The bowl’s bottom shouldn’t touch the water—steam does the melting, not direct heat.
Step 5: Combine Chocolate and Milk
Add your white chocolate chips and 7 oz condensed milk to the bowl. Stir gently with a silicone spatula.
The mixture will look separated at first. This is normal—keep stirring slowly in a figure-eight pattern.
Watch the temperature. You want it between 110-120°F. Higher temps cause graininess and oil separation.
Step 6: Stir Until Smooth
Keep stirring constantly for 3-4 minutes. The chips will gradually melt into the milk, creating a glossy, smooth mixture.
When you lift your spatula, the mixture should fall in a thick ribbon that holds its shape for 2 seconds before melting back in.
Remove from heat immediately when smooth. Overheating creates a grainy texture you can’t fix.
Phase 3: Flavor Development (3 minutes)
Step 7: Add Flavorings
Stir in 1 teaspoon vanilla extract and ⅛ teaspoon salt. The vanilla enhances the peppermint, and salt cuts through the sweetness.
Mix for 30 seconds until fully incorporated. The mixture will smell incredible—resist tasting it yet because it’s very hot.
Step 8: Fold in Candy Canes
Add your reserved crushed candy canes (minus the topping pieces). Fold them in gently with a spatula, using broad strokes.
You want even distribution, but don’t overmix. 10-12 folds should do it.
The candy will start releasing peppermint oil into the white chocolate. Some pieces will turn the fudge slightly pink—that’s perfect.
Step 9: Check the Consistency
Your candy cane fudge mixture should be thick but pourable. If it’s too stiff, it won’t spread evenly.
If it seems too thick, return it to the warm (not hot) water bath for 30 seconds and stir. Don’t add more liquid—it breaks the emulsion.
Phase 4: Setting and Finishing (2+ hours)
Step 10: Pour Into Pan
Scrape the fudge into your prepared pan. Use your spatula to spread it into an even layer, working from center to edges.
Tap the pan firmly on the counter 5-6 times. This removes air bubbles that would create holes in your finished fudge.
Step 11: Add Toppings
Sprinkle your reserved 2 tablespoons crushed candy canes over the top immediately, before the surface sets.
Press them gently with your palm so they stick. If you wait too long, they’ll just sit on top and fall off when you cut.
Step 12: First Chill
Refrigerate uncovered for 30 minutes. This sets the surface so you can cover it without damaging your topping.
After 30 minutes, cover loosely with plastic wrap. This prevents the fudge from absorbing fridge odors.
Step 13: Complete Setting
Chill for at least 2 more hours, or overnight for best results. The fudge needs this time to firm up completely.
Resist cutting it early. Soft fudge crumbles and doesn’t give you clean edges.
Step 14: Cut and Serve
Lift the fudge out using the parchment overhang. Place it on a cutting board.
Use a large, sharp knife warmed under hot water and dried. Cut into 16 squares (4×4 grid).
Wipe the knife clean between cuts. This gives you professional-looking edges.
Step 15: Store Properly
Layer your candy cane fudge between parchment paper in an airtight container. Don’t stack pieces directly—they’ll stick together.
Store at room temperature for up to 5 days, or refrigerate for 2 weeks. Bring to room temp before serving for best texture.
Chef’s Notes
Temperature is Everything: Keep your melting mixture between 110-120°F for smooth, creamy candy cane fudge. Higher temps break the emulsion and create grainy texture. Use a candy thermometer clipped to your bowl.
Candy Cane Crushing Matters: Mix fine powder with small chunks for the best texture. All powder makes it too sweet; all chunks make it hard to bite through. The variety creates interest in every piece.
White Chocolate Quality: Cheap white coating chocolate won’t set properly and tastes waxy. Spend a bit more on real white chocolate chips with cocoa butter listed in the first three ingredients.
Timing the Topping: Add crushed candy canes to the top within 60 seconds of pouring the fudge. The surface starts setting fast, and late additions won’t stick properly.
Nutrition Information (Per Serving – 4 pieces)
| Nutrient | Amount |
|---|---|
| Calories | 385 |
| Protein | 4g |
| Carbohydrates | 52g |
| Fat | 18g |
| Saturated Fat | 11g |
| Sugar | 48g |
| Fiber | 0g |
| Sodium | 95mg |
Nutrition calculated for 4 servings (4 pieces each from 16 total pieces)
Delicious Variations
Chocolate Peppermint Swirl
Replace half the white chocolate with 6 oz dark chocolate chips. Melt separately, then swirl together in the pan with a knife. The contrast looks stunning and tastes like fancy peppermint bark. This works beautifully if you’re already making heart-shaped chocolate shortbread for a gift box.
Cookies and Cream Candy Cane
Fold in ½ cup crushed Oreos with your candy canes. The cookies add texture and cut the sweetness. Use the chocolate cookies only, not the cream filling.
Salted Caramel Peppermint
Drizzle 3 tablespoons caramel sauce over the fudge before adding crushed candy canes. Sprinkle with flaky sea salt. The salty-sweet-minty combination is addictive.
Eggnog Candy Cane Fudge
Add ¼ teaspoon nutmeg and ⅛ teaspoon cinnamon with your vanilla. Replace vanilla extract with 1 teaspoon rum extract. It tastes like eggnog in fudge form.
Storage and Reheating
Room Temperature Storage
Keep candy cane fudge in an airtight container at 65-70°F for up to 5 days. Layer pieces between parchment or wax paper.
Don’t store in plastic bags—they trap moisture and make the candy canes sticky.
Refrigerator Storage
Refrigerated fudge lasts 2 weeks in an airtight container. The texture gets firmer and less creamy.
Let it sit at room temp for 20 minutes before serving. Cold fudge is too hard and doesn’t release its peppermint flavor properly.
Freezer Storage
Wrap individual pieces in plastic wrap, then place in a freezer bag. Freeze for up to 3 months.
Thaw in the fridge overnight, then bring to room temp. Don’t thaw at room temp directly—condensation makes the surface wet and sticky.
Reheating Tips
Don’t reheat candy cane fudge—it won’t reset properly and becomes grainy. If it’s too hard from the fridge, just let it warm up naturally.
For soft fudge that didn’t set, refrigerate it longer or freeze for 30 minutes to firm up.
Troubleshooting Common Problems
Problem: Grainy, Separated Fudge
Cause: You overheated the chocolate mixture above 125°F, breaking the emulsion.
Fix: Next time, use a thermometer and remove from heat at 115°F. Stir constantly to distribute heat evenly. If it’s already grainy, you can’t fix it—but it still tastes good.
Problem: Fudge Won’t Set After Hours
Cause: You either used white chocolate coating instead of real white chocolate, or added too much condensed milk.
Fix: Freeze the fudge for 2 hours. It won’t have perfect texture, but it’ll be firm enough to cut and eat. Store frozen pieces in the freezer—they’re actually delicious frozen.
Problem: Candy Canes Turned the Fudge Pink and Sticky
Cause: You used fresh, room-temperature candy canes. The warm fudge dissolved their colored coating.
Fix: Use candy canes straight from the package without warming them. Crush them just before adding. The pink color is harmless, but sticky means the candy dissolved too much.
Problem: Fudge Crumbles When Cut
Cause: You didn’t let it set long enough, or you stored it in a too-cold environment that made it brittle.
Fix: Refrigerate for 1 more hour if it’s too soft. If it’s too brittle from cold, let it sit at room temp for 30 minutes before cutting. Use a hot, dry knife and wipe between cuts.
Problem: Top Layer Falls Off
Cause: The fudge’s surface started setting before you added crushed candy canes.
Fix: Next time, add toppings within 60 seconds of pouring. For the current batch, press the fallen pieces into the sides of each square after cutting—they’ll stick to the edges.
Equipment Essentials

Must-Have Tools:
- 8×8-inch baking pan (metal or glass)
- Parchment paper for easy removal
- Medium saucepan for double boiler
- Heat-safe mixing bowl (glass or metal)
- Silicone spatula for stirring
- Candy thermometer (critical for perfect texture)
- Sharp chef’s knife for clean cuts
- Zip-top freezer bag for crushing candy canes
Nice-to-Have Tools:
- Rolling pin for crushing candy canes evenly
- Offset spatula for smoother spreading
- Kitchen scale for precise measurements
Shopping List
Baking Aisle
- White chocolate chips (12 oz bag)
- Vanilla extract (pure)
Canned Goods
- Sweetened condensed milk (14 oz can)
Seasonal/Candy Section
- Candy canes (box of 12, use 6)
Spices
- Salt (you have this)
Supplies
- Parchment paper
- Cooking spray
Success Secrets
1. Use a Thermometer Every Time
Guessing temperature ruins more fudge than any other mistake. A candy thermometer costs $10 and guarantees perfect candy cane fudge every batch.
2. Quality White Chocolate Makes the Difference
Cheap white chips contain vegetable oil instead of cocoa butter. Read labels—real white chocolate lists cocoa butter in the first three ingredients.
3. Don’t Rush the Setting Time
Cutting fudge too early creates crumbly edges and messy pieces. Wait the full 2+ hours even if it looks set. The center needs that time.
4. Crush Candy Canes at the Last Minute
Pre-crushed candy canes absorb moisture from the air and get sticky. Crush them fresh right before mixing for the best texture and peppermint punch.
5. Warm Your Knife for Perfect Cuts
Run your knife under hot water, dry it completely, then cut. Wipe clean between each cut. This simple trick gives you bakery-quality edges that make people think you’re a professional.
This candy cane fudge brings Christmas magic to any dessert table. The creamy white chocolate melts perfectly with those peppermint bits, creating something that tastes way fancier than four ingredients should. Make a double batch—trust me, four servings won’t be enough once people taste it.