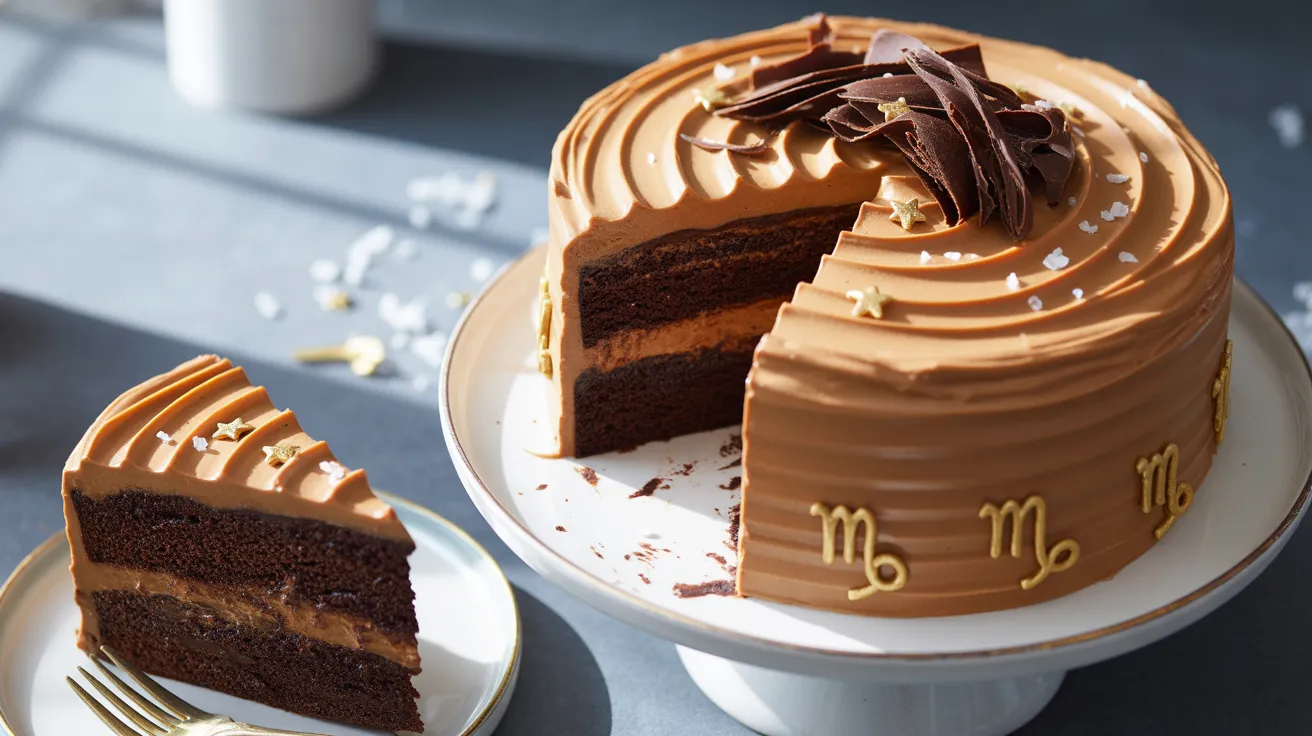
This Capricorn cake embodies the zodiac sign’s love for classic elegance and refined taste. I created this rich chocolate espresso layer cake with salted caramel buttercream specifically for ambitious Capricorns who appreciate timeless flavors with a sophisticated twist. Perfect for birthday celebrations or astrology-themed gatherings, this Capricorn cake serves four people generously with its decadent layers and balanced sweetness. The earthy chocolate combined with bold espresso represents Capricorn’s grounded nature, while the elegant presentation satisfies their appreciation for quality and craftsmanship.
SERVES: 4 | PREP: 25 MIN | COOK: 28 MIN | TOTAL: 53 MIN (plus cooling)
Why This Recipe Works
I’ve spent years perfecting this Capricorn cake recipe to match the zodiac sign’s personality traits. Capricorns value quality over quantity, so this scaled-down version serves four without compromising on sophistication.
The combination of dark chocolate and espresso creates depth without being overly sweet. The salted caramel buttercream adds a luxurious touch that appeals to Capricorn’s appreciation for refined flavors.
This cake stays moist for days, making it practical for Capricorn’s busy schedule. You can bake the layers ahead and assemble when needed.
Ingredients
For the Chocolate Espresso Cake Layers
| Ingredient | Amount | Notes |
|---|---|---|
| All-purpose flour | 1 cup | Sift before measuring |
| Granulated sugar | ¾ cup | Divided |
| Unsweetened cocoa powder | ⅓ cup | Dutch-process preferred |
| Baking powder | ½ teaspoon | Fresh for best rise |
| Baking soda | ½ teaspoon | Creates tender crumb |
| Salt | ¼ teaspoon | Enhances chocolate flavor |
| Instant espresso powder | 1 tablespoon | Deepens chocolate notes |
| Large egg | 1 | Room temperature |
| Whole milk | 6 tablespoons | Room temperature |
| Vegetable oil | 3 tablespoons | Keeps cake moist |
| Vanilla extract | ½ teaspoon | Pure extract only |
| Hot water | 6 tablespoons | Blooms the cocoa |
For the Salted Caramel Buttercream
| Ingredient | Amount | Notes |
|---|---|---|
| Unsalted butter | 6 tablespoons | Softened to room temp |
| Powdered sugar | 1½ cups | Sifted |
| Caramel sauce | 3 tablespoons | Store-bought or homemade |
| Heavy cream | 1-2 tablespoons | For consistency |
| Sea salt | ¼ teaspoon | Flaky salt for topping |
| Vanilla extract | ¼ teaspoon | Complements caramel |
For Assembly and Decoration
| Ingredient | Amount | Notes |
|---|---|---|
| Chocolate shavings | 2 tablespoons | Dark chocolate preferred |
| Gold star sprinkles | 1 tablespoon | Optional Capricorn symbol |
| Flaky sea salt | Pinch | Finishing touch |
Step-by-Step Instructions
Phase 1: Prepare Your Workspace and Pans (5 minutes)
Step 1: Preheat your oven to 350°F and position the rack in the center. This ensures even heat distribution for uniform baking.
The center rack prevents the top from browning too quickly while allowing the bottom to cook through properly. Never skip preheating—your cake needs consistent temperature from the moment it enters the oven.
Step 2: Grease two 6-inch round cake pans with butter or non-stick spray, then line the bottoms with parchment paper circles.
Cut the parchment to fit precisely by tracing the pan bottom. Grease the parchment too—this double insurance prevents sticking. For this Capricorn cake, presentation matters, so we want clean release every time.
Step 3: Dust the greased pans lightly with cocoa powder instead of flour.
Tap out the excess cocoa after coating the sides. This trick prevents white flour marks on your dark chocolate cake layers. The cocoa adds flavor while serving the same anti-stick purpose.
Phase 2: Mix the Dry Ingredients (3 minutes)
Step 4: Sift together 1 cup flour, ¾ cup sugar, ⅓ cup cocoa powder, ½ teaspoon baking powder, ½ teaspoon baking soda, and ¼ teaspoon salt into a large mixing bowl.
Sifting aerates the dry ingredients and breaks up lumps in the cocoa powder. Use a fine-mesh sieve and tap it gently. This step ensures your Capricorn cake has a tender, even crumb without pockets of unmixed cocoa.
Step 5: Whisk 1 tablespoon instant espresso powder directly into the dry mixture until evenly distributed.
The espresso doesn’t make the cake taste like coffee—it intensifies the chocolate flavor. You should see the powder spread uniformly throughout the mixture with no clumps remaining.
Phase 3: Combine Wet Ingredients (4 minutes)
Step 6: In a separate medium bowl, whisk together 1 egg, 6 tablespoons milk, 3 tablespoons oil, and ½ teaspoon vanilla until the mixture looks smooth and slightly frothy.
Room temperature ingredients emulsify better. If your egg is cold, place it in warm water for 5 minutes first. The frothiness indicates proper incorporation, which creates a lighter cake texture.
Step 7: Pour the wet ingredients into the dry ingredients and stir with a wooden spoon until just combined—about 15-20 strokes.
You’ll still see small lumps, and that’s perfect. Overmixing develops gluten, which makes cakes tough and dense. The batter should look thick and slightly grainy at this stage.
Step 8: Heat 6 tablespoons water until steaming hot but not boiling, then slowly pour it into the batter while stirring continuously.
The batter will transform from thick to thin and pourable. This hot water “blooms” the cocoa powder, releasing its full flavor. The final batter should have the consistency of thin pancake batter and look glossy.
Phase 4: Bake the Cake Layers (28 minutes)
Step 9: Divide the batter evenly between your two prepared pans, using approximately ¾ cup batter per pan.
A kitchen scale helps ensure even layers. If you don’t have one, eyeball it by pouring half into the first pan, then adjusting. Tap each pan firmly on the counter 3-4 times to release air bubbles.
Step 10: Bake for 26-28 minutes, rotating the pans halfway through at the 13-minute mark.
Rotating ensures even browning since most ovens have hot spots. The cakes are done when a toothpick inserted in the center comes out with just a few moist crumbs attached—not wet batter, but not completely clean either.
Step 11: Let the cakes cool in their pans on a wire rack for 10 minutes, then carefully invert onto the rack to cool completely.
Run a thin knife around the edges before inverting if they seem stuck. The 10-minute rest lets the structure set enough to handle without crumbling. Full cooling takes about 45 minutes and is crucial before frosting.
Phase 5: Make the Salted Caramel Buttercream (8 minutes)
Step 12: Beat 6 tablespoons softened butter in a large bowl with an electric mixer on medium speed for 2-3 minutes until light and fluffy.
The butter should look pale and have increased in volume. This incorporates air that makes the frosting light. If the butter is too cold, it won’t whip properly. It should leave an indent when you press it.
Step 13: Gradually add 1½ cups sifted powdered sugar, beating on low speed initially, then increasing to medium once incorporated.
Start slow to prevent a sugar cloud in your kitchen. The mixture will look crumbly at first, then come together. Scrape down the bowl sides twice during this process.
Step 14: Add 3 tablespoons caramel sauce, 1 tablespoon heavy cream, ¼ teaspoon sea salt, and ¼ teaspoon vanilla to the butter-sugar mixture.
Beat on high speed for 2 minutes until the frosting becomes silky smooth and lighter in color. If it seems too thick, add the remaining 1 tablespoon cream a teaspoon at a time. The frosting should hold stiff peaks but spread easily.
Phase 6: Assemble Your Capricorn Cake (8 minutes)
Step 15: Place the first cooled cake layer on your serving plate. Spread ½ cup buttercream evenly across the top, leaving a ¼-inch border around the edges.
Use an offset spatula for smooth spreading. The border prevents frosting from squishing out when you add the second layer. Make the frosting slightly thicker in the center than at the edges for even weight distribution.
Step 16: Gently place the second cake layer on top, pressing down lightly to adhere. Apply a thin “crumb coat” of frosting over the entire cake.
The crumb coat seals in loose crumbs. Use the remaining frosting thinly—you should still see cake through it. Refrigerate for 15 minutes to set this layer before applying the final frosting coat.
Step 17: Spread the remaining buttercream over the chilled cake, creating swirls or a smooth finish as you prefer. Sprinkle chocolate shavings, gold stars, and a light dusting of flaky sea salt on top.
For smooth sides, hold your offset spatula at a 45-degree angle and rotate the cake on a turntable if you have one. The chocolate shavings add texture that complements the smooth buttercream beautifully.
Chef’s Notes
Temperature Matters: Room temperature ingredients mix more evenly and create a better texture in this Capricorn cake. Cold eggs and milk can cause the batter to seize or mix unevenly.
Espresso Enhancement: If you don’t drink coffee and worry about the espresso flavor, don’t. It doesn’t taste like coffee—it makes the chocolate taste more intensely chocolatey.
Caramel Options: Store-bought caramel sauce works perfectly here. I recommend brands like Ghirardelli or Torani for consistent quality. Homemade works too if you’re feeling ambitious.
Pan Substitution: Don’t have 6-inch pans? Use 8-inch pans and reduce baking time to 22-24 minutes. The layers will be thinner but still work beautifully. Just like baking a blueberry cream cheese loaf, proper pan size affects baking time.
Nutrition Information (Per Serving)
- Calories: 485
- Protein: 5g
- Carbohydrates: 62g
- Fat: 25g
- Saturated Fat: 12g
- Fiber: 3g
- Sugar: 48g
- Sodium: 285mg
Creative Variations
White Chocolate Capricorn Cake: Replace the cocoa powder with an additional ⅓ cup flour and fold in 4 ounces melted white chocolate after combining wet and dry ingredients. Use white chocolate buttercream instead of caramel.
Mocha Capricorn Cake: Double the espresso powder to 2 tablespoons and add 2 tablespoons brewed coffee to the buttercream for an intense coffee-chocolate flavor profile.
Vegan Capricorn Cake: Substitute the egg with a “flax egg” (1 tablespoon ground flaxseed + 3 tablespoons water, let sit 5 minutes). Use plant-based milk and vegan butter throughout. The texture stays remarkably similar.
Capricorn Birthday Extravaganza: Transform this into a showstopper like a Stranger Things cake by adding themed decorations. Use constellation piping, mountain goat silhouettes in chocolate, or earthy elements like rosemary sprigs and crystallized ginger.
Storage and Reheating
Room Temperature: This Capricorn cake stays fresh for 2 days when covered with a cake dome or inverted bowl. The oil in the recipe keeps it moist.
Refrigeration: Store in an airtight container for up to 5 days. Bring to room temperature 30 minutes before serving for the best flavor and texture. Cold cake tastes muted.
Freezing: Wrap unfrosted cake layers individually in plastic wrap, then aluminum foil. Freeze for up to 3 months. Thaw overnight in the refrigerator before frosting.
Buttercream Storage: Make the frosting up to 1 week ahead and refrigerate. Re-whip it for 2-3 minutes before using to restore the fluffy texture.
Assembly Timing: Frost the cake up to 24 hours before serving. This actually improves the flavor as the layers and frosting meld together.
Troubleshooting Common Problems
Problem 1: Cake Layers Are Dense Instead of Light
Your baking soda or baking powder might be expired. Test freshness by dropping ½ teaspoon in hot water—it should fizz vigorously. Also check that you didn’t overmix the batter. Stop mixing as soon as the flour disappears.
Problem 2: Buttercream Is Grainy
The powdered sugar wasn’t sifted, leaving lumps. Beat the frosting on high speed for an additional 3-4 minutes to break down sugar crystals. If it’s still grainy, add 1 teaspoon of heavy cream and beat again.
Problem 3: Cake Stuck to the Pan
You skipped greasing the parchment paper or didn’t let it cool long enough before inverting. Next time, grease every surface and wait the full 10 minutes. For stuck cakes, carefully run a thin knife around edges and try again.
Problem 4: Frosting Is Too Soft and Slides Off
Your butter was too warm or your kitchen is hot. Refrigerate the frosting for 15 minutes, then re-whip. If you’re working in a warm environment, chill your cake layers before frosting.
Problem 5: Cake Layers Domed in the Middle
Your oven runs hot or you didn’t rotate the pans. Use an oven thermometer to verify temperature. Level domed cakes with a serrated knife before frosting—save the scraps for “cake pops” mixed with extra frosting.
Equipment Essentials

- Two 6-inch round cake pans (essential for proper portion size)
- Parchment paper rounds
- Fine-mesh sieve for sifting
- Electric hand mixer or stand mixer
- Wire cooling racks
- Offset spatula for frosting
- Mixing bowls (large and medium)
- Wooden spoon for gentle stirring
- Measuring cups and spoons
- Toothpicks for testing doneness
Shopping List
Baking Aisle
- All-purpose flour
- Granulated sugar
- Powdered sugar
- Unsweetened cocoa powder
- Baking powder
- Baking soda
- Instant espresso powder
- Vanilla extract
Dairy Section
- Large eggs
- Whole milk
- Unsalted butter
- Heavy cream
Condiments/Specialty
- Vegetable oil
- Caramel sauce
- Sea salt (flaky)
Baking/Decorating
- Parchment paper
- Dark chocolate (for shavings)
- Gold star sprinkles (optional)
Success Secrets
1. Measure Accurately: Use the spoon-and-level method for flour. Scooping directly creates 20% more flour than needed, resulting in dry cake. Spoon flour into the measuring cup, then level with a knife.
2. Don’t Skip the Hot Water: This step seems unusual but it’s critical. Hot water activates the cocoa powder’s flavor compounds and creates the perfect tender texture. The thin batter is correct—trust the process.
3. Test Your Oven Temperature: Most home ovens run 15-25°F off from the display. An $8 oven thermometer prevents baking disasters. I learned this the hard way after multiple failed cakes.
4. Quality Cocoa Powder Matters: Dutch-process cocoa creates a smoother, less acidic flavor perfect for this elegant Capricorn cake. Hershey’s natural cocoa works but tastes sharper. Splurge on Ghirardelli or Valrhona for special occasions.
5. Patience with Cooling: I know you’re excited to frost your cake, but rushing this step causes frosting meltdown. Literally. Touch the cake bottom—if it feels even slightly warm, wait longer. Perfectly cooled layers create professional results.
This Capricorn cake recipe delivers sophisticated flavors without complicated techniques. The earthy chocolate and bold espresso represent Capricorn’s grounded personality, while the salted caramel buttercream adds that touch of luxury this sign appreciates. Bake this for your favorite Capricorn and watch them light up with appreciation for such a thoughtful, well-crafted dessert.