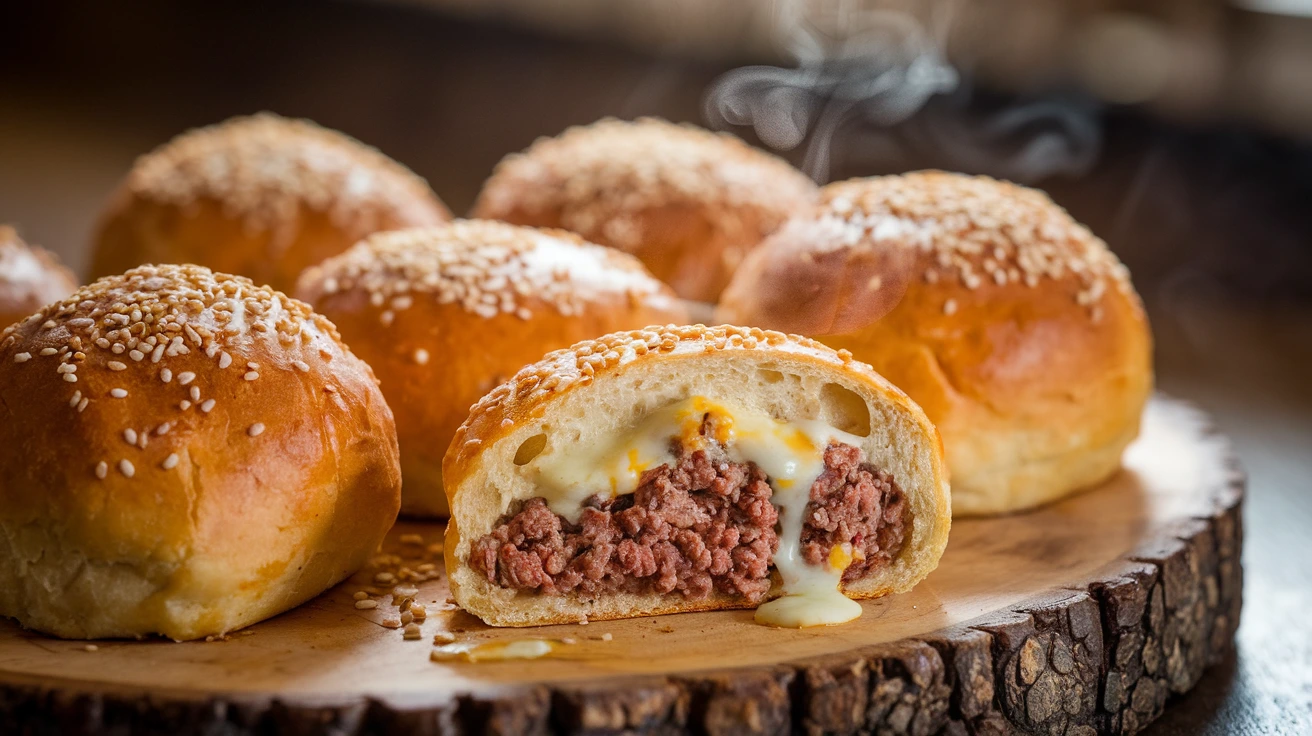
- Perfect handheld meal combining savory beef filling with gooey melted cheese
- Simple 5-ingredient filling that’s ready in just 15 minutes
- Make-ahead friendly – freeze unbaked rolls for quick weeknight dinners
- Kid-approved recipe that adults will love too
Are you tired of the same boring dinner options? Need something that satisfies the whole family without hours in the kitchen? These Cheesy Ground Beef Stuffed Bread Rolls are the answer you’ve been looking for!
I discovered this recipe when I needed something portable for busy weeknights. The combination of seasoned ground beef and cheese wrapped in soft dough creates the perfect handheld meal, similar to my popular Ground Beef Grilled Cheese Sandwich but in a fun, portable form. Even better, you can make a batch on the weekend and freeze them for later.
Nutrition Information (Per Serving – 2 Rolls)
| Nutrient | Amount | % Daily Value |
|---|---|---|
| Calories | 420 | – |
| Protein | 22g | 44% |
| Carbohydrates | 38g | 13% |
| Fat | 19g | 24% |
| Fiber | 2g | 7% |
| Sodium | 580mg | 25% |
| Calcium | 200mg | 15% |
What You’ll Need
Ingredients
| Ingredient | Amount | Notes |
|---|---|---|
| Refrigerated pizza dough | 2 (13.8 oz) cans | Or homemade dough |
| Ground beef | 1 pound | 85/15 lean-to-fat ratio |
| Yellow onion | 1 medium | Finely diced |
| Garlic | 3 cloves | Minced |
| Cheddar cheese | 2 cups | Shredded |
| Mozzarella cheese | 1 cup | Shredded |
| Olive oil | 2 tablespoons | For cooking beef |
| Salt | 1 teaspoon | To taste |
| Black pepper | ½ teaspoon | To taste |
| Italian seasoning | 1 tablespoon | |
| Worcestershire sauce | 1 tablespoon | For depth of flavor |
| Egg | 1 large | For egg wash |
| Water | 1 tablespoon | For egg wash |
| Sesame seeds | 2 tablespoons | Optional topping |
Kitchen Tools
| Tool | Purpose |
|---|---|
| Large skillet | For cooking beef filling |
| Baking sheet | For baking bread rolls |
| Parchment paper | To prevent sticking |
| Mixing bowls | For preparing ingredients |
| Cutting board | For preparation |
| Sharp knife | For dicing onions |
| Measuring spoons | For accurate measurements |
| Measuring cups | For measuring ingredients |
| Pastry brush | For egg wash application |
| Wooden spoon | For mixing filling |
| Cooling rack | For cooling baked rolls |
Substitution Options
- Ground Beef Alternatives: Ground turkey, chicken, or plant-based meat substitute
- Cheese Options: Pepper jack for spice, Swiss for milder flavor
- Dough Alternatives: Crescent roll dough, homemade bread dough, or whole wheat dough
- Seasoning Swaps: Taco seasoning or Montreal steak seasoning instead of Italian
- Dairy-Free: Use dairy-free cheese alternatives
Step-by-Step Instructions
Preparation Phase (15 minutes)
- Preheat your oven to 375°F (190°C)
- Turn on your oven and set the temperature dial or digital controls to 375°F.
- Allow at least 10-15 minutes for the oven to fully preheat while you prepare the other ingredients.
- If you have an oven thermometer, use it to verify the temperature is accurate.
- Line a baking sheet with parchment paper
- Take a baking sheet (cookie sheet) with edges.
- Cut a piece of parchment paper to fit the size of your baking sheet.
- Place the parchment paper on the baking sheet, making sure it lies flat and covers the entire surface.
- The parchment paper prevents sticking and makes cleanup easier.
- Take the dough out of the refrigerator
- Remove the refrigerated pizza dough from the refrigerator.
- Let it sit at room temperature for about 15 minutes.
- This makes the dough more pliable and easier to work with.
- Keep the dough in its packaging until you’re ready to use it.
- Prepare your workspace
- Clear a clean, flat surface on your counter.
- Make sure you have at least 2 feet of space to work with.
- Wash your hands thoroughly with soap and water.
- Have all your tools within easy reach.
- Dice the onion
- Cut off both ends of the onion and remove the outer papery skin.
- Cut the onion in half from top to bottom.
- Place each half flat-side down on your cutting board for stability.
- Make vertical cuts about ¼-inch apart, being careful not to cut all the way through.
- Make horizontal cuts about ¼-inch apart.
- Finally, cut across the onion to create small, uniform diced pieces.
- Aim for pieces about ¼-inch in size – larger pieces won’t cook as quickly.
- Mince the garlic cloves
- Separate the garlic cloves from the head.
- Place the flat side of your knife on each clove and press firmly to crush it slightly.
- This makes the skin easier to remove.
- Peel off the papery skin completely.
- Chop the garlic roughly.
- Continue chopping with your knife in a rocking motion until the garlic pieces are very fine (about 1/16 inch).
- Keep chopping until all pieces are uniform in size.
- Combine the shredded cheeses
- Measure out 2 cups of shredded cheddar cheese using a measuring cup.
- Measure out 1 cup of shredded mozzarella cheese.
- Place both cheeses in a medium bowl.
- Mix them together with your hands or a spoon until well combined.
- Set aside for later use.
- Mix egg and water for egg wash
- Crack one large egg into a small bowl.
- Add 1 tablespoon of water to the egg.
- Beat with a fork until completely combined and slightly frothy.
- This egg wash will give your bread rolls a golden, shiny finish.
Cooking the Filling (10 minutes)
- Heat olive oil in a large skillet
- Place your skillet on the stove over medium-high heat.
- Add 2 tablespoons of olive oil to the pan.
- Allow the oil to heat until it shimmers slightly (about 1-2 minutes).
- To test if it’s hot enough, add a tiny piece of onion – it should sizzle immediately.
- Add diced onions to the hot oil
- Carefully add all your diced onions to the hot skillet.
- Use a wooden spoon to spread them evenly across the pan.
- Cook for 2-3 minutes, stirring occasionally.
- The onions should become translucent (see-through) but not brown.
- If they start to brown too quickly, reduce the heat slightly.
- Add minced garlic to the onions
- Once onions are softened, add all the minced garlic to the pan.
- Stir continuously for 30 seconds.
- The garlic should become fragrant but not brown.
- Be very careful at this stage – garlic burns easily and becomes bitter.
- If the pan seems too hot, lift it off the heat for a few seconds while stirring.
- Add ground beef to the pan
- Add the entire pound of ground beef to the skillet with the onions and garlic.
- Use a wooden spoon to break the meat into small pieces.
- Continue breaking up large chunks as the meat cooks.
- Aim for pieces no larger than a small marble for even cooking.
- Season the beef while cooking
- Sprinkle 1 teaspoon of salt evenly over the cooking meat.
- Add ½ teaspoon of black pepper.
- Sprinkle 1 tablespoon of Italian seasoning over the mixture.
- Stir well to distribute the seasonings throughout the meat.
- Cook beef thoroughly until no pink remains
- Continue cooking the beef for 5-7 minutes, stirring occasionally.
- Break up any remaining chunks with your wooden spoon.
- The beef should change from pink/red to a brown color throughout.
- No pink should remain when the beef is fully cooked.
- If you have a meat thermometer, the internal temperature should reach 160°F (71°C).
- Stir in Worcestershire sauce
- Measure 1 tablespoon of Worcestershire sauce.
- Pour it evenly over the cooked beef mixture.
- Stir well to incorporate it throughout the meat.
- Cook for another minute to allow the flavors to combine.
- This adds a rich, savory depth to the filling.
- Remove from heat and cool
- Turn off the heat under the skillet.
- Move the skillet to a cool burner if possible.
- Allow the mixture to cool for about 5 minutes.
- This cooling period is important – if the filling is too hot, it will melt the cheese too quickly during assembly and could make the dough soggy.
- Drain excess fat if necessary
- If there’s a lot of liquid or fat in the pan, hold the lid slightly ajar and carefully drain the excess into a heat-safe container.
- Never pour fat down the drain – it can clog pipes.
- You want the filling to be moist but not swimming in liquid.
- A bit of fat will add flavor, but too much will make your bread rolls greasy.
Assembly (15 minutes)
- Unroll the pizza dough onto a lightly floured surface
- Sprinkle about 1 tablespoon of flour on your clean countertop or cutting board.
- Spread it around in a thin layer with your hand.
- Open the first can of pizza dough by following the package instructions.
- Carefully unroll or place the dough onto your floured surface.
- If the dough is sticking to itself, gently pull it apart.
- Repeat with the second can of dough.
- Cut each dough sheet into 4 equal rectangles
- Use a knife or pizza cutter to divide each sheet of dough.
- First, cut each sheet in half lengthwise.
- Then cut each half crosswise to create 4 rectangles per sheet.
- You should end up with 8 rectangles total from both cans.
- Try to make them as even in size as possible for consistent cooking.
- Place beef mixture in the center of each rectangle
- Use a measuring spoon to scoop about 3 tablespoons of beef mixture.
- Place it in the center of each dough rectangle.
- Leave at least a ½-inch border of dough around all edges.
- This border is crucial for properly sealing the rolls.
- Spread the filling slightly, but don’t push it to the edges.
- Top each with cheese mixture
- Sprinkle about ¼ cup of the combined cheeses on top of each beef portion.
- Keep the cheese centered on top of the beef.
- Make sure the cheese doesn’t touch the edges of the dough.
- Don’t overfill – it might be tempting to add more, but overfilled rolls may burst during baking.
- Fold the dough over the filling
- For each rectangle, lift all four corners and bring them toward the center.
- The corners should overlap slightly in the middle.
- Think of it like folding a small package or envelope.
- If the dough seems stiff or springs back, let it rest for a minute then try again.
- Pinch all seams firmly to seal completely
- Use your fingertips to firmly pinch together all edges and seams.
- Pay special attention to the corners where seams meet.
- Press firmly enough to create a complete seal.
- Check the entire roll for any small openings or thin spots.
- If you find any, pinch or fold the dough to close them.
- This step is extremely important – unsealed rolls will leak cheese during baking.
- Place each roll seam-side down on the prepared baking sheet
- Carefully lift each sealed roll.
- Place it on your parchment-lined baking sheet with the seam side down.
- This helps prevent the seams from opening during baking.
- Space the rolls at least 2 inches apart.
- They will expand during baking, so don’t place them too close together.
- Brush the tops with egg wash
- Use a pastry brush to apply the egg wash to the top and sides of each roll.
- Cover the entire surface with a thin, even layer.
- Try not to let egg wash pool around the bottom of the rolls.
- The egg wash will give your rolls a beautiful golden brown color when baked.
- Sprinkle with sesame seeds if desired
- If using sesame seeds, sprinkle about ¼ teaspoon over the top of each roll.
- The egg wash will help the seeds stick to the dough.
- Try to distribute them evenly for a nice appearance.
- This step is optional but adds a nice texture and appearance.
Baking Phase (15-20 minutes)
- Bake in the preheated oven
- Make sure your oven has fully preheated to 375°F (190°C).
- Place the baking sheet on the middle rack of your oven.
- Set a timer for 15 minutes initially.
- Don’t open the oven door during the first 10 minutes of baking.
- Opening the door causes temperature fluctuations that can affect baking.
- Rotate the baking sheet halfway through
- After about 8-9 minutes, quickly open the oven door.
- Turn the baking sheet 180 degrees.
- This ensures even browning since most ovens have hot spots.
- Close the oven door promptly to maintain temperature.
- Check that rolls are golden brown
- After 15 minutes, check if the rolls are golden brown.
- They should be puffed up and have a shiny appearance from the egg wash.
- If they’re still pale, bake for 2-3 minutes longer.
- The total baking time should be 15-18 minutes.
- Verify internal temperature if possible
- If you have an instant-read thermometer, insert it into the center of a roll.
- The internal temperature should reach at least 160°F (71°C).
- This ensures the dough is fully cooked and the filling is hot throughout.
- If the temperature is too low, continue baking for a few more minutes.
- Remove from oven
- Once fully baked, remove the baking sheet from the oven.
- Use oven mitts or pot holders to protect your hands.
- Place the hot baking sheet on a heat-resistant surface or cooling rack.
- Be careful of hot steam that may escape from the rolls.
- Allow to cool on the baking sheet
- Let the rolls rest on the baking sheet for 5 minutes.
- This initial cooling period allows the filling to set slightly.
- The rolls are very hot inside and could burn your mouth if eaten immediately.
- During this time, the residual heat will finish cooking the centers.
- Transfer to a cooling rack
- After the initial 5-minute rest, use a spatula to transfer the rolls to a wire cooling rack.
- This allows air to circulate around the rolls, preventing soggy bottoms.
- Space them slightly apart on the rack.
- Let them cool for another 5 minutes before serving.
- Serve while still warm
- The rolls are best enjoyed while still warm but not hot.
- The cheese inside should be melted but not scalding.
- You can serve them as is or with a side of marinara sauce for dipping.
- Each person should get 2 rolls for a serving.

Troubleshooting
| Problem | Possible Cause | Solution |
|---|---|---|
| Dough tears during assembly | Dough too cold | Let dough sit at room temperature for 20-30 minutes before using |
| Cheese leaks out during baking | Seams not sealed properly | Double-check all seams and pinch firmly; use less filling if needed |
| Rolls are doughy inside | Underbaked | Bake 3-5 minutes longer; check that oven temperature is accurate |
| Filling is too runny | Not drained properly | Make sure to drain excess fat from beef; let filling cool longer |
| Bottom of rolls burn | Oven too hot | Use middle rack and check at 12 minutes; consider using two stacked baking sheets |
| Rolls look pale | No egg wash | Always use egg wash for golden color; make sure to cover entire surface |
| Filling falls out when eating | Overfilled | Use less filling; make sure to seal edges completely |
| Dough is sticky and difficult to work with | Too warm or humid | Chill dough for 5-10 minutes; use more flour on work surface |
| Cheese not melty enough | Not enough cheese or wrong type | Try my Beef Queso Mac and Cheese technique – combining multiple cheese types for the perfect melt |
Variations & Substitutions
Flavor Variations
- Taco Style
- Add 2 tablespoons taco seasoning instead of Italian
- Mix in ¼ cup corn and ¼ cup black beans
- Use Mexican blend cheese
- Serve with salsa and sour cream for dipping
- Pizza Style
- Mix in ¼ cup marinara sauce with the beef
- Add 2 tablespoons chopped pepperoni
- Use only mozzarella cheese
- Sprinkle dried oregano on top before baking
- Serve with extra marinara for dipping
- Philly Cheesesteak
- Replace ground beef with 1 pound thinly sliced beef
- Add ½ cup each sautéed green peppers and onions
- Use provolone cheese instead of cheddar
- Add a dash of hot sauce to the filling
- Breakfast Rolls
- Fill with 6 scrambled eggs instead of beef
- Add ½ cup cooked, crumbled bacon
- Use cheddar cheese only
- Sprinkle with everything bagel seasoning instead of sesame seeds
Dietary Modifications
- Gluten-Free
- Use certified gluten-free pizza dough
- Check that all seasonings are gluten-free
- Make sure Worcestershire sauce is gluten-free (some brands contain wheat)
- Low-Carb
- Wrap filling in large blanched cabbage leaves instead of dough
- Bake at 350°F for 15 minutes until heated through
- Add extra cheese on top during the last 5 minutes of baking
- Vegetarian
- Replace beef with:
- 2 cups finely chopped mushrooms, sautéed until moisture evaporates
- OR 2 cups black beans, slightly mashed
- OR 14 oz firm tofu, crumbled and sautéed until golden
- Add 1 teaspoon smoked paprika for meaty flavor
- Increase seasonings slightly for more flavor
- Replace beef with:
- Dairy-Free
- Use plant-based cheese alternatives
- Check that your dough is dairy-free (some contain milk)
- Brush with olive oil instead of egg wash if avoiding eggs
Storage & Reheating
Refrigerator Storage
- Let rolls cool completely before storing to prevent condensation.
- Place in an airtight container with a paper towel on the bottom to absorb moisture.
- Separate layers with parchment paper to prevent sticking.
- Refrigerate for up to 3 days.
- Label container with the date they were made.
Freezer Storage
- Freeze unbaked rolls:
- Place assembled, unbaked rolls on a baking sheet.
- Freeze until solid (about 2 hours).
- Transfer to freezer bags or containers.
- Label with the date and baking instructions.
- Store for up to 3 months.
- Freeze baked rolls:
- Cool completely after baking.
- Wrap individual rolls in plastic wrap.
- Place wrapped rolls in a freezer-safe container or bag.
- Label with the date.
- Freeze for up to 2 months.
Reheating Instructions
- From refrigerated:
- Microwave: Heat for 30-45 seconds on high.
- Oven: Wrap in foil and heat at 350°F for 10 minutes.
- Air fryer: 350°F for 3-4 minutes.
- From frozen (unbaked):
- Do not thaw first.
- Preheat oven to 375°F.
- Place frozen rolls on parchment-lined baking sheet.
- Brush with egg wash.
- Bake for 25-30 minutes until golden and heated through.
- From frozen (baked):
- Thaw overnight in refrigerator (recommended method).
- Reheat thawed rolls in 350°F oven for 10-15 minutes.
- For quick reheating: Microwave frozen roll for 1 minute on 50% power, then 30 seconds on high.
Safety Notes & Tips
Food Safety
- Always cook ground beef to 160°F (71°C) to eliminate harmful bacteria.
- Wash hands thoroughly after handling raw meat.
- Don’t leave assembled rolls at room temperature for more than 2 hours.
- Use separate cutting boards for meat and vegetables to prevent cross-contamination.
- Refrigerate leftovers within 2 hours of cooking.
Beginner Tips
- Read the recipe completely before starting to understand all steps.
- Prepare and measure all ingredients before you begin cooking (mise en place).
- Work with one roll at a time to prevent dough from drying out.
- Don’t overfill the rolls – less is more! Overfilled rolls often burst during baking.
- Let the filling cool slightly before adding to dough to prevent premature melting.
- If dough becomes sticky, dust hands with flour before handling.
- For even baking, make sure all rolls are similar in size.
- If you’re unsure if rolls are done, it’s better to bake a few minutes longer than to underbake.
- Rest the rolls before eating – the filling is extremely hot when first out of the oven.
Prep Time: 25 minutes | Cook Time: 20 minutes | Total Time: 45 minutes | Servings: 4 (2 rolls per person)
These Cheesy Ground Beef Stuffed Bread Rolls are perfect for busy weeknights, game day snacks, or packed lunches. With a make-ahead option and endless variations, they’ll become a family favorite!