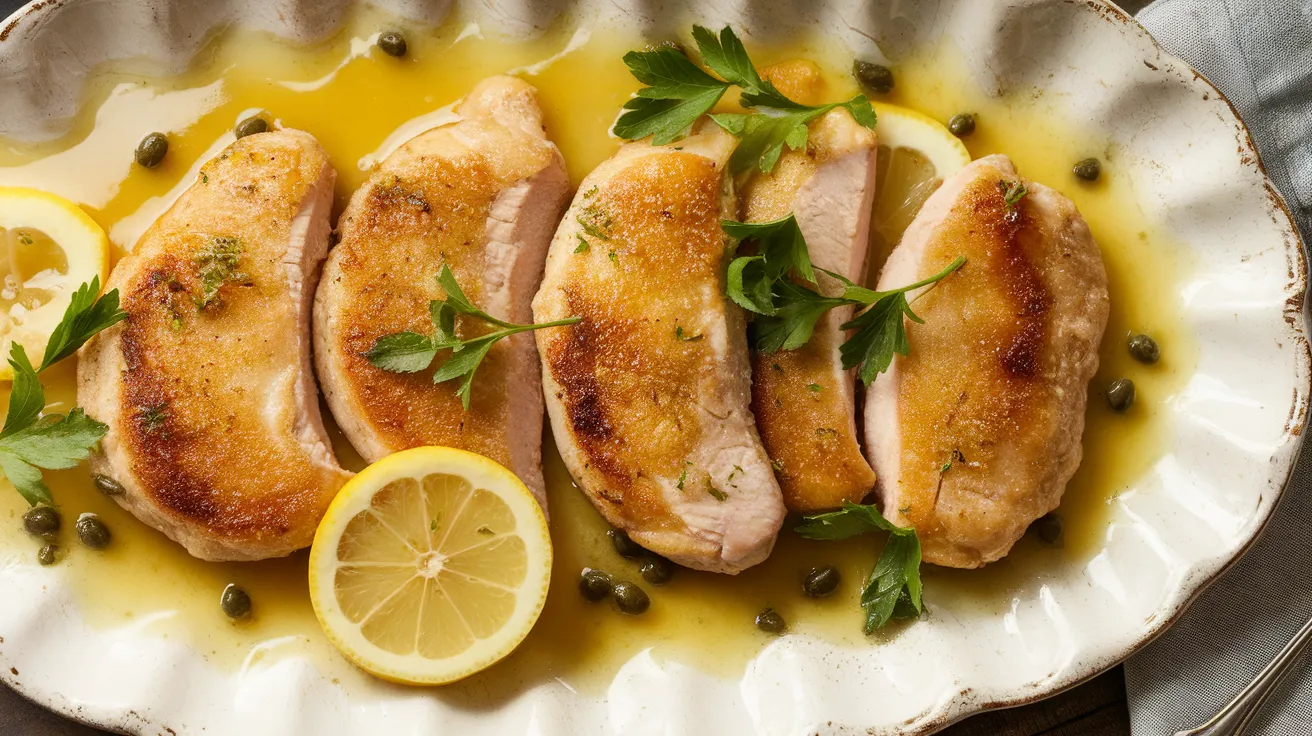
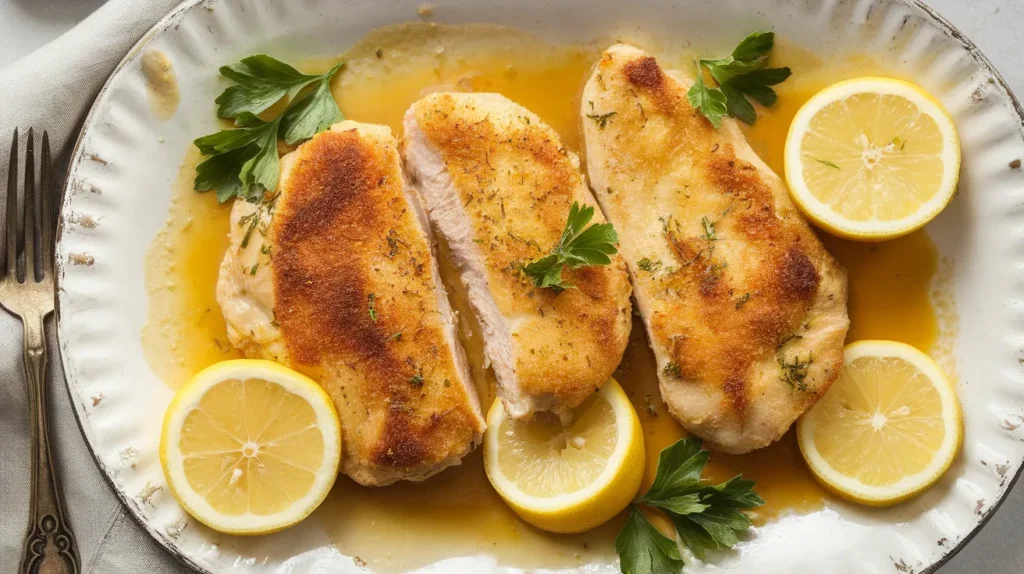
Golden, crispy chicken cutlets swimming in a silky lemon-butter sauce—this Chicken Francese recipe transforms humble ingredients into restaurant-quality magic. With tender, egg-battered chicken and a tangy sauce that begs to be soaked up with crusty bread, you’ll master this Italian-American classic in under an hour.
SERVES: 4 | PREP: 20 MIN | COOK: 25 MIN | TOTAL: 45 MIN
What You’ll Need
For the Chicken
- 4 boneless, skinless chicken breasts (about 6-8 oz each)
- 1 cup all-purpose flour (for dredging)
- 3 large eggs (beaten until frothy)
- ½ cup grated Parmesan cheese (adds nutty depth)
- 1 teaspoon salt
- ½ teaspoon black pepper
- 3 tablespoons olive oil (for frying)
- 2 tablespoons butter (for richness)
For the Lemon-Butter Sauce
- 1 cup chicken broth (low-sodium recommended)
- ½ cup dry white wine (Pinot Grigio or Sauvignon Blanc)
- ¼ cup fresh lemon juice (about 2 lemons)
- 4 tablespoons cold butter (cut into cubes)
- 2 tablespoons capers (drained, optional)
- 2 tablespoons fresh parsley (chopped, for garnish)
- Lemon slices (for serving)
Let’s Get Cooking
Phase 1: Prep Your Chicken (5 minutes)
Step 1: Place chicken breasts on a cutting board and cover with plastic wrap. Using a meat mallet or rolling pin, pound each breast to an even ¼-inch thickness. Why this matters: Even thickness means every bite cooks at the same rate, preventing dry edges and raw centers.
Step 2: Pat the pounded chicken completely dry with paper towels. Any moisture will create steam instead of a crispy crust. Season both sides with salt and pepper.
Step 3: Set up your breading station with three shallow dishes: flour in the first, beaten eggs mixed with Parmesan in the second, and a clean plate for the coated chicken. Pro tip: Keep one hand for dry ingredients and one for wet to avoid clumpy fingers.
Phase 2: Coat That Chicken (5 minutes)
Step 4: Dredge each chicken breast in flour, shaking off excess until just a light coating remains. Too much flour creates a gummy texture.
Step 5: Dip the floured chicken into the egg-Parmesan mixture, letting excess drip off for 2-3 seconds. The egg should coat evenly but not puddle.
Step 6: Place coated cutlets on your clean plate. Don’t stack them or the coating will stick and tear when you separate them.
Phase 3: Achieve Golden Perfection (12 minutes)
Step 7: Heat olive oil and 2 tablespoons butter in a large skillet over medium-high heat until shimmering but not smoking (about 350°F if you have a thermometer). Visual cue: A drop of egg mixture should sizzle immediately when it hits the pan.
Step 8: Carefully lay 2 chicken cutlets in the pan, working away from yourself to avoid oil splatter. Don’t crowd the pan—overcrowding drops the temperature and creates soggy chicken.
Step 9: Cook undisturbed for 3-4 minutes. Resist the urge to peek! The chicken will release naturally when a golden crust forms. Look for edges turning golden brown.
Step 10: Flip gently using tongs or a spatula. Cook the second side for 3 minutes until golden and the internal temperature reaches 165°F. Safety note: Chicken should feel firm when pressed lightly.
Step 11: Transfer cooked chicken to a paper towel-lined plate. Repeat with remaining cutlets, adding more oil if the pan looks dry.
Phase 4: Build That Dreamy Sauce (8 minutes)
Step 12: Reduce heat to medium and pour in white wine, scraping up any browned bits stuck to the pan—that’s pure flavor gold. Let it bubble for 1-2 minutes until reduced by half. You’ll smell: The sharp alcohol scent will mellow into a sweet, fruity aroma.
Step 13: Add chicken broth and lemon juice. Bring to a gentle simmer and cook for 3-4 minutes until the sauce reduces by one-third and coats the back of a spoon.
Step 14: Remove pan from heat. This is crucial: Add cold butter cubes one at a time, swirling the pan (not stirring) until each cube melts into the sauce. This creates that glossy, restaurant-quality finish.
Step 15: Stir in capers if using. Return chicken to the pan, spooning sauce over each piece. Let it warm through for 1-2 minutes.
Step 16: Garnish with fresh parsley and lemon slices. Serve immediately while the chicken stays crispy and the sauce stays silky.
Chef’s Notes
Butter Temperature Matters: Cold butter whisked into the sauce creates an emulsion that stays smooth and glossy. Room temperature butter will separate and look greasy.
Wine Substitution: No wine? Use an extra ½ cup chicken broth plus 1 tablespoon white wine vinegar for acidity.
Make It Restaurant-Style: For an extra elegant Chicken Francese presentation, overlap cutlets on the plate and drizzle sauce artfully across the top.
Parmesan Power: The cheese in the egg wash isn’t traditional, but it adds incredible flavor and helps the coating stick better than egg alone.
Nutrition Facts (Per Serving)
- Calories: 485
- Protein: 42g
- Carbohydrates: 18g
- Fat: 26g
Delicious Variations
Mediterranean Twist: Swap capers for Kalamata olives and add sun-dried tomatoes to the sauce. For more Italian-inspired chicken dishes, try our Chicken Milanese with arugula salad on top.
Herb Garden Version: Add fresh thyme and oregano to the flour mixture and finish the sauce with chopped basil instead of parsley.
Spicy Francese: Mix red pepper flakes into the egg wash and add a dash of hot sauce to the finished sauce for a kick.
Piccata-Style Hybrid: Double the capers and add thin lemon slices directly to the sauce for a mashup similar to our popular Chicken Piccata recipe.
Storage & Reheating
Refrigerator: Store chicken and sauce separately in airtight containers for up to 3 days. The coating softens when stored with sauce.
Freezing: Freeze cooked, cooled chicken (without sauce) for up to 2 months. Wrap individually in plastic wrap, then aluminum foil.
Reheating: For best results, reheat chicken in a 375°F oven for 8-10 minutes until crispy. Warm sauce separately in a saucepan over low heat, whisking in a tablespoon of cold butter to refresh the texture.
Make-Ahead Tip: Pound and bread the chicken up to 4 hours ahead. Keep refrigerated on a wire rack until ready to cook.
Troubleshooting Guide
Problem: Coating Falls Off During Cooking Make sure chicken is completely dry before breading. Let coated cutlets rest for 5 minutes before cooking—this helps the coating adhere. Don’t flip too early; wait for a golden crust to form.
Problem: Chicken Turns Out Dry Don’t overcook beyond 165°F internal temperature. Pounding to even ¼-inch thickness is critical—thicker parts dry out while thinner sections cook perfectly.
Problem: Sauce Looks Broken or Greasy This happens when butter is added over heat or isn’t cold enough. Remove the pan completely from heat and use ice-cold butter cubes, swirling constantly.
Problem: Egg Coating Is Too Thick and Gummy You’re using too much egg mixture. Let excess drip off for a full 3 seconds before placing in the pan. The coating should be thin and delicate.
Problem: Sauce Tastes Too Acidic Balance with an extra tablespoon of butter or a pinch of sugar. Next time, reduce lemon juice by 1 tablespoon—lemon intensity varies by fruit.
Equipment Essentials
- Meat mallet or rolling pin (for pounding)
- Large skillet (12-inch works best)
- Three shallow bowls (for breading station)
- Instant-read thermometer (ensures perfect doneness)
- Tongs or fish spatula (for flipping)
- Wire cooling rack (optional, for make-ahead)
Shopping List
Meat Department
- 4 boneless, skinless chicken breasts (6-8 oz each)
Dairy Section
- 3 large eggs
- 7 tablespoons butter (1 stick minus 1 tablespoon)
- ½ cup grated Parmesan cheese
Pantry Aisle
- 1 cup all-purpose flour
- Salt and black pepper
- Olive oil
Produce Section
- 2 fresh lemons
- Fresh parsley bunch
Wine/Spirits Section
- 1 bottle dry white wine (Pinot Grigio or Sauvignon Blanc)
Canned Goods
- 1 cup low-sodium chicken broth
Condiments (Optional)
- Capers
Success Secrets
1. Temperature Control Is Everything Keep your oil between 325-350°F. Too hot and the coating burns before the chicken cooks through. Too cool and you’ll get greasy, soggy results.
2. The Rest Period Saves Your Coating After breading, let chicken rest for 5-10 minutes in the fridge. This allows the egg to set slightly, creating a coating that won’t slide off.
3. Don’t Skip the Deglazing Those brown bits stuck to the pan after frying? That’s concentrated chicken flavor. The wine dissolves them into your sauce—pure magic.
4. Cold Butter Creates Silk The French call it “monter au beurre”—mounting with butter. This technique turns a thin sauce into luxurious velvet. Always use cold butter off the heat.
5. Serve Immediately for Maximum Impact Chicken Francese waits for no one. The contrast between crispy chicken and silky sauce is most dramatic within 5 minutes of plating. Have your sides ready before you start cooking.
This Chicken Francese recipe proves you don’t need a culinary degree to create restaurant-worthy Italian-American classics at home. The combination of crispy, tender chicken and that bright, buttery sauce will have everyone asking for seconds—and the recipe.