Prep Time: 20 minutes | Cook Time: 5 hours | Total Time: 5 hours 20 minutes | Servings: 4
- No more boring chicken soup! This Chicken French Onion Soup Slow Cooker Recipe transforms classic French onion soup with tender chicken for a hearty, complete meal
- Set it and forget it – Your slow cooker does all the work while you enjoy rich caramelized onion flavor without constant stirring
- Perfectly balanced – Sweet onions, savory broth, tender chicken, and gooey cheese create an irresistible flavor profile
- Beginner-friendly – Simple techniques with clear instructions ensure success even for first-time cooks
Why This Chicken French Onion Soup Slow Cooker Recipe Will Become Your New Favorite
Ever tried to make traditional French onion soup? The constant stirring and watching over caramelizing onions can eat up your whole afternoon.
This Chicken French Onion Soup Slow Cooker recipe solves that problem.
By combining the rich flavor of French onion soup with protein-packed chicken and the convenience of a slow cooker, you get an impressive meal that practically makes itself. The slow cooker method allows the onions to caramelize gently while the chicken becomes incredibly tender.
With this Chicken French Onion Soup Slow Cooker Recipe, you’ll create a restaurant-quality dish with minimal effort. Perfect for busy weeknights or impressive enough for weekend guests. If you enjoy creative chicken dishes, you’ll find this just as satisfying as my chicken tenders and fries but with a sophisticated twist.
Nutrition Information Per Serving
| Nutrient | Amount | % Daily Value |
|---|---|---|
| Calories | 385 | – |
| Total Fat | 16g | 21% |
| Saturated Fat | 8g | 40% |
| Cholesterol | 98mg | 33% |
| Sodium | 890mg | 39% |
| Total Carbohydrates | 24g | 9% |
| Dietary Fiber | 3g | 11% |
| Sugars | 9g | – |
| Protein | 36g | 72% |
What You’ll Need for Chicken French Onion Soup Slow Cooker Recipe
Ingredients
| Ingredient | Amount | Notes |
|---|---|---|
| Boneless, skinless chicken thighs | 1½ pounds (about 6-8 thighs) | Trimmed of excess fat |
| Yellow onions | 3 large (about 2 pounds) | Thinly sliced |
| Garlic | 4 cloves | Minced |
| Beef broth | 4 cups | Low-sodium preferred |
| Chicken broth | 2 cups | Low-sodium preferred |
| Dry white wine | ½ cup | Can substitute more broth |
| Worcestershire sauce | 2 tablespoons | Adds depth |
| Fresh thyme | 4 sprigs | Or 1 teaspoon dried |
| Bay leaves | 2 | Remove before serving |
| Olive oil | 2 tablespoons | For sautéing onions |
| Butter | 2 tablespoons | Adds richness |
| All-purpose flour | 2 tablespoons | For thickening |
| Salt | 1 teaspoon | Adjust to taste |
| Black pepper | ½ teaspoon | Freshly ground |
| Gruyère cheese | 8 ounces | Shredded (about 2 cups) |
| French baguette | 1 small | Cut into 8 slices |
Kitchen Equipment
| Equipment | Purpose |
|---|---|
| 6-quart slow cooker | Main cooking vessel |
| Large skillet | For pre-caramelizing onions |
| Sharp knife | For slicing onions and chicken |
| Cutting board | For prep work |
| Measuring cups and spoons | For accurate measurements |
| Wooden spoon | For stirring |
| Ladle | For serving |
| Oven-safe bowls | For broiling cheese topping (optional) |
| Baking sheet | For toasting bread slices |
| Meat thermometer | To check chicken doneness |
| Heat-resistant mitts | For handling hot dishes |
| Paper towels | For patting chicken dry |
Ingredient Substitutions
- Gruyère cheese: Swiss cheese or provolone work well
- Chicken thighs: Boneless chicken breasts can be used (reduce cooking time by 30 minutes)
- White wine: Apple cider, extra broth, or 1 tablespoon white wine vinegar mixed with broth
- Fresh thyme: 1 teaspoon dried thyme or ½ teaspoon herbs de Provence
- Yellow onions: Sweet onions or a mix of yellow and red onions
Step-by-Step Chicken French Onion Soup Slow Cooker Instructions (Beginner Detailed Guide)
Preparation Phase (20 minutes)
- Get organized
- Clear your kitchen counters to create ample workspace
- Read through the entire recipe twice before starting
- Take out all ingredients from the refrigerator 15 minutes before beginning
- Place your slow cooker on a heat-resistant surface with access to an outlet
- Gather all ingredients
- Arrange all ingredients on your counter by preparation stage
- Double-check that you have everything listed in the ingredients table
- Make sure your measuring cups and spoons are clean and ready
- Beginner tip: Pre-measure ingredients into small bowls to stay organized
- Prepare your tools
- Plug in and turn on your slow cooker to ensure it’s working properly
- Place cutting board on a stable surface
- Wet a kitchen towel and place it under the cutting board to prevent slipping
- Sharpen your knife if needed for safer, more efficient cutting
- Prepare the onions
- Place one onion on the cutting board, root end intact
- Cut off the stem end (the non-root end)
- Stand the onion on the flat cut end
- Cut the onion in half from top to bottom through the root
- Peel off the papery skin and discard
- Place each half flat-side down on the cutting board
- Make thin slices (1/4-inch) across each half, from one end to the other
- Beginner tip: Keep your fingers curled under while slicing to avoid cuts
- Repeat with all onions, placing sliced onions in a large bowl
- Warning: If your eyes water, briefly step away or use onion goggles
- Prepare the garlic
- Place each garlic clove on the cutting board
- Place the flat side of your knife blade on top of the clove
- Carefully press down firmly with the heel of your hand to crush the clove
- Peel off and discard the skin
- Finely chop each clove by rocking the knife back and forth over the garlic
- Beginner tip: Keep garlic separate from onions until needed
- Alternative method: Use a garlic press if you have one
- Prepare the chicken
- Line a plate with paper towels
- Open chicken package and drain any excess liquid
- Lay each chicken thigh flat on the cutting board
- Using your fingers or kitchen scissors, trim away any visible fat
- Pat each thigh dry on both sides with paper towels (this helps with seasoning)
- Cut each thigh into 2-3 even pieces, about 2 inches each
- Place chicken pieces in a clean bowl
- Sprinkle with ½ teaspoon salt and ¼ teaspoon pepper
- Toss gently to coat evenly
- Food safety tip: Wash hands thoroughly after handling raw chicken
- Food safety tip: Sanitize cutting board and knife after cutting chicken
- Prepare the bread
- Place baguette on cutting board
- Using a serrated knife, cut 8 even slices, each about ½-inch thick
- Place slices in a clean, dry bowl and set aside for later
- Beginner tip: If baguette is very fresh, slicing is easier; if it’s day-old, expect some crumbs
- Prepare herb and seasoning station
- Count out 4 sprigs of fresh thyme and rinse under cold water
- Pat dry with paper towels
- Count out 2 bay leaves and set aside
- Fill a small bowl with remaining salt and pepper for adjusting seasoning later
- Beginner tip: Keep all small ingredients visible in a dedicated area
Pre-Cooking Phase (15 minutes)
- Heat your pan properly
- Place large skillet on stovetop
- Turn heat to medium
- Allow pan to heat for 2 minutes before adding fat
- Beginner tip: To test if pan is hot enough, sprinkle a few drops of water—they should sizzle and evaporate quickly
- Add fats to the pan
- Add 2 tablespoons olive oil to the hot pan
- Add 2 tablespoons butter
- Allow butter to melt completely, swirling occasionally
- Beginner tip: The butter should sizzle but not brown—if it browns immediately, your pan is too hot
- Begin cooking onions
- Add all sliced onions to the pan
- Using tongs or a wooden spoon, spread onions evenly across the pan
- Sprinkle with ½ teaspoon salt to help draw out moisture
- Beginner tip: The pan will be very full at first—this is normal, onions will shrink
- Let onions sit for 1 minute, then stir
- Continue cooking onions
- Stir onions every 2-3 minutes to prevent burning
- Cook for 10-15 minutes total, until onions become soft and translucent
- They should begin to turn golden but not dark brown
- Beginner tip: If onions are browning too quickly, reduce heat slightly
- Beginner tip: If onions stick to pan, add 1 tablespoon water and scrape the bottom
- Add garlic to onions
- Once onions are soft and beginning to caramelize, add all minced garlic
- Stir continuously for 60 seconds
- Warning: Garlic burns easily and becomes bitter, so watch carefully
- Beginner tip: You should smell the fragrant garlic aroma but it shouldn’t brown
- Create the roux for thickening
- Sprinkle 2 tablespoons flour evenly over the onion-garlic mixture
- Stir continuously for 2 minutes to cook the flour
- The mixture will become pasty and slightly thicker
- Continue stirring to prevent flour from burning
- Beginner tip: The roux should turn light golden but not brown
- Beginner tip: Make sure to reach the edges of the pan while stirring
Slow Cooker Assembly (10 minutes)
- Transfer onion mixture carefully
- Turn off heat under the skillet
- Check that your slow cooker is plugged in
- Using oven mitts, pick up the skillet
- Use a wooden spoon or silicone spatula to transfer onion mixture into slow cooker
- Scrape the bottom and sides of the pan thoroughly to get all the flavorful bits
- Warning: The skillet handle will be very hot—use proper protection
- Add the liquids step by step
- Measure 4 cups beef broth in a measuring cup
- Pour slowly into the slow cooker
- Measure 2 cups chicken broth and add to slow cooker
- Measure ½ cup dry white wine and add to slow cooker
- Measure 2 tablespoons Worcestershire sauce and add to slow cooker
- Beginner tip: Add liquids gradually to avoid splashing
- Stir the mixture thoroughly
- Use a wooden spoon to stir all ingredients together
- Scrape the bottom of the slow cooker to ensure nothing is sticking
- Stir for at least 30 seconds to fully incorporate the onion mixture with the liquids
- The broth should be a light brown color and slightly thickened
- Beginner tip: If you see any flour clumps, press them against the side of the slow cooker and stir vigorously to dissolve
- Add herbs and seasonings
- Gently place the 4 thyme sprigs on top of the liquid
- Add 2 bay leaves
- Add ¼ teaspoon black pepper
- Important: Do not add more salt at this stage—wait until the end
- Beginner tip: Count out herbs as you add them so you know how many to remove later
- Add the chicken properly
- Pick up each piece of seasoned chicken individually
- Place chicken pieces into the liquid, spacing them evenly
- Using a spoon, gently push all chicken pieces below the surface of the liquid
- Critical step: All chicken must be fully submerged for safe, even cooking
- Food safety warning: Wash hands immediately after handling raw chicken
- Prepare for cooking
- Check that all ingredients are in the slow cooker
- Make sure the liquid level is at least 1 inch below the rim of the slow cooker
- Wipe away any spills or drips from the outside of the slow cooker
- Beginner tip: Take a photo of your assembled ingredients for future reference
Slow Cooking Phase (5 hours)
- Set up your slow cooker correctly
- Place the lid securely on the slow cooker
- Ensure it’s seated properly with no gaps
- Press the “Low” setting button on your slow cooker
- Set the timer for 5 hours
- Verify the slow cooker is heating (some models have an indicator light)
- Note the start time on a piece of paper or set a separate timer
- Beginner tip: Different slow cooker models may have different controls—refer to your manual if needed
- During the cooking process
- Keep the lid on at all times
- Critical warning: Do not open the lid during cooking as each peek can add 15-20 minutes to cooking time
- Ensure the slow cooker remains plugged in
- Keep children and pets away from the hot appliance
- Safety tip: The exterior of the slow cooker will become hot—maintain a clear space around it
- Check for doneness safely
- After 5 hours, turn off the slow cooker
- Put on heat-resistant mitts
- Carefully lift the lid away from your face to avoid steam burns
- Use a clean fork to check if chicken is tender
- Insert an instant-read thermometer into the thickest piece of chicken
- The temperature should read at least 165°F for food safety
- Beginner tip: The fork should easily pierce the chicken, and the meat should start to fall apart
- If chicken isn’t fully cooked
- If temperature is below 165°F or chicken isn’t tender
- Replace the lid
- Turn slow cooker back on to Low setting
- Cook for additional 30-minute increments
- Check temperature again after each increment
- Food safety warning: Never serve undercooked chicken
- Shred the chicken properly
- Once chicken is fully cooked, keep it in the slow cooker
- Use two forks to pull the chicken pieces apart
- Hold one fork stationary while pulling with the other
- Continue until all pieces are shredded to desired consistency
- Stir gently to distribute shredded chicken throughout the soup
- Beginner tip: For finer shreds, use two forks; for chunkier pieces, use one fork
- Remove herbs
- Using tongs or a fork, find and remove all thyme sprigs
- Find and remove both bay leaves
- Count to ensure you’ve removed the correct number
- Important warning: Bay leaves can be a choking hazard if left in the soup
- Final seasoning adjustments
- Using a clean spoon, carefully taste the broth
- Warning: Blow on the spoon first to avoid burning your mouth
- Add additional salt if needed, ¼ teaspoon at a time
- Add additional pepper if needed, ⅛ teaspoon at a time
- Stir and taste again after each addition
- Beginner tip: It’s easier to add more seasoning than to fix over-salted soup
- Keep soup warm
- Once properly seasoned, switch slow cooker to “Warm” setting
- This maintains serving temperature without continued cooking
- Beginner tip: Soup can be held on warm setting for up to 2 hours
Finishing Touches (10 minutes)
- Position oven rack and preheat broiler
- Move oven rack to the top position, about 6 inches from the broiler
- Turn on the broiler to high
- Allow broiler to preheat for 5 minutes
- Beginner tip: Some ovens have a separate broiler drawer—check your oven’s design
- Prepare baking sheet for bread
- Line a baking sheet with aluminum foil or parchment paper
- Arrange baguette slices in a single layer, not touching
- Beginner tip: If using parchment, check that it’s broiler-safe
- Toast bread carefully
- Place baking sheet with bread under broiler
- Leave oven door slightly ajar to watch the toasting process
- Broil for 1-2 minutes until top side is golden brown
- Using oven mitts, remove baking sheet
- Carefully flip each bread slice using tongs
- Return to broiler for another 1-2 minutes to toast second side
- Critical warning: Never leave bread unattended under the broiler—it can burn in seconds
- Prepare serving bowls
- Set out 4 oven-safe soup bowls or crocks on a baking sheet
- The baking sheet makes it easier to move multiple bowls
- Beginner tip: If you don’t have oven-safe bowls, you can add the cheese topping to the bread separately
- Ladle soup properly
- Using a ladle, fill each bowl about ¾ full with soup
- Ensure each serving has equal amounts of broth and chicken
- Leave space at the top for bread and cheese
- Beginner tip: Place a plate under the ladle when moving between pot and bowl to catch drips
- Add bread to each bowl
- Place 1-2 toasted bread slices on top of each soup bowl
- The bread should float on the surface
- Beginner tip: If bread is too large, break it to fit within the rim of the bowl
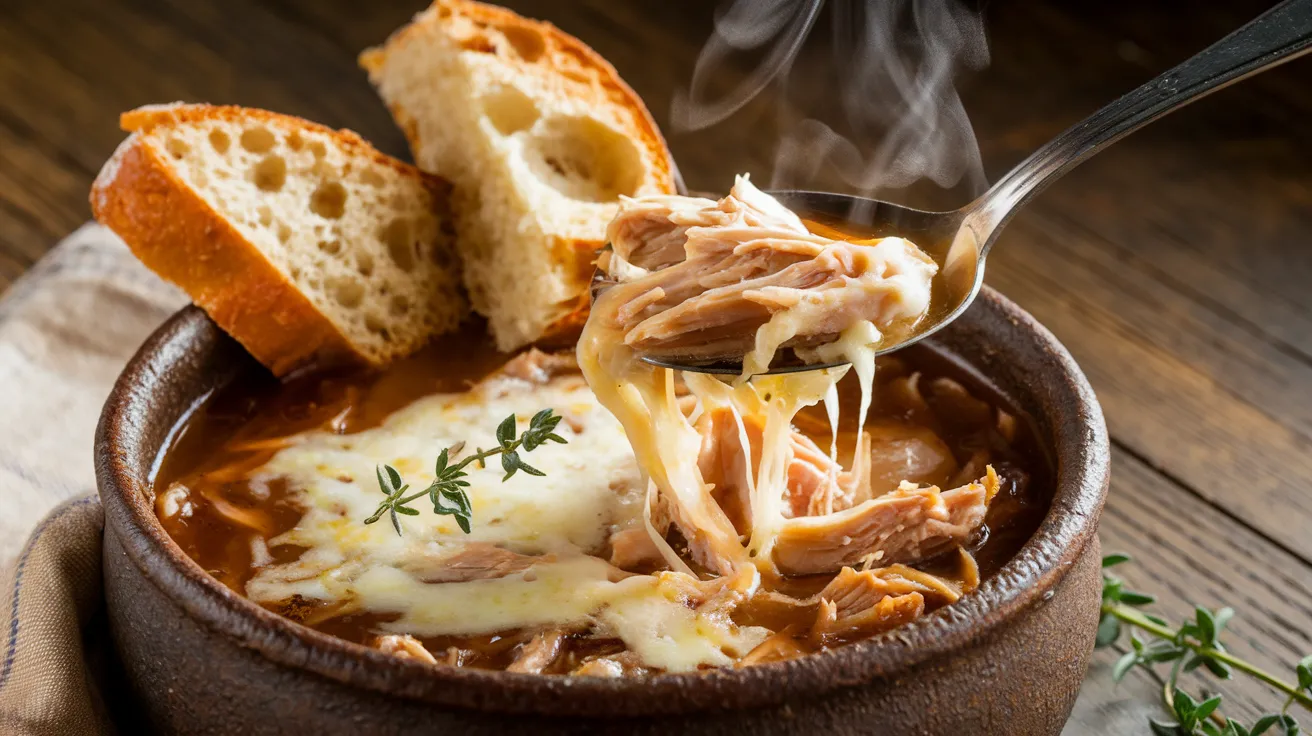
- Add cheese topping
- Sprinkle shredded Gruyère cheese evenly over the bread in each bowl
- Use about ½ cup of cheese per bowl
- Make sure cheese covers the bread completely and touches the edge of the bowl
- Beginner tip: For the best melting, bring cheese to room temperature before using
- Broil the soup safely
- Place the baking sheet with filled soup bowls under the broiler
- Broil for 2-3 minutes, watching constantly
- Remove when cheese is bubbly and has golden brown spots
- Critical warning: The bowls will be EXTREMELY hot
- Warning: Use proper oven mitts with full hand coverage when removing
- Serve safely
- Using heat-resistant mitts, remove baking sheet from oven
- Place each hot bowl on a plate or heat-resistant placemat
- Allow to cool for 2-3 minutes before serving
- Critical warning: Inform everyone that bowls are very hot
- Beginner tip: Provide a napkin or small plate for the spoon rest
- Optional garnish
- Sprinkle a few fresh thyme leaves on top if desired
- Offer freshly ground black pepper at the table
- Beginner tip: Fresh herbs add visual appeal and a burst of flavor

Troubleshooting Your Chicken French Onion Soup Slow Cooker Recipe
| Problem | Solution |
|---|---|
| Onions aren’t caramelized enough | Next time, cook onions longer in the pre-caramelization step or increase slow cooker time by 1 hour |
| Soup is too thin | Mix 1 tablespoon cornstarch with 2 tablespoons cold water, add to soup, and cook on HIGH for 15 minutes |
| Soup is too thick | Add ½ cup additional broth and stir well |
| Chicken is tough | Cook 1-2 hours longer; chicken thighs become more tender with extended cooking |
| Too salty | Add a peeled, quartered potato to absorb excess salt, then remove before serving |
| Bread gets soggy too quickly | Toast bread longer or serve it on the side for dipping |
| Cheese isn’t melting properly | Check that broiler is fully heated; use room temperature cheese; use a coarser grate |
| Slow cooker isn’t heating | Check that it’s plugged in and the outlet works; press settings again |
| Ran out of baguette | Use any crusty bread, toast thick slices of regular bread, or even use croutons |
| Soup burned on the bottom | Don’t stir—carefully ladle the unburned portion into a different container |
Variations & Substitutions
Vegetarian Option
Replace chicken with 2 cans of drained, rinsed chickpeas and use vegetable broth instead of beef/chicken broth.
Gluten-Free Version
Use gluten-free bread and replace the flour with 1 tablespoon cornstarch mixed with 1 tablespoon water.
Low-Carb Adaptation
Skip the bread and serve with extra cheese or use low-carb bread alternatives.
Spicy Twist
Add ½ teaspoon red pepper flakes or a diced jalapeño to the onions during pre-caramelization. This adds a kick similar to what you might find in my smothered chicken recipe but with a French-inspired flavor profile.
Mediterranean Variation
Add 1 teaspoon dried oregano, ½ cup diced tomatoes, and finish with crumbled feta instead of Gruyère.
Herbed Chicken Version
Add 1 teaspoon each of dried rosemary and sage to the chicken seasoning for more herb flavor.
Storage & Reheating
Refrigeration
- Allow soup to cool for no more than 2 hours at room temperature
- Transfer soup (without bread and cheese) to airtight containers
- Leave ½-inch space at the top of containers for expansion
- Label containers with name and date
- Refrigerate for up to 3 days
- Store bread and cheese separately
Freezing
- Use freezer-safe containers with tight-fitting lids
- Freeze soup portion only (no bread or cheese)
- Leave 1-inch headspace for expansion
- Label with name and date
- Good for up to 3 months
- Thaw overnight in refrigerator before reheating
- Beginner tip: Freeze in individual portions for easier reheating
Reheating
Stovetop Method:
- Pour soup into a pot with a heavy bottom
- Heat over medium-low heat
- Stir occasionally to prevent scorching
- Heat until bubbling and temperature reaches 165°F (about 5-7 minutes)
- Toast fresh bread and add new cheese for serving
Microwave Method:
- Place soup in a microwave-safe bowl
- Cover loosely with a microwave-safe lid or paper towel
- Heat at 70% power for 2 minutes
- Stir thoroughly
- Continue heating in 1-minute intervals until hot throughout (165°F)
- Beginner tip: The bowl will be hot—use mitts to remove
Slow Cooker Reheating:
- Place refrigerated soup in slow cooker
- Set to LOW for 1-2 hours until hot
- Prepare fresh bread and cheese when ready to serve
Safety Notes & Tips
Safety Notes
- Always wash hands before and after handling raw chicken
- Keep raw chicken separate from other ingredients
- Sanitize cutting boards and knives after contact with raw chicken
- Always verify chicken reaches 165°F internal temperature
- Use heat-resistant mitts when handling hot bowls or the slow cooker
- Keep the slow cooker cord away from edges and out of reach of children
- Place slow cooker on a heat-resistant surface away from paper or cloth items
- Allow soup to cool before refrigerating (within 2 hours of cooking)
- Never place hot soup directly in the refrigerator
- Keep face and hands away when removing slow cooker lid to avoid steam burns
Pro Tips
- For deeper flavor: Deglaze the onion pan with ¼ cup of wine, then add to slow cooker
- Make ahead: Prepare through slow cooking, refrigerate, then reheat and add bread/cheese before serving
- For extra richness: Add a splash of heavy cream (about 2 tablespoons) before serving
- Flavor boost: Use homemade stock if available
- Time saver: Slice onions the night before and refrigerate in an airtight container
- Better browning: Let cheese come to room temperature before broiling
- For more depth: Add 1 tablespoon tomato paste to the onions when adding garlic
- Serving suggestion: Pair with a simple green salad dressed with vinaigrette
- Ideal timing: Start this recipe in the late morning for dinner service
- Presentation upgrade: Serve in individual French onion soup crocks if available
For an even simpler but equally tasty chicken dish, try my Dorito chicken when you want something quick and family-friendly that still delivers amazing flavor.
This Chicken French Onion Soup Slow Cooker Recipe combines comfort food with convenience. The rich broth, tender chicken, sweet caramelized onions, and gooey melted cheese create a satisfying meal that feels special enough for company but easy enough for weeknights.