Picture this: tender chicken breasts swimming in a velvety white sauce that clings to every bite, ready in less time than ordering takeout. This chicken with white sauce recipe transforms simple ingredients into restaurant-quality comfort food that’ll have everyone asking for seconds. Whether you’re cooking for a weeknight dinner or impressing guests, this foolproof chicken with white sauce delivers creamy, savory perfection every single time.
SERVES: 4 | PREP: 15 MIN | COOK: 25 MIN | TOTAL: 40 MIN
Ingredients You’ll Need
For the Chicken
| Ingredient | Amount | Notes |
|---|---|---|
| Chicken breasts | 4 medium (6-7 oz each) | Boneless, skinless |
| All-purpose flour | ½ cup | For dredging |
| Salt | 1 teaspoon | Plus more to taste |
| Black pepper | ½ teaspoon | Freshly ground |
| Paprika | ½ teaspoon | Sweet or smoked |
| Olive oil | 2 tablespoons | For searing |
| Butter | 2 tablespoons | Adds richness |
For the White Sauce
| Ingredient | Amount | Notes |
|---|---|---|
| Butter | 3 tablespoons | Unsalted preferred |
| Garlic cloves | 4 large | Minced fine |
| All-purpose flour | 3 tablespoons | Creates the roux |
| Chicken broth | 1½ cups | Low-sodium recommended |
| Heavy cream | 1 cup | Full-fat for best results |
| Parmesan cheese | ½ cup | Freshly grated |
| Fresh thyme | 2 teaspoons | Or 1 tsp dried |
| White wine | ¼ cup | Optional but recommended |
| Salt & pepper | To taste | Adjust at the end |
Step-by-Step Instructions
Phase 1: Preparing the Chicken (5 minutes)
Step 1: Remove chicken breasts from refrigerator and let sit at room temperature for 10 minutes. This ensures even cooking throughout—cold chicken creates a raw center while the outside overcooks.
Step 2: Place each chicken breast between two sheets of plastic wrap or parchment paper. Using a meat mallet or heavy skillet, pound to an even ¾-inch thickness. Why this matters: Even thickness means every part cooks at the same rate, preventing dry edges and raw middles.
Step 3: In a shallow dish, combine flour, salt, pepper, and paprika with a fork until evenly distributed. Set up your dredging station near the stove for smooth workflow.
Step 4: Pat each chicken breast completely dry with paper towels. Moisture is the enemy of a good sear—dry chicken creates that beautiful golden crust.
Step 5: Dredge each chicken breast in the seasoned flour, pressing gently so the coating sticks. Shake off excess flour (too much creates gummy clumps in your sauce later). Let coated chicken rest on a plate for 2 minutes so the coating adheres properly.
Phase 2: Searing the Chicken (10 minutes)
Step 6: Heat a large skillet (12-inch works perfectly) over medium-high heat for 2 minutes. Add olive oil and butter, swirling until butter melts and foam subsides. Temperature check: Oil should shimmer but not smoke—that’s your sweet spot.
Step 7: Carefully lay chicken breasts in the pan, leaving at least 1 inch between each piece. Don’t move them for 5 full minutes—this develops that gorgeous golden-brown crust. Listen for the sizzle: A steady sizzle means perfect temperature; silence means too cool; violent spattering means too hot.
Step 8: Flip chicken using tongs (not a fork—you’ll lose precious juices). Cook second side for 4-5 minutes until internal temperature reaches 165°F on an instant-read thermometer. The chicken should feel firm but still slightly springy when pressed.
Step 9: Transfer chicken to a clean plate and tent loosely with foil. Don’t stack the pieces—trapped steam makes the crust soggy. Pro tip: They’ll continue cooking while resting, reaching perfect doneness.
Phase 3: Building the White Sauce (10 minutes)
Step 10: In the same skillet (don’t clean it—those brown bits are flavor gold), reduce heat to medium. Add 3 tablespoons butter and let melt completely, scraping up any stuck-on bits with a wooden spoon.
Step 11: Add minced garlic and cook for 45 seconds, stirring constantly. Your kitchen should smell amazing, but watch carefully—burnt garlic tastes bitter and ruins everything. Visual cue: Garlic should be fragrant and just barely golden, not brown.
Step 12: Sprinkle in 3 tablespoons flour while stirring continuously. Cook this roux for 2 minutes, stirring constantly in a figure-eight pattern. What you’re looking for: The mixture should turn from white to light golden and smell nutty, not raw and floury.
Step 13: If using wine, pour it in now while stirring vigorously. Let it bubble and reduce by half (about 1 minute)—this cooks off the alcohol while keeping the flavor.
Step 14: Slowly pour in chicken broth while whisking constantly. Add it in three parts, whisking smooth after each addition. Critical technique: Slow addition prevents lumps from forming in your sauce.
Step 15: Once smooth, stir in heavy cream and bring to a gentle simmer. Temperature warning: Don’t let it boil hard or the cream might separate—gentle bubbles around the edges are perfect.
Step 16: Reduce heat to medium-low and simmer for 3-4 minutes, stirring occasionally. The sauce will thicken enough to coat the back of your spoon—run your finger through it, and the line should stay clean.
Step 17: Remove from heat and stir in Parmesan cheese until melted and smooth. Add fresh thyme, then taste and adjust salt and pepper. Seasoning tip: The sauce should be slightly over-seasoned on its own since the chicken is already seasoned.
Phase 4: Final Assembly (2 minutes)
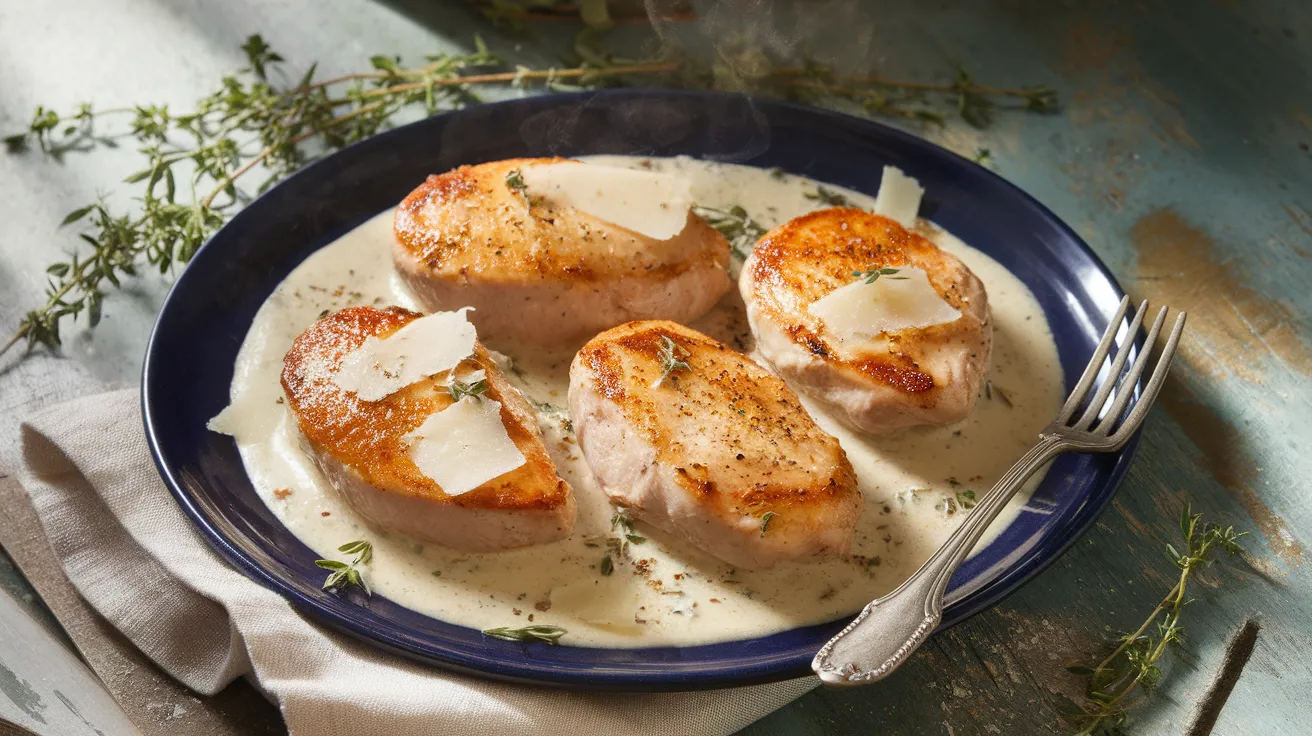
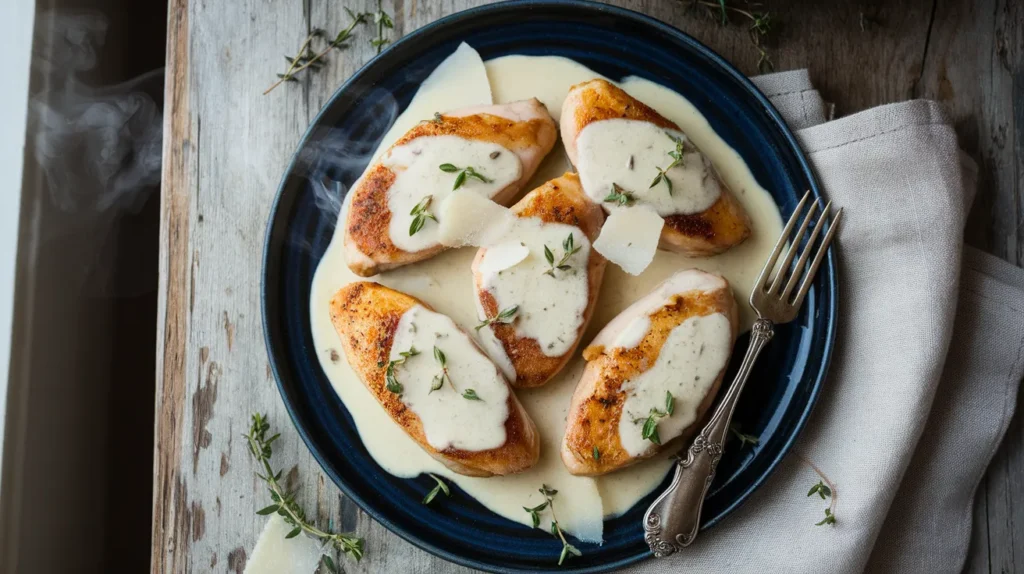
Step 18: Return chicken breasts and any accumulated juices to the skillet. Spoon sauce over each piece generously, letting them warm through for 2 minutes over low heat.
Step 19: For extra elegance, garnish with additional fresh thyme sprigs and a crack of black pepper. Serve immediately while the sauce is silky and the chicken is hot.
Chef’s Notes
Temperature precision matters: Chicken is perfectly cooked at 165°F, but remove it from heat at 160°F—carryover cooking brings it to the safe zone while keeping it juicy.
Sauce consistency secrets: Too thin? Simmer longer uncovered. Too thick? Whisk in warm broth one tablespoon at a time until you reach the perfect coating consistency for this chicken with white sauce.
Garlic intensity control: Four cloves creates bold garlic flavor. If cooking for garlic-sensitive folks, reduce to two cloves or use roasted garlic for mellower sweetness.
Make-ahead magic: Pound and season chicken up to 24 hours ahead. Store covered in the fridge, then bring to room temperature 20 minutes before cooking for best results.
Nutrition Information (Per Serving)
Calories: 520
Protein: 46g
Carbohydrates: 16g
Fat: 30g
Saturated Fat: 16g
Fiber: 1g
Sugar: 2g
Sodium: 680mg
Creative Variations to Try
Mushroom Lover’s Dream: Add 8 oz sliced cremini mushrooms after removing chicken in Step 9. Sauté until golden before starting the sauce. The earthy richness pairs beautifully with the creamy base.
Mediterranean Twist: Swap thyme for fresh basil and add ½ cup sun-dried tomatoes (chopped) with the Parmesan. This bright variation reminds me of the complex flavors in chicken with olives, where briny elements transform simple chicken.
Spicy Cajun Style: Add 1 tablespoon Cajun seasoning to the flour mixture and include ¼ teaspoon cayenne in the sauce. Finish with sliced green onions for a Louisiana kick.
Lighter Lemon Version: Replace half the cream with additional broth and add 2 tablespoons fresh lemon juice at the end. Perfect for those watching calories, though if you prefer even lighter cooking methods, check out chicken breasts in the air fryer for a different approach entirely.
Storage & Reheating Guide
Refrigerator storage: Cool completely, then store chicken and sauce together in an airtight container for up to 3 days. The sauce thickens when cold—totally normal.
Freezing instructions: Freeze for up to 2 months in freezer-safe containers. Leave ½ inch headspace for expansion. Label with date and reheating instructions.
Reheating perfection: Thaw overnight in fridge if frozen. Reheat gently in a skillet over medium-low heat with 2-3 tablespoons chicken broth or cream to restore silkiness. Microwave works in a pinch—use 50% power in 1-minute intervals, stirring between each.
Sauce separation fix: If reheated sauce looks broken, whisk in 1 tablespoon cold butter off heat until smooth and emulsified again.
Troubleshooting Common Issues
Problem #1: Rubbery or dry chicken
Solution: You overcooked it past 165°F. Use an instant-read thermometer and remove chicken at 160°F. The carryover cooking during rest brings it to safe temperature while keeping it tender. Also ensure your chicken isn’t thicker than ¾ inch—pound it evenly.
Problem #2: Lumpy sauce
Solution: You added liquid too quickly to the roux. If it happens, pour sauce through a fine-mesh strainer into a clean pan, pressing solids through. Or use an immersion blender for 10 seconds. Prevention: Always add liquid gradually while whisking vigorously.
Problem #3: Sauce won’t thicken
Solution: Your heat is too low or you didn’t cook the roux long enough. Increase heat to medium and simmer 2-3 minutes longer. The sauce should coat a spoon thickly. If desperate, mix 1 tablespoon cornstarch with 2 tablespoons cold water and whisk into simmering sauce.
Problem #4: Sauce tastes floury
Solution: You didn’t cook the roux long enough in Step 12. The flour needs 2 full minutes over heat to lose its raw taste. Next time, cook until it smells nutty and turns golden. Can’t fix it now, but longer simmering helps slightly.
Problem #5: Burned bits in the pan
Solution: Heat was too high during searing, or the pan wasn’t properly preheated. If bits are black (not brown), discard them before making sauce—they’re bitter. Use a fresh pan for the sauce. Brown bits are flavor gold; black bits ruin everything.
Equipment Essentials
- Large skillet (12-inch): Heavy-bottomed stainless steel or cast iron works best for even heat
- Meat mallet: For pounding chicken to uniform thickness
- Instant-read thermometer: Takes guessing out of doneness
- Whisk: Essential for lump-free sauce
- Wooden spoon: Perfect for scraping up browned bits
- Measuring cups and spoons: Accuracy matters in sauce-making
- Tongs: For flipping chicken without piercing
Shopping List by Section
Meat Counter
- 4 boneless, skinless chicken breasts (6-7 oz each)
Dairy Case
- Heavy cream (1 cup)
- Butter (7 tablespoons total—about 1 stick)
- Parmesan cheese (½ cup, or buy block and grate fresh)
Produce Section
- Garlic (4 large cloves)
- Fresh thyme (1 small bunch)
Pantry Staples
- All-purpose flour (about ¾ cup total)
- Chicken broth (1½ cups—one 14.5 oz can)
- Olive oil (2 tablespoons)
- Salt, black pepper, paprika
Optional
- White wine (¼ cup—use what you’d drink)
Success Secrets from the Pros
1. Room temperature chicken cooks evenly: Cold chicken straight from the fridge hits a hot pan and the outside overcooks while the inside stays raw. Just 15-20 minutes on the counter makes all the difference.
2. Don’t skip pounding the chicken: Even ¾-inch thickness throughout means every bite finishes cooking at exactly the same moment. Thick spots stay raw while thin edges dry out.
3. Let the crust develop undisturbed: Resist peeking or moving the chicken for those first 5 minutes. The Maillard reaction needs uninterrupted contact with heat to create that golden-brown crust packed with flavor.
4. Use the fond (brown bits): Those caramelized bits stuck to your pan after searing contain concentrated flavor that makes your chicken with white sauce taste restaurant-quality. Scrape them up completely when building your sauce.
5. Finish with cold butter: A tablespoon of cold butter whisked into the finished sauce off heat creates professional-level glossiness and richness. Chefs call this “mounting” the sauce—it’s the secret to silky perfection.
This chicken with white sauce recipe proves that elegant cooking doesn’t require complicated techniques or expensive ingredients. Just quality chicken, a well-made sauce, and attention to timing create magic on your dinner table.