- Quick weeknight dinner ready in just 30 minutes with minimal cleanup
- Foolproof technique that guarantees juicy chicken every time
- Restaurant-quality results using simple ingredients from your pantry
- Perfect for meal prep – tastes even better the next day
The Secret to Perfect Creamy Garlic Chicken
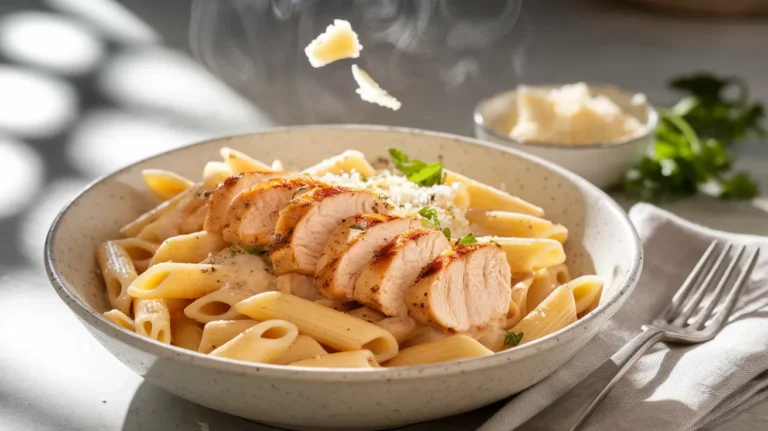
Tired of dry, flavorless chicken? This Creamy Garlic Chicken recipe solves that problem with a simple cooking method that locks in moisture while creating a rich, velvety sauce.
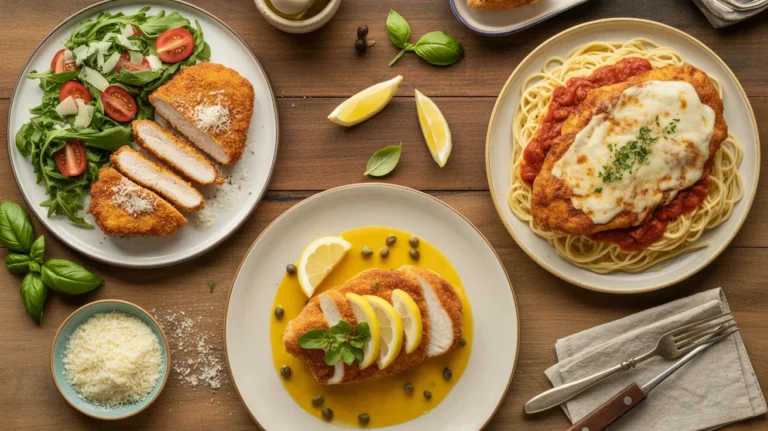
The secret lies in quickly searing the chicken before allowing it to finish cooking in the sauce. This technique ensures juicy meat while building deep flavor in every bite of this Creamy Garlic Chicken. If you enjoy Asian-inspired flavors, you might also like my Crispy Chinese Honey Garlic Chicken for a different twist on garlic-infused chicken dishes.
Best of all, you only need one pan and 30 minutes to create this impressive Creamy Garlic Chicken meal that serves 4 people perfectly.
Nutrition Information
| Nutrient | Amount Per Serving |
|---|---|
| Calories | 425 |
| Protein | 35g |
| Fat | 28g |
| Carbohydrates | 8g |
| Fiber | 1g |
| Sodium | 580mg |
| Sugar | 2g |
Equipment & Ingredients
Kitchen Tools Needed
| Tool | Purpose |
|---|---|
| Large skillet (12-inch) | Main cooking vessel |
| Meat thermometer | Checking chicken doneness |
| Sharp knife | Slicing chicken and garlic |
| Cutting board | Preparation surface |
| Measuring cups/spoons | Accurate measurements |
| Wooden spoon/spatula | Stirring sauce |
| Tongs | Handling chicken |
Ingredients List (Serves 4)
| Ingredient | Amount | Notes |
|---|---|---|
| Chicken breasts | 4 (about 2 pounds) | Boneless, skinless |
| Salt | 1 teaspoon | Divided use |
| Black pepper | ½ teaspoon | Freshly ground |
| Olive oil | 2 tablespoons | For searing |
| Butter | 2 tablespoons | Unsalted |
| Garlic | 8 cloves | Minced (about 3 tablespoons) |
| All-purpose flour | 1 tablespoon | For thickening |
| Chicken broth | 1 cup | Low-sodium preferred |
| Heavy cream | 1 cup | Room temperature |
| Parmesan cheese | ⅓ cup | Freshly grated |
| Italian seasoning | 1 teaspoon | Dried |
| Red pepper flakes | ¼ teaspoon | Optional, for heat |
| Fresh parsley | 2 tablespoons | Chopped, for garnish |
Substitution Options for Creamy Garlic Chicken
- Chicken: Use boneless thighs instead of breasts for even juicier results
- Heavy cream: Half-and-half works but creates a thinner sauce
- Parmesan: Pecorino Romano offers a sharper flavor
- Garlic: 1½ teaspoons garlic powder can substitute in a pinch (but fresh is much better)
- Herbs: Fresh thyme or basil can replace parsley
Looking for a completely different chicken preparation? Try my Chicken Nanban for a Japanese-inspired sweet and tangy alternative.
Detailed Step-by-Step Instructions for Beginners
Prep Time: 10 minutes | Cook Time: 20 minutes | Total Time: 30 minutes
Preparation Phase
- Gather all ingredients and tools:
- Before starting, place all ingredients on your counter so everything is within reach
- Make sure your skillet is clean and ready to use
- Position your cutting board and knife in a comfortable workspace
- Have a clean plate ready for the chicken after searing
- Prepare the chicken:
- Remove chicken breasts from packaging and pat completely dry with paper towels (this is crucial for good browning!)
- Place chicken on cutting board and examine thickness
- If chicken breasts are thicker than ¾-inch in any part:
- Option 1: Use a sharp knife to butterfly them by slicing horizontally through the middle (but not all the way through)
- Option 2: Cover with plastic wrap and gently pound with a meat tenderizer or heavy pan until even thickness
- Sprinkle each chicken breast on both sides with ⅛ teaspoon salt (using ½ teaspoon total) and a pinch of pepper
- Use your fingers to gently press seasonings into the meat
- Let chicken sit at room temperature for 5 minutes to take the chill off (cold chicken won’t sear as well)
- Prepare your ingredients:
- Peel 8 garlic cloves by placing them under the flat side of your knife and pressing gently with your palm
- Mince the peeled garlic cloves into very small pieces (approximately the size of grains of rice)
- Place minced garlic in a small bowl and set aside
- Measure out all other ingredients into separate bowls:
- 1 cup chicken broth
- 1 cup heavy cream (take this out of the refrigerator 15-20 minutes before using)
- ⅓ cup grated Parmesan cheese
- 1 tablespoon all-purpose flour
- 1 teaspoon Italian seasoning
- ¼ teaspoon red pepper flakes (if using)
- 2 tablespoons chopped fresh parsley for garnish
Cooking Phase
- Heat the pan and oil:
- Place your large skillet on the stove over medium-high heat
- Allow the empty pan to heat for 2 minutes (important for proper searing!)
- Add 2 tablespoons olive oil to the pan and tilt to coat the bottom evenly
- Watch for the oil to start shimmering (but not smoking) – this indicates it’s hot enough
- Sear the chicken properly:
- Using tongs, carefully place chicken breasts in the hot oil one at a time, laying them away from you to prevent oil splatter
- Leave at least ½-inch space between each piece
- IMPORTANT: Do not move the chicken for 4-5 minutes! Moving too soon prevents proper browning
- After 4-5 minutes, the bottom should be golden brown – if not, give it another minute
- Using tongs, carefully flip each chicken breast over
- Cook for another 4 minutes on the second side without moving
- The chicken will NOT be fully cooked at this point – that’s normal and expected
- Remove chicken to a clean plate and tent loosely with foil
- Start the sauce base:
- Reduce heat to medium (this is important to prevent burning the garlic)
- Add 2 tablespoons butter to the same pan, allowing it to melt completely
- When butter is melted but not browned, add all of your minced garlic
- Stir continuously for exactly 30 seconds using a wooden spoon (set a timer if needed)
- WARNING: Watch carefully! Garlic burns quickly and will turn bitter
- The garlic should become fragrant and slightly golden, not brown
- Add flour to thicken:
- Sprinkle 1 tablespoon flour evenly over the garlic and butter mixture
- Stir continuously for 1 minute to cook the raw flour taste out
- The mixture will form a paste-like consistency (this is called a “roux”)
- Keep stirring to prevent any burning or sticking
- Create the liquid sauce base:
- Hold the chicken broth container close to the pan
- While whisking constantly with one hand, slowly pour about ¼ cup of broth into the pan
- Whisk vigorously to incorporate the flour mixture completely and prevent lumps
- Once smooth, slowly add the remaining broth while continuing to whisk
- Scrape the bottom of the pan with your spoon to release any browned bits (these add flavor!)
- Allow the mixture to come to a gentle simmer (small bubbles around the edge)
- Let it simmer for 2 minutes, stirring occasionally, until slightly thickened
- Complete the sauce:
- Reduce heat to medium-low (important to prevent the cream from curdling)
- Pour in the 1 cup of room temperature heavy cream while stirring gently
- Add ⅓ cup Parmesan cheese and stir until melted
- Stir in 1 teaspoon Italian seasoning, remaining ½ teaspoon salt, and red pepper flakes (if using)
- Allow sauce to simmer gently for 2-3 minutes until it coats the back of a spoon
- To test thickness: dip a spoon in the sauce, run your finger through it – the line should hold
- Finish cooking the chicken properly:
- Check that sauce is gently simmering, not boiling (adjust heat if needed)
- Using tongs, carefully place chicken pieces back into the pan
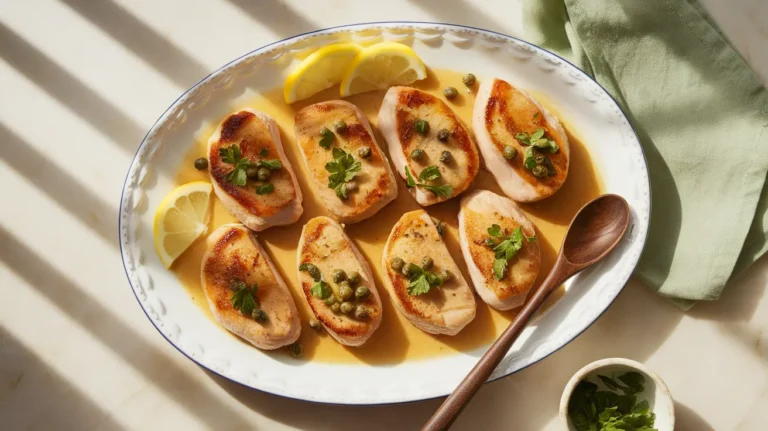
- Spoon sauce generously over each piece of chicken
- Cover the pan with a lid or foil
- Cook for 5-7 minutes until chicken is cooked through
- Safety check: Use a meat thermometer inserted into the thickest part – it must read 165°F
- If chicken needs more time but sauce is getting too thick, add 2-3 tablespoons chicken broth
- Final adjustments:
- Once chicken reaches 165°F, remove pan from heat
- Taste a small amount of sauce (be careful, it’s hot!)
- Add additional salt or pepper if needed (¼ teaspoon at a time)
- If sauce is too thick, add a splash of chicken broth
- If sauce is too thin, allow to stand for 2-3 minutes off heat to thicken naturally
- Sprinkle fresh chopped parsley evenly over the dish
- Serving the dish:
- Allow the dish to rest for 3 minutes off heat (this helps the flavors meld)
- For each serving, place one chicken breast on a plate
- Spoon additional sauce generously over and around each piece
- Serve immediately with your choice of side dish (pasta, rice, or vegetables work well)

Troubleshooting Common Issues
Sauce Too Thin
- Problem: Sauce is watery and doesn’t coat the back of a spoon
- Solution:
- Simmer uncovered for 3-5 more minutes, stirring occasionally
- If still too thin, mix 1 teaspoon cornstarch with 1 tablespoon cold water in a small bowl
- Slowly stir this mixture into the sauce while it simmers
- Allow to cook for 1 minute to thicken properly
Sauce Too Thick
- Problem: Sauce is gluey or pasty
- Solution:
- Add chicken broth, 2 tablespoons at a time
- Stir well after each addition
- Continue until desired consistency is reached
- If you run out of broth, you can use water in a pinch
Chicken Not Cooking Evenly
- Problem: Some parts of chicken remain pink while others are done
- Solution:
- Cover pan completely with foil to trap heat
- Reduce heat to medium-low
- Cook for 3-5 more minutes
- Check temperature in multiple spots
- If thick parts still aren’t done, make a small slit in the thickest part to help heat penetrate
Garlic Burns
- Problem: Garlic turns dark brown or black and smells bitter
- Solution:
- Remove pan from heat immediately
- Discard the burnt garlic and wipe pan clean (or use a fresh pan if needed)
- Restart with fresh garlic and butter
- Use lower heat (medium-low instead of medium)
- Stir constantly while cooking garlic
Cream Curdles
- Problem: Cream separates and looks grainy
- Solution:
- Remove from heat immediately
- Whisk vigorously to try to reincorporate
- If still separated, gradually add 1-2 tablespoons of fresh cream while whisking
- To prevent: always use room temperature cream and add to a cooled-down sauce
Variations & Substitutions
Lemon Garlic Chicken
- Add 2 tablespoons lemon juice and 1 teaspoon lemon zest to the sauce after adding the cream
- Finish with fresh dill instead of parsley
- Perfect for a brighter, summer flavor profile
Mushroom Garlic Chicken
- After cooking the garlic for 30 seconds, add 8 ounces sliced mushrooms
- Increase heat slightly to medium-high
- Sauté mushrooms for 4-5 minutes until golden and they release their moisture
- Proceed with the regular recipe from there
- Creates a deeper, earthier flavor profile
Spinach & Sun-Dried Tomato
- Stir in 2 cups fresh spinach and ¼ cup chopped sun-dried tomatoes during the last 2 minutes of cooking
- Cover and allow spinach to wilt from the heat
- Adds beautiful color and nutritional value
Storage & Reheating
Refrigerator Storage
- Allow leftovers to cool completely to room temperature (no more than 2 hours)
- Transfer to an airtight container with a secure lid
- Store in refrigerator at or below 40°F
- Keeps fresh for up to 3 days
- Sauce will thicken when chilled – this is normal
Freezer Storage
- For longer storage, freeze in portions for up to 2 months
- Use freezer-safe containers or heavy-duty freezer bags
- Remove as much air as possible before sealing
- Label with contents and date
- Freeze individual portions on a baking sheet first, then transfer to container for easier portioning
- Sauce may separate slightly when thawed – this is normal
Reheating Instructions
- Microwave Method:
- Place a single portion in a microwave-safe dish
- Cover with a damp paper towel to prevent drying out
- Heat on 70% power for 1 minute
- Stir the sauce gently
- Continue heating in 30-second intervals, stirring between each
- Heat until internal temperature reaches 165°F (about 2-3 minutes total)
- Let stand for 1 minute before serving
- Stovetop Method (Preferred for Best Texture):
- Place a large skillet over medium-low heat
- Add 2-3 tablespoons of chicken broth or water to the pan
- When liquid begins to simmer, add chicken and sauce
- Cover with a lid to create steam
- Heat gently for 5-7 minutes, turning chicken once halfway through
- Check temperature with meat thermometer (should reach 165°F)
- If sauce becomes too thick, add additional broth 1 tablespoon at a time
Safety Notes & Tips
Food Safety
- Chicken must reach 165°F internal temperature as measured with a food thermometer
- Always wash hands for 20 seconds with soap after handling raw chicken
- Use separate cutting boards for meat and other ingredients
- Never reuse marinades or utensils that have touched raw chicken without washing
- Refrigerate leftovers within 2 hours of cooking (1 hour if room temperature is above 90°F)
- Discard any food left out for more than 2 hours
Pro Tips
- Temperature matters: Allow refrigerated ingredients (especially cream) to come to room temperature before adding to prevent curdling and create a smoother sauce
- Prep before cooking: Having all ingredients measured and prepared before starting makes the cooking process much less stressful
- Don’t crowd the pan: If your skillet is smaller than 12 inches, cook chicken in two batches to ensure proper searing
- Test sauce thickness: Sauce should coat the back of a spoon – run your finger through it and the line should hold
- Rest before serving: Letting the dish rest for 3 minutes helps flavors meld and juices redistribute throughout the chicken
- Garnish freshly: Add fresh herbs just before serving for the brightest flavor and color
- Serving suggestion: Pair with pasta, mashed potatoes, or crusty bread to soak up the delicious sauce
Dietary Notes: This recipe contains dairy and is low-carb/keto-friendly. For gluten-free version, substitute cornstarch or gluten-free flour blend for the all-purpose flour.